#visual-fx
1 messages · Page 23 of 1
I am pretty close to just giving this up and doing individual projectiles with ribbons, which are more straightforward but strikes me as somewhat inefficient
I just stick to whatever gets results quicker imo
It can be improved later
I've seen the code for a shader like that for unity FWIW I might be able to find it when i have timr
Hey guys, is there a way to plug a panning texture in this thing?
@brittle monolith You would have to do it within the function. Easy enough to duplicate the function and add another UV input for the Optional Heightmap
Thanks, I'm still super happy with what it does even without that: https://www.youtube.com/watch?v=FxJJKXkB-Q4
Parallax Occlusion Mapping + Panning Noise Textures A version of this material: https://twitter.com/com04/status/1052051879444631552 Music: Jeremy Soule - nj...
Is there a way to rotate an emitter as a whole in Niagara?
anyone knows where to start doing something similar with particles? don’t need the forces... https://youtu.be/-S5uj3jJS6Q
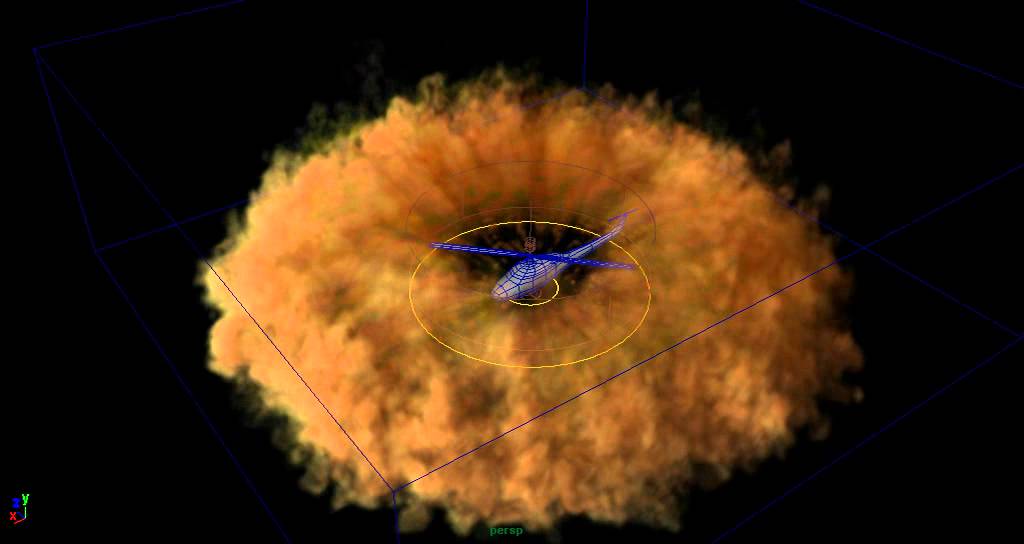
Some tests to achieve the effect of dust being blown away by a helicopter. Made using Maya Fluid effects.
anyone know how to destroy on collision in niagara?
@brittle monolith just plug the Panner in to the UV input of the function
I have added a generate collision event module
and assigned an event handler
but dont know how to destroy the sprite on a collision event
^ I would also like to know how to do that
@short sorrel as a start you could just get a good smoke texture and spawn it radially outward
@brittle monolith hehe I recognize the noise textures :p
and yea, youll need to duplicate the mat function and add in the additional uv-inputs for panning. unless that specific UV thats already available is connected to what you want to pan
vlady yeah but can't seem to make it work. will dig deeper, thank you.
ill take a look in a bit
I forgot what a clusterf of a mess the POM mat function is. mat functions inside mat functions inside mat functions
no easy way to add panning to it, though in theory you should be able to add a texture coordinate node > panner > to that uv input
would affect more than just the heightmap sadly
imho they should try and create a new one, preferably with some things more optimized trough core changes. doubt that would ever happen sadly.
poor luos english is poor
@fossil swan the mileage you can get out of the noise textures is insane ❤
I use them for everything
😃 ikr :p
these were the last things I tried them on:
Arcane magic stuff (with the combined colour ones):
https://www.youtube.com/watch?v=R2RyDFgjZV0
Stylised sparks (with the zig-zag lines one):
https://youtu.be/r5Uaz4MohqQ
GPU: GeForce GTX 1070 CPU: Intel(R) Core(TM) i7-4770K CPU @ 3.50GHz Memory: 16 GB RAM (15.94 GB RAM usable) Current resolution: 2560 x 1440, 59Hz Operating s...

GPU: GeForce GTX 1070 CPU: Intel(R) Core(TM) i7-4770K CPU @ 3.50GHz Memory: 16 GB RAM (15.94 GB RAM usable) Current resolution: 2560 x 1440, 59Hz Operating s...
could prolly get away with a very tiny noise map, or just some math for same things.
happy its making peoples lives better 😃
All, is there a way to make it so the rain particles get the light from the sun / spotlights and are not always lit?
https://gyazo.com/97bfc635dc88be286a46ec6193ce9d17
this is my model RN https://gyazo.com/dc829cddea00bffaa22dc773a6b2ed58

why unlit if you want to have it affected by light?
you can always store LightVector/LightPosition/LightColor in the Material and tint your Particles according to that
someone from the realtimevfx community (i think @round fog as well) where doing stuff with unlit + fake shadow thingies.
generally though you only need rain quite close to the player, and random splashes on the floor in a somewhat close vicinity
I did. Pixel normal dot atmospheric light Vector, multiplied with atmospheric light color, on an unlit material. Think I had to multiply it with something weird like 0.32 to get exact intensity match to a lit material. Doesn't give you shadows or self-shadows, but where that's not important and you only need the atmospheric directional light influence, it works fantastically.
I've got a muzzle flash pack off the marketplace, but they all seem to loop. Is there an easy way to get it to only play once? without editing each emitter?
anyone know what the cheapest method would be for On-Screen Damage FX (like blood on camera) that would work with Stereoscopic VR type views?
anything cheaper than Post Process?
but still perfectly aligned to each eye?
At what depth do you plan to place it? VR is not the friendliest thing in respect to flat effects like that. In the context, a perfectly aligned to each eye would have infinite parallax.
needs to be as close as possible, you know like UI
@indigo jolt
I'm a mat newb and dont have a VR HMD offhand, so don't know if it'll work, but... what if you
- parent a dome-shaped mesh to the HMD (so that the player is always looking through it from underneath), and then
- parent a decal above the dome mesh that encompasses it, and
- use a double-sided/or normal-flipped mask material for the decal
tried something sorta similar, problem is any dome meshes have some stereoscopic vision issues on any pixels on them

A brand new entry in the legendary over-the-top action series, complete with its signature blend of high-octane stylized action and otherworldly and original...
Hm... not impressed by their art style. Weapons have too much boring flat specular for me, could increase normal strength. Explosions are kinda meh, compared to what other games do (might also be bad video quality). Cerberus lightning effects are dope though.
there's some nice subtlety there if you pause things mid-swing, no bad frames
Sorted
This is like the most epic copy pasta of all time.
I dunno. Im inclined to let them keep going.
😄
@fossil swan do you know any good workflows on creating ice effects
- get a fridge
- put water into it
- wait
- throw ice against wall
- ??
- profit
........ i love that comment but i hate it at the same time
writing down a detailed workflow is a day's task.
sketch waht you want, break it down to its smallest pieces, make them, assemble them, what you dont know you learn by googling, assemble more, done.

YouTube
Few hours worth of (re)creating the Secret of Mana ice magic.
Looking for someone to do some post process screen effects for a super quick job. Paid. Please DM me if you are interested and up your alley.
@velvet wasp what needs to be done?
by now it isnt a super quick job anymore 😄
also: #looking-for-talent
^
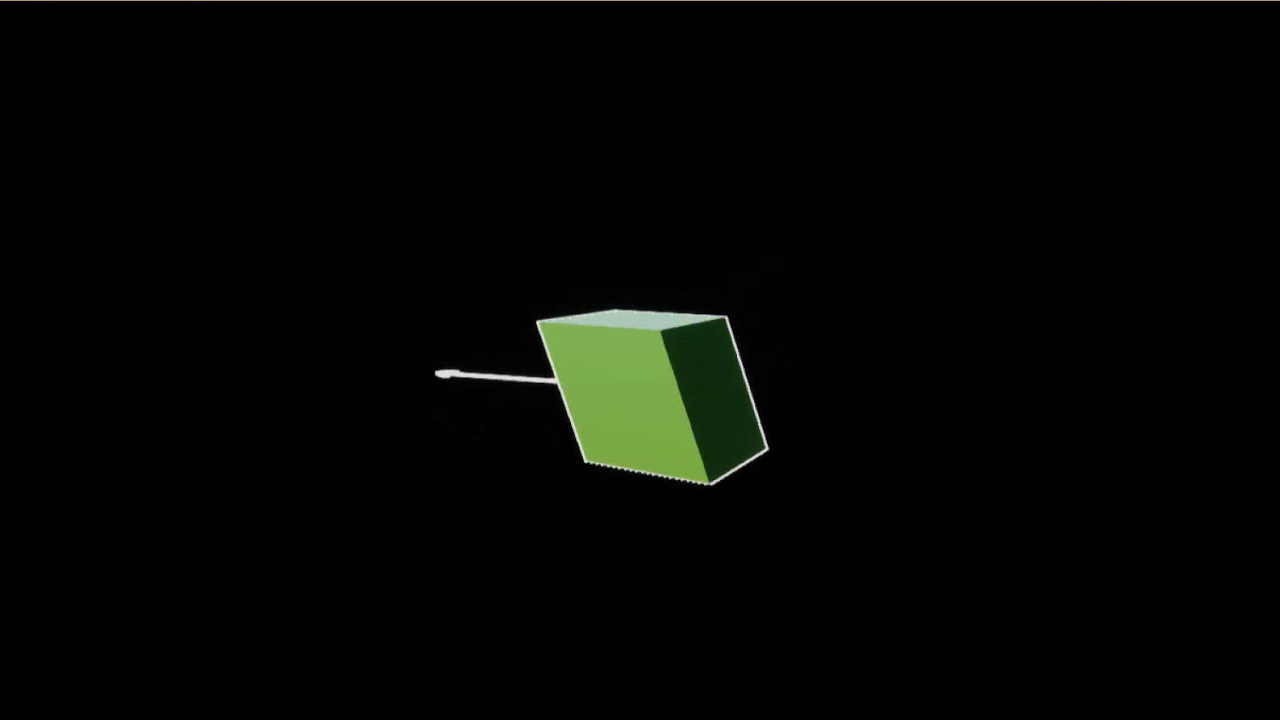
Heya guys, i'm trying to tackle explosions in our game, wanted to know if anyone of you had some good source for understanding what constitutes a good explosion particle effect
right now i have something like this (sorry for the twitter link)
found this particular post that looks promising

Game Development Stack Exchange
I'm not much of an artist, but I'm trying to make decent particle effects in a 2.5D game. I'm making a replica of Wii Play's "Tanks" and I can't quite get the explosions to look good. I'm not going...
they say that using Pre-Multiplied alpha is rather important
but i'm not too versed on why is that
explosions are hard, start with some youtube videos of actual explosions in slow-mo, then look up pinterest VFX explosions and video game explosions on youtube
try to get a well rounded idea of what other people do, what nature does, then start imitating until you're ready to innovate
there's a lot of stages to think about - single frame "flash" where all the actual damage occurs, often flaring up huge area, this is where explosion is at it's largest, then 95% of the explosion after that point is fire, fire-turning-to-smoke, smoke rising, shockwaves, distortion, debris, sparks
depending on what kind of explosion and what scale it is things like smoke and even fire might not even be all that prominent
anyone know if theres a way to get that "see through walls outline/glow" without using post processing?
thx @indigo jolt , that's what i'm currently doing.. i'll be continuing on that. Cheers!
Hi, let me know if this is the correct channel, I didn't find a #cascade one.
https://streamable.com/y6754

I have a ribbon module, trailing a main module. Particles are killed by collision in the main module.
The issue is that upon collision another ribbon trails the dead particle instead of just the initial one. Now two ribbons are seen. Anything basic I'm missing?
because its source died, its removing back to its local 0/0/0
I always wondered if two "particle randoms" nodes both give different values or the same..
That was the first question coming to mind.
"How is the seed value managed?"
Cause there might be times where you'll want to attributes to match the random value and other times to diverge.
someone mentioned that default spawn rate on switch is set to 0.25
yuck, the thought of that :/
Hey guys trying to recreate this exact effect glitch effect
https://youtu.be/HbhqSjDscto?t=9
(the one with the less of color shifting)
the color shifting material is done
i am just looking for an optimal way to split the screen and move it and i have no clue what to do like the video
any help would be appreciated

guys, I have a simple ribbon particle here, but it updates very slowly

lifetime is set to Distribution Float Uniform (5,5)
spawn rate is 1
other than that, I can't figure out what the problem is
velocity is set at 0
grab it at the corner of two axis and move about

lifetime seems correct, albeit quite long. whats the ribbon settings?
Indulge me. What happens if you increase the spawnrate?
😉
sometimes better to set spawn to 0 and use a spawn per unit
that way it spawns X particles per unit moved
oh, really? let me try that
0.5 is often enough, but it depends on usecase ofcourse
same can be used for other emitters that move along, so instead of an insane high spawnrate to make it look good, you can make it spawn 10 for each unit passed.
that's a good tip
...which was something I didnt know when making my fireworks pack XD
Spawn by distance is amazing when attached to physicsobjects that get glitched out of the level. Endless particle fun!
Is there a way to connect Parameters. Let's say I want to have size by life drive color by life.
No relative references for you!
@cold sorrel like that zeppelin from battlefieldcodwhatevs?
And I wouldn't want to have to make the same curve in both,.
I will never live that one down will I...

It didn't spawn by distance, but it stretched with velocity of a point on the surface. And when it's rotating like there's no tomorrow that stretches and sets the inherited velocity quite high.
poor video.
/me removes salt
No relative references for you! @cold sorrel
I guess I wish the particle system was also blueprint based, so I could just use the float value "life" modulate it and use it across attributes.
yea some more back/forth would be neat.
Spinning zepp looks like a feature, not a bug!
can use a particlerelativetime and control its color over life that way. there is also a particlesize one
I keep forgetting about "SphericalParticleOpacity"
Ok, will look into it for next thing. Cause apparently it's not possible to copy paste curve too.
you can, not the curve itself but the curve values you can copy
in parts, but it saves some writing

in udk you could copy, save, load curves. I so miss that feat.
I see, yeah faster than one by one for sure, thanks.
Is there any reason why my ribbon won't spawn on my ribbonsource?
@simple plaza what's the values on Spawn and Spawn Per Unit and on the Emitter type? There's a limit in the latter.
To anyone, is there a way to edit multiple curves handles in the Curve editor at once?
Oh nevermind, fixed it ^^ It seems like Ribbons don't like it when their source is a GPU Particle
Althought I have a new problem now, it seems like the ribbon "spawns" a new part of a trail at a slow interval so it doesn't really follow its source properly
The tangent handles seem to only change one even when I Ctrl+Alt box select the keys
It doesn't follow smoothly, it "lags behind"
turn off initial velocity?
already disabled on the ribbon
Oh sorry, I was expecting to see the source to the left.
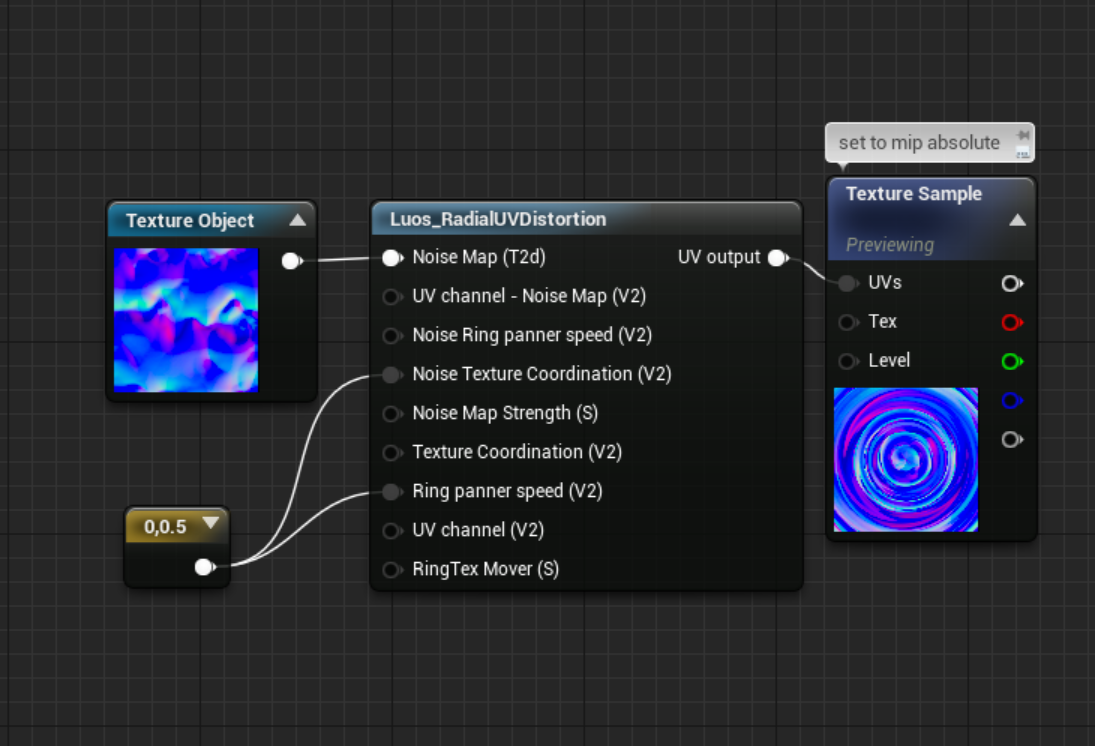
@fossil swan i saw you made a radial panner video, how did you make it so the texture panned outwards?
by panning it :p

Small effect I made in slightly over 1 hour (with a few small breaks in between because: weekend) Two textures and vector field are from the free infinity bl...
download in description
good story on that one as well.
was talking to a "potential" client who wanted me to do an art-test, but even before I could begin he got annoyed because I asked about twice what another person was asking so he went with that person.
He also told me it took him four hours to make something like that, so.. for funzies I made the whole thing in slightly over an hour (could probably do it faster now) and gave it away for free.
"potential" client then tells me he wants to fire the other person and hire me, which I kindly refused.
Gotta keep away from work, where client hops over from freelancer to freelancer on the same task.
i honestly hope that person is now a better artist than me, nothing against that person ofcouse.
just odd client being odd
Client is always right. Except the cases where he isn't. 4 hours is a bit of an overkill though ;p
right now its killing me
i just want this effect to pan inwards, the radial distortion didnt work @fossil swan
anyone know why a cell-shading post process might be doing this?
UV's
seems to be doing it with everything
@celest birch noise map panner speed > moves the noise
ring panner speed > (V2) pans the texture.

@fossil swan yeah i went through it but nothing is appearing in preview or in the scene
U/V tiling needs to be 0.5
(of the texcoord)
also that noise map is already radial, might not look properly
yeah i changed it around and still nothing :/
is this meant to be there?
the error in the radial distortion
those errors are fine, just doesnt have a preview
Yeah I'm getting nothing at all from it :/

but if you dont need the distortion
https://i.gyazo.com/3b5c2c5fb35544064f1c537a3e2a2108.png

is there a way to get the emissive color of a material? I dont mean get a parameter that sets the emissive color
reason I ask, I have a material function that modifies the emissive color of my material based on time
and I want to get the new value
for?
could be for many things. Could be so that enemies know how bright the object is. Could be for setting a point light. Etc.
I realize I could calculate this emissive color in BP or code, then set the parameter on the material...
perhaps thats just what i have to do
But Im wondering if i could have it be material driven
and then get that value
miiight be one of the few ways possible
so its not possible?
when its outside of shaders/cascade my knowledge is limited hehe. so might want to wait for someone else to reply
alright, thanks
What's the standard way to syncronize ribbons to die as the source particles die as well?
They keep reseting to the origin, I've tweak the lifespan and fixed translation instead of killing, but I'm sure there's a proper way to sync both.

Even with time adjustments it looks like they try to get a center, bah... https://streamable.com/62o3p

I can't find how to change the LUT in blueprints. What I really want is to fade form one to another, any tips?
Or should I do it in the post process material instead?
Ok, here's a new one...
I'm trying to have particles spawn as a trail, but only after a main projectile is spawned. Atm I tried normal Spawn + Emit from location which makes the trail like I want but the particles spawn regardless if the first emiter has particles or not https://streamable.com/elnxv

I tried Event Receiver Spawn, but that only creates one, doesn't loop.
Basically I would like to withhold spawn until the projectile emitter has some particle
well you could put a delay
practically speaking though, the norm here is actually to affix this to a Projectile Blueprint
trying to do things otherwise is kinda fake and hard
not the good kind of fake
since a projectile blueprint can give you handy events like "on collide do ___" or "on start do ___"
Hey there! im not sure if this is in the correct place but im trying to create a spell projectile effect and im quite stumped on the math behind it, i want to have the projectile travel on a random arc from the caster to the target. im kind of lost when it comes to writing blueprints so i dont really know the specific terminology or technique that would be used in this kind of thing, i did make a quick sketch showing what i mean though!
any help or pointing in the right direction would be greatly appreciated!
Well....you could use a Beam with a Blueprint-set target point, then have a Beam Modifier that offsets the middle part randomly in one of those directions
could use a Projectile Blueprint and do all sorts of wild things to its trajectory
both of those options should give you plenty to research
i'd look up Unreal 4 Projectile Homing Missile
Oh! i will definitely have to look into those! thank you very much!
@indigo jolt
Projectile Blueprint I didn't know this was a thing.... I surely miss procedural control. Will look into that, thanks. I thought Cascad was the only thing available.
@glossy spire projectile blueprint is your friend - it's going to give your game designer the timing on when and how much damage to apply to opponents, when to play audio, and gives you the option of playing a variety of VFX - from ribbon trails, to weapon flashes (not really best spot but it's possible) to impacts with ground impact normal rotations sorted correctly 😃
before finding projectile blueprints, i felt pretty lost, trying to chain together actual game design gameplay with the visual fluffery of cascade
you can technically wire up a lot of events and collision with cascade, but it's a better "listener" than it is a "sender"
@indigo jolt I was doing this and coming from nodal programming for 3D I was like: "Man I really miss nodes to re-use information ("by Life" curves) and just setup my own logic". I'm sure there's caveats, but yeah, sounds great, thanks!
oh lol yeah timelines in blueprint will cover some of those things
it's actually pretty wild how much of VFX you can do with Blueprint in general. with animated materials on meshes, you can do some fairly high-visibility stuff without even using a particle system. you haven't lived until you've made a projectile trail that involves no particles, just an animated mesh
hey guys - Sorry if this is too much of a amateur question - I was going through the paragon particle effects and run into some effects called CameraEffect. So i was wondering how would these be used as camera effect?
they are applied/spawned in front of & attached to the camera in such a way that it just covers the screen.
oh so nothing fancy, just have to make them fit the camera's field of view. thank you Luos!

Dhruva has a new service line which is VFX for games, and we're happy to share a small demo reel to show our skillset. Hope you all like it :)
hi there, im looking for someone who is experianced in Houdini to provide some advice if possible. pm me 😃
hey guys, quick question.. is it possible to loop a particle SUB uv animation?
Random #shader doodling... Color curve used to color a fresnel based on camera-relative normal angle.
#UE4 #techart #RealTimeVFX #gameart #gamedev

@gleaming fulcrum you can pan a texture in your particle material and offset it
using a different number for every particle
Morning guys, I'm working on procedural squash / stretch ⭐ 🔭 https://youtu.be/sh_GeINcjWI
This is the goal: https://idearocketanimation.com/wp-content/uploads/2017/02/1_Squash-and-stretch.gif

And here's the finished product: https://www.youtube.com/watch?v=W7zyWWfrLIc

GPU: GeForce GTX 1070 CPU: Intel(R) Core(TM) i7-4770K CPU @ 3.50GHz Memory: 16 GB RAM (15.94 GB RAM usable) Current resolution: 2560 x 1440, 59Hz Operating s...
And here's the material:
that's very bonito my man
anyone playing with houdini?
not sure if this is the proper channel, but i have a material related question
how come I cannot see the object behind my glass?
nvm I forgot a setting
¯_(ツ)_/¯
@shadow cosmos yep
should say what that setting is
it was nothing with the glass material, something that conflicted with a different material
so whats in the picture is tots correct ^^
so in this Weather tool it states i have to have Generate Distance Fields enabled in the project to make it work. Which I do, however the particle is acting very odd.
This is happening for Rain and snow only where the particles start at the top.
with collision enabled on the particle it barely works for rain and the snow freaks out and never really falls and barely be seen looking like a blizzard up high in the iar
if I disable collision everything works fine with rain and snow particles
or if i set the collision from Distance field to Scene Depth
Nvm. it was a shadows settings lower than medium which i guess you cant have when using Distance Mesh Fields
https://youtu.be/mQJ0w8aS_3M?t=66 anyone have a tutorial on putting together something like the ability in this video? The character comes with the pieces, I think, but it isn't assembled, and that isn't something I've set up before. there are several "vectorfields" included with the character, and I assume those are involved in that ability.

Learn to play Zinx, the new durable ranged Hero in Paragon. Play Zinx for free starting Tuesday, July 18. www.paragon.com Paragon is the MOBA from Epic Games...
Hey do you guys know if there’s a thing in the engine editor where you can take a model with a cape and decide what is fabric that should be flowing?
Blah... has anyone had luck with the new 3d textures applications added on 4.21 preview? For the life of me I cant figure out how to generate a custom one in ue4 without using a noise node. I would like to generate one from a skeletal mesh for a game. I just cant seem to get the scene capture to slice by depth so I can record it to a flip book.
did anybody worked with POM with differed decal material? am having issue with shading on walls, floor is fine, and strange shading is accruing when decal is rotated for wall. I found the problem is in parallax occlusion mapping function, but so far what I found online didn't fix the problem. I tried to change from transform to vectors to transform 3x3 matrix, as suggested on ue4 forum but no luck there.
got a material causing an issue. It looks fine when I edit the material, but in content browser and anywhere else it just looks like a world grid material. It's making a mess out of my particle effects
@near jacinth check the usage check boxes
on the material or the particle?
ah on the material
yes it's checked for particles
the problem is the material shows up with that square even in the content browser
I'm using the one beside it for now..it's not identical, but it solves my giant squares in game issue.
copy the whole node setup into a fresh new material and see what happens
there could be a ton of things done weird just on material settings
I can't quite hook it up the same
they have surface/translucent/default lit as their setting
and something plugged in to normal
I set the new material to the same, but normal isn't available
yup, go down to the lighting options for translucency
in the meantime at least see if it works in scene now
by default, translucency doesn't react to normal maps for lighting purposes, so you have to set that
Might be a weird question but does anyone know how epic setup their hair for Paragon? I am trying to recreate the movement of the hair as the hair cards work fine. I have setup the hair cards with pivot painter and can control their movement (its rough atm), but I noticed that epic had hand animated the hair as well. Would love to know best practices for animating hair cause I can't find Jack. Thanks!
@solar remnant this showcase/downloadable example is based mostly on the paragon workflow I think: https://docs.unrealengine.com/en-us/Resources/Showcases/PhotorealisticCharacter
Yup I have that running only way I was able to get a shader working for hair in a short time frame as its all new to me
world position offset isn't working as expected with wind though. I am actually using Shinbi's example file as it had some world position offset techniques to move the hair based on wind
what kind of results are you getting?
Well with the base setup no movement
If I apply my own version of wind pivot painter movement then I get movement
but if i use their base wind movement with Shinbis model then the hair moves
so im trying to determine where the problem is
So on my hair with the base unreal shader I am seeing no movement, but with Shinbis model her hair moves with the same shader. When I change the shader to take in pivot painter data the way I am used to (far dirtier in all honesty) then it will move around based off its pivot
I'd also heard some people say they were using APEX for hair but I couldn't find any APEX tie ins with the Shinbi example
Haven't got much experience with this beyond trying out the tech when the example were released, so don't think I can offer you much help sorry 😦
No worries! There aren't alot of resources and you gave me a few ideas to test just by talking. Iv been trying to get tutorials out on lesser talked about subjects is my main reason so I completely get it haha.
how would I set up panini projection in the blueprint editor?
-the documentation isn't totally clear on this (from a beginner's perspective) and seems like it was typed in a big hurry?
-there aren't any easily accessible nodes that control it
thanks in advance to anyone willing to help!
@drowsy maple you're looking for a post processing effect, basically unreal will render the frame then alter it based on your effect. https://www.youtube.com/watch?v=i6lYSXyUKRY this is a quick thing that can help get the idea across.

In this tutorial i show you how we can apply some basic post process effects to our level, globally, or in certain positions of the map. Make sure you go thr...
mhm! I'm aware it's post-processing, but I don't understand what it has to do with depth of field (it's not in depth of field settings with the other options, or in any blueprint post processing options afaict), because it seems to be pointing to upscaling in rendering?
but thank you for the video
mk lemme try it out one sec
@drowsy maple you have to use console commands to access those variables. to use console commands the shortcut is tilda (~)
tbh that was my first time using console commands but I imagine they alter your core file as I have done a similiar thing to make older games run on high res monitors
this is what it should be doing and I'm typing it in according to the documentation and not getting anything
170 should be a pretty noticeable difference
I was getting similar results to that one sec lemme grab a screen shot but one thing I saw on the forums was people saying its inconsistent on a hardware level
that's unfortunate
ah I got it
it's really blurry and doesn't look great but I'll mess around with it
thanks for the help!
for sure try out that post too someone spent some time tweaking them to get these results I'm showing I ended up just using his values
anything past 140 is gunna be hard to more of an AA issue at that point ;/
I actually like the 120 alot though think ima use this haha
weird. it should be far clearer if it's regular projection mapping but maybe the fact that it's under post-processing in documentation means it happens too late
it happens to late
cause its post
you could do something weird though
like do 2 render targets or something janky
yeah I might try to find a way to mess with the projection matrix if I even can, though that means getting my feet a bit wet
ah well
all the code is open but I'v never messed with the core tbh haha
other then compiling in nvidia plugins but thats different
yeah I always seem to take on too much as a beginner, this always happens lol
tis ok if you're a beginner Id just say take on as many projects as you can and dont plan on finishing them all
yeah fair
lots to learn haha
dont get caught up cause youll probably figure it out later thats how most my projects have gone at least
thanks for the advice, I usually have a bad habit of doing exactly what you're warning me about
no worries man just dont lose the passion and you'll be fine good luck!
thanks!
@cloud quest I also figured out what it was in the base hair unreal uses APEX to power their hair with some minor offsets using wind and pivot painter. Think it might make more sense anyways haha
they also hand animated the hair which holy cow id lose my mind
@drowsy maple I saw your other post with the link to github hes basically capturing an image of the scene itself then projecting that onto a cubemap which he then displays. I would say learn how cubemaps work, learn how the render target works, then try and combine the two but it won't be easy
yeah the math for panini especially is a bit complicated
thanks for telling me what's happening in the mod
@indigo jolt Thanks I found it. The only difference now seems to be the content browser thumbnail, theirs all come up as squares while mine are spheres, I don't think that's indicative of any real difference though.
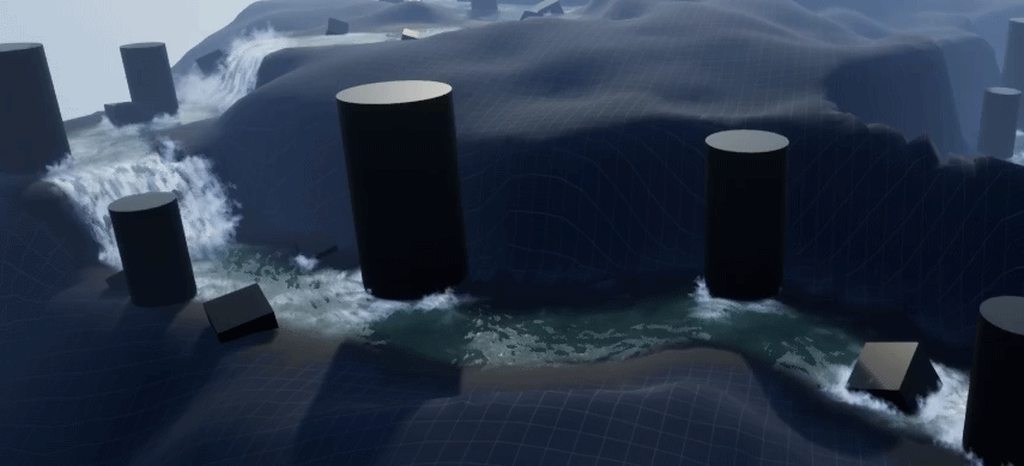
update! still working on my river challenge.
https://i.imgur.com/QiiOf7s.mp4
https://i.imgur.com/oZyELif.mp4
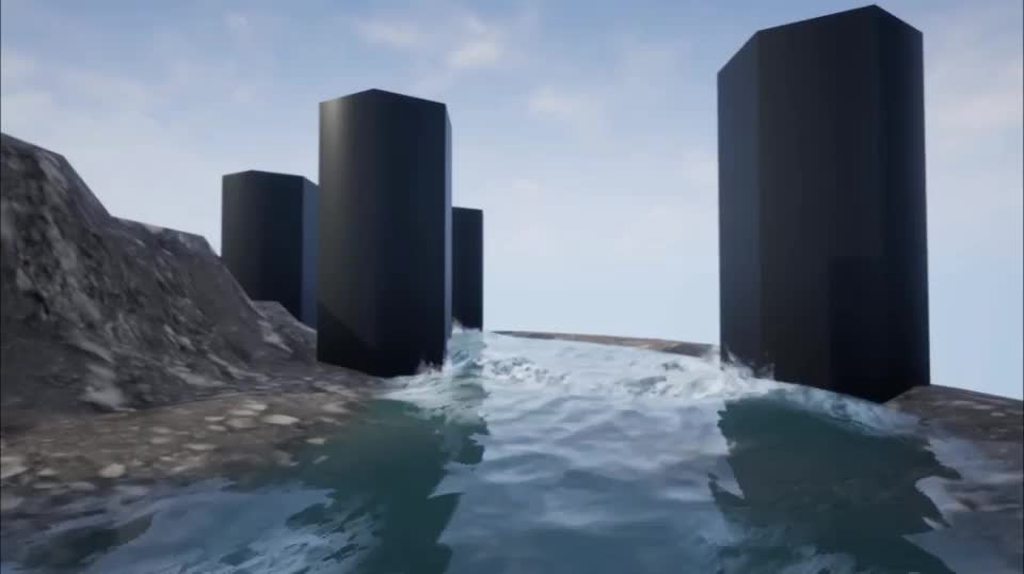
@drowsy lynx Your realtime vfx contest entry ?
@analog onyx exactly :) not finished yet
Looks great. Good luck with it.
@analog onyx you should def. show off your sea thing on realtimevfx
Haven't had enough time in october, sadly. 😭
@celest birch

Real Time VFX
This month around we’re diving into a personal favorite of mine. There’s plenty of hurdles awaiting depending on how deep you choose to go, the personality of the river, and may be completely new to many of you. We’re excited to see what you’ve got with this months ch...
Not to dampen anyones spirit, but the river sketch ends tomorrow.
spirit dampened
i'll tell myself that i would have done an amazing river if i had entered, but it's not my fault because the deadline is so soon
Luckily, the next sketch starts the day after tomorrow!
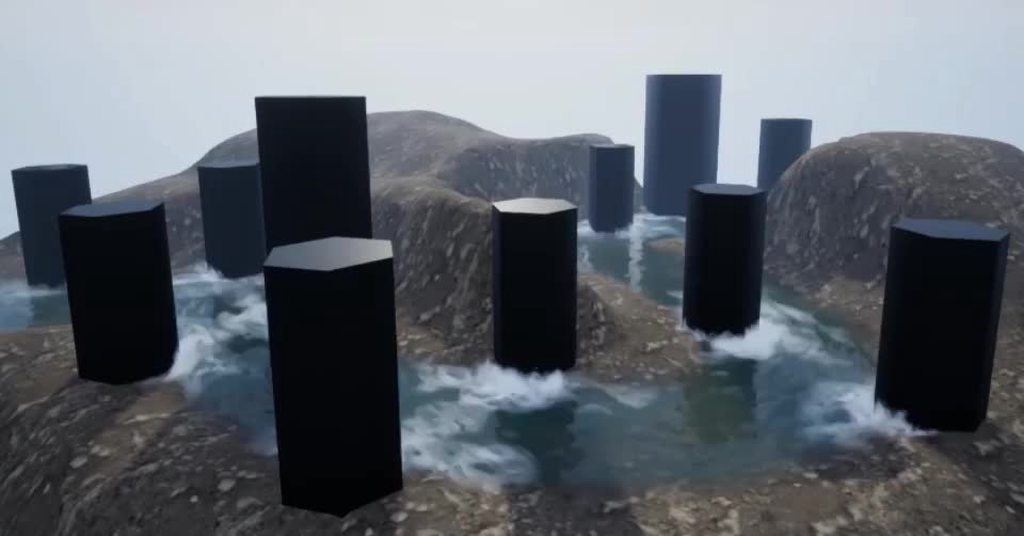
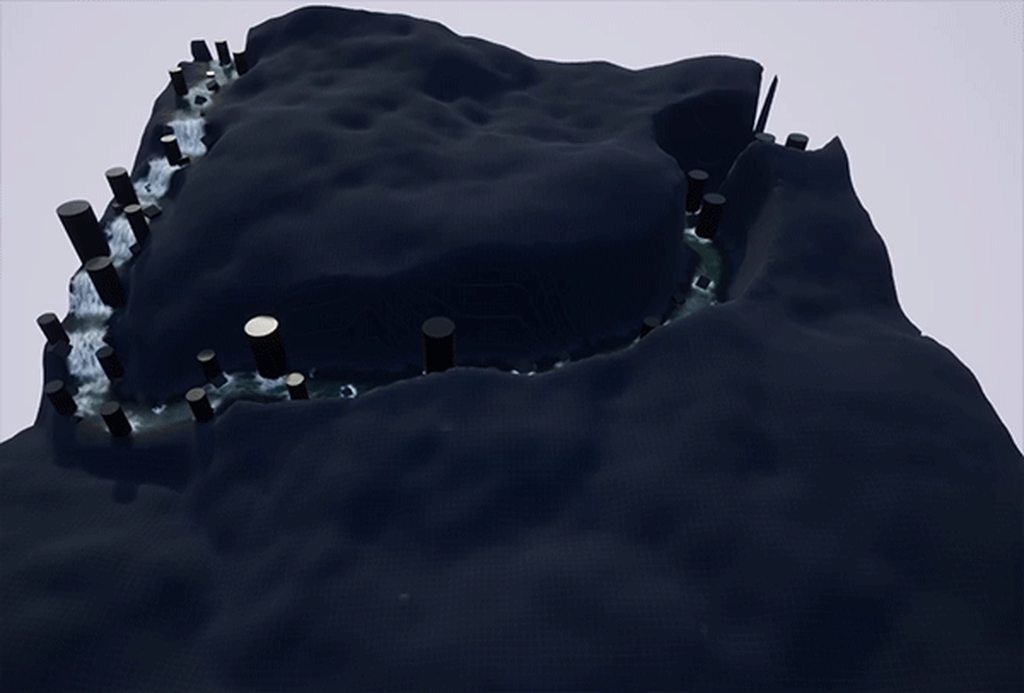
little update:
https://i.imgur.com/PQeXL0a.mp4
v
wet riverbed:
https://i.imgur.com/RpzvwEN.gif

@cold sorrel that's NOT good 😄 only 1 day for finishing 😦
those particls...
mhhhhhhhhhh
why are they behind he object and inverted flow direction
i love the idea tho
thats a great river
prolly spline tool
Houdini Engine
@lilac obsidian what do you mean with "behind the object" and "inverted flow direction"?
i'm not sure if i understand the question. but several small foam-particle systems are spawned where the pillar intersects with the water. it's automatically placed by houdini.
yee
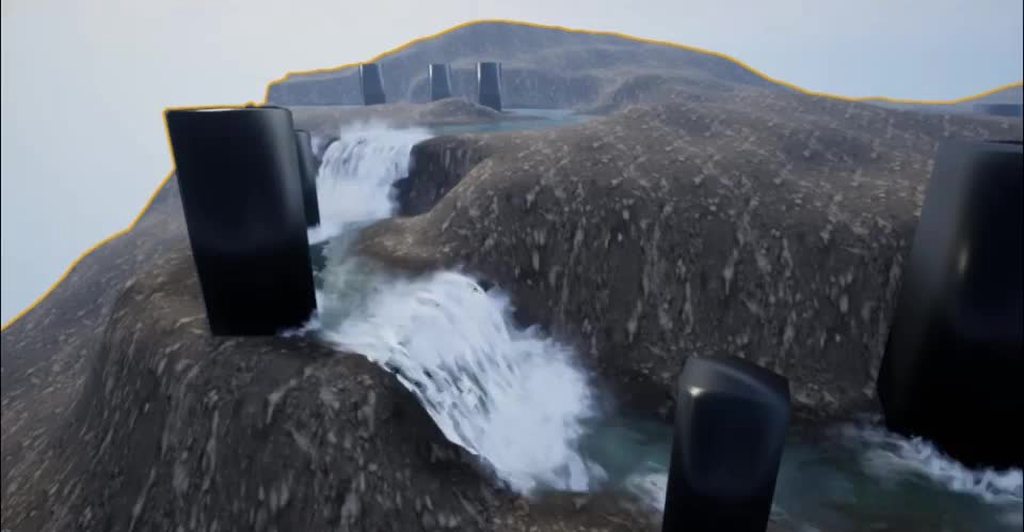
but against flow direction?
it should hit in front of the pillar
where the water collides
not behind it
thats what i mean
the water flows in a different direction
ah! now i undertstand 😄 yes that's a system flaw. i didn't get it running yet to use the flow direction for that
this would be a great improvement.
@drowsy lynx Distance Fields or Vertex Colors for the Flow Map?
@spare hare the flow map is a texture, the foam-areas is baked into the vertex color of the river mesh
Very nice :)
thanks 😃
Foam behind pillars is perfectly fine though.
how is that fine XD
sparkling up there like a shower
the force there is forward
it would never hit the pillar with enough force
But...
@lilac obsidian Would we potentially come to a settlement, if I rephrase Foam behind pillars is perfectly fine into Foam behind pillars looks perfectly fine?
no.
😭 Well, was worth a try.
depends in the engine. i use unreal..i guess the name legitimates things like that 😄
but
come one
i know its not easy to fix
but the flow map
there must be a way
yes
you could offset the alpha uvs
distort it above the pillar
that could work
i found that out by myself.
distance fields is prolly the only way to paint vertex color at runtime mh
hehe yeah it's something i really would like to do but deadline is this night and i'm not sure if i can have it. i would like to compare the normal of the obstacle with the normal of the flowmap and if they point into the same/similar direction, no particle system should be used.
yee i didnt dumped my head into flowmap normals yet
its prolly much easier that way
tho i still dont know how you want to paint particles...
paint particles?
well you want it automatic dont you
yes
so the particles would spawn auto infront of obstacles
like the flow map
the 💦
you are not using particles arent you...?
i would use particles
yeah. they are placed automatically alreday. i "just" have to make sure they are NOT spawned behind the object
i use foam-texture on the river-mesh + particle systems.
but how do you convert flowmap into a location?
particle systems are only created/placed where obstacles intersect with the river mesh. this placement has nothing to do with the flowmap. obstacle + river mesh are coming both from houdini. there you can just calculate the intersction between 2 objects
this means: placing an object from unreal into the river would not generate particles nor foam.
Making solution for N whitewater particle emitters for river is actually quite interesting challenge.
oh
so nobody found a solution to this yet?
wow
that is nice
i think i got one
i dont know. i didnt ask. i was working hard to get to the current state and didn't investigate further yet. i'm sure there are other people already tackling the more advanced problems
well nice of you to join the fight!
i need to get into my river tool someday soon
its such a nice project
looking forward to that!
Hi peeps! Anyone here used camera fade extensivly?
Got a quick question about it.
I do a cam fade into white then back to normal screen
What id like to achieve is go to white, then blue back white back blue back white and back to normal
Fade from full alpha white to full alpha blue aint doing anything at all
just finished the current realtime vfx challenge "river". 😃
https://i.imgur.com/C4V2mvX.gif
https://i.imgur.com/n8bk05z.gif
https://realtimevfx.com/t/simon-trumpler-sketch-17-wip/6131/24?u=simonschreibt
Real Time VFX
❤
Love it! is it procedurel ?
question: how would one go about making a residual-heat effect?
like a blowtorch glow on metal
sounds like decal
I can get to the world somehow, but I don't wanna stack 1000 decals into single location
N torches? 1 or more materials?
is it a important effect?
you could make a render target to write the pos of the torches and read on the mat, but would need 2 rts to build heat up
obviously if its just for the looks not worth it
if its a single blowtorch on a single location, a Pos + heat parameter would be enough
raytrace from the blowtorch and write the hit location to the parameter and with another parameter you increase the spheremask and put on emissive
but that would only work if you are only heating a single location
spawning particles on top of the metal is also another option
with the correct blend it would look just like its glowing
@grim moat if you're trying to fade into multiple colors in sequence use a LUT
hey guys, how should I use particle pooling in this case
basically I have an even that spawns an emitter attached to a certain actor and saves a reference to that
then another event later on calls destroy component on that reference if it's valid
it's just an infinite emitter that loops
but I get weird null errors and crashes when I try to use particle pooling in any way
Hi guys, do you know if i buy Substance Painter for 990$ with 12 month updates. would i still be able to use it after 12 month? i dont see it being annual
any suggestions on a good approach for adding ghosts into my game. The goal is a for a more "realistic" feel, so for example shadow figures that are obscure or that can only been seen with night vision
Here's the sort of scene I have in mind
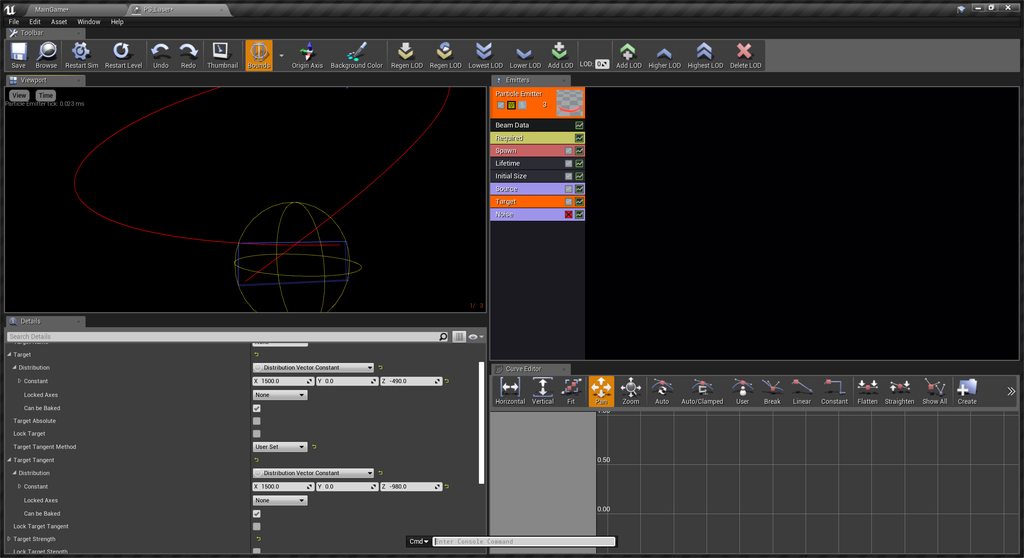
Hi! I need help in the particle system of UE4! I want to put an orbit, but only at the end of the particle lifetime. Can someone help me? I'm beginner in UE4. Thank you so much! Also, I tried to set the distribution as Vector Uniform Curve, but I cant get it to work! :c
maybe put a delay in on the start of a duplicate emitter that has orbit on
and kill off the current one at that point
@cursive cedar that's at least the lazy easy approach
Thank you so much! @indigo jolt
no prob, delays are your friend 😃
Hehe 😆
Using the Card flip particle effect from the black jack example game from epic; switching to open gl rendering mode causes the effect to look horrible, lots of screen noise, I can try to grab a screen shot if it would help. I'm hoping someone knows what to do
I have ran my editor in opengl mode to compile shaders for the materials in use
Hey guys, can you use texture sheets in UE like this? https://youtu.be/5Mw6NpSEb2o

This eighth episode explains the creation of a very simple stylized Fire effect in Unity, including texture creation and layering. Support me on Patreon: htt...
I think this dude is splitting the texture into 4 tiles and randomly selecting each particle, how would you do that in UE?

More experiments with video and particles for a new theatre performance by Stages of Science @TCorneliussen. Thanks, @RenderHeads for super smooth HAP playback.
#madewithunity #unity3d https://t.co/pbVae9OGPx
Likes
389
I am working with weather tool and the snow particles at set for Collision of Distance Field and Kill response. However a few of the meshes still allow about 40% of the particles through.
what can i do to correct this.
If i throw a large mesh on top of it, all particles do collide
@indigo jolt Hi, you gave me suggestion yesterday but I couldn't try it since I didn't have my computer! I'm trying to search for putting delay, but I'm not sure what it is xD Could you help me again? Sorry, I'm using ue4 for school since like one week so I don't have a lot of knowledge D:
right above the "spawn" thing, click the gray area
then scroll down
it'll be like "Emitter Delay" or something
there's also other things there you will want to memorize in general
like Looping
and duration
very few particle systems can be created without requiring a change to Duration, Looping, and/or Delay
sometimes one emitter will be on looping, while other parts will be a non-looping burst
Thank you so much! I'm gonna try!
I found it and I'm trying to put differents values, I seems to have change something, it may work ;u; thank you so much!! 
try to think it through logically with these. if you have 2 emitters make sure the Delay + Duration = Delay + Duration of other emitters in system
so if one system lasts 2 seconds, and you want the other system to kick in at 1.5 second mark
then make duration of second one 0.5 seconds with 1.5 second delay
this can be important if you're looping stuff
otherwise one system starts repeating before the other is finished or too much later
I didn't even know about that ouo actually, its gonna also help for an other problem I had and didnt look much into
but if I put a delay, I make the whole particule start later? I there a way to make a dalay to only one element in the particle system?
the delay relates to individual emitters inside the system
you should be setting the delay on the specific emitters, find the specific emitter for delay, click that, click above spawn, scroll down
I mean particle emitter, sorry!
you can have many emitters
inside one system
and not all of them should be on same timing
it's like a fireworks show
things gotta be triggered in varying sequences and bursts to get a good show
But like can I put a delay to one element in the emitter? For exemple the orbit?
well you could....but that would have to be done with a Curve
yeah so do you know how to do curves?
Yes, I tried to put differents values in a distribution vector uniforme curve, but its not working :c
you might have to watch some basic fundamentals tutorials tbh, doing curves is pretty important.
uniform ain't a curve, that's a random number
But its 2 differents curves and the number goes random between theses curves?
the constant dont work either :1
lets take it one step at a time, i'd first get ONE particle to behave the way you want
what are you trying to make anyway?
just random magics?
I'm trying to make petals appearing and exploding and then falling
its like a teleportation for a character that like roses
My english is not good also, im french xD So i'm sorry if what I say sound unclear
hmmm so you first need a sort of semi-circular or conical up-ward velocity
with no orbit
then you want orbit to kick in
Yes! 😄
ok so your upward burst movement should have nothing to do with velocity. you could do that with a Sphere Location
Oh I see!
check all the boxes XYZ - X and -Y, but leave -Z unchecked. then click the "velocity" check box
that'll shoot everything upward and outward
in random DOME
what I have now is drag that is stopping my velocity. And once they stopped, they go down with a acceleration/life and what is missing is the orbit to make a leaf falling effect
then make sure you have a Constant Accelleration module in there set to something like -900
nah don't do drag, too messy
ok xD
kill the drag, kill the accelaration/life thing
that's complicated
it's not like they are going to fall faster/slower over time 😛
just pop them up with the velocity and make the value high enough and then up the value of the Constant Acceleration and they'll do a nice Arc just like picture
Do i make a sphere location?
ya
okay
sphere location, make that, check all the boxes, but UNCHECK -Z
that's the "down axis"
you don't want to shoot stuff downward
done! 😄
i uncheck negative z and positive z
ok!
lol youre right
then check the Velocity checkbox
yes
and below that there's a Velocity value. i like to set that to a Uniform
since you don't want these all poofing out too regular
you want some chaos
yes ^^
make one velocity value a smidgen smaller than the other, but not 0
like min -30 and max 30?
no more like 10 and 15
ok
also your Sphere Radius will impact this
if Sphere Radius grows, the velocity will grow too
it's weird
i'm not sure i really like how that works....
XD
but just keep that in mind, if you want bigger radius or smaller radius....it will change velocity and you'll have to adjust velocity numbers to compensate
I see
so if this is bursting from a tiny flower you probably want a small radius
i assume this is from a flower sized object, not a yoga ball
yes, its from a flower ^^
ok so like 10 or less probably
with a higher velocity to make up for it
then you'll add just a simple Constant Acceleration set to a negative value
ok
like -900, or -5000 (this varies depending on your velocity)
just try different values until things fall at the right speed
and things get the arc you want
sometimes you may feel like it's not "up" enough with arc
if that is case, add a Velocity module with a constant 0, 0, 100 or something
to get some added "up boost"
ok
just stuff to think about
anyway, once you get arc right, and you got the orbit working
find a number in the orbit that turns the orbit off
and on
depending on how big of a value it is
like if there's a number for distance from center or something. find that thing, change it to a Constant Curve
and set like 3 points
one at 0.0 seconds at value of 0.0. another at lets say 0.5 seconds, with value of 0.0. and another at 0.6 seconds at value of 1.0
and if you want you could add a 4th point at 1.0 seconds at value of 2 or something if you want to make orbit get bigger as they fall....i don't think flower petals do that
but these are things to tinker with
and these values are all just empty - your real value will probably be larger than 1, that's just example
Yeah, I understand
im trying to find the values, but i think its gonna work after
in the constant acceleration, do i put something for the z?
very rarely are X and Y values used for acceleration. it happens, but it is rare
I see! Now I have to get the orbit to work
ya and you'll need to get familiar with curves
they're sorta annoying to work with
Thanks!
for the orbit, the in val is always between 0 and 1 (life and death of particle)?
yeah
i tried to find a tutorial for you on curves
this is funny
our resident moderator Luos
just goofing off after I explained how to start orbit halfway down the life of a particle.
he's everywhere
lol
lol thx
I cant get the orbit to work, once again...
only the value on 0.0 is doing something
i've put the other to 0.1 and 0.2 to be sure to see it, but no orbit
get orbit to work with Constant values first
then figure out which value does "on/off"
ok, im working in constant curve rn
so one value there is going to be like "Off = 0.0" and "On = ??? 40? 50?"
only go to the curve once you know which value is "ON" and which value is "OFF"
for the in val?
i'd watch this https://www.youtube.com/watch?v=yLpZZcPjiPo

This high-level overview of Cascade shows you the basics of each area of the interface, familiarizing you with what you need to get started creating particle...
explains curves
ok
Greetings, i just want to spam here, in case someone need this:
https://twitter.com/mc_lo/status/1058792805005438976
It's been a long delay before I've published this Halftone PostProcess Shader:
https://t.co/0MMqKTc10j
#UnrealEngine #ue4 #indiedev

Are you still here ballsproblem?
does anyone know how to make something like this?
the flash trail
https://gyazo.com/89374d6ec1fc2c8eb187da248569f99f

in particles?
yes
I don't know much, so I wont be able to help you, but I came across this the other time: https://www.youtube.com/watch?v=KRT-Jb883Zo

Its a trail following a saber, I think i could help doing this
ok thanks
yeah i'll search around
@celest birch Spawn emitter attached node
Or spawn emitter at location and spawn on the feet of the character
Oh okay it's full body
ya i'm here
well idiot-answer to your question - attach Particles with Ribbons to your character at various points
it'll be pretty expensive but it'll get the job done
the easy way of attaching if you don't want to get gameplay involved - just use an Anim Notify and attach a ribbon emitter to your running
that way stuff doesn't spill out everywhere during idle
But imagine how cool that'll be! Add collision and it'll form pools of light around the player!
@indigo jolt I did it thanks to your help c: Thank you so much!
congrats!
Does anyone know what would be the main causation for the error: "Spawn Emitter Attached spawned a potential immortal particle system"?
I just create a 1 second burst of orbiting lines :/
Try if checking Kill on Completed/Deactive solve the problem
Other it's maybe because the particle you spawn in your code will never be killed though the code too; check if the checkbox Auto Destroy is ticked in your Spawn Emitter function
also check that looping is set to 1
looping stuff wont' even trigger on some things - like notifies
hey. anyone know how to solve this? It's a decal what I want to spawn when a grenade explodes. "Leaking" up the wall is kinda ugly, but I dont want to make the decal box smaller, because it would not be visible, if the grenade exploded over the ground
If you are not writing normals from decal, you can sample world normal and compare it to decal vector and fade opacity when angle is above threshold.
Hm, that makes sense. So I grab the PixelNormalVS, compare with decal normal, which i guess should be sent from outside as parameter?
or well, i could always just use up vector, because its always on ground... Thanks! :)
LightVector should give you decal projection vector.
that's a really cool solution...kinda want to try that
not exactly 100% sure how that would work or look node-wise
Okay, i think I got it working.
LightVector gave some wierd results (if the decal center was close to the floor, it started giving off sideways normals), but PixelNormalWS returns with the orient of the decal
thanks for help :)
oi! nice work!
ah dang i tried to copy that, sadly i'm in forward shading 😦
so i can't use scenetexture
i'm assuming something else will work tho
light vector kinda works - although it seems more like it just deletes stuff above a certain point
@devout portal You share it? I'm interested 😃
ooo i gave up on that technique for the side stuff on decals with that tactic and tried SlopeMask
turns out that works good!

it still doesn't really address the "bleed down" issues, but the bleed-up thing gets fixed
When I'm doing decal application I don't just use the normal of the impact point. You can do a few traces around the impact point and use the averaged normal. This will fix most of your problematic cases. Then you can use some shader magic as above to clean up the rest of the issues.
@sterile saddle um...yes...the link in the post
Anyone got any idea how to do image burn effect?
like that shadow image when you see really bright light
or ghost image, which ever makes more sense
Hello everyone. I've watched a few videos on destruction but am running into a problem
No matter what i set the damage spread to, my mesh crumbles all at once
Am i possibly missing a step?
I can give more information :p
anyone have an idea why my particle systme doesn't Spawn at Location?
it works if I don't spawn it, add it as a component and just activate it
what are you setting the location to in your bp?
@winged nymph yes Darinius is probably pointing to the heart of the issue. If you don't SET the location, your 0,0,0 input means particle is spawning at 0,0,0 in world space, wherever that is in your level. You can "Get" the location of any part of your blueprint then connect that location output into your Spawn At Location's location input
OK
on to my thing. Anyone know of a Vector that relates to the Particle Emitter's orientation that is normally a node already in Materials?
it's not spawning, it isn't being added to the worldoutliner
if you have gyazo, share screenshot of the blueprint
also
use a Print String in there for good measure
make sure you're firing off anything at all
if Print String doesn't shoot off, then your problem is higher up the food chain
Killing itself too fast?
Hi there! Is it possible to adjust the mesh particles's colision size? I have a projectile particle that collides with the corner even though visibly it shouldn't. And it's with 'Collision Consider Particle Size' turned off.
havent played with that, but I assume you should turn that on
The checkbox says it won't consider particle size to determine collision event, by doing that collision radius indeed became smaller, but not perfect.
And it seems like Cascade doesn't use simple collision primitive of the mesh itself, or am I missing something?
i do know it takes those settings for whatever it impacts with, it should afaik also do that for your emitted mesh as well
havent done much with mesh collisions in cascade lately so my memory is a bit vague about it all
Do you have any idea about simple collision? Or Cascade always uses some sort of it's own collision primitives?
Hey everyone. I am currently implementing a helicopter. Do you have any tips how to create a "wow now im going really fast" sense of speed?
Radial blur
now go off young padawan and make the best "wow im going really fast" sense of speed ever made

https://www.playstation.com/en-us/games/tetris-effect-ps4 From Tetsuya Mizuguchi and the same people who brought you the award-winning Rez Infinite and Lumin...
oh god
Is there a particle culling volume?
Anyone know how I can get actor forward vector in material? I can get the up vector with object orientation.
depends on what it's the forward vector OF
if it's forward vector of a BP it's attached to, then it could just be +X
usually it's +X
so 1, 0, 1
err
1, 0, 0
Gotta love when forward is rotated 45 degrees 😉
I found a good way for my situation using MF_RotateVector_90
ultimately I was trying to get the perpendicular vector to the up vector
Okay so new question. Why are my imported vertex colors not acting as a mask in the world position offset node of the material?. I can see the vertex colors in the view port because using the "vertex colors" material input node it is applied to the color and emmisive slot. So I know the vertex colors are there. Pulling of that same node I am trying to only move the verts that have green values in the vertex colors. Yet all the verts move
Anyone have experience compositing with image plate? My image plate footage looks correct in unlit mode, but washed out with lit. I'm attempting to match an object to the lighting of the footage, but can't do that in unlit mode. I only need the image plate to be unlit.
set its material to unlit?
It was by default, it's still being lit somehow
please show the material and unlit setting?
in that case it should be unlit O_o
Here's Lit Vs Unlit
Unlit makes the footage look correct, but also delights the objects I'm trying to match.
Sadly the old Composure live stream bypassed using Image plate and used a method that doesn't even show the background which doesn't work for what I'm trying to do.
okay so what am I missing?
I've got a raymarching material (that I don't fully understand yet) and if I apply it to a particle mesh it only renders my shape at world 0,0,0
on a normal mesh it shows it normally
I hope this helps visualising the problem: https://i.gyazo.com/e276d5ebdbdb5c6690e28b4880a82d69.mp4
I'm just wondering where the difference between meshes and particles meshes might come from 🤔
actor position vs particle position in the material?
I guess it has to be, but I can't for the life of me find anything like that in the custom code
Plug node into one of the result node pins and check generated HLSL code
Seems to be this for Particle Position:
Parameters.Particle.TranslatedWorldPositionAndSize.xyz - ResolvedView.PreViewTranslation.xyz
okay thanks
now I just have to find out which part actually defined the position
I just don't get it there's not many thing that can be location related variables, but no matter what I change, I can't seem to find the right one


anyone got any tipps on making a smoking gun effect?
Use a ribbon
make gun, make cigarette, put cigarette in one of its holes.
In the front facing hole to be specific
smoke from the other holes tend to be more irratic
we consider that front hole its front because we are anthropomorphizing the gun..
perhaps thats the back.
wow getting philosophical now 🤔

I have no words
there is some really really weird stuff when you google "gun senpai" hehe
and what's the best way to set up a symetrical particle effect? like I've got a mesh that should have the same particle effect on both sides of it
I'm currently just using the same emitter twice
but since the mesh is static I'm wondering if I can set it up within one emitter
emit particles onto mesh? or use mesh as particle?
well I want to spawn them at a specific point on the mesh, that's why I'm just placing it inside my blueprint to the place where I want them to spawn
which channel should I use for lighting issues?
thx
place same one on each side, tweak things accordingly @prime pecan
yeah that's how I have it currently
so I have this block with 2 vents on the sides and I want wispy smoke trails going up and some smoke puffs being shot towards the back basically.
My setup right now is a particle systems that has both, the wispy smoke and the smoke puffs that I place on either side and rotate so that the smoke puffs get shot out towards where I want them to and with the wispy smokes going up in worldspace
but the wispy smoke coming from a point looks weird, so I want them to spawn along the whole venting block
so should I split the two systems and just place 4 of them on my mesh?
just wanna know what's a good way to set this up
if I use a mesh particle is there a way to set the material in the particle system or does it have to be assigned to the mesh asset?
@celest birch lmk if you find anything all I can find is the very incomplete official docs and glossary. I'd settle for a list of all available commands and just figure it out if I could get that at least.
Blueprint is the same way. There's no way to just look up what nodes there are and what they do without reading the in-engine tips one by one.
is there any particular reason why my mesh particles might now spawn when I set their loops to 1? it works normal if I set it to 0 🤔
Now or not*? What is your goal?
hm infact it seems like it's ommiting the first loop. so if I set it to 2 it just shows the second one
Is it plugged in? (Not sarcasm i promise)
Oh and placing the same thing twice is almost always faster to process than placing 2 different things. That extends to most things in the engine. @prime pecan
yeah but this was never about two different things
it's the same emitter just rotated differently
what I meant with that question was if I should just to the duplication in the emitter or not
It would start being different things if every object had bespoke fx like that.
It's better to make modular systems that work in as many situations as possible and make tweaks like you did by putting one on each side and changing simple things about each to make them look unique
Layering helps a lot
is the object radius for particles calculated differently?
left is a mesh and right is the same mesh spawned through a particle system at the same scale
yeah seems like the object radius node returns 78.6 instead of 50
oh man one issue after another... can multiple emitters inside a particle system conflict with eachother?
https://i.gyazo.com/358b707977207e662ae2bf6635c9a3c3.mp4 with the dome active
https://i.gyazo.com/ce5d2e2f7c32e6cfe4b41c36da9d980c.mp4 and without
anyone got an idea why it behaves like this?
they shouldnt affect eachother @prime pecan
@prime pecan Object radius returns radius of object bounds, which is particle system. Use particle radius instead.
Following issue is most likely related to you using object radius and adding emitter expands calculated bounds, hence the emitter affecting other emitter.
@analog onyx good call, but is the particle radius calculated differently? It seems like the radius gets normalised to 1 as 2 particles with different sized return the same value
@prime pecan Using mesh particles?
yes
Its radius is hardcoded at 1.
😦
well I opted to just use the UV's it doesn't look too bad for the time you can actually see the things so it'll probably make no difference
but thanks, those things will be good to know in the future, I'm sure
hey, getting some weird black flickering when adding SimpleGrassWind to the WorldPositionOffset of my grass shader that I'm using on my static instanced grass. It looks like z-fighting but it's not. Any ideas?
Hi ! I am trying to do a path visualizer. My first thought was to use beam_fx for this. I have a spline and i am looping through it points ,spawning a beam emitter and transferring the tangents and locations (in world space) from spline to each emitter source and target. As you can see from the screenshot , i have a problem when i have a turn in the spline. So , is it possible to fix this ? Can someone point me in the right direction ?
i guess i should show what my grass problem looks like, thought i solved it earlier but I'm still at a loss. If anyone's dealt with a problem like this before some insight would be much appreciated!
@fossil swan Beautiful website. Now turn all of them into material functions and sell it on the marketplace :p
@old magnet your grass wind is affecting the roots. that's bad. roots don't move. Vertex Paint the root parts of mesh to be one color, then mask the Wind in that color in material
@indigo jolt Thanks but i already know how to do that, my problem is seeing the black flickering when the wind is added!
@junior reef You can use USplineMeshComponent -> used to make sinuous road. For my curved laser beam, i try to use cascade beam, but the joint were imperfect because the beam always face camera. My solution was to use a cylinder with a specific shader and USplineMeshComponent.
How can i make the light better in a closed off room with a single light and no windows or outdoor light
Ah alright I thought because it’s a visual thing, and I have no idea what that is xD
Anyone know how I can get forward vector or object rotation in material?
I can use object orientation to get the up vector (seems odd that this exists and not a forward vector)
Obviously I'll take right vector too, so long as I have two I can cross them to get the other
@lethal spruce Transform any vector that you might need from local space to world space.
Yeah I tried that. I wasn't able to find way for that to work. I created a vec 3 in the material (1,0,0) then plugged into a transform position node, set it to from "local" to "absolute world" and my directions are still wrong. I've moved onto creating dynamic material instances and storing those in a container so I can access a custom parameter instead. probably better this way anyhow
@analog onyx thanks though
👍
@old magnet kinda looks like you're using 2 planes per grass card, and maybe a double sided material and the back-side plane is popping through as z-fighting. hard to say without knowing construction
what you have looks more like a form of z-fighting than anything else
i've never seen that issue with single-sided planes before without there being a completely co-planar mesh (perfectly parallel)
btw if you haven't seen this before, it's pretty awesome grass technique https://jesshiderue4.wordpress.com/materials/stylized-wind-blown-grass/
By using a Z-Up normal mesh and a couple of panning textures, we can create this simple but effective wind-blown effect.
pretty common knowledge actually, its quite a common practice used for decades hehe.
good that people are reminded of it
@indigo jolt Thank you for the reply! It is a 2 sided material but with only 1 plane per grass card. No planes in parallel. The weird thing is this happens even when I make it a single sided material. I am also adding the wind on top of some vertex displacement that happens when the player character moves over the grass.
And thanks for the link, may be common knowledge but as a self learner i appreciate it! looks cool!
did you use Z-up normals?
having super dark areas would be symptomatic of lighting showing up as "back-side"
and yeah Luos i think i've posted that same link over a dozen times, it's pretty hard to tell how much everyone knows 😛
lotta new faces
I’m not sure, i just baked a really basic normal map and threw it on there. I’ll give that a shot later. 👍
he doesnt mean texture normal
ya it's something you gotta do in your 3d package
read over this as well http://wiki.polycount.com/wiki/VertexNormal
it'll give you a bit more of an idea of theory here
and make other foliage better
this image sums it up http://wiki.polycount.com/w/images/8/8e/Chai_bentnormals.jpg

see how the black stuff goes away?
Oooh, ok. Yeah, I’ve been trying to figure out how to do that in blender and get decent results. I’ll read up, thank you!
if you don't have a Skylight in scene that'll also be a factor, as a skylight will create fake-bounce lighting
but i think you should do this stuff as first fix
or you won't notice it's wrong
I do have a skylight actually! Anyways i’ll try this out later and report back, appreciate it! 🙌
Anyone know if there's a way to blend cubemap inputs for exponential height fog? Looking for something like the Set Cubemap Blend node for skylights, but not finding a way..
@indigo jolt So I fixed my grass vertex normals so they're pointing straight up, and followed the tutorial you linked (which was great, thanks!) and my grass looks a lot better than before and doesn't do the weird black z-fighting. 😃 However when I try and add my displacement output (from character walking on the grass) to my wind displacement output then I start getting the black z-fighting again. Should I be combining the outputs a certain way? Sorry if this is really basic, i'm a beginner at this shader stuff. And I can post the shader if it helps.
and of course, a quick clip showing the improved grass and the weird black z-fighting
https://www.youtube.com/watch?v=6Lk3SL44A6o part 1 of my new tutorial series is finally out there 😃

In this tutorial, we'll go over part 1 of creating a realistic fireball projectile from scratch. This includes painting some of our first textures we'll need...
just wanted to drop this in, couple of tutorials I'm trying to keep extending, somebody might find it useful :) https://forums.unrealengine.com/community/community-content-tools-and-tutorials/1468298-material-effect-collection
Unreal Engine Forums
Hey everyone!
I've been playing with Unreal model and post-processing shaders and wanted to share the codes with you, in case somebody will find them interesting.

hnngh
also luos, this gun-senpai google search looks like a really deep rabbit hole
?
cant even remember hehe
how do you forget something like that`
also that fire looks cool, but also kinda repetetive
quarter dropped, hehe gun senpai
@old magnet try making same grass using a single plane with only 1 quad but same shader and technique and see what happens. i think something is still odd with geometry
once you remove the problem you can build from there
so, I'm trying out that Sobel tutorial
but my screen UVs are messed up
or more like, it only works when in fullscreen
so it's not scaling properly
the code says uv *= 0.5;
so I assume that's causing the issue
or not
nvm, fixed it with return GetDefaultSceneTextureUV(Parameters, 14);
no idea what that is
yea that's new thing from UE 4.19+ for optimization the screen is rendered in one resolution and scaled for viewports, so you can't use texCoords node in PP materials or it looks squished in editor (work find in standalone tho)
from what I understood
<_< I still would like to have a way to give something glow without it being overly saturated with this new tonemapper. 99 times out of a 100 I can work with it, but there is always that one case where the subtleties are just lost when using an emissive higher than a few decimals
is there anything in cascade that would cause a beam to wrap around completely? I have custom tangents set, but it doesn't end after the target... it seems like it's repeating but I can't find any settings that I haven't already set to 0 or 1
I may just not be calculating tangents correcly
🤦 tangent strengths were 25, not 1. much closer now, but not exact yet
@fossil swan is the bloom in 4.21 improved or something?
not afaik, but havent touched it either
@indigo jolt I tried using a single plane with only one quad and it's still happening... it only happens when I add character grass displacement + wind displacement in my shader.
heres a screenshot of shader!
It's going into World Position Offset, just to be clear
can someone hook me up with a really good youtube video for everything about texturing? i've looked some up im just looking for personal opinion of a good video
👀
this goes through the main process

This is a quick video to do advanced materials using textures. I do want to make it extremely clear that this method can be used to make ANY material but in ...
it sows alot imptent things
I wanna use ISM's to visualise building propertes on a tile via a simple texture, Is it possible to add a material to them that basicly would work like an emitter, purely showing the desired icon, always facing camera?
Nvm, found it. Called billboard material
@lilac obsidian thanks
For anyone who ends up having a similar problem to the one I was experiencing with my grass, the solution was pretty obvious in retrospect- add my two different world position offsets before the SimpleGrassWind. And voila. No more weird black z-fighting! 😃
@upbeat jungle not allowed to post here, please read the rules and read the pinned message in #looking-for-talent
thanks you 😃
and as a vfx artist myself, good luck on the project 😃
thank you 😃
@old magnet congrats! never had to do that before, but a solution is a solution!
@indigo jolt Thanks! Whatever works I guess! And also thank you for trying to help me earlier 🙌
OK i got problem someone here probably knows answer to
Mesh Particles - i got a bunch of mesh particles. Is there a Material Node that relates to the current Particle Scale of the mesh particles?
i want a SphereGradient radius to scale up with the particle
local to world transform should give you the scale
ok local to world transform - what would be the input to the left?
object scale?
not quite doing it
the particle position thing is working great, they're all centered
but the radius is still a fixed quantity that doesn't realize mesh is scaling
mesh is a sphere
debug it. Object scale should work
hmmm ok
ah got it
not local space to world
but Mesh Particle Space to World
ty!
anyone have an issue with SubUVs where frames will be empty for no reason
all my settings were right, I checked everything and then duplicated the texture and now everything works without changing anything...
duplicated texture, swapped for that duplicated texture and now the other texture works fine
what if you go in the level blueprint and add the play there
like this
if it works not going to figure out why the checkbox isnt working but itll work
it wasnt gonna be the camera cuts thing I was just thinking outloud
buit ok
you think it isnt playing because you're not possessing the camera right?
are you sure it isn't actually playing
it is playing but i get nothing on the vieport
ok ya
Ive had that issue, I forgot what it was Ill look
you have a cine camera right
yop
ok so I think I was right
it is to do with cam,era cuts
you need a camera cut
and then bind that cut to the camera
make a camera cut in the Track menu in sequencer
right click the camera cut in the timeline
and this is why it makes a camera cut when you make a camera
because they're pretty much required
so a made a camera cut what now 👀
right click it in the timeline