#visual-fx
1 messages · Page 13 of 1
Don't plug the custom straight into emissive
but the error is gone, at least
oh, I am dumb 😐
I forgot to fix it
Totally working, you're a wizard! 😋 Really appreciate, thanks! 😃
By the way, any chance there is a book you learned from?
and would recomend
Nah I learned everything I know from testing and trying to implement my own shaders
I don't actually know HLSL. I just get by on my C knowledge
I wish I could learn that way as well lol... I usually get stumped by not understanding what my node are doing, probably I need to figure out a better way to display the outputs or of reasoning about them
Well the outline code is pretty simple. It just samples the neighbouring pixels and outputs the highest pixel value
TL = Top Left, TM = Top Middle, TR = Top Middle etc.
ScreenPosition + float2(x, y) is just the UV position of the pixel you want to sample
Yeah but I think I'm missing all the concept around, like what Texel are, or somethimes it seems like "pixel" are treated as a 3d intity inside a virtual world an sometimes as a 2D thing on a plane, or maybe I'm getting it wrong, basically I have too much doubts all around 360° that prevent me from actually understand this stuff :\
Oh right, in that case you probably just need a better understanding of rendering
Don't worry it's all pretty simple 🙂
oh btw,
what node should I use to overlay my base material? :S
rather, to overlay this effect to my base material
What do you mean?
well I want the edge outline but also to keep the cube original material for the inside
not a black mesh :S
I thought your original cube material was just black
The Post Process Input 0 connected to the Lerp is supposed to show through your original mesh
You're supposed to add it to a Post Process Volume
ah, got it
I didn't even know you could assign post process materials to meshes...
maybe my random clicking is unlocking new functionality
@harsh peak i don't like using SUB uv for mesh particles that need uv distortion, i usually tend to use Flipbook
I was waiting for this s<3t

Epic's Chris Murphy explores how Unreal Engine's Blueprint allows developers to create high-end effects that impact many areas of the game environment withou...
Will tell in 13min if it's good... yup this guy is cool
Hey everyone ! Is this node :
the same thing as writing this in a custom node : return SceneTextureLookup(UVs, 14, false); ?
Because when I do that :
I get that :
What comes from SceneTextureLookup is weirdly resized and it change when I resize the window...
Its like there's a buffer which keep the maximum size when you extend the window
and when you reduce the window it wants to display the whole buffer (even if there's a blank space on the right and at the bottom)
That unreal video with Chris, was great! I would love to see more of that stuff.
@lusty saddle The way you get UVs for Scene Textures has changed in 4.19
Use this:
float2 UV = GetDefaultSceneTextureUV(Parameters, 14);
@celest birch : Thank you so much 😄 !
@celest birch I wanted you to ask the other day and I've forgot, but where can I read the api you're getting the GetDefaultSceneTextureUV() function from?
is something general to HLSL?
or something that is from UnrealEngine?
@surreal bay I just get it from the generated HLSL code which you can view in the material editor by going to Window\HLSL Code
what?! nice trick 😄 Btw do you read it from that window, or there is like some tool that can give you proper highlight?
maybe pasting it in VS would give proper highlight? Need to try
I copy paste into Notepad++ but VS would work too
I just set the syntax highlighting to C++ or C#
ok I've pasted it in notepad++, err..where is the C++ syntax highlight option? 😬
sorry I know I can google this
but since we are already here... 😄
oh, found it
much better!
😃
Language\C\C++
@celest birch Check this -> https://mynameismjp.wordpress.com/2012/11/04/hlsl-udl/
When it comes to writing shaders, Notepad++ is currently my editor of choice. The most recent release of Notepad++ added version 2.0 of their User Defined Language (UDL) system, which adds quite a …
apparently you can download the file, import it from notepade++ under Language/UserDefinedLanguage import
and get HLSL highlight
proper one 😛
I'm trying it now, succeded to import the file but failing to apply it 😐
strange
Well if you happen to try it out and it works, let me know 😃
it works!
required to restart notepad++ after import
but it looks the same as c++ highlight? 😄
well, I guess one can add it's own highlight for other stuff so is a good base
glad I could help you back, then 😃
Is there an actual chance that noise textures are packed together when you select the Texture Group to Effects? Because Paragon noise textures are not packed in RGB and they are using a lot of them.
I don't think so, but strange nonetheless
I have the problem, that my particle collision (CPU, not GPU) works perfectly fine in editor view, but it doesn't collide at runtime. Is somebody familiar with that issue? Thanks for your help
It’s not always advantageous to channel pack if you are looking for quality. The channels crosstalk and degrade the fidelity of any individual texture. Often it’s better to keep the textures separate if you have quality concerns.
Is there a bug with "Quality Level Spawn Rate Scale" on the Emitter Class Module in Cascade? If you uncheck "Apply Global Spawn Rate Scale" in the Spawn Module to adjust the emitters own Quality Level Spawn Rate Scale in the Emitter Class Module, then the result is always 0, unless the value is exactly on 1.
Info: I am on 4.18
@strong carbon doesnt that depend on compression settings?
Only if you go uncompressed, in which case there’s no point in channel packing anyways
@strong carbon doesnt channel packing allow you to sample the texture once?
at least if the sampling is coherent at the same UV
or bind 1 texture instead of binding multiplpe
Sure, in practice it can be a savings. Not compared to uncompressed data though in most cases as you are likely to just stall reading the texture. Every platform is different, these are all generalities. Generally, vfx materials are not texture stalled compared to instruction count so the cost of a couple small texture reads doesn’t fill the bucket at the same rate as pixel shader complexity
thanks for the clarification
FWIW I generally pack textures unless I need extra quality in which case I use greyscale which is single channel uncompressed, and get my color elsewhere
Oh yeah, I got some proper awesome bugs from channelpacking when making energyfields on Naboo. Smooth gradients in some channels. low frequency specks in another. Bad times... 😄
@cold sorrel Do you know by any chance, what tex compression was used for detail textures, that were blended over photoscanned assets in battlefront ?
I remember GDC talk by DICE about the battlefront pipeline and I had been wondering ever since, why channel cross talk is not noticeable in the game, especially for normals.
the viewport in cascade is like 50% functional
anything that requires it to move to see... forget it
does anyone have any advice on how i can take the data captured through the new 'audio capture' plugin and using it to change my vr pawns camera's post-processing fx?
Hey ! I don't know if it's the right channel, but i'd like to know if there's a better method to create "tire trace" (when a car is drifting) than just spawning lot of decals ?
@winged nymph there is a motion option
@lusty saddle Some Indie Games use Ribbon particles, I also saw Rendertargets, but if you need the stamp of the tire, decals are still the best way. Even the newest graphical update of World of Tanks is using them. More about World of Tanks: https://80.lv/articles/world-of-tanks-graphical-update-technical-overview/

The amazing team of artists from Wargaming discussed all the updates to GI, particle systems, materials, water shaders and other elements of the astonishing World of Tanks engine.
@celest jasper : Thank you for helping me ! I just want to darken the road (no need for normals or position offset).
I think the Ribbon method could create some visual bugs (the ribbon needs to be a little higher than the road I guess ?)
Right now, i'm testing with the decal method, but i'm afraid it will create thousands in seconds...
Use Render Targets
I once used a Mesh Particle System that spawned just meshes (plane), so I could easily adjust how many are spawned, but that was stylized + top-down + flat surface, depends on your game, so any information is much appreciated
General answer for PBR, look at World of Tanks ^^
yeah, this is going Rendertargets 😄
Actually RT might not be the best way. Fast objects can create holes in the trails when using RTs
there are bumps, looping, and generally non-planar roads (like trackmania)
Yeah perhaps not render targets lol
realistic/ actual stamp of the tires or just a trail with a simple color/gradient?
just a trail, players won't be able to see the stamps I think
Decal is probably the way to go
ok, thank you ! And you don't think it will be quite heavy on performance ?
depends how long you want the effect to stay on the road
in a particle system you can easily kill them with time
I was planning to use the "LifeSpan" parameters of decal. If it stay 10 seconds, i'm good !
The thing is that's a multiplayer game (8 players) and if everyone drift at the same time, that'll create 8 * 4 tires = 32 decals per ticks...
so ~2000 decals in a second
(or i can space them a little bit, but i don't want holes in the trace)
you have to test that yourself, and if things won't work, try just using solid mesh planes, I doubt anyone here tested such a number
Ok, thank you very much for your help ! I'll test that as soon as I manage to get "SpawnDecalAtLocation" working 😛 !
but theoretically spawning 2000 meshes in a particle system can be done, with my approach I used SpawnPerUnit and I didn't see much of a difference on my i5 4460, Radeon R9 270x
I would be more concerned about network code, I only have that thought in my mind where Overwatch devs talked about Mei's Ice, but with Particles you just disable/enable them on the clients, as long as it's just a visual thing it shouldn't be a problem, but for that we also have another channel 🙂
hey, anyone know how to get this to work in 4 18, blur custom shader i got off the forums
float4 blur = Texture2DSample(Tex, TexSampler, UV);
for (int i = 0; i < r; i++)
{
blur += Texture2DSample(Tex, TexSampler, UV + float2(i * dist, 0));
blur += Texture2DSample(Tex, TexSampler, UV - float2(i * dist, 0));
}
for (int j = 0; j < r; j++)
{
blur += Texture2DSample(Tex, TexSampler, UV + float2(0, j * dist));
blur += Texture2DSample(Tex, TexSampler, UV - float2(0, j * dist));
}
blur /= 2*(2*r)+1;
return blur;
with a render target
re: car burn trail stuff
@celest jasper @lusty saddle
https://www.youtube.com/watch?v=67z5u8ZcEcw this might be repurposable for that as well I think
Epic's Chris Murphy explores how Unreal Engine's Blueprint allows developers to create high-end effects that impact many areas of the game environment withou...
at least, as someone who never had to make tire-slipthingies, thats how I'd probably do it
doesnt seem to allow me to enter a render target texture
sec just to be sure cause i went over 50 different shaders today
ah
undeclared identifier scenetexturelookup
i have inputs UV dist and r
anyway cant input texture2d into the uv
scene texture works fine
i need to blur a render target that i will use as an aplha in the pp
Texture doesn't go into UV
Is it a post processing effect ?
Goes into an input called Tex
Need to connect the Color output of a SceneTexture to get rid of the undeclared identifier error
ye its pp, trying to get the fog of war
but i need to do it over a rt
i mean i have it over 50 other ways but its this one specific everyone want
What are you doing to create the RT? Might be better to not use a blur
have a rendered procedural disk mesh, that has a stencil value, i can use it just fine to generate fow but i need soft edges and now its a pain in the ass, anyway camera component with a scene capture attached to it that renders only the mesh that i input as the alpha, also use the render texture current and old as a way to interpolate between those two so i get nice transitions (that dont work atm cause the rt is rendered on the screen and im moving both textures when moving the char)
Oh right I remember this
sshort answer trying to get moba fow
like lol
for a twin stick shooter
Well if you get the blur working, I'm interested to see how the FOW looks
here s a cropped image for ui
this i can get np
or with full hard endges with min nodes
white is a building im in
i managed to break one of my iterations to show ill try to fix it to ss
ah here it is
i get the edges if use a rt with 24x16 resolution
but i get alignment issues on the screen depending on the resolution
the custom stencil one is perfect minus the rough edges and no interpolation
@celest birch
use this : float2 UV = GetDefaultSceneTextureUV(Parameters, 14);
then this
SceneTextureLookup(UV, 14, false);
you can offset the UV with some float2
did i mention i have no idea about custom shaders, im just randomly poking around hoping it will work xD
just to mention the top screenshot is just using a customstencil scene texture in alpha of a lerp and the bottom picture is 2 render targets
@lusty saddle here it is again
float4 blur = Tex.Sample(Tex, UV);
for (int i = 0; i < r; i++)
{
blur += Tex.Sample(Tex, UV + float2(i * dist, 0));
blur += Tex.Sample(Tex, UV - float2(i * dist, 0));
}
for (int j = 0; j < r; j++)
{
blur += Tex.Sample(Tex, UV + float2(0, j * dist));
blur +=Tex.Sample(Tex, UV - float2(0, j * dist));
}
blur /= 2*(2*r)+1;
return blur;
inputs are UV, Tex, dist, r
float2 UV = GetDefaultSceneTextureUV(Parameters, 14);
float4 blur = SceneTextureLookup(UV, 14, false);

for (int i = 0; i < radius; i++)
{

blur += SceneTextureLookup(UV + float2(i * dist, 0), 14, false);
blur += SceneTextureLookup(UV - float2(i * dist, 0), 14, false);

}

for (int j = 0; j < radius; j++)
{

blur += SceneTextureLookup(UV + float2(0, j * dist), 14, false);
blur += SceneTextureLookup(UV - float2(0, j * dist), 14, false);

}

blur /= 2*(2*radius)+1;

return blur;```input are radius and dist
tex coord into the uv?
hum
oh
did the change it in 19?
they
TexCoord into UV is fine. You can remove the top line
It's different in 4.19
so you can remove the top line and input "screen position"
and add this node somewhere in your material :
Wait why are you using SceneTexture in the first place? I thought you were blurring the render target
was wondering ye
need to use it with a rt
as texture input
need to blur the alpha
best case
Your original code should work fine. You just need to supply RT to the custom node and call it Tex
to stop poking around
this is the whole setup
Sorry, I don't know how to use "external" texture :/ ... For me, the input of a cutom node can only be float, float2, float3 and float4. I don't know about texture parameters...
i just use a channel from the texture as a grayscale
its float2
i mean scalar
wish unreal had a simple blur node for all of this
from what i understand, you dont want a float/scalar, you want a "texture of scalar"
the type name is "sampler2D"
Did you try to use a Texture Object ?
@fossil swan topic: Tire Trails: That BP video you sent is Rendertargets, but his track is full of custom Static Meshes, which would need a whole new system of managing shitload of Rendertextures
Yes, it was very interesting but reaaaaally complex for what i want
@fossil swan I know, but it doesn't react the same
Decals work pretty great 😃
ya that's looking pretty fantastic
there are people that love decals, and there are people that haven't figured out how to use decals
any good decal tutorials?
@celest birch Your texture needs to be Texture Object
@celest birch , was afk, ill try that tomorrow
as for good decal tutorials, this is a nice starting point https://www.youtube.com/watch?v=kLeKe2SHu78
YouTube
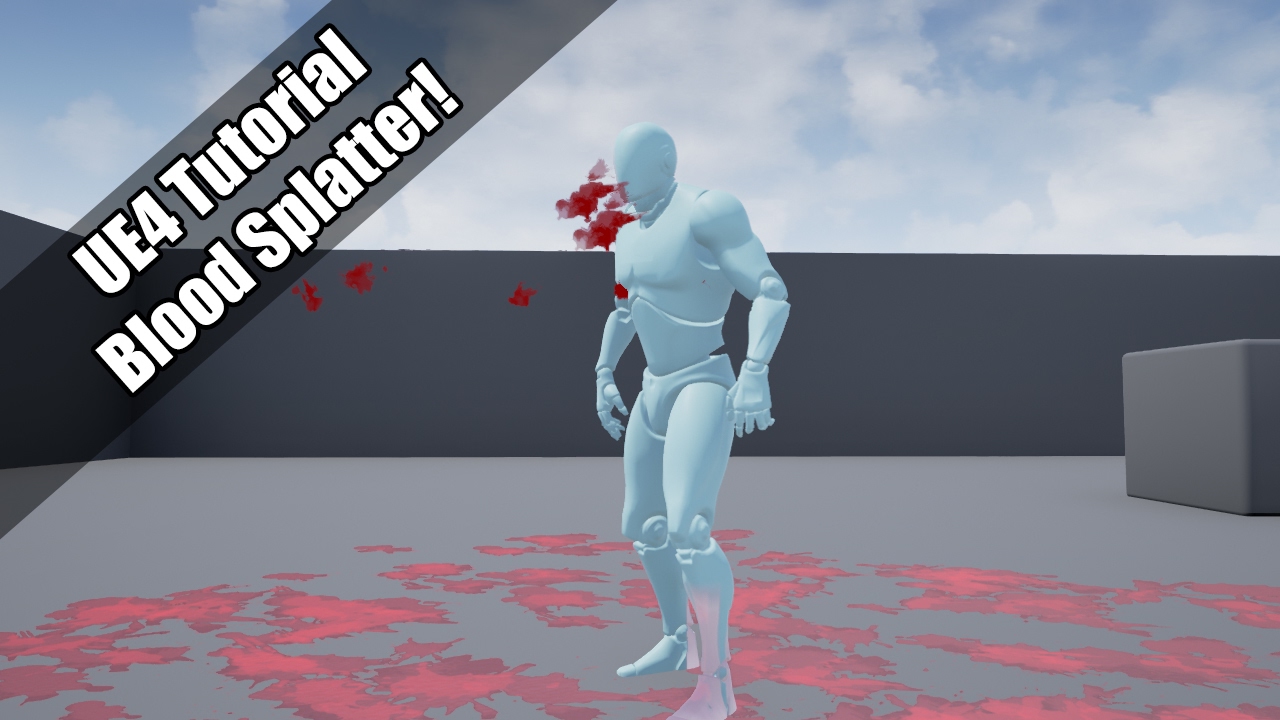
UE4 tutorial on spawning a blood spurt particle, which them adds decals to the environment! So violent :'( Request by - "Nickname Surname" (that's literally ...
if you don't have your decals rotating to align to surface like this...every other consideration is meaningless
once you get past that, then you can start driving decal animations via Decal Lifetime node (in material) + decal fade node (in blueprint)
ie - set decal lifetime to drive a flipbook with 64 frames, then set decal fade time to like 2 seconds with 0 declay and you'll have a nice animation
also i highly suggest getting a good radial uv function for decals so you can do animated things like expanding rings/splats etc. Polar Coordinates is one term for it
how can I get Maya viewport to playback my cached fluid faster
its only 200 res 32x32x32 it should playback faster than 1 frame every 5 seconds right
ah not many people here are going to know that one - maybe Glad might
Step 1. Get a better machine.
If step 1 fails, stop simulating in Maya for the love of Bob
If a 32x32x32 cache is that slow, you are either on a laptop or Maya is still as bad as it was when I abandoned it years ago.
I should learn houdini
the machine is a work machine and theyre not gonna buy me a new one
it's not terrible though
they might get me houdini though
😂
@cold sorrel WHat do you use to make sprite sheets? I just tried using photoshop's contact sheet but it doesnt bring the alphas in >:-|
Anyone good w unreal?
ok that took forever to make a 121 cell SubUV index with an alpha with photoshop
4000 in this serverr but no one in chats
you havent even asked a real question
@winged nymph Houdini can export sprite sheets directly. Although I understand Slate is good for making them otherwise?
I went through a basic tutorial with houdini today, it's pretty expensive for a studio though
but how would you generate the sprite sheet through houdini from exrs instead of through an effect created in houdini
Houdini has its own compositing context called COPs. The mosaic node will generate a sprite sheet from an image sequence.
I prefer to render out frame by frame from maya and assemble my spritesheet in After Effects. This way i can minimize waste of texturespace etc.
@Qwiggλlo#6669 they recently made optimizations to how fluids (depending on what fluids we're talking tho) are rendered in the viewport. Sadly they ship those only with Maya 2019 (as an update, for more money hehe)
@fossil swan just saw the Niagara keynote, holy damn
Slate is the easiest way to build sheets since it's purpose built for it.
Has anyone used Niagara?
There's a really old version in 4.19, but the real deal will come early access in 4.20
man I'm so excited to try that baby out
is there a particle system instance?
nope
however, i do tend to open up 2 particle systems at once and just "export" various elements from one to another
like 90% of my fx start that way
starting from scratch is annoying
Is still worth to learn cascade or I should just wait Niagara? :S
ya I export a lot of emitters
everythign isn't going ot be all niagara immediately
there will still be cascade based effects on the marketplace you might want etc
also, it's not like Cascade is the most complex software that exists, you can just hop in and do stuff
cascade probably wont go away in a heartbeat just because niagara is there
I have a question that kinda goes both to #graphics and here. It's about particle system being used for placing volumetric fog. Perhaps anyone here used that and is willing to help me out here
well I posted it on answerhub so here's the link:
tl;dr I can't recreate the particle system shown in the tutorial. What am I doing wrong
First, is vol fog enabled and did you set material to Volume?
yeah I've set the material to volume and vol fog is enabled, I just decreased the density so it's not that visible
Alright lemme test real quick
sure
Works fine for me I think
just in case I'm actually blind and can't see obvious error:
I've got pretty much the same material setup as you
@celest birch so you changed liftime, initial velocity and initial location in particle system
or anything else?
I just deleted initial velocity and lifetime
And changed it to burst (probably not neccessary)
@celest birch could you perhaps pack and upload that material and particle system somewhere for me?
I think I've googled everything there was to google. Also created a new project and tried making this with no luck
yeah, for some reason I just assumed that 😀
same here
well, thanks. Let's see if this is any different
well it works
and that's confusing
gotta find the difference
guys, when i spawn a projectile with a Ribbon particle system as a child to it, due to the high speed of the projectile i end up with the Ribbon over shooting it's tail towards the player (inverse of direction of movement), any idea how to fix this overshooting of the ribbon tiles ?
kinda like this guy actually https://forums.unrealengine.com/development-discussion/rendering/18340-weird-particle-behavior-ribbons
For discussions about Materials, Textures, Lighting, Particle Systems, and Post Process Effects.
i dont even have velocity for my PS
set ribbon to World Space not Local
and if that's not issue
then i'm tempted to say ditch the ribbon and use a beam
a ribbon that doesn't bend could be done with a ribbon and an animating material
via a Beam
ribbons are weird about velocity, too slow and they get all janky /foldy. too fast and they break
ok will try world space, maybe they better implement it in Niagara 😦
well it is already in World Space, my hack is that in the projectile BP i set the PS as auto active (false) then after 0.02 seconds i activate the PS so that the trail from the ribbon is not getting throu the mesh =))) fml
ah a slight delay
also you can simply remove some of the opacity at the front end of the material of the ribbon
ribbons operate in 0-1 space in your uv's
so if your ribbon was just a single dot in the middle of a square for instance, it would stretch into a really stretched oval, but it wouldn't touch either end of the ribbon
Any tips on achieving a blur like this in a post process material?
Circular blur?
Like a radial blur, but instead of away from the center, it's around the center
Might not be the most efficient way but I would use a 1D kernel and rotate it depending on its direction from the center
Never implemented radial/circular blur before though
This seems like a good way to do it: http://chemaguerra.com/circular-radial-blur/
Thanks
There isn't a good way to put a custom curve into a material is there? I'm trying to control lerping between two different morph targets based on an input. Trying to get a nice smooth A > B > C > A transition. Could stick it in my particle dynamic parameters, but I'm trying to use those to set a random rate.
you got like 3 options
at least
one is free up one of your dynamic parameters obviously....another is to stop using your particle color for particle color and use some of the particle color channels
those can be keyframed to drive stuff - in fact, i actually routinely use particle color channels to drive random rates on stuff
Correct me if I'm wrong, but those are both either "life of the particle" or "Fixed loop time" aren't they?
another option is just use regular old parameter float values, then drive those with Timelines in Blueprint
with color you got life of particle OR "at start" if you go with "initial color"
there's a very good chance you'll want to do this with a blueprint timeline
since then you get some really precise control over what happens in which order
I'm doing flock of birds. Trying to give each of them a blueprint seems excessive?
oh you're doing morph target wing flaps?
Right.
ah i see now
you want to go from morph 1 to morph 2, then morph 3, then back to 1, but skip 2 on the way back
Right!
hmmm i'm actually about to tackle this problem myself in the coming week or two....
And using the Dynamic parameter to adjust the time input to the flap rate, so they're not all beating at the same rate, which gets shot if I just put a bunch of keys in dynamic parameters that control the lerping.
Works great for two states, but three... I figured I'd just drive the time through a custom curve instead of a sine, no problem, but it looks like that's not viable in the material itself.
well you can kinda get around that same rate flapping thing if they spawn at different times
A fair point! Use case is birds sitting around that take off as a flock when you get too close, so the flying ones will all spawn at once.
i'm tempted to say do 1-2-3 at Normal Speed, then do 3-2-1 at 4x speed
1 second for main flap, 0.25 seconds for "un-flap"
i don't really know how birds do this so i should probably watch some reference...
We found there's this "M" shape that the wings form when they're pulling up that they don't have when they're going down.

birds flying in the sky about 4 feet away. great shots, beautiful sky
you know what i'm seeing here that is cooler?
the non-flap lulls
That IS pretty cool.
it's 1-2-3-2-3-1-2-3-2-1 ----- coast ---- repeat
they're not really moving that much
and it feels like similar movement both directions
like 3 symmetrical beats then a pause
Though that's more of a cruising cadence.
that's my kneejerk reaction to reference anyway - getting in that coasting would add more variety and realism than consta-flap
descending -> Flap wings, Ascend -- > Glide -- > Repeat
i'd honestly try doing it like that with just 1-2-3-2-1 - glide - etc and just see how it looks
and maybe dial down the wing flap motion to bare minimum
i mean unless it's ducks
ducks seem to flap like mad
you're probably doing crows right?
Yeah. I mean, I HAVE it with a symmetrical motion (for crows), but I've been asked to add the shape change on the upstroke. So....
hmmm
lol ok here's solution but it's ridiculous
ok so you can only pack 3 morph targets
BUT this will be in a particle system
so you could have 2 birds
downflap bird and up-flap bird, both transitioning at exact same end points
then you get 2 more morph targets
you simply vanish out bird 1 when you play bird 2
and vise versa
Packing the morph targets isn't the problem though, it's controlling the interpolation between them.
you could go further and do 3 birds, have bird 3 as "coast bird"
I was thinking of possibly driving speed off of up-z motion, which could work with that coasting nicely.
bird 2 could go from Morph Target 3 to 1
you just vanish one out and load in other
i think 2 birds is best solution the more i think about this - you could even do 3-2-1 on the up-stroke and make 2 on the 2nd bird a unique new morph target that does the "up-stroke" action better
i guess you could have some overlap risks or blink risk tho
another thing you could do is try to drive the world position offset by additional values - like mask wings in a gradient from tip to base with vertex color
then have them sorta "pull in" during up-strokes
Hm
hey everyone, can someone help me with my particle problem?
https://youtu.be/h3yBNVyWO7Y

How do i prevent this from happening?
i need the particles to behave relative to its emitters motion, i tried inherit velocity but either i did it wrong or it didn't work
i don't want them to speed up like this, they should behave like in cascade
is there any way to get the distance between emitter and particle and use it as a parameter?
@amber timber I'm not sure I understand; are they stationary against a moving camera?
@amber timber click "Local" checkbox on your particles
it's near the top, above Spawn
also you can get more complex with it if you want, you can have Local particles that then have World-based velocities etc
or Local with Local
options are Local space + World velocity, Local space + Local Velocity, World Space + World Velocity.
you can also parent emitters to specific particles for more weirdness but that's another topic


any idea how to edit particle's thumbnail? There's a hotkey for this as far as I know, I just can't find what it is
how can I get rid of that flickering frame
it's just a mesh emitter that loops through color over life, emitter dur 5, lifetime 5
Im guessing there's nothing I can do because it's just the order it goes through the modules
the spawn is set to instant burst 1 particle
There's gotta be something you can do about that. Tried messing with the distribution type or maybe the arrive/leave tangents?
I'd suspect the cause is located somewhere in Color Over Life w/ your point values (In Out Arrive Leave) . You try finagling that stuff?
@winged nymph use at least 2 particles with overlapping lifetimes and set them to spawn at 0 opacity, then die at 0 opacity
oh I forgot to show the graph
if you really want this thing to loop then you're better off just doing some fade in and fade out with constant spawn rate not a burst
also what's the total duration of this item?
5
no, you said 5 but then you said it restarts
so like what is this thing - like a fire that lasts a minute?
how many loops?
it's a ribbon that lasts 5 seconds
infinite loops
well it's not a ribbon
it's the static version of this ribbon effect
it's for the preview/UI to show which effect you've chosen
in our game
well one way or another you gotta go to 0% opacity at start and at end of the particles or you're going to give engine a headache trying to line up 1 frame with the last
How do you get chunk positions? Can you only do that in a custom build? Ive read that DMs are like skeletal meshes, but I've no idea how to get them bones. Most of the threads on the subject are old and don't end well afaict.

UE4での破壊×電気エフェクトのテストですー
testing destruction × lightning effect on UE4
#gamedev #ue4 #effect #realtimevfx https://t.co/TRvrcbdysL
Retweets
158
Likes
600
hey so a really dumb question, I dont know almost anything about cascade, I am prototyping and I need a simple trail for something moving, I already managed to do that, however I would like the emmiter to emit particles only when its moving, how might I achieve that
What causes the emitter to move?
Quick way is to call Activate/Deactivate on it when it's moving/stationary.
its a child of a component that moves based on a timeline
Cool. So just call Activate on it when you have the timeline start and Deactivate when the timeline stops
Show me a ss of it and Ill show you where to put it.

set it to constant curve, add at least two inputs
birth = 0
death = 1
change values between birth and death to change alpha amount
does need particle color alpha hooked up on a masked or translucent material
you dont have a particle color set up in the material
Any idea why I am able to see particles when I am simulating, but not if I am playing
oh right!
place down particle color, multiply rgb with albedo
multiply alpha with alpha and follow some generic particle tutorials while you are at it :p
@untold yoke can be a lot of things, from bounds to them just not activating.
they are activating, as they are during simulation and there is nothing that would stop them on begin play. I am on a project from mobile
so maybe this type of particles isnt for mobile, not that i changed it in any way
its just the default particle emitter
really basic stuff
@fossil swan You absolute hero
need to know more, give as much detail as you can along with a video and or images.
what you are describing could be a gazillion things without any proper info.
I just created a particle emitter actor, and changed the material to a red unlit one
@untold yoke should work in that case, might be something related to the way its activated

check the blueprint, be sure auto activate is on
it is
all I can help with is excluding if its a cascade issue, and unless both the background and the particles are transparent I doubt thats an issue
the background isnt trasparent but the particles are
I tried switching to a opaque material, but it still doesnt show
I tried with the default explosion particle, and that one shows up when playing
@fossil swan figured it out
the screen alignment was set to camera facing
and looks like it doesnt work with ortho cameras
oooooh you are using ortho
that wouldve been valueble info to know hehe
also apologies for not asking
since its not something I use a lot I didnt think about asking that
Yeah, untill i make the conection that the difference between editor view and playing is the camera PoV
took me a while sorry on my part as well
thanks anyway
glad you figured it out
getting a problem with masked lit particles changing color depending on camera rotation
ok nvm
i need meshes for it to be correctly shading
was trying to lit a plane from the sides, but i guess it would work with a normal map on the particles
@fossil swan just a quick one if your still around, how can i change the area where the particles spawn so not just at one point in space
i need them in a radius basically
used to be a sphere / box in source engine
location > sphere and/or cylinder
cheers mate
Is here a good place to ask how the guy's getting DM chunk locations to pass into beam targets?
https://mobile.twitter.com/agni_flare/status/981139687740907520
you can get location info either from blueprint or cascade.
emitter init loc, emitter direct loc, etc
Cool. Know what node it might be to get chunk locs? I got the particle and dm in the same actor for easy ref.
it might be seperate emitted chunks in this case
so each one is just a mesh emitter
and the beam (not as much experience with beams) got its location trough emitter direct loc or trough blueprint
though best bet is its using the lightning tutorial from epic
On this week's livestream, Alan Willard demonstrates the creation of complex in-game effects using Blueprints, particle systems, and shaders. He shows how th...
Cool I haven't seen that one. Hopefully it uses destructibles. Can't find how to get separate chunk locs, even though the general consensus is that DMs are basically skeletal meshes.
Thanks, Luos, ill check it out.
its not using destructables I think
if it does, its much more interesting, and since I have zero experience with destruction stuff in ue4 im not sure if that can be done out of the box.
Ah. Np. If you referenced it its gotta have other valuable info in it.
That would make sense. All my searches led me to conclude u need to modify the engine to get chunk transforms. Then again all those threads are like 2 years old, so I was hoping that wasn't still the case.
Much appreciated.
I have a question about Emitter Initial Location module. This doesn't seem to work with modules like Sphere - the Sphere remains at 0,0,0. Is there any way to make it work?
if I had 5 particles from some mesh emitter, let's say 5 sphere meshes and I wanted each of them to emit some gpu particles - how would I go about doing that?
you want to emit particles from the surface of a particle mesh?
i think if you could clarify exactly what you're trying to do, along with the context (why you're trying to do this, what it should look like etc) the answer should be forthcoming
Alright so:
I have a particle system
I have two emitters in it
One emitter is Mesh Data type and emits 5 spheres at random initial locations
Second emitter has Initial Emitter Location module pointed to emitter #1 on it so it's particles spawn at location of the spheres from emitter #1.
That all works fine so far.
Now, if I add Sphere module to the 2nd emitter, it should get me 5 spheres spawning those particles at desired locations - at least that's what I thought.
the Sphere module of 2nd emitter remains at it's origin
and there's only one
@fossil swan
thanks for your help today man!
I have 1 last question if you're still around?
if the camera cant see the particle directly
it turns off entirely
set the bounding box of the particle
if you can't see the bounds - the particle disappears. That's just the nature of it
rightclick in empty black module space, now on your right you can see some particle info and also has some bounds info
and yeah, click where luos said
weird bounds are weird hehe
@ruby ermine ok i think i know what you're asking and i'll test that out in a second, i think what you're saying should be possible

hehe
those asians got great vfx
it's nutty
i think one thing any VFX artist could take away from these for their own reel - do VFX of a tiny character on-screen with huge screen-filling particle systems
Diablo-style
makes everything seem super dramatic/awesome
can't do that on VR.....
that over-head diagonal perspective helps too
only difficult aspect of this advice....people hiring probably are NOT making a game like this lol
most games with a camera like this have some cool skill effects since they're always perfectly shown on the screen
and yeah, the effect / character size ratio really makes it feel powerful
it's a bit of a double edged sword doing fx like this - it basically dominates EVERYTHING - all gameplay, all visibility. if it isn't amazing, then it ruins game
if it is amazing though....boy does it make the fx person look good
true
btw Qbix
is this what you were trying to do? https://i.gyazo.com/6827118b7ebba7dbb6b3e5f64162efa1.mp4
the red ones are spawning relative to the emitter initial location + sphere location
the green ones are the source particles
huh
you did it
does it only work for gpu particles then..?
wait I messed up something it's just not working. Let me set up a new particle system from scratch
no i see the problem
huh
switching the green (source) ones to gpu
that's what breaks it
those ones cannot be GPU, but the child-particles can be
oh wait maybe mesh data also breaks it
no no just the source being gpu i think
no it doesn't
wtf why did it not work in my effect from 2 days ago
I mean, still doesn't
gonna have to search for the cause
okay I haven't been so confused in quite a while
from what i'm seeing, you can't use emitter initial location to follow GPU particles at all, in any circumstance
it works now
thanks for the help I guess lol
I didn't make it follow gpu particle, not once
¯_(ツ)_/¯
but good news is, this goal is do-able
oh I just remembered what I needed it for
when you spawn the tiny sparks on a sphere with no velocity
can you somehow make them rotate around the center of that sphere?
or do you need a vector field for that
orbit
orbit modules are really good for this but they require some tinkering to understand
oh and fyi, GPU particles behave worse with Orbit than non-GPU
keep that in mind when tinkering
you can kinda do this with pivot offset....but not well
by worse - i mean GPU particles straight up will not do certain kinds of orbit rotation axises
i don't really understand why this is
literally if you take that thing i just shared and change to GPU
exact same emitter just switched to GPU
😛
wait, I didn't explain the whole idea, sorry
I meant rotating them on one axis
I couldn't get it to work
perhaps I wasn't using the orbit properly

A compilation of all Warlock magic spells and their animations from the Playstation 1 role playing game, Vagrant Story. ----------------------------------- V...
like in this video
before each spell there are red particles around the character
like, when he's channeling
and they rotate around Z axis
any way to have my Post process on particle preview viewport? like with static meshes
ya orbit will work good for that
you'll have to use some other location modules to nail it down
I think I figured it out
thanks for the help 😀
alright last one, I feel bad spamming questions like that but I just can't figure that stuff out D:
can I make the particles spawn on a ring? Like a cylinder module but hollow inside
ya
cylinder location module with zero height and spawn on surface only
or sphere, same deal, but no positive/negative Z
surface only
wait i forgot about surface only
yeah
missed that part
well nothing changed ._.
oh wait
it works with the sphere module
thanks!
also this is do-able with orbit again https://i.gyazo.com/5d367f786972dce0b44e666de6889405.mp4
yeah but then they orbit. Spawning them on a circle and adding some Z velocity also makes for a nice effect around a character
just trying understand all the tools
ya can do orbit with no spin by setting rotation rate to zero
and rotation amount to -1 to 1 on Z
i'm not saying this is the way to go, but it's just good to have a lot of options
yeah, I'll keep that one in mind
i have one particle system full of emitters that have different orbit experiments
i use it for nothign
just for testing orbits
because i can't remember how i did stuff otherwise 😛
like this weird one https://i.gyazo.com/02a19d6112d6d59c95ba82ac47a83cfe.mp4
for the record i rarely ever use orbits in anything either, but you just never know
I used it like.. once so far. I think. But probably because I didn't do many effects yet lol
started making bigger things just few days ago
yeah exactly. Creating effects is suddenly my favorite part of working with ue4
one of the best parts about it - it's probably the only discipline in game development that gets easier the longer production goes
yet still remains super important
ie - you create 50 spells for like 10 months, then you're asked to make number 51
number 51 will likely take 5% as long as #1
as it will re-use a ton of core elements
job just gets easier and your art looks better the longer things go
like a work-effort-pyramid scheme
I often find myself imagining some weird effect, going to Blender and then thinking
how the hell do I create a mesh like that 🤔
that's a lot of time spent on things like that
but later on you just know right away
there's some new particle editor coming to replace cascade? the Niagara? Or am I getting it the wrong way
I've been living under a rock for quite a while when it comes to ue4 news
Luos knows more about it than most of us
it's not really clear from any images i've seen that it makes things more user friendly for artists exactly
it's more like a node-based way of making things more re-usable or something
i haven't heard a solid "pitch" for why it exists, but i don't think there's near term plans to remove cascade
best to watch the gdc talk about niagara, shows more than I knew about it back then besides a few small details
ya but could you sum up in 3 sentences or less WHY we should want it?
sorry i know that's a bit rushed
i skipped around a lot in that video and saw HOW things worked, but not WHY
basically you can make your own modules instead of the few we have in cascade (which comes with its own node based editor), you can still tweak each module as if they are instances/childs, and everything is accessible related to particles. it even accepts most sim data from houdini sims and use that to trigger or control other aspects
its going to be porn for us vfx artists
compared to the control you had in cascade, you are a god in niagara and a small rodent in cascade
@fossil swan and you can abstract a single effect and reuse it constantly
wich is something you cant do in current cascade
for people like you, who sell in the market, is going to be god tier
becouse you create modular effects
which is bloody fucking annoying btw (in cascade)
and then people reuse
yeah i have to duplicate an effect to have it in a different explosion
and scales dont scale well
wich is a massive pain
I never knew how much i hated that till i saw what you can do with it in niagara hehe
hmmm ok i can get behind those concepts
replicating everything does feel wrong sometimes
and then being unable to quickly update changes to the initial node settings across all copies....
instead of 4 parameters and some other things like particle color.. anything can be a parameter for whatever you want
instead of having color on every module
you have color as a global param
a base color
for example a magic ball could have blue as core color
< afk
and then explosion is blue, sparks are blue, and the smoke is blue-ish, and thelight is blue
but then you change it
and everything changes
cascade is really restricting, niagara won't be
well you might still not have some features for gpu particles etc
hmmm that sounds nice
one color to rule them all
i've been using multi-gradients for that but it's still imperfect

Shaun Kime (Senior Rendering Programmer, Niagara Lead, Epic Games) walks through Unreal Engine 4’s Next Generation VFX toolset during the the 2018 EDU Summit...
cutest bird evar
15:00, apparently can make modules that improve lod's/scale variables depending on distance etc
goddamn
hnnng

I'm gonna have to learn the new editor D: seems exciting tho
hi everyone, i'm working on a post process for my game but i can't figure out the right nodes to use and i'm stuck since pp is the only field i'm not experienced.
@safe merlin If you post your question, someone will help you if they can
Not sure if the right place, but i have a real general question im curious about... What is worse performance wise and how badly: more polygonal grass with a super simple shader, or simple plane grass with a more complex shader(read alphas)??
on mobile if that matters
@fossil swan Can you pin to this channel the Youtube video you posted in #work-in-progress a bit ago? "The Artistic Principles of VFX #1: Gameplay" one.
I really like it when useful guides, tutorials, and videos get pinned to various channels here.
did you watch those videos? I only read the pdf, watched like 10sec of the videos and thought it only covers the pdf
I did not watch those videos because I am a shallow and stupid person
I am guilty of judging a book by its cover and I am sorry
to update on the fow i was working on and some guys asked to see how its going, here is one of the iterations we are considering

have a procedurally generated mesh with line traces attached to the player pawn , the mesh has a stencil value and i just pull that stencil value to the post process as alpha for a lerp, also smoothed the edges of the stencil but the base material has just the lerp post process and the scene texture nodes for it to work
very nice
i see there is some wobblyness. Have you thought that you could have a colision only "perfect representation" of the map, and trace on that?
not really the normal collision, but a manually made perfect collision
also, are you using async traces?
they have a huge performance improvement
eh ye the wobbliness
we also have a workaround that by spawning stationary meshes that is another iteration tho
i was mostly commenting that you could have a extreme low poly walls only mesh
no idea about the traces i gave it to the programmer to solve
not sure about that tho, atm the whole leveh has about 25k actors, ill have to reduce, merge, that also trying to avoid having too many polygons
but ye we thought about having collisions just for the raytrace
mostly just a "2d" mesh
with exactly the walls
and an extrude up. Very simple
no walls nor ceiling nor misc objects
raycasting against a single mesh could also be much faster, but thats probably not even needed
yup, the idea is sound but not sure about it yet, cause of the high complexity and time constraints
fun fact, here are the ways i tried to do things
PP_Fog_of_war__simple
the idea was simple xD
We need better refactoring for the Material Editor.
Select > Right Click > Collapse to Material Function
just like BP.
I really wonder how people can work with Materials like that Oo
oh this is good for keeping something close to hand and making quick changes, ofc we use functions later on
why is everything black inside my warehouse even after i put a point light in it i have tried a lot but it wont work
aight
any way for a particle input to be the same of another module, i want the initial location sphere of multiple emitters to be the same as the radius of the first emitter which is a parameter
not trough cascade, so you'd need em al to be parameters controlling trough blueprint.
oki
Have you guys seen this: https://www.facebook.com/100008437454260/videos/1867033046921259/
It's like comets flying in clouds, insane volume material stuff
Looks nice. Though it seems he's using volumetric fog to do it so it's not really scalable to a full sky
^ funny how there are still people asking what engine it is, even the post starts with "ue4" and shows the entire editor with the unreal logo showing twice.

People do realize the "propagating light trails" are just additive sprites right? Right? Hold me I'm scared
is there anyone willing to help me get a specific effect with post process? i'm not an expert of this field and i'm in deep sea
i think you should show what you've got, then explain what you want
that'll help
everyone here has varying levels of expertise on these things
i might be able to help - no idea yet
Not sure if this is the right section, but does anyone have any idea how to make your character viewable through objects like trees in a top down game? I don’t want to hide the trees, but more or less give a looking glass down to see my character. Almost like a sphere cutout above him
i'm contemplating buying some fx from marketplace
made by the guy called Kakky
are they any good?
is there are a way to "preview" instance parameters of the emmiter? Like for example I have Start Velocity parameter and in Cascade nothing is obviously moving as nothing is being set in the editor
I have a procedural mesh (sphere, planet) interesecting a static mesh (sphere, water). I want to color the coast yellow, like a beach etc. So the parts where the ground is intersecting the water. What would be the best way to go about it?
You can use a radial falloff around the object position of your planet. You’ll need to use radiusOfWaterSphere + elevationOfBeaches as your mask.
Look up the ObjectPosition and SphereMask nodes.
You’ll also want to clamp, pow, multiply or SimpleContrast to control the fuzzyness of your beach edge.
Alternatively you can just get the Distance between the ObjectPosition and WorldPosition and divide by the (WaterSphereRadius + BeachHeight)
Sorry not at home at the moment or I would just paste you the nodes.
Thanks! I will give it a shot
If you could post the nodes afterwards tho it would be highly appreciated, since I might not have the time to test right now
I can but not home for another 8 hours. Im traveling
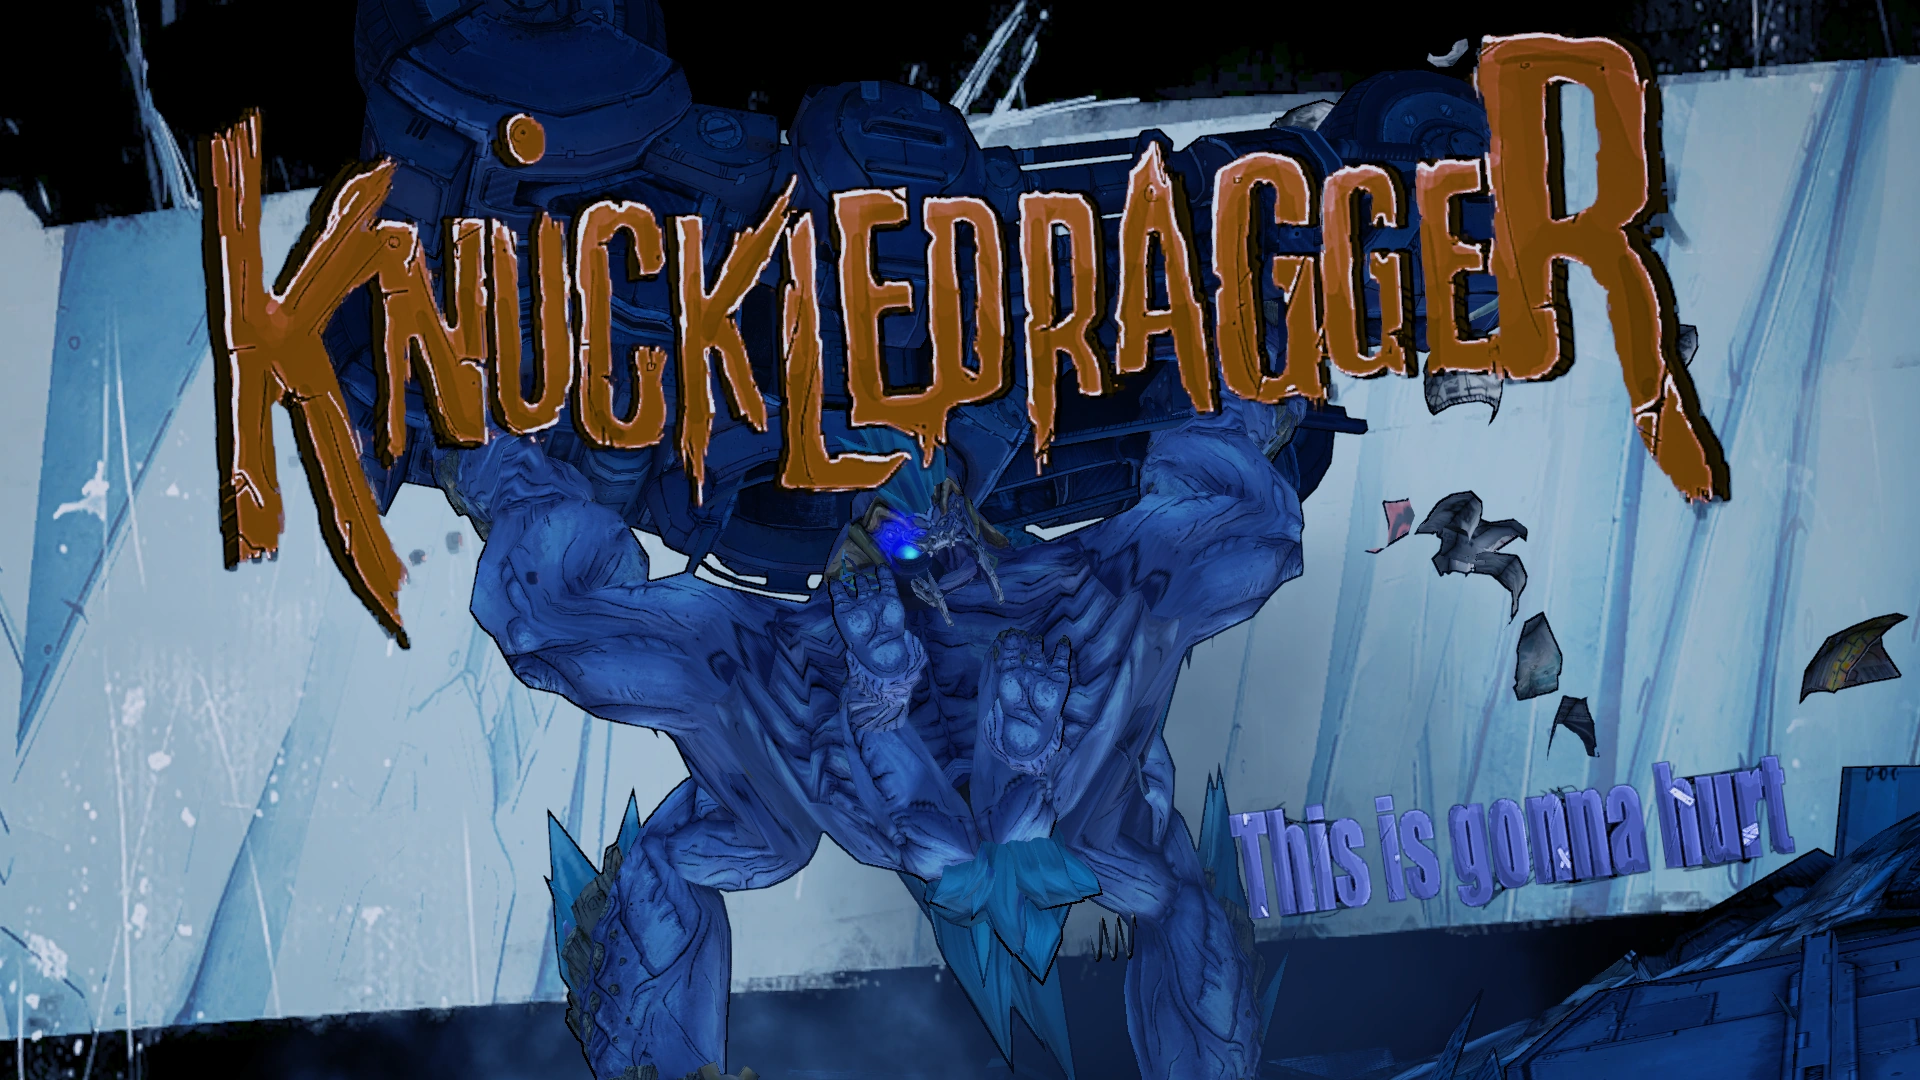
Hello All! I was wondering what the best way to render an enemy title card on screen akin to this Borderlands 2 image (https://vignette.wikia.nocookie.net/borderlands/images/a/a4/Knuckledragger.png/revision/latest?cb=20120919213305) I was thinking it through and thought, I could either model the actual lettering and toggle the static mesh. or i could render it via umg. I could disable player movement then enable it after the image plays through UMG. Which do you think would be the best way?

@cinder lichen I've never seen the Borderlands one in action, but if it's just textures, I'd use UMG. Using a 3d mesh for the lettering would take more time, but would definitely make it pop more.
Afaik, UMG doesn't support static meshes, so you'd have to handle the textures and mesh animations separately.
Imo, the coolest way would be to create an Actor that's got the static mesh and a UMG widget on it. Spawn that actor whenever you need. Adjust the text mesh visibility/opacity and transform (loc/rot/scale) via timeline, in tandem with the UMG animations.
in borderlands it kind of rotates around a bit

A gameplay video showing all of the bosses of Borderlands 2 including all of the DLC and Headhunter DLC. Enjoy! ►►►►►Click Description for Boss List!◄◄◄◄◄ Do...
ok I guess it just scales a bit
itd be cooler if it rotated though
reminds me I Have to beat borderlands 2
Ah cool. Thx for the vid.
If it rotates, that would mean it's either:
a) a separate 3d static/skeletal mesh
or b) it's using that scene capture technique (https://answers.unrealengine.com/questions/184475/use-static-mesh-in-umg.html)
right?
Totally looks like a standard, easy UMG to me. Far easier to do/manage than the scene capture.
Regardless, this question is prolly better asked in the UMG section. Doesn't have much to do with vfx, I don't think.
In borderlands we did it using matinee. In ue4 i would recommend using a BP to manage it all.
Or perhaps sequencer depending on the complexity
Most of the work was a single material with parameters. Some post fx and and animated mesh / camera
Matinee handled the transition from gameplay pawn to skel-mesh with animation.
Awesome. I was totally wrong. Sorry, ook!
@fresh harness NP at all man, if you need any additional details let me know!
Anyone here know how to have a VFX fire on contact with a static mesh?
@indigo jolt Thanks
hey guys, i have a problem with an mesh fx. i want it to fade in/fade out, so its not at obvious when a new one is spawned so i can fake some variations with rotation etc. i tried to do it it via the alpha over life, but i cant get it to work. its just a very basic mesh with an additive material on top. any clues where to start?
@trail quest what happens if you just multiply the alpha with a scalar parameter, did you try changing the parameter from a bp?
@celest birch doesnt change a thing. ill try to record what i have now and screenshot the BP for the material, for some insight

The Material blueprint
so you want it to fade out
did you try particle lifetime->1-x>multiply with opacity
eh cant see tho
but i think some things dont work on gpu particles
or beams
hm cant create a particle lifetime node
in the material?
yeah
erm
sec just closed the ue
particle relative time
eh
but if its a beam i have a feeling it wont work
maybe drive a scalar parameter by hand somehow, thats how i approached issues with timelines
its a mesh fx
np, thanks for the advice! 😃
when it reaches a value try inverting
simplest usea blueprint xD
with timelines
but wait if its in use in a particle shouldnt it work anyway?
imma try it
it worked 😄
cool
@trail quest default way of solving this problem is putting a Particle Color node in your material multiplying your Alpha out put of it against alpha in material, and color against color or whatever you want
but if you need additional controls - dynamic parameters are always handly
handy
@indigo jolt Do you know of a good tutorial on Dynamic parameters?
Paragon uses the eff out of them, but I can't grasp the ins and outs of'em.
Different subject >
Isnt this new to 4.19.1?
https://i.imgur.com/PB7OBXF.png

Question, I believe it’s visual-fx related. How would one go about showing your character in an open world environment with tall trees in a TopDownGame?
I tried using material masks that have locations driven by my character and tried it using my cameras location (both modified after to give a good angle) but it doesn’t work the way I’d like it to
This was the result
It’s alright, but it doesn’t work well with tall trees
And zooming of the camera. Would it be smarter to use a screen render with an added UI to display it and try lining them up?
I have these actors that are being moved with seqeucner transform keys
and I can;t get inherit parent velocity to work
anyone have a solution?
@fresh harness I am not sure. But I am pretty sure it is
@Pierce#8582 Generally speaking games make trees go transparent when near the player to pull that off
or mask + dither
My idea would be to have a Parameter for the Players World Position and use a 3D SphereMask using that World Position to mask the Tree's Visibility
Hey all! Does anyone know if theres a way to move all XYZ tangents on a single point at once in cascades curve editor? I'm trying to spline my size curve but when I move the spline handle I only manipulate one curve at a time
@ebon copper
not sure if solution but I think @drowsy lynx mentioned it in #graphics
https://cdn.discordapp.com/attachments/221799195806400512/431931270058999824/2018-04-06_23-40-27.gif

so might want to do a search from: his name on discord
That did the trick! cheers
anyone have any idea how to pull custom stencil data into a masked material or how to make a material that when two objects with it overlap they cancel each other out(go opacity 0)(also masked material)
does anyone know of any resources on something like styling options for single developers to make something that doesn't look like total ass? maybe just a portfolio of minimalist art styles? kind of a vague question
@fresh harness i think i know one from ImbueFX, but no they are not new. i've been using the eff out of them for quite a long time now
all you really have to do is drop the dynamic parameter node into your material, and give the parameters names (if you want) and pick one or more to use. they're great for keyframing events over time in particle - like adding to UV's to do a stop-start Panning action etc
then you open up your particle system, right click, add parameter, then once that's in right click "refresh" and it'll refresh the names to show the things you named in the material
and change it to a constant curve value, and start tinkering
or whatever you need
Sweet thanks, @indigo jolt. Much appreciated. Couldnt find usage instructions on it anywhere (doesnt help that dynamic materials are more commonly used).
Ey guys! I got le question about particle systems! I would like to make a Fire particle, which like has half local space and half not, here's what I wanna make, I wanna make a flamethrower and when firing and moving forward around atm the flames are remaining in place which means my character goes right throw them XD I would like to make something like Moira's Heal beam/spray from Overwatch when walking it does get left behind and it's only getting affected when the character looks left right up down thats when it like gets left behind like fire should be haha
anyone could point me to the right direction to make my fire only react to left right up down and not get left behind when I walk?
Thanks lots! All I want are some tips on where to go next 😄
is it possible for the particle system to create a sort of fire effect on a sword that also has real time lighting?
I wish we could have event generators on GPU particles 😭
Does anyone know if its possible to spline particle modules (such as initial size, initial velocity etc) using emitter lifetime to create "tapering" bursts? Basically, I want my emitter to keep spawning particles during its designated lifetime, but taper the size of the spawned particles based off of the emitters lifetime.
I have set up an emitter with a lifetime of 2 seconds, containing an initial size module with its distribution set to constant curve, where my particle size in XYZ is "10/10/10" at my first in value (0.0) and "1/1/1" at my second in value (1.0). This almost works like I want it to; Spawned particles are large when the emitter starts and gradually becomes smaller as the emitter runs. However, after 1 second has passed, my spawning particles stop scaling and remain at "1/1/1" for the remainder of the emitter lifetime. Now, I could go around this issue by simply matching my second in value to the emitters lifetime (2) but this feels counterintuitive and could potentially create a lot of extra work if I decide to change my emitter lifetime. Have I just misunderstood how in value works with emitter lifetime, or is there a way to make this work?
@ebon copper in this you should set the distribution curve time to the duration of the particle.
not sure why it doesnt take loop time or whatever as its 0-1 value.
in the case of you potentially changing the emitter lifetime later on, you might want to control it trough a blueprint parameter instead.
add a small camera offset @celest birch
either a negative value on smoke, or possitive value on fire
and since its camera offset doesnt matter what angle
it offsets from camera
hence, camera offset
:p
np 😃
is it possible for the particle system to create a sort of fire effect on a sword that also has real time lighting?
add some dynamic lights to the sword in a blueprint
Id do that over using particle lights
so particle effect for the fire, and dynamic lighting in the bp for the realtime lighting?
yea, should be cheaper than trying to use particle lights.
especially if you want shadow casting and other goodness
@fossil swan Hi there, I saw somewhere your youtube channel, but could you please whisper it to me ? 😛
@vast bramble https://www.youtube.com/luos83/

YouTube
Besides a few personal things, this channel will mostly be about pewpewpewparticle effects. 99% of those will be made within ue4 with the use of a variety of...
@fossil swan Thanks, exactly what i want to learn the most in UE4 😄
anyone got some good EMP VFX references ?

Pinterest
[分享] KMS 1.2.178 末日反抗軍+重砲指揮官 超技能資訊 第 1 頁 :: ★嚐鮮★ :: 新‧楓之谷系列 討論板 :: :: 遊戲基地 gamebase
most of that is stylized
but there's a lot of good examples of shapes and movement
Think this can be done in unreal https://i.imgur.com/w5gAtAv.gif?
Yes
What is the technique?
Render targets
THanks!
@celest birch So that a combo of render targets with good material and good textures?
Yup
Yeah looks really good in GoW
Dunno if they have anything else going on
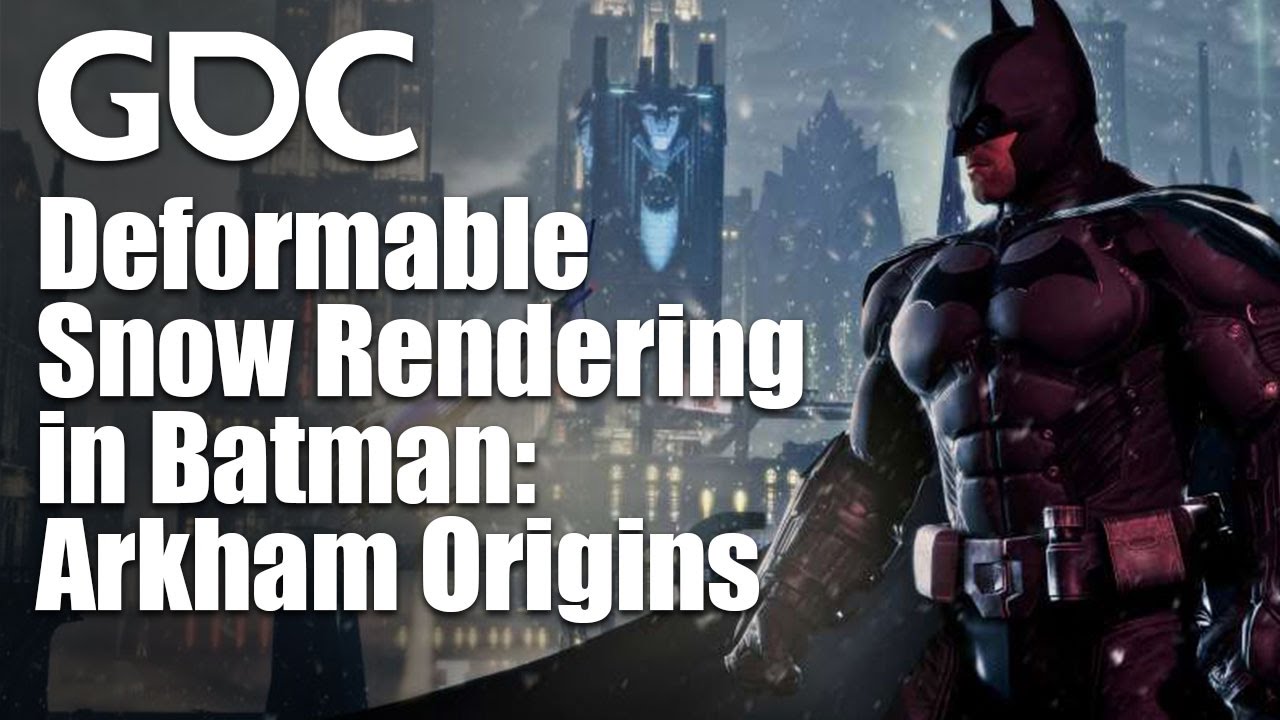
In this GDC 2014 session, WB Games Montreal's Colin Barre-Brisebois explains how his team created an organic snow system that didn't destroy CPUs while creat...

Dev Blog: Snow Tech and Houdini Simulations Mike...
My comment may have been a bit vague. You can achieve the effect with a combination of Render Targets, tesselation and displacement
Does anyone know of a way of triggering an Emitter inside the Particle System played by a Timed Particle System Notify using an EventReceiver? Like on on deactivate
fml, that snow in GOW looks so extra fluffy
gears of war just lost their acronym huh?
there's detailed explanation of the rise of the tomb raider snow on GPU Pro 7
Gotta buy it though 😛 Unless Google Books has a preview of that exact section
while render targets for this type of stuff is easy
one thing I always wondered, how to do it for large areas?
it's a shit ton of memory needed
Low res RT for large areas and higher res for area around camera
ya, but you still have hardware limits
I am thinking landscape btw
the arkham one just has small surfaces and it is somewhat easy to manage memory there
You do it, the same way, cascaded shadow maps work. Cover area only around the player.
to do it, the best would be to have a render target centered on the player
materials around the player read from that texture, and add the player offset
that way you use 1 texture for a lot of materials and meshes
and its coherent
and its only in a radius around the player, wich lets you bump the resolution without going ham
should be possible to actually do it fairly cheaply

I implemented a toon+cel shader post processor and it seemed to be behaving pretty well in smaller areas but when I try it in a larger one I get this dithering/ghosting effect
could anyone tell me if this is likely the cel/toon implementation getting weird on distant things or some type of AA or other rendering featuring causing it?
i.e. if there's an engine setting I can turn off to avoid having to actually fix it
pretty new to the engine
@runic ledge Make sure those materials are opaque or masked, not translucent, so that they can write velocities to the velocity buffer; that's required for TAA reprojection to work.
Still, a bit of ghosting can sometimes be difficult to avoid on certain types of scenes. Switching to FXAA should eliminate the problem altogether, if TAA really is the problem.
scifi megacity
btw its Madrid, spain, with a procedural filter on top XD
testing some of the houdini procedural stuff, you can load maps from OpenStreetMap and then do things on-top of it
makes it real easy to have a autogenerated city
@fossil swan That's a beauty.
yea had a lot of fun looking at em all
i need to dissect them more for my game
too bad my game is PSVR (ultra low gpu) and stylized, so some of the high frequency ones might look weird
but just saw that muzzle flash
dat looks great
maybe i can do something similar for my fire spell
i find interesting they are using meshes this much
Hi guys, is there a way to scale a particle DOWN based on its velocity ? The 'Size By Speed' module only seems to allow for scaling UP
should work. you could also get particle velocity trough the material and with some vertex manipulation make em smaller
set the max Scale to a number < 1
setting the max scale < 1 or = 0 just makes them disappear
1 = regular scale - max scale.
0.1 is 10% of that
you might want a low speed scale, and get the min desired size as its initial size.
or again, try to use the particle velocity module in the material and change size of particles trough vertex
no matter how low/high I set speed scale or max scale, I can never seem to invert the effect
invrt doesnt work, but you can get it to 0.001% its innitial size
so if that doesnt suit you, you'll need to do it trough material
I'd like that, but even that I can't seem to achieve
it's always larger when fast, never the opposite
currently no time/able to set a material up. perhaps later. (sorry)
no worries, thanks for your help !
i'd just do a Size by Life and match up values to where things are hitting that peak
unless your velocity is varying dynamically via Blueprint-driven particle parameters....then i'd drive the size by life by blueprint driven particle parameters as well
Isn't it somehow possible to place actors via a material (like rock meshes on a rock texture)? Can somebody point me in the correct direction? Saw it in an example I cant access right now.
yup
it CALLS itself "grass" but it works for rocks, trees, you name it
relies on landscape
don't know if this is possible on static meshes...
Aah, thanks a lot. I will check it out!
it actually runs faster than Foliage Painted objects btw
😃
just keep in mind that you won't be able to do "harvest" or "destruction" with these
Oh, that's great. I need it to save myself some work and don't want to paint all the foliage if possible.
only light, shadow, and collision
That's fine, its just some light decoration : )
but it's great for workflow