
#aec-visualization
1 messages · Page 14 of 1
@deep valve yes only first image baked rest fully dynamic
When creating assets for an arch viz scene using Unreal, do you all MOSTLY use Color ID maps for asset creation? Or make a texture set for let's say, castors the table top another texture set?
I feel like the answer is the latter but I don't know
I try to use tiled textures wherever possible
I can't bake lights anymore
swarm.exe gives me this error: "Error: System.IO.IOException: The process cannot access the file 'C:\Users\JanLaptop\AppData\Local\UnrealEngine\4.24\Saved\Swarm\SwarmCache\AgentStagingArea\v1.B11FB9D1D46D31BA775A9B8C512185CBA6DCE19C.mtrlgz' because it is being used by another process."
any ideas..?
Alternatively, anyone have an idea where I could get a complete list of my level and these hexadezimal numbers that are associated with each material?
I think my swarm crashes at one specific material but i can't make out which material it references in my build
solved it
Hey guys, do anybody know a place that does archviz in unreal that is recruiting?
I guess people found it https://twitter.com/HighlySpammable/status/1225321821248970759?s=20 :p

I was just going to ask about that 🙂 ... any tidbit of info @hallow arrow you can provide? Can I do a build and start playing with it?
thanks
also you'd better use this one as it fixes some build problems
Awesome, thank you
do you have large area lights in the scene?
you then need to tweak BaseLightmass.ini to increase num of shadow rays for them
NumPenumbraShadowRays=8```raise to 32 and see
Thank you, much appreciated !
I made them non-area lights for now and hope that this fixes it
If not, i'll go with the ray incresae
@hallow arrow How do we get rid of this kind of noise with GPU Lightmass?
bump num of samples - the only way
or increase lightmap res so they are small enough not to be seen
which samples?
or
ok that 2nd one seemed to do it. Any recommended settings?
Also I know there's the long post of the forums for GPU Lightmass but it would be nice if there was one summarized how to, common problem troubleshooting & best practices guide somewhere
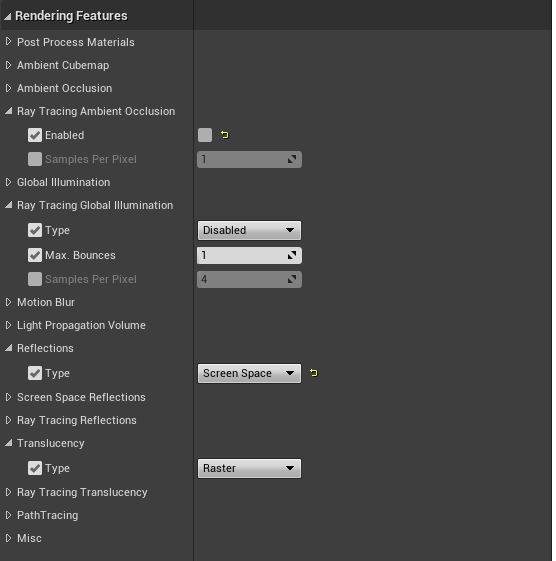
@forest depot Hi! How to activate this feature in dev-rendering build? Does this only work with RTX?
you need dx12 and dxr
@small ocean> To use the GPULightmass prototype:
- Enable ray tracing (including switching default RHI to DX12 and check 'ray tracing'. And having a DXR capable graphics card with Win10 version >= 1809)
- Enable virtual texture and virtual texutured lightmaps in project settings (optional, yet without this realtime preview in editor will be unavailable)
- Enable GPULightmass plugin
and restart the editor
currently no UI has been setup, so just a bunch of console commands
r.GPULightmass.xxxxcontrols parameters
and finally,ToggleLightmapPreviewto start GPULightmass in editor- GPULightmass throttles itself when the level editor viewport is realtime. To make it run at full speed, uncheck 'realtime' in the viewport options
maybe full path to those files are too long, iirc ue4 doesn't like paths longer than 64 characters @amber tendon, just throwing a loose guess
oh, just noticed native gpu baker news just now. Sweet, was wondering few days ago if it would come to 4.25. Question - if i have been using gtx1080 and old luoshuang's plugin, what downsides should I expect? @vernal pecan @hallow arrow
downside would be you'd better get a DXR card for the new one
so on gtx1080 it would be much slower than on your plugin?
probably yes, and in fact i doubt this preview version will be faster on a 2080 either
i see, thanks 👍
It's currently a lot slower than old gpu lm
Hello. Anyone using the Panoramic Capture plugin: is it possible to render frames with alpha? I've tried rendering still images with nothing but a cube and a directional light but the background is rendered as black and not transparent.
hey, I've got a question to people who sell archviz project files on marketplace/online stores. Where do you get textures/assets? I'm working on sort of archviz project with intention to sell it on ue4 marketplace/artstation or gumroad. Quixel is a no-go, substance3d, not sure, asked on their discord, but I expect to be same. So far I've found few websites that has CC0 textures (hdrihaven, texturehaven, cc0textures). Would appreciate some info bits/recommendations 🙂
(there are some screenshots to project im working on currently, if it helps to see what kind of type https://drive.google.com/drive/folders/1UFKNq3-Q1-olZGQQT5dE_Am3M1czFIbv)
I would imagine if youre selling a project it would be best to create your own assets?
thats a really cool project 🙂
indeed, i do make own assets as much as possible, but some are difficult to make, like detailed wood-grained ones or rocky/soil
3d assets are doable for me, but textures are worst for me I think. Thanks, glad you like 🙂
Your source for high resolution Textures, MultiTextures, HDRi Locations, HDRi maps and scanned 3D models for architectural visualization.
these guys are royalty free
royalty free means it's allowed for project buyers to access textures in ue4 project?
no
what's the correct legal term for that case of selling project files that contain assets?
it means you can use the textures commercially and profit from them without paying more than the agreed price from the source
but i am not a lawyer
im pretty sure no assets exist where you can buy them and then just expect to be able to transfer that license to everyone that has access to your project
which is why you should really just make your own if your intention is to sell your whole project
CC0 license seems to allow them, luckily there are some websites with such licensed content, example being https://www.cc0textures.com/
yeah
free cc0 is pretty limited
as in, not many CC0 assets around in web? true
i cant find good refrence to match my light with for this shot. is this to bright or spot on?
A few shots from our archviz app for a bathroom manufacturer coming out in a month or two! We will premiere it in London next month and then bring it to the Salone del mobile in Milan in April.
Standard gpu bake for best performance. I will test some Raytracing reflections and other effects if we have room for them.
C&c are welcome
@pastel summit it's not a still image so we shouldnt judge it like a still, definitely needs context to see if it makes sense
@supple pewter hey this is cool. I'm also thinking of going to Salone del mobile but in 2021 😄
Can you explain a bit more about your app?
The first image has something funky going on with the light? The top left corner of the interior window, not sure what's going on with it
The app will have a two screens configuration with a touch interface on a totem and these interiors displaying on a large wall mounted screen. The user will be presented with five different products collections, after choosing one of these he will then be able to choose between a small, medium or large bathroom configuration, then he will be able to move in the space with touch controls, change between different finishes combinations and view the products up close thanks to some close up cameras presets. In the end the selected configuration will output has a pdf and it will be sent to the user via email.
The first image has a stationary light in that hidden room behind the bathroom. Something to fix for sure 🙂
thats really cool
is there a webpage for any of this at the moment or is it all kept under wraps?
@forest depot with context im assuming you mean lighting scenario, time of day etc..?
nope, I just mean what the rest of the scene is like
everything looks great in the screenshot you showed. Are there spots that are too bright? Not exactly, the whole shot is quite bright but then Im saying I dont really want to judge it as a still as thats not a camera you would use. May if you setup a still shot that you would end up using, it would be easier to judge.
But to know if that area in general is too bright, we should really be walking around the whole place to get a better understanding

this is looking fantastic
i dont think its overly bright, you can always just drop the exposure if you do a still shot just for that bedroom
this scene is looking really great
thanks! awh men i haven't even thought of playing arround with exposure... great tip!
Great job on this scene, Wes!
is there a webpage for any of this at the moment or is it all kept under wraps?
@forest depot we are just full on finishing it then we will gladly move on a more social networking and promotional phase. There is nothing more than these screens on the net atm
@amber tendon thanks man!
Do you guys know if we can use assets from the learn tab in our projects? (assuming they are UE4) Edit: answer is yes
hello humans 😄

Unreal Engine
Autodesk University 2018 yielded a series of exciting announcements and demonstrations from Unreal Engine and Unreal Studio partners—not least among them is this long-awaited technology preview from Twinmotion.
according to this thing here , i can export twinmotion to unreal engine
anyone knows how ?
Hi, I would have liked to know if there was a pre-existing solution in unreal engine to load meshes in octree form
What I mean by this is, let's imagine, I photographed a large environment like the ruins of an old city.
Is there a way/workflow to (without using point cloud rendering) have a grid of objects in several small pieces used to be decimated at several scales, to depending on the distance to the camera, display only the closest details, and to have the same principle as the LOD but pre-calculated beforehand for example, for elements in backgound.
The use would not be for video games, but for video rendering.
@gaunt ibex This is an article from early last year, pre acquisition of Twinmotion by Epic Games 🙂
we are currently working on such a workflow
Batz is hyper learning life
Has 4 days to learn it all for a job
Advice for batz?
4 days you say @verbal sierra ?
use Twinmotion, stay in Twinmotion
in 4 days you dont have much leeway
it was 5 when I went to sleep
:sadtrumpet:
lol 
@gaunt ibex this is the best learning courses you can find for a 4 days deadline
4 days to learn it all seems quite short, you'll need at least a couple weeks/months to learn how to do decent archvis in UE (some may say years to master it)
Have you guys played with the HDRI Back drop?
i followed the official documentation , removed the skylight and sky sphere and it just seems like it add a grey film to everything
hello humans , 😄
any ideas how to add colissions to a data smith file quickly !
it's a pain to add manually to each wall and each floor and each object and actor !
Hey guys, don't know if people are having issues with ANSEL, there's a solution for the activation problem
Just made a forum post https://forums.unrealengine.com/development-discussion/rendering/1719880-ansel-session-can-t-be-activated-at-the-moment-solved
Unreal Engine Forums
Quick fix for the ANSEL problem.
Sometimes photography is not allowed at gameplay.
https://www.youtube.com/watch?v=yytBgaylFGU&feature=youtu.be
hi guys, have you any idea about matter port cloud point data, how to use in unreal engine 4.24????????????
Hi all - I have made a house before using Geometry objects, but scaling makes the textures warped. What's the quickest way you use UE4 to knock up a simple house without importing walls? Cube geometry scaled (measurements then aren't accurate), or extruding a mesh (if this, how can I see the size of the object). Other ways?
Uh, just do it in a DCC app?
Why would you need to that in UE4 when it's faster to just do it externally?
Well, with the Geometry tools in UE4 and the new Modelling tool added, I thought there might be a way to knock it up quickly in the engine. I suppose if I wanted a simple room, it would be pretty quick to do in Unreal - it is just the dimensions that are missing
well if you use the snapping options you can keep track of your measurements. You can also take measurements in the orthographic viewports with the middle mouse button - though that doesn't snap
Thanks @sweet fossil - middle mouse button trick will do for now. I agree using Blender is better for detailed stuff, but I just want to muck around in UE to try it out. Cheers
not seeing help channel per se anyway, lost connection, coudln'tg get discord going so luckily personal I was chatting with sent email invite but its not working,,just means they are offline and if wsere online igt would send me where exactly...ty anyone
some keyprfess made discord go haywsire apparently or server mishap ?
new experience with this occurring so not sure what to expect
typing in their name is giving erreor,,asking for code but email shows no such info
came here as they are interestged in arch.
Good morning! What is the normal lightning building time? I have a scene with 3200 actors and their lightmap resolution is 512. It has been two hours and its still 0%
If you're using default lightmass then that's not out of the ordinary
But your lightmass world settings have a huge factor in this
I forgot.. I changed lightmap bounces 10 and other settings. I try to tweak them back until final version. Thanks
Aah tooltip says that greatly increases lightning build times
👌
3200 actors all at 512 will probably take quite a while unless you're using GPU Lightmass.
Even with a swarm of about 6-7 machines, we would often have to do overnight light builds with CPU Lightmass. We can get even our largest ones done in less than an hour now (as long as we don't run out of VRAM)
@sleek cove if you double click on the swarm icon in the windows tray it will open a better “debug” view of what is actually happening
Hi everyone, I was wondering if anyone has any insight on light physical values in UE4. I put the sun at 110.000 lux and I got a nice interior lighting on a scene. In a room that was left dark because not much light reached it, I set the EV100 at 8 (which is a normal value for artificial interior lighting) and a point light at 800 lumens (value found from Philips website) but it's as if it wasn't there. Even putting 4 of them the contribution is minimal, almost imperceptible. The room is quite small and the materials Albedos have light colors, so I don't understand if I'm doing something wrong or if there's something that don't work right in Unreal's physical units.
Screenshot for reference
8000 lumens seems to be a decent value to have some light... Which is 10x times a normal light bulb
I am also struggling to get a handle on base lighting but the more I test the more It seems that Unreal is pretty random when it comes to light values/exposure. You'd think that they'd use some sort of best practices in their sample scenes. If you make a new project with the collaborative default level and set it to EV100 8 it will be pitch black, you won't see a thing. So I thought it might be the sky so llets remove the sky and related lights and instead add the "sunsky". Now it's completely blown out, extremely bright.
Yes, Sunsky seems to be more close to having physically correct lights so you need a high EV100 value. But then with interior lights it doesn't seem to act correctly, unless I'm doing something wrong. If you make a small room with white walls and you place a 800 lumens lamp at EV 8 you can see a bit though... But making a test with my phone in real life, at EV 8 I can clearly see in a room only lit by a lamp, and even if it results underexposed I can certainly see much more than I do in Unreal
@zinc galleon That's likely because you are using a point light. It should look different with a spot light. I'm able to get accurate sun values and correct lighting values looking okay when the exposure is done correctly. Bare in mind that 110k lux is the brightest possible sun - like midday in the Sahara desert. I would recommend dropping you lux value a bit to somewhere around 70-80k. Also bear in mind that you're looking and a worse case scenario for exposure - you have super bright sunlight in the background and a completely closed off dark room, you're never going to be able to expose for both.
@sweet fossil thanks for the answer!
Are you sure about sun values? I've been reading the topic on UE forum about physical light units, where Daedalus51 and a few other lighting artist where complaining, among other things, about the same issue back in 4.19, and multiple times they mentioned that normally they put the directional light intensity a 125.000 - 135.000 lux for a sunny day. On wikipedia it also says that 120.000 lux is direct sunlight at noon, and 110.000 is bright sunlight.
But that's not really the issue for me. The problem is that at EV 8 a 800lm spotlight is invisible. Nevermind to have both areas exposed correctly at the same time, I know it's not possible, but let's focus on the dark room. I also consulted a friend of mine which is a lighting engineer and a 3D artist, and he said that that kind of result is not normal. You're right, it might be the fact that it's a point and not a spot light, he mentioned that too, but even then, the difference is way too big to be just a distribution problem.
Are you using GPU Lightmass? That could also introduce errors
Here's another screenshot for reference. The light is 800lm, distancing 1mtx1mtx1.8mt from the walls and the floor, camera settings as you can see are 1/60, 100, 2.0, so around EV 8
No I tried both baked and movable lights, same result, but with baked I didn't use GPU lightmass
a moveable light is always going to look a bit different too, GI can have a big effect on the result.
Also this diagram from velux is actually very useful
That's very useful, do you have a link to that?
In this case the direct light is so mild that the GI is completely invisible when I bake it
hmm you really should be getting at least some GI
what were your world settings and bake quality?
scale 0.5
indirect light bounces 25 and 25
Quality at 3
Production quality and I even raised the lightmaps resolution to have a more accurate result
I got the project stuck at loading the Kite demo trees right now, but later I can make a bake and show you the result
Hmm, realistic light values are tricky in UE4 but your result does seem a bit of an anomaly. Try with a point light and see if the results are the same
you mean a spotlight?
yeah sorry - not finished my morning coffee yet 😛
what angle though?
stick with default for now
Actually now that I think of that I did a test already, but I don't remember the settings I used. It was brighter but still not as much as I'd expect
I think I tried to emulate a table lamp I have, I put the phone's camera exposure on manual and saw the result.
Same settings on the light and the PP camera settings, waaaay darker. I'm actually thinking about a tonemapping problem at this point
I've done some test myself with my camera, I have a straight path from windows on the south side of my flat and the north side and I can pivot 180degrees after exposing for one direction and the other direction is exposed completely differently (wrong) - I've been meaning to recreate this in UE4
Have you done that yet?
You should also try with artificial lights at this point, and see if you get the same problem
Not yet
Ok, can I add you here on Discord? So when you do it you can let me know the results. I'm very curious to see what you come up with
sure
Just checked the scene I'm currently working on and the SunSky actor defaults to 75k lux
matches what I've come to with experimenting in the past
I noticed that too, I think it's a midway between max and min. I'll have to delve more into those values eventually, but what I'm basing myself on right now is that a well lit interior scene is around EV 8, and on the results I got from my camera and 400lm light I have. I turned off natural light for now
I'm having two issues, (im using vray to render my lightmaps). 1. It seems like my lightmaps will look great, but will end up loading up low resolution. Texture streaming is off. Another issue I just encounter is my lightmaps wont load while simulating the game.
never used vray to do lightmaps, how do you assign them?
Hey guys, I need tips on how to denoise my Raytraced images! I'm using Ansel to get 360 shots but it still noisy!
hello, sorry if i'm not in the right channel.
I have a problem with a mesh created in UE4. I can no longer modify the vertices. What can I do ?
Hey guys. Just completed my first true UE4 project.
http://www.gregrogers3d.com/don
Let me know what you think!
GREG ROGERS
Awesome project dude
Thank you, appreciate that
@leaden axle Wow! Awesome job!
Nice work dude!
Thanks, Wes
@leaden axle Did you create all the models yourself? How long did it take just to get your scene ready for lighting?
Id say 75% were modeled by me, others were Megascans and a handful from Marketplace and other sites. Being a newbie with UE going into this project everything took 10x longer and redone countless times. I'd say about a month of solid heads down work to get it ready. Modeling in 3ds max took a while because I wanted to really do as much detail as I could
Really good result especially being new in unreal
@leaden axle GPU Lightmass ?
is there a way to turn of the slowdown effect of the camera in sequencer? every cut the camera start slower gets up to speed and slows down when close to the end
@pastel summit Rightclicking the key and selecting linear should do the trick. Unless I'm not understanding the question correctly.
@median rivet you understood it right thanks a lot! this will help me tremendously, cheers
did my first iteration on a trailer video. no audio for this test just looking for some feedback of the overall shots and composition: https://www.youtube.com/watch?v=Z2OuRFo3FKM&feature=youtu.be

@wicked willow yup! Love it
Hey everyone just need a bit of guidance here on a product I am thinking of releasing. I thought of making a modular kitchen cabinet set that includes all of your common cabinet sizes and styles, in addition to several door pulls and door styles. Do any of you see value in such a package? Right now I have at least 40 different cabinets with 3 common door styles done now, all UV’d and ready for materials. I am just not sure if people model most of this themselves or if this could be a big time saver for people. Thoughts?
@bronze snow I think for people working on their portfolio especially 3d artists they are going to need and want to create everything themselves. But for on the job situations, client work and deadlines anything that saves time is very much worth it
@amber tendon is that coming from your picture frame?
never seen artifacts like that tbh. maybe an uv issue?
Baking using commandline will get rid of them
while im sure thats artifacts from large area lights, not sure how baking with cmdline interacts with that
🤔
@hallow arrow do you know how to fix light leaks? for example if i have a model placed on an interior wall and its glowing bright! instead of the original material color? I tried placing another solid model on the outside the wall but its giving unpredictable results.. either its makes the material too dark or does not stop if from 'glowing'
@hallow arrow that artifact comes from spotlights as well. area lights and point lights make it worse
yes, by saying 'area lights' im referring to any light that has a physical non zero size
so point/spotlights with source radius > 0 are considered area lights
The complex collision seems to be perfect for my use, but i can't set it to be complex
I can do simple or convex collision
which cause many problems because of bad collision
So can I add a complex colision to this sphere? because it has openings etc.
Thank you guys!!
i have been expiremtning arround to create my first exterior project in ue4. i can highly recommend the Procedural Landscape Ecosystem thats avilable in the ue4 marketplace. it took me about 20m to set up this ez environment including lighting
@pastel summit WOW -- really well done -- love the shots and the modeling -- I am soon to be at that stage on a project I'm working on -- do you have an tutorials you followed to produce the videos?
@bronze snow for me, that would be huge to have in the library, I agree with @wicked willow for those building portfolio, but once you get to production, anything to save time is great
giving it a check out
@mellow crater Thank you!, I don't really follow any tutorials. its more of a trail and error route I take. The most important part for me to develop is constantly asking for feedback to improve myself. I Highly recommend watching the Quixel - EU4 breakdowns Quixel posts on their YT channel. It doesn't have a focus on archviz but some of the technique that are being discussed are really useful to push your graphical results. Besides that its really worth to watch these series to get a good understanding of a general workflow and an in depth talk about al the features within lightmass: https://www.youtube.com/watch?v=TzqpyNb0998

How do people handle lawn grass?
I could not find a suitable short grass solution so I made my own by making grass planes with just a few strands and instancing them heavily. (I had to turn off static lighting on them since baking did weird things to it)
Fair enough, makes sense
I'm getting very little light from sun and skylight alone in my scene (through windows)
Anything here looking off?
I did place portals in all windows
@amber tendon bump up the directional light intensity
try 100
and make it stationary
Anyone has or know any demo project of infoarquitecture to try it on quest? To see how is optimized and if it runs good on the headset. I want to start developing and designing for ArchViz on Quest! Thanks! (:
made a walkthrough of a recent scene i did: https://www.youtube.com/watch?v=N_mqEcXft0I

@near viper Arch Viz on Quest is a road that leads to pain. It's quite hard to make things look good on such limited rendering power.
It has an Adreno 540 GPU that is about as powerful as a mid range laptop from 2010.
Agreed, Quest was using very outdated hardware even before it came out. It's not very powerful. Good luck with archviz - it struggles with even basic scenes and low lightmap resolution
@amber tendon CPU or GPU Lightmass?
because if GPU it could be a low fireflyclamping threshold
CPU Lighmass, @sweet fossil
Thanks, @wicked willow Why would i put my directional light stationary instead of static though?
Uh, your directional light is only 3 lux... That's like 3 candles
that makes a lot of sense, cheeers 😄
that should be a lot higher
got you
Thank you , that is helpful
I mostly used unreal's standard setup they use and that's usally 3.14 😄 (they mentioned it in that blog post)
shouldn't in this case eye adaptation be brightening this up a lot?
not sure what i'm missing
i do have it enabled
guess this is broken in 4.24 😄
@amber tendon I noticed that too. The Archviz and PhotoStudio template use realistic lighting but changing the setting doesn’t work at all
Yeah 4.24 exposure seems very odd using the new sun system
Mhmm. I might have to switch to 4.23 then.
Currently there's no way to adapt to different lighting conditions.
You mean the new atmosphere tech, @forest depot ?
Even not using it exposure seems broken.
yeah
been working on the first iteration of lighting for this project lately. getting to a point where i can start putting up a frame of the building and shape the environment more arround it to make it more natural. would love to receive some c&c
Hello all, i require some help.
An option to write the passes/AOS into one single .exr file.
Inclusion of ID (red, blue, green) masks for objects and/or shaders for better selection in compositing.
unreal isnt designed to replace an offline renderer, people have been asking for those features for years but there hasnt been any progress on that front
So, there is no way to render the accurate passes for compositing. i am creating lot of Environments in unreal for live action integration due to render pass ,i have lot of issues in compositing. at lest can we do this thing manually.
If i can get proper AO,Beauty,Cutmatte is enough.
In Composure, a graphics utility plugin available with Unreal Engine, we’ve added a new set of tools to make compositing a lot easier.
this should help
i will check this out. thank you.
Can someone show me a link for detailed post processing volume settings?
@amber tendon eye adaption only works in editor..if you want to remove it theb go to post processing volime
Check global illumination
eye adaptation most certainly usually works in game mode
and also it shouldnt be impacted by toggling gi
So I fixed it by deleting the Saved and Intermediate Folder 😄
is there a video capture option without usign sequencer?
you could play it out and use something like Nvidia Shadow Play, but quality will suffer.
i just need to make a quick video capture to show a problem im having with animated noise in my metallic looking textures
Just use OBS?
^ OBS to record, HandBrake to compress it
ah just found I have an old version of Camtasia ..hopefully it works in windows 10
I'm looking for an environment artist / world builder for UE4 that can graybox and basic set dress a large building within a week
why i can't change this?
Those of you doing VR UE4 - what do you use for teleportation?
I am running into a lot of issues with the stock teleportation implementation
@amber tendon i'm using the default template for that. what issues are you having?
Trying to teleport up the stairs, I sometimes teleport into the basement.
Even tho I have collision geometry etc setup properly
stairs in question (white is a invisible collision helper I use)
@amber tendon Open the "Trace Teleport Destination" function in BP_MotionController and set this "Project Nav Extends" float variable to a smaller value
The other option is to not use the default implementation and instead use another. I really like Mitch's VR setup as it's a lot more flexible and allows for various forms of teleportation: navmesh, pre-made "navmesh" via spline creation BP or hot-spots.

GitHub
Unreal Engine 4 community VR content examples. Contribute to mitchemmc/VRContentExamples development by creating an account on GitHub.
That is incredibly helpful @sweet fossil , thank you!
What engine version is everyone using nowadays
that github mentions he supports 4.22
@etieneboy Unreal seems to be automatically rebuilding the path anytime you change geometry or package for distribution anyways
@amber tendon We use whatever stable version is available when a project comes in. That repo just hasn't been updated since 4.22 - it should still work fine however
Not sure if can be asked here, but are v-ray/octane plug-ins need rtx capable cards to function?
just wanted to share some progress on a recent project. started on the blockout for the walls soon to start blocking out an interior so i can start modeling everything out that i need
Inspiration
can anyone tell me why this happens and what can i do to solve this
@jovial nebula check UV chanel
@jovial nebula That is a lack of reflection captures
@pine jay how can i change uv channel...i mean change it to the UV channel 3 and save it..but when i check it again, it goes back to zero...also when i change the uv channel and do a build, i still get overlapping uv's
can you tell me what is the best way of using reflection capture....i want the best quality for my archviz project @sweet fossil

There are several ways to add reflections inside Unreal Engine, each with its pros and cons. In the first part of this two-part Unreal Tips and Tricks video tutorial, we'll cover the basic use of Scene Capture Actors. This method generates cube maps to approximate simple refle...
They fail to mention box reflection actors in that example. I prefer to use box reflection captures for the larger areas in the hierarchy then move down to smaller ones that may match the size of the room and only use sphere reflection captures for smaller detail objects like the glasses in the given example
thanks @sweet fossil
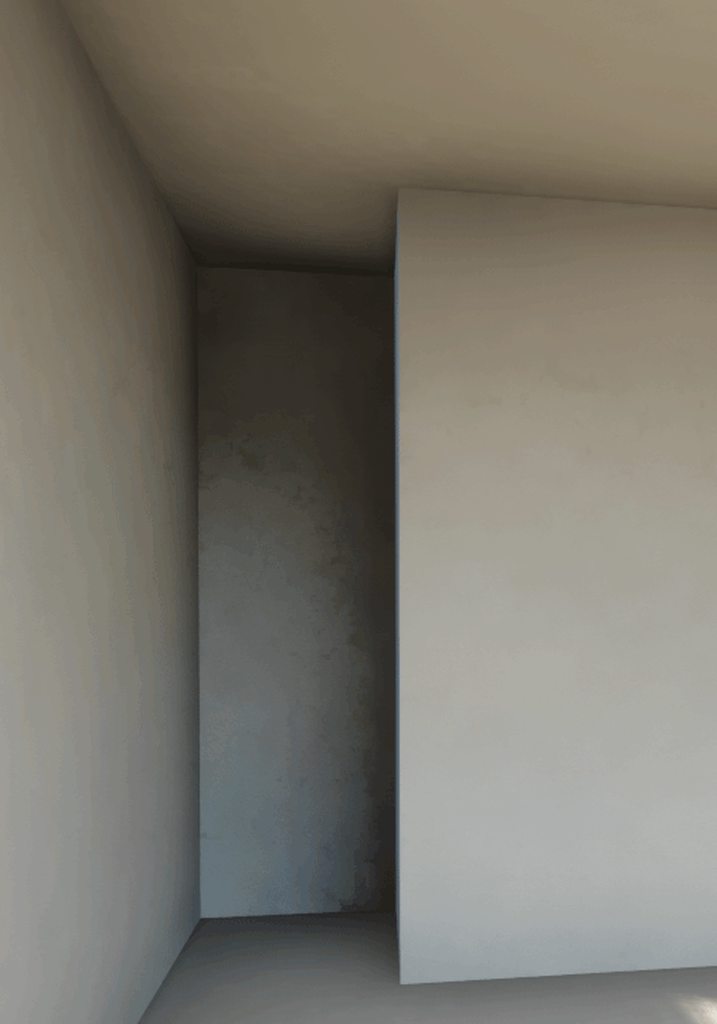
When working with datasmith, do you prepare the Lightmap UV's in your external 3d software or do you let UE generate them? Is it possible to create your own just for the models that create issues?
I'm asking because on that back wall there's a white line created by an insted, but is should be darker, nor brighter. I'm pretty sure this is a UV issue, since I double checked everything else
Hey guys, I'm having an issue getting a material to apply properly to an imported mesh. In the material editor, it looks fine:
But then when applied to the mesh, it looks... like a flat color:
Is this an issue with the import options? Is it possible to reimport with the dialog options box again? (it just auto-reimports when I try)
Another thing to note: The model has 5 material slots. The only one that works is slot 0. Anything I put there works, and any material I put into the others gives me a flat color result.
Figured it out. Turned out the artist had 4 different UVs, so I had to add a TexCoord for each one and assign it to the proper material slot.
Reiterating on my question from earlier. Is it possible with Datasmith to let UE generate the lightmap UV's only for certain objects?
@austere hazel Dataprep allows it yep
If you are using Max, you can also add a Datasmith modifier to your meshes force the importer to not create new lightmaps
What do y'all use for customisation in ue4 archviz apps?
On marketplace I noticed HAL which seems obsolete and then archviz studio
@amber tendon I made my own with bleuprints

Best Hardware for GPU Rendering Octane Redshift Vray
@dense summit hi vanek, i have 970 not RTX, can't find any documentation about the UE plug-in about either plug-in needed RTX supported card.
granted I'm being a bit lazy and not installing the plug-in
ty for keeping me in mind ❤️
Hello all, can anyone suggest reference for creating realistic looking fantasy environments.
Anyone have luck dynamically loading DataSmith Actors at runtime?
@cyan salmon https://render.otoy.com/octanebench/summary_detail_item.php?systemID=1x+GTX+970 I don’t think they require RTX support
you’re welcome 🙂
cheers dude!
Hey does anyone know why my vertex snapping is not working for some reason
hello, how do we achieve flat-camera? i mean standart UE camera is too convex. When i spawn a character and i look up or down, the camera is very convex.

In the first of this two-part Unreal Tips & Tricks tutorial, we'll demonstrate the different steps to solve light bleeding and get the best lighting results in Unreal Engine. We'll be using Revit to show you how to correctly prepare your assets before exporting your data in or...
In the second of this two-part Unreal Tips & Tricks tutorial, we'll dive deeper into the process of cleaning up light bleeding, with a look at how to correctly set up your scene in the engine to avoid lighting artifacts by fine tuning lightmap settings.
For additional help, ...
Just wrapped up this project:
https://gum.co/zUAHa

Gumroad
A modular set of kitchen cabinets with over 50 items. Full list of content below: 9"-36" Base Cabinets. 9"-36" Wall Cabinets in both 30" height and 36" height. 2 Door styles: Shaker and Raised Panel. 5 Crown molding profiles. 5 Base board profiles. 3 Cabinet pulls. All cabinet...
Does anyone know why rendering passes brightens the image?
Hey, not sure if this is the right place to ask this question or not, but I'm hoping to figure out when the Direct Link Plugin for the TwinMotion Plugin for SketchUp 2020 will be available?
Does anyone here know how to get it so grass doesn't overlap the pavements or other pieces of geometry without painting it out? I kinda wish there was a forestpack plugin for Unreal as I've only just started my unreal journey - are there any plugins like that or is it just foliage tool for now?
@summer mason I can highly recommend PLE add-on for ue4. are you using a terrain or did you import a mesh into the foliage tool?
@pastel summit
Looking at it now, overall it does look exceptionally pretty. How does it work with boundary lines?
I've imported a mesh so the foliage tool is painting on top of that. I wanted to use landscape but my geometry was specific.
I'm not that familiar with foliage tool but i think you just have to erase it manually until you are satisfied. And regarding boundary lines not sure if this is what you meant but you can assign specific materials to layers. you can paint those layers on your terrain. foliage will only generate on the parts you painted it to be, see it like masking
not sure if that is what you meant
Ah that's unfortunate, I was hoping I wouldn't have to paint it out as it's not very efficient right now. Thank you for this plugin info though, may work well for future jobs. I knew that you can use the landscaping tool to paint foliage but there was no way I could find to use your own geometry in there without a height map so I have been using the foliage tool for now.
With the foliage tool on my image the grass is only on the grass geometry, it's overlapping other geometry (kerbs, pavements) even though it's been excluded from the paint tool entirely 🤷
@summer mason That's because the grass is in clumps. The center of that clump will be within the specified bounds, but due to the size of the clump, it looks as though the grass is where it shouldn't be
It does not treat every blade of grass individually
@sweet fossil that does make sense, so smaller clumps that are being instanced at a higher number should have a better outcome than I'm having right now. I'll look into editing existing assets but it sounds like the best thing to do is start making my own?
The only way to really address the spillage is to manually edit with the foliage tool and possibly edit the placement and rotation of clumps near the edge to better meet it
When doing fly through videos i struggle to avoid the fisheye affect while at thee aame time showing as much as i can of the rooms.
How do you guys do it?
I don't think there's much you can do. I usually set my focal length to around 50 and try to work with that. Maybe you could use multiple shots to show what you want instead of a single one with everything in it?
Temporarily removing a wall could help in pulling the camera out further
Fair enough, cheers!
Does anyone know why rendering passes brightens the image?
@turbid river
Can u show an example?
hello, how do we achieve flat-camera? i mean standart UE camera is too convex. When i spawn a character and i look up or down, the camera is very convex.
@blissful stratus
Change the fov or focal length of the camera
Just thought to share some work I've been a part of, finally revealed by the powers that be at my work place.
I did the last apartment and the bedroom/most of the second space, I can't remember as another colleague worked on that one and things had been changed so often it's hard to say what was mine on that one.
Vimeo
The future of VR and its place in the architectural Visualisation industry is still an unknown, but there is no escaping the potential it has in the marketplace.…
Nice stuff
Hello everyone!
I'm happy to announce that I submitted my work for the Rookies Awards 2020.
First of all I want to thank everyone who helped me on the my journey becoming an artist/ArchViz creator, it means a lot to me!
Im making this post because I am in need of a favour.
It would help me out a lot if people can like my post and perhaps share it.
With this message I want to ask you to like my post and maybe help me futher on my journey to become a great artist, thank you!!
You can like my post by giving me a high five, you can do this by creating an account.

The Rookies
Arround march 2019 I discovered that ArchViz was a thing. I Always was a big fan of creating game art but never felt like this was something I would get old with. When I found about ArchViz I knew I found my real passion. I combine all the teqniques I learned in game art to c...

I turned on raytraced reflections but I still see them disappear when I remove the reflection capture sphere from the scene. How come? Is this correct?
Any good references for heigtmaps from real world maps.
maybe here? https://terrain.party/
Very good for US heightmaps. Not so much for EU.
and i facepalm myself cause i should have mentioned that.
💩
Hey everyone ! Twinmotion 2020.1 is out ! https://www.unrealengine.com/en-US/blog/twinmotion-2020-1-delivers-new-levels-of-realism-and-much-more

Unreal Engine
With higher-fidelity assets, more realistic lighting, and new options for presentation and review, Twinmotion 2020 takes fast, easy, real-time archviz to a whole new level. Get it today.
And the good news is... all owners of an Epic Games 2019 licence... Get 2020 for free and updates until December 2021 !
tried it today, really liked the auto roads/cars
couldnt work out whether i can delete parts of imported geo though (mesh editing)
can someone tell how to change uv channel of any mesh... i change the uv channel to 2 or 3 and then save it... but after closing it when i come back to check it, it goes back to it default position of 0....can someone help me with thi...thanks
Hi, can anyone help me on how to do this kind of screens in ue4? This render is done using 3dsmax+vray and we used a highres opacity map + vraydisplacement modifier with waterlevel ticked to show thickness. Thanks in advance!
If you want the level of lighting quality on the thickness then it will need to be geometry for the lightmaps to work
If you want the level of lighting quality on the thickness then it will need to be geometry for the lightmaps to work
@forest depot thanks for your reply, if it is all over the restaurant, is there a way to model it so it will be parametric?
you could build a single screen in max and then bring them in as a single asset and place them in your restaurant so that changes only need to be made to the single asset
you could build a single screen in max and then bring them in as a single asset and place them in your restaurant so that changes only need to be made to the single asset
@forest depot the problem that i have is the location that i need to apply it varies in size. The designer also applied it on the ceiling. Thanks again for answering.
your best bet is probably using the same texture and doing it with a material in unreal, at the cost of the lighting being inaccurate in depth
your best bet is probably using the same texture and doing it with a material in unreal, at the cost of the lighting being inaccurate in depth
@forest depot thanks and noted!
Hey everyone . Do any of you guys know how can I animate the sun's north offset? When I add the Sunsky in the sequencer there's no option to animate the north offset. The north offset 😔
@vernal pecan question...if it's free, why it's trial? if it's not free, how to remove this new tab from launcher?
oh...it's not free, so i prefer to have "hide" checkbox in settings
where can i find trees and vegetation for free...i have already downloaded garden and lush plant from unreal
You could try out Treeit, the downside is they're not pre-made but the advantage is you can create them exactly the way you want: https://www.evolved-software.com/treeit/treeit
So, no one can help me? Pls
@tidal prairie its free for all holders of a 2019 licence. I'll pass the suggestion of a "hide" option in the launcher settings
@fiery warren go in the SunSky blueprint, check for the NorthOffset variable and toggle on the "Expose to Cinematics" variable. Now it will be available for your sequencer needs
@tidal prairie I have confirmation that the "trial" is the same version as the full version, but you are only allowed to make non commercial projects with it
the paid version (that all holders of the 2019 version get for free) has a different licencing allowing commercial projects
@vernal pecan thank you!
@vernal pecan is there still a plan to make a twin motion to unreal engine bridge?
Was there a plan for that?
I saw Pierre mention it a few times on the forum as something they were looking into
totally understand, glad it's in development!
hello. what happen with my mesh and controller icon. the icon is invisible . and all other is black. ue4.24
is this because my shader is compliling
?
Anyone have success making something like a glass or jug full of water?
glass looks ok in Unreal, but not super realistic
@royal osprey which glass are you using? I've tried a bunch of different tutorials . they look good in the static mesh viewer but they don't look correct in the viewport
Floor is looking dark and hardly visible if i set the spot light to static, how to fix this?
@wicked willow On the sample scene (the one with the yellow chairs) there is a glass statue, I based my glass off of that. If you download the twinmotion materials from the store they also have some glass materials, some specifically for Raytrace. A good glass needs a good reflection probe (or raytrace settings) and a good handle on how refraction and fresnel work.
@wicked willow check this out https://www.youtube.com/watch?v=xtdKob1iy4Y

Exciting new features developed by the Niagara and Physics teams at Epic. Coming to a version soon.
This tests some of the features by making a texture from particles that can interact with a 2D sim from the Landmass plugin, but there is far more you can do with the new tools...
i'm trying to achieve lighting similar to this, not matter how many spot lights i add, i'm not getting the same result
can anyone please point me in the right direction, i am completely new to 3dgraphics and unreal
You'd want
- skylight and lightmass portals in windows
- Directional light for that sun lighting
- Point light for the lamp in the corner
this seems to be lit mostly by daylight, as far as i can see
then you wanna make sure your lightmass settings are good, ie skylight bounces > 5, indirect bounces >5
production quality
@amber tendon thank you
@royal osprey @solemn hawk I think I'm having problems because the models I
Im trying to make a drinking glass and water bottle and they have an interior to them
i made them this way so i could try and make them look like they are full of water too
It’s a hard look to pull off currently, if you can avoid showing the glass/water id recommend doing that.
anybody here know why a static light is not lighting static objects at all?
@tepid marten show the settings of the light and the settings of the static obejct
- Did you bake lighting?
- Is the object within the attentuation radius of the light?
- Are both the light and the object's mobility set to static?
I have a hdribackdrop, which contains skylight, but the light hardly entering the building...
added portals too to the windows, but no use
I'm very new to architectural visualisation in unreal (and in general); could someone point me at anything to read or watch in regards to workflows for interiors? I can't clearly figure what part of work I should better keep in the 3d editor (blender in my case) vs unreal editor. For example; given that I planned to use the marketplace assets it makes little sense to model anything other than the walls in blender. Am I looking at the problem correctly?
@rancid tinsel Can you show your lightmap settings? Also, are you baking at production?
then apart from that, try cranking up the intensity of the hdri backdrop
@arctic mesa
Floors, walls, roof, baseboards, doors, windows you would do in 3dsmax
then assets you can get from any marketplace including unreal's
so yes you are looking at it correctly
thanks! very much appreciate the advice
@rancid tinsel Can you show your lightmap settings? Also, are you baking at production?
@amber tendon i didn't change any settings, all left to default values
then apart from that, try cranking up the intensity of the hdri backdrop
@amber tendon will try, thank you
ok
it can happen if the lightmap UV isn't aligned perfectly or the wall there is just too thin
Thanks - anything you could link to read up more on Lightmap UV alignment etc? @solid oxide
Not that I know of lol, just experience and here
@vernal pecan sorry for the late answer... thank you very much for the help.
@amber tendon more precisely speaking, make sure your wall is at least 2 lightmap texels thick
i assume this isn't what you guys mean by wall thickness
(part i marked in yellow in the lower middle)
would also include the floor below, some light may come from there too
but yeah that would be it
Hello. I've been light baking just fine but recently I've been getting these errors/ corruption (pixelated, mosaic) on a few meshes. UVs are perfectly fine, and they bake fine in another project. Default Lightmass settings, Lightmaps are uncompressed. Has anyone encountered this problem?
inside the sofa, under the blanket
I'm having exact same problem like @silver void , not sure what's happening, I've checked UVs and other lots settings, nothing's wrong. Can anybody help please?
@silver void could you share alt+0 view (lightmap density)?
also you should verify that there's no invisible object casting a shadow or similar
cleaning and validating swarm cache wouldn't hurt. then deleting intermediate+saved folder.
any error messages you got?
Anyone here using RTX for arch-viz, and if not, have you run into issues when trying?
I used it on one project
so my experience is not vast
I did experience crashes and slowdowns, even a scene corruption at one point. But I did get much more stable reflections than using regular non RTX methods.
yeah the reflections are wonderful
but I noticed, the global illumination seems to be off by default.
I created a post process volume to force it on.
I've tried RTX in a game project and arch-viz, and also got different results. Not sure whats going on under the hood there too.
I didn't use the real time GI, I baked the scene using the gpu lightmapper
Theres alot to tweak and know, and bit overwhelming. Wish there was a sample scene to just build from.
but, I ask cause, it seems very frontier like, not alot of info, alot of people don't know much about it, and definitely dont wanna waste too much time on it, if its not worthwhile yet
yeah there is a lot of hunting around for stuff
I think I would have been faster with this scene if I hadn't used raytrace, but the look was better for sure.
RTGI is definitely not up to scratch at the moment
I bumped the samples per pixel up to 16 on everything, and still had some pretty severe noise in places.
There must be something I'm missing, perhaps only a console command at this time.
Would be nice if there was just a denoiser like Vray has.
The only potential workaround I know of at present, is to render at 400% screen res, but it crashed when I tried to do just 200%.
And it seems like the wrong solution, unless its the only one :3
You're not doing anything wrong really....it's just how it is
maybe it can output a pass of just the GI, and I could run a denoise on that in After Effects.
It has such great potential to replace a traditional renderer :3
You can't separate gi as a pass atm
Hi everyone! I'm trying to export a bunch of objects from blender and some of them export fine to fbx with all their materials intact and some objects have their materials but they are completely white.
anyone have any ideas?
Here's an example, all these objects are photoscans of my landscape all processed though blender with the exact same settings.
im trying to make a video walkthrough of my scene... Its a building with landscape, when i import Sketchup to datasmith file on ue4.24 the actor count in the world outliner shows as 32thousand actors.. my FPS drops to 15 and below....can someone tell me a way in which i can do it in a better way without compromising with my quality... I Use 1080ti with 32RAM
i also tried to break my components in skp and bring the datasmith separately, now my actor count is 10000 but im seeing the black spots after building it on preview...can someone help me
the shadows are very weird
hello. may i ask in which case should i use this ?
from the documentation "The texture streaming system, or texture streamer, is the part of the engine responsible for increasing and decreasing the resolution of each texture. This enables you to have good visual quality while managing the available memory efficiently."
so turn it off wont make my project smoother ?
On the contrary, turning it off will consume more memory. I have had to turn it off many times. When your are nearing the texture limit on the graphics card textures go low rez, and that is bad when you just want to export an image sequence.
is there some kind of setting or plugin allow me to work with Low res viewport while having ability to export high res image ? like in 3dsmax
yeah
forgoty what it's called at the moment.. hang on
engie scalability
engine
by default it exports as cinematic
but i still have to change it into cinematic when exporting screenshot ?
oh.. so i can set it to low and work with bunch of 4k texture and when exporting it will go full 4k even when my vram is low ?
you have to turn off texture streaming on export if you are low on Vram
still I recommend you only use high rez textures only when it's absolutely necessary.
So what do you people use for baking nowadays - Luoshuangs GPU Lightmass, Stock CPU Lightmass or that VRay plugin for Ue4?
wondering which renderer is best for which usecase
GPU lightmass, I used the octane plugin to render out lightmaps for export to Unity. I had already done a video in Unreal but needed the realtime in Unity so it was the fastest way.
Mhm fair enough
so there is really no point in using epic's stock cpu lightmass then 😄
I stopped using it a while ago, It's not bad, it's just slower and a bit lower quality.
Currently my cpu lightmass takes 1 hour for medium quality with standard settings and a 100 lightmaps.
And for production 10 hours.
: D
Looks like lighting is affecting my wall color, on the left it is in one color and on the right its little different, any idea how to fix it to make it uniform (i dont want lighting to affect it)
left side is where the window and direction light is kept
i don't know why you wouldn't want light ot affect it
but if that's what you really want, make the material unlit and use emissive instead of base color
@rancid tinsel
ok
My directional light sits at 3/3.14 and my skylight at 1.
Does anyone feel like this can in some cases (ie very white materials) create extremely strong contrast between sun and sky?
At those values it shouldn’t. However it all depends on your camera
Can you post a screenshot?
Fixed it for now by using a fake pointlight as bounce

A short tower design and digitally built in the middle of a dense temperate forest for your getaways. Inspired by the shape parallelogram together with the love of nature.
At Pixel Stack
We help you digitize your ideas in 3D so that you and your customers or prospects can be ...
hey, how to get rid of UV import problems?
it's ok in blender:
and at same place, here artifact in ue4
@fair forge you want to spread the edges out over the surface so there is more area between them. when you unwrap a face like that with vertexes going in the corners its best to but your unwrap method on "Conformal" instead of "Angle Based". if that doesn't help the best thing to do is just to select al the faces that have the same normal direction and unwrap using the unwrap option "Project From View"
you open the menu just by clicking U and pressing unwrap
so as an example how to cleanup your mesh is to not do this
but rather like that so you keep space
i'm almost always unwrap as project from view
but sliding verticies actually help and reducing artifact
when splitting up the house into meshes, everyone does per one room: one mesh of vertex snapped planes for the walls, one for the ceiling and one for the floor, no?
I split up all the walls where they meet. this way i can hide every single seem. also by doing this i keep the lightmaps small. doing this i can have a bigger lightmap size, this equals to better quality.
ya makes sense. If they don't split exactly, you'd get bleeding
i read that quite a few people snap their uv's to a grid, so that the uv texels all line up perfectly.
for lightmaps
gpu lightmass is working fine for everyone on 4.24?
Yes, I just formatted my pc so I don't have it installed but it was working fine before the wipe. @amber tendon
just a quick question, is it possible to bake lighting in blender and bring it to unreal?
in theory you could bake it into the albedo map
then use those as unlit materials in unreal
anything view dependent (mostly specular) you would have to get from realtime lights in ue4 tho
there's also the AO input in materials
@rancid tinsel
thanks @amber tendon
my directional light sits at 3.14 (lux) and my skylight at 1.0
Inside i set my point and spotlights to 0.02 (lumen).
My Windows aren't bright enough. So my natural reaction would be to increase the intensity of the lights, but then any sunlight that comes in looks completely burnt out.
How do you guys handle this?
@amber tendon you almost always want to keep the lights the same and adjust the camera exposure instead
agreed with bryan
I was referring to the outside lights
basically increasing the brightness difference between inside and outisde
so that the windows appear blown out and there's more natural light illuminating the house instead of artificial light
Again, it’s all about how your exposure is set. The amount of light doesn’t change, how you perceive that light does.
If you want to make your lights accurate to scientific values try using the new arch viz template in 4.24 it has a sun/sky blueprint that’s set up with accurate values
@amber tendon can you share screenshots of what you’re seeing?
For GPU Lightmass on Fast or Medium Quality, are these black splotches inside and the bright splotches outside to be expected? (just a static skylight)
I’d check your light map density, and also try baking at higher settings to see if you get different results
The only Lightmass Settings that GPU Respects is Num Indirect Lighting Bounces tho.
Apart from that, people basically change the NumPrimaryGISamples and the NumSecondaryGISamples to higher values (that would be the fast/medium/etc setting)
All of these artifacts disappear if i do the insane quality one
Just wanted to be sure that this is how ppl have it on their ends too
the artifacts also appear on high res lightmaps
open baselightmass.ini and clamp fireflies
Thanks, setting the fireflies to 1.0 fixed the bright splotches completely
I assume that for fast/preview settings these splotches are to be expected.
anyone got some good world settings > lightmass build settings they can screenshot and maybe pin in this channel? i'm always losing them
also does anyone else find the directional light on the new SunSky too bright at 75000 lux? if i exposure compensate i get dancing samples almost as if rtx gi is on, but no raytracing is on.
Hi!
Anyone here uses sky material?
Got an annoying issue. We have a Sky Dome with Sky material (demo level copy) and meshes keep flashing saying that
So we optimize by not rendering the sky as full-screen pass.
However, your sky mesh does not cover that part of the screen!```

The sky mesh is a regular sphere with 1000000.0 X and 150000.0 Y copied from the demo level, so I'm pretty sure it covers it all.Anybody knows how to fix this dirty shadows in some objects?
This is my lighmass settings
@cyan ether
For CPU :
0.2 scale
10 indir bounces
10 skylight bounces
5 indirect quality
Then production settings
@near viper
Increase indirect lighting quality to sth like 5
Also maybe disable ao
@near viper Don't use lighting quality 10
that looks more like a problem with the lightmap Uvs
Do listen to Dan in that case 😄
more experienced than me with thsi
these kind of artifacts I get when I bake with lower indirect quality and/or bake in medium or preview
Also I'd like to say that GPU Lightmas is the shit ❤️
@amber tendon Do you happen to know a solution for patchy builds with GPU Lightmass on intersecting meshes? 😄
can you show a picture?
Sure, just a sec
Quality is increased further via console settings, and still, no matter the lightmap res, no matter the quality, intersecting meshes always have patchy dark spots
This one is with glowing red lightmap res. No lightmap compression. Any idea?
does your UV have enough padding?
UVs work better when the edges can be straight (vertical or horizontal) it's not always posibble but it helps with stair stepping
@amber tendon I didn't mean to contradict you but lighting quality 10 is Only used for final high quality bakes to remove the subtle splotchy noise that arises when you don't have enough samples, not to remove an obvious artivact. What I mean is that if it looks that bad, it's not gonna help. And since it takes hours to bake it's not a good troubleshooting measure.
i could imagine this being an uv issue, @still adder
could you show the alt+0 view to show lightmap texels
@royal osprey
That's fair enough, I did read about the rule of having scale * indir quality be 1 always.
So if you have a 0.1 scale then you'd need 10 indir quality to get to 1 again.
For me these artifacts do happen with baking preview/medium vs production and high indir tho!
in any case, do show your uvs, @near viper
@amber tendon This final image is: 4k lightmap resolution, no lightmap compression, lightmass ini modification to ultra, and max packed lightmap res increased to 4k from 1k,
this is the lightmap density view of the last build
the texels are good and uniform
uses a default unreal unwrap tho
thanks all, still not finding a solution for dancing light samples, never used to have this
is gpu lightmass available for 4.24.3? google search returns an oldish forum thread, but i have a feeling this isnt the direct source for builds
oh ty
well that was easier to get up and running than i thought, and took a 29 minute cpu build to 1min20 on gpu
although my results and light bake levels are a little different
they are, it has some limitations, but in general it does a better job much faster.
i read somewhere in the thread area lights arent working yet
i dont suppose this is kept uptodate anymore https://github.com/sgeraldes/LightmassConfiguration/

GitHub
LightmassConfiguration is a script made for Unreal Engina 4 to allow to change from Unreal's CPU Lightmass to GPU Lightmass (made by Luoshuang for the Unreal Forums) and back. Since there a...
changed from 3x 2048 Lmaps to 3x 4096 Lmaps, feeling the wait now, 10 mins in
before using gpu, I had a few bakes that took more than 4 hours, I even set up a renderfarm with 8 machines.. Now it's rare to go over an hour.
do you tend to keep everything sub 4096 to achieve this?
I am obsessive in making really good lightmaps UVs so I can get away with lower resolutions on some objects, I use just enough on each one.
john that gif you have is because youre using RTGI if youre baking dont turn it on
doesnt really make sense to combine baking + rtgi
i thought that too, but when i check the postprocess settings everything is raster, gi off, so it's something else
it defnitely looks like the final gather mode of RTGI
test by swapping to bruteforce just to see if it isolates the issue
Maybe disable ssr?
wonder if it was turned on for the project by default and the post process volume isnt on infinite?
it's on infinite, doesn't seem to be reflection related
120fps too, i usually dont get that if doing rtx calcs
https://i.imgur.com/rnGVgEq.gifv yeah seems to be in both, moreso in detail lighting
seems like datasmith's autounwraps use a lot of padding, which is wasteful when using 2048 maps
i dont suppose there's a setting to tweak that somewhere
you could try step by step debugging specular related things
ie disabling/deleting refcaptures first
and so on
Yeah don't use datasmith if you're doing quality archviz
When using GPU Lightmass do your PCs also become super unresponsive?
responsive as ever here
I mean things that your bug could be:
-raytracing
-dynamic shadows
-specular reflection from capture or analytical light
-some other postprocess effect
it should be unresponsive on when you do anything with your gpu
as its using 100% gpu
cant do other 3d, watch videos etc
it is also prone to crashing if you do
I guess I should not have UE4 open in the background then
that might be causing it 🙈
i'll run it from command line then next time
Hahaha
i've also noticed that the nvidia studio drivers have different scheduling behavior on CUDA queue vs 3D queue
so if UE4Editor running in foreground is making GPULightmass slower, you can try to switch to those drivers
Huh... Interesting could you elaborate more on the queueing?
since some version around 410 nv drivers prioritize 3D queue over CUDA
so if you have UE4Editor running with realtime checked in the foreground it will slowdown GPULightmass greatly
ah I see
I guess its best practice to never have the editor running at the same time anyway
yep, it also eats up vram for GPULM
the new GPULM largely solves the problem by directly sharing the resources with editor
thats cool
like, this forest was not possible with previous GPULM (nor is it possible with CPU LM), but fine with the new one, also thanks to proper instancing support
didnt try full bake, but it runs fine in preview
for the new GPULM, preview = final bake, wysiwyg, so as long as the preview runs fine there shouldnt be problem with final bake
thats cool, was just wondering about performance
it's the man himself, keep up the mind boggling work
Anybody knows how to make glass material to use it in an ArchViz project for Oculus Quest?
When I try to do it it looks like this
Hello
Hi, anybody has this problem before? I got a huge problem with light baking in 4.24 (never happened in 4.23 before), I don't know. But I've tried to bake test many times, I found that the problem causing from the shadow of the ceiling, so if I switched it to Moveable it didn't cause those mosaic splotchy shadow, then again of course the room all looked wrong because of that. So how can I still keep at Static and has a nice light bake?
I've tried to break the ceiling mesh, also break UV into multiple shells. All UVs related are just fine, especially if I moved these objects to another room, it baked without any problems
The 3 tables below I just want to showcase, there's certain areas in the rooms where the shadows look so wrong, the other does not
@open zinc try unwrap object with 3dmax or 3d software to fix it
GPULightmass artifacts like these are not firefly-related, but instead just need more sampling, right?
correct
When I try to do it it looks like this
@near viper Any help with this?
When I try to do it it looks like this
@near viper This is a pretty good tutorial
https://youtu.be/lZ2o-NEdJhw
Learn to work with interior in UNREAL ENGINE 4 - Click here to get the hole scope: https://vrayschool.com/course/vr-interior-workshop-3dsmax-vray-unreal-engine-4/
@safe snow those tables are created in Maya with 2 UVs before importing to UE. You can 2 out of 3 tables are good with the lightbake, just the middle where some weird shadows cast upon it.
@near viper This is a pretty good tutorial
https://youtu.be/lZ2o-NEdJhw
@torpid sapphire Is this optimized for Oculus Quest? Like android compilation?
Learn to work with interior in UNREAL ENGINE 4 - Click here to get the hole scope: https://vrayschool.com/course/vr-interior-workshop-3dsmax-vray-unreal-engine-4/
For GPU Lightmass to fix this, which value would I have to tweak?
It's the only place in my house wherw this happens
its also in the wall above it that is covered and thus invisible usually (camera is clipping into the ceiling here)
How can I solve this tiling problems in the render visualization of this picture?
@near viper use higher resolution.
@near viper its not optimized for quest.
I think I should create a common errors for gpu lightmass thread or sth
and share the things i noticed
Hi all 🙂 I searched this channel and found alot of people mentioning Planar Reflections and the performance costs of it.
I noticed that the feature has a 'capture every frame' and 'capture on movement' checkbox, which I've unchecked but the actor seems to ignore that and continues to capture all the time.
In the level blueprint, I've added a reference to the planar reflection actor and when searching I can 'get capture every frame' but nothing shows up for 'set capture every frame'
Has anyone managed to get this working? Is it broken?
@near viper use higher resolution.
@amber tendon It is for quest too so I have to use compress quality and resolution but I try to trick that :S
@near viper Make sure the texture has power of 2 dimensions so that mipmapping is enabled.
also make sure to enable mipmapping after you made it power of 2
@near viper Make sure the texture has power of 2 dimensions so that mipmapping is enabled.
@junior path where can I see that option?
You'll have to resize the texture in Gimp/Photoshop etc to suitable power of 2 dimensions then re-import into Unreal.
You'll then be able to set the Mip Gen Settings away from 'No mipmaps' if you load up the texture asset in UE. Like this -
does anyone know why the purple light is casting light on the inner wall of the cabinet?
they are both set to cast shadow
Are the normals correct?
yeah they are
It may be the volumetric fog depending on what your volume density is
can you show lighting only viewmode?
heyo ! can anyone help with some lighting tips ? i have a bit atrium space with a bis emissive screen, ssgi is on so i get nice bounces in space, but is there a way to cast dynamic shadow from that emissive mesh as well ? and also is there a way to combine this with a baked static Ao for instance ?
was having a play with mesh distance fields but the resolution is too low, and i have too much geometry in the level it woukld be a huge perfomance hit
i thought about lightmass too, but as my light is mostly coming from the emissive screen plane it's wouldnt work
so i was thinking to just bake some nice shadows so that they show up when then screen is lit
otherwise, the space is mostly black when the screen is black
"cast dynamic shadow from that emissive mesh as well ?"
you could try compiling VXGI from nvidia, it might support that
otherwise you'd need to bake
best bet atm is baking
dynamic shadow on the mesh is already turned on but doesnt seem to be doing much
so then, shall i just bake the ambient occlusion ?
or maybe get a point light from near the source of the emissive screen to fake it
so when the screen gets brighter it reveal the baked AO ?
why dont you use the mesh as emissive
I'm thinking of (pipe dream) starting an Archviz company that offers pixel-streamed interactive solutions to a custom home builder a friend of mine works for. What would you recommend as a platform to host and run such a thing for potentially hundreds of users, scalable up from there? I would be a vendor offering streaming interactive Archviz as a service to the custom home builder architecture and construction company.
a server farm with strong GPUs :d
and some very smart load scaling
bakterhaz mentioned some stuff regarding this
in graphics channel
thanks
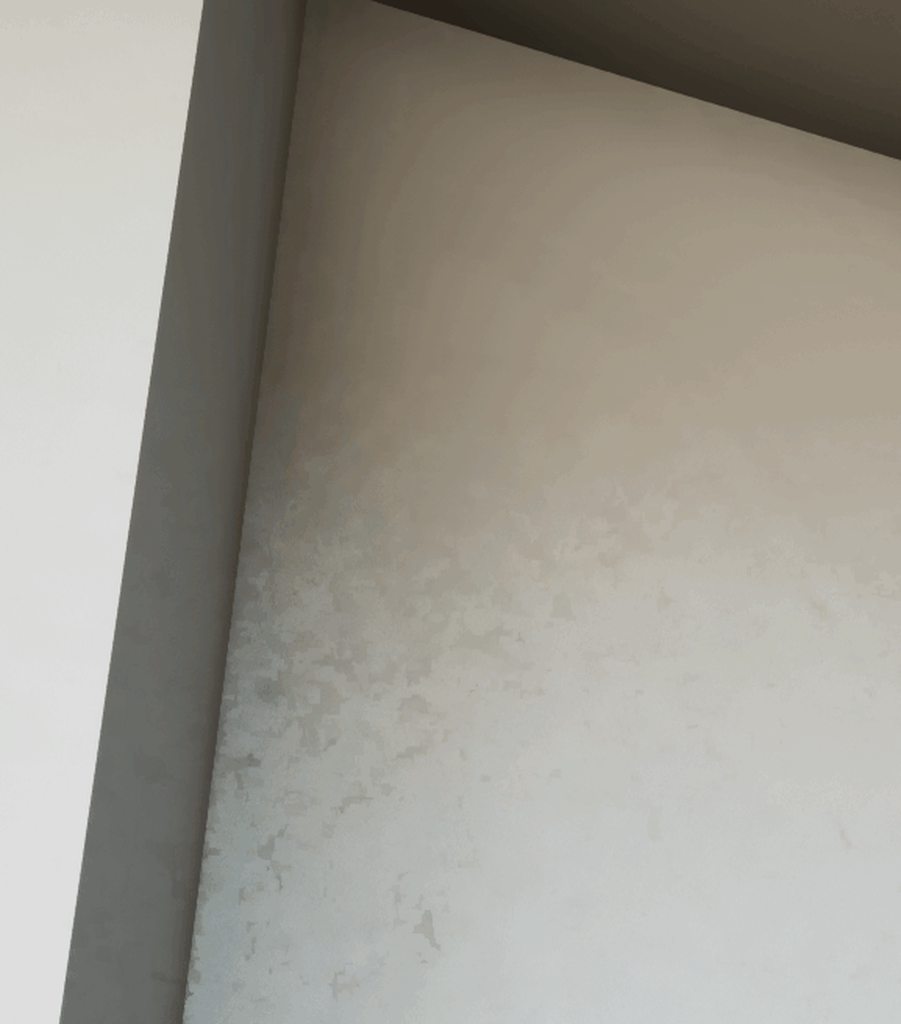
hey guys been getting some weird artifacts on my lightbakes in 4.24. All of these models have been manually lightmapped in maya, so 100% sure it's not UV overlaps or not enough lightmap res. Anyone got any idea what might cause these?
Hey.. so i guess the raytracing stuff is more common under arch-viz creators so i post this problem here too:
i have a serious problem with translucency and DOF. I dont know if its a Raytracing problem because it kinda works with the standart "Raster" method. So yeah im pretty new to Raytracing and overall not the biggest pro so maybe im just missing something, but after searching everywhere i cant find a working solution. Here is the problem: I want to use the DOF from the cine-camera but as soon as the background behind the bottle gets blurry it just clips through it. I know the issue is in the Dbuffer because you cant see it in the debug view but even after enabling the custom depth i dont know how to use it right. Thanks in advance :D
offtopic but you have a really cool name 😄
@queen kiln i have had these when i baked on medium quality instead of production. Or if i had some hidden object there.
hey guys been getting some weird artifacts on my lightbakes in 4.24. All of these models have been manually lightmapped in maya, so 100% sure it's not UV overlaps or not enough lightmap res. Anyone got any idea what might cause these?
@queen kiln I had the same problem but that artifacts are softer... Idk what could be 😅
How can I solve that shadows?
@amber tendon @hot ruin Yeah we are attempting to do the same. PixelStream seems like an ideal solution, however scalability is a huge block that we are trying to resolve. At its simplest for, we can get matchmaking working, and have numerous instances of cirrus and executable running, at which point any client is directed to an empty session of an instance running. This works, but as soon as you run out of instances, spinning up servers takes a long time (relatively speaking). Not to mention the load on the server just having 10's of executables just running in the background. Ive managed to implement pausing the GPU, along with pausing the video stream, to save resources. The lack of documentation in terms of how to handle scalability is hindering progress.
I did not find any GPU servers when I checked out AWS. What service are you using for your infrastructure? @median rivet
@hot ruin We havent deployed anything to AWS just yet, this is all internal. However, I do believe we did a test on AWS and they did have GPU farm, albeit fairly expensive.
@near viper Those are not shadows, it's called Occlusion
occlusion can help define the walls in a scene, but with good global illumination it's not as important, I rarely use it or use it with low values.
@median rivet I guess you guys optimized the scenes as much as one could already
pausing the gpu makes sense
wonder if there'd be a smart way
to have set cameras
and reuse a lot of the rendering data
just change the materials in a seperate path and then recombine
dunno
Doesnt Epic have a partner company who does this kind of thing?
@amber tendon Not optimized at all really, could use some work for sure.
Not sure @hot ruin . There are these guys, apparently purchased by Unity, which seem to do what we are after https://www.furioos.com/.

FURIOOS, Stream any 3D project anywhere, anytime, on any device.
Stream any 3D project anywhere, anytime, on any device. Furioos makes it easy to share any 3D application and embed it onto any website. Stream 3D experiences from Unity and other real-time 3D platforms, Windows applications, and other creations from any web browser.
It'll become more important in the future
@near viper @royal osprey It looks like it might be both SSAO and low quality lightmaps? If it was just SSAO, it would give you at least a smooth gradient without that noisy look. What are your lightmass settings set to?
so i realised that my scene is not pulling any ambient occlusion
like the buffer visualiser is all white
for both ssao and material ao
anybody here know what the issue might be?
Do you have ssao enabled in post process?
yes
Are you using deferred rendering or forward rendering?
deferred
scalability settings fucked
mybe
-try an empty levels and see if it works
-try a new empty project and see if that works
-delete intermediate/saved folders in your project directory (make sure there's nothing important in your saved folder ie builds or screenshots/renders)
-check if your scalability settigns are ok
-check Cvars
int he editor viewport you can set flags to disable lighting component. make sure that isnt your problem
that's all i can think of for now
nice cabinets @tepid marten is that a scene or a game or? interested to see the final result
@cinder glade thats a scene for a challenge. Yup ill upload it once is done :) in a couple of weeks
Screen Space Ambient Occlusion
go to your post processing volume
and disable ambient occlusion there
also, simple things like these you can usually find by googling
😉
@amber tendon I know where these setting are. is just that i dont see my ao maps on my materials working at all. plus when i go to the buffer visualization the whole buffer is white. also the material ao buffer is also white.
Would this be an appropriate channel to ask about an issue I am having with staticswitch param on my master material?
following the Unreal academy archviz track and I can't seem to get the instanced material to work using the staticswitch for each texture type.
any idea what I am missing? I am stumped
@tepid marten This was not directed at you at all
do you guys use virtual texturing with your lightmaps?
@near viper SSAO is screen space ambient occlusion, what dann had mentioned it might be. You change this in the Post Process settings.
from the looks of it, it's because you have your wall in separate objects, instead of one.
ya you need to merge dat
How can I reduce that pixelate shadows in mobile rendering?
increase lightmap resolution of the table

Behance
Realtime Architectural Visualization I made in Unreal Engine 4. It runs at 90 FPS in Virtual Reality on a HP Reverb.
I've finished my first ue4 archviz project
thank you guys for the help/error troubleshooting 🙂
looks great
Are there any sample projects that show off the current state of the engine (and how to achieve them), similar to these projects from 2014?
https://www.unrealengine.com/marketplace/en-US/product/lightroom-interior-day-light
https://www.unrealengine.com/marketplace/en-US/product/xoio-berlin-flat
It would be great to try a tech demo before I invest a lot of time into learning UE4 ArchViz (coming from Max/VRay).

A sample scene to evaluate architectural visualization-friendly daytime and nighttime lighting configurations in UE4.

An apartment realistically rendered using Unreal Engine 4.
Well, I just found one on the Learn tab of the EG Launcher, should have checked there first! 🙂
increase lightmap resolution of the table
@forest depot I increased by 264 override
Keep your resolutions as power of 2. Eg. 256
hey Jan, looking awesome 🙂
Means a lot coming from you @forest depot I hope it improved a lot from when you last saw it 🙈
yeah definitely making some big steps 🙂
Hi does anybody encounter with this lightbake problem before? Like those fireflies spots on the walls shadows? The lightbake was working fine before though
@amber tendon thanks for your reply, also I've tested with preview bake, working fine, but when I baked with High, it seems appear again!
@amber tendon thanks for your reply, also I've tested with preview bake, working fine, but when I baked with High, it seems appear again!
@open zinc check your baselightmass and bake with production
it might help
I'm having an issue where I can't finish any light builds because my editor just closes down the moment it's done (my scene is 3500 objects at 256). I'm fairly sure this is because I don't have enough disk space left on my SSD. Are there specific folders I can safely delete to free up space?
@open zinc this happens sometimes when your lights have a source radius that touches something
ahh good point dann
@open zinc this happens sometimes when your lights have a source radius that touches something
@royal osprey Oh, is that the only thing that can cause this? I've had it a few times and in some cases I never really got rid of it.
@sweet fossil
That is one culprit, another is having small emissive surfaces that are too bright, like light fixtures, so do the bake with the emissive low, then crank it up after the bake if you want the glow/bloom
why is my shadow doing this when i get up close
@tepid marten try these commands ! or adjust the value of cascaded shadow distance
@amber tendon the project looks awsome dude!
Thank you very much , @pastel summit !!
@queen grail Thank you imma try them
What happened to the #datasmith channel?
what about it
@junior path it is still there in the general category
Its still here indeed 🤔
any way to automate this part? Not a fan of clicking import 500 times 😄
Browser glitch it seems. It back.
Have you tried import all?
Is it possible to take image or video output (from sequencer) of archviz project at runtime?
You can render your sequence out to stills or video.
https://docs.unrealengine.com/en-US/Engine/Sequencer/Workflow/RenderMovieSettings/index.html
Describes the options available to you when rendering out your cinematic sequences.
@junior path Is it possible to invoke the sequence renderer at runtime?
No, it is editor only afaik. I use Geforce Experience to capture video in realtime for packaged apps. There is no programmatic way to trigger this though.
ok, thank you
you can invoke it
in the sense of having it play back a scene (not write to disk tho)
alternatively there's always the windows game bar
[Job] Error: Failed to pull a required file from remote Agent: GPULightmassKernel_2019-08-10_21-44-26_21697024-64bit.dll
[Job] BeginJobSpecification: Failed to cache necessary job
Anyone know what causes this issue for swarm (using it w/ gpu lightmass)
Hi guys, would love some advice as I've spent 2 days solid on this now and it's driving me up the wall (literally). I'm a new user so I apologise in advance if this is a noob question! So I'm trying to get this interior scene lit. It's a large flat all lit by natural lighting. I have the levels where I want them but I just can't get rid of these black splotches everywhere. I know this is a common issue so I've tried going down all the 'common' avenues, ie ramping up my lightmaps, fiddling with global lightmass, using portals etc. I have basically done everything by the book but it's still there and to be honest I'm approaching the end of my rope. I think at this point that it must be some stupid basic thing I've done which is causing it, but don't know what?
These are the worst affected spaces. I also don't know why the ceiling of the blue room is so bright, so no doubt that's countless hours of troubleshooting ahead of me for that. But any advice or opinions I can get on this will be very, very appreciated and I can't stress enough that I know this probably something I'm doing wrong 🙂
If any settings etc are needed, let me know. As I say, I'm new to this so not sure what you guys would want to see.
Hi, i want to know if u can share some tips or experiences on how do u share the packaged ue4 archviz files to your clients? I saw some real estate guys viewing it on ipad pro and the quality is not compromised, for me atleast.
Many Thanks to all who will answer.
I asked this because when i tried to share my windows x64 package to my friends, they cant open it without installing some prerequisites.
@velvet saddle first make sure you are baking to uncompressed lightmaps and your build quality is set to high or production, and if that's not the issue can you post screenshots of the scene in lightmap visualization mode, and your lightmass settings.
Your also going to want to disable all of the default post processing settings like Screen Space Ambient occlusion, bloom, lensflare etc... While doing archviz
Thank you so much for the advice. So the compression checkbox is something that's been evading me. It's not where my tutorial or the documentation says it is (under the lightmaps sections of lightmass in world settings). Sorry if it's a very obvious question, but where might I find this?
No worries, found it hiding higher up in the world settings. It's really helped, but there is still something strange going on. My maps are pretty high for the walls, for instance (min 256, 1024 res) but I'm now getting this artefact:
Again, really appreciate any advice on this.
@velvet saddle may be this can help https://www.youtube.com/watch?v=3TqQH1fZAtM
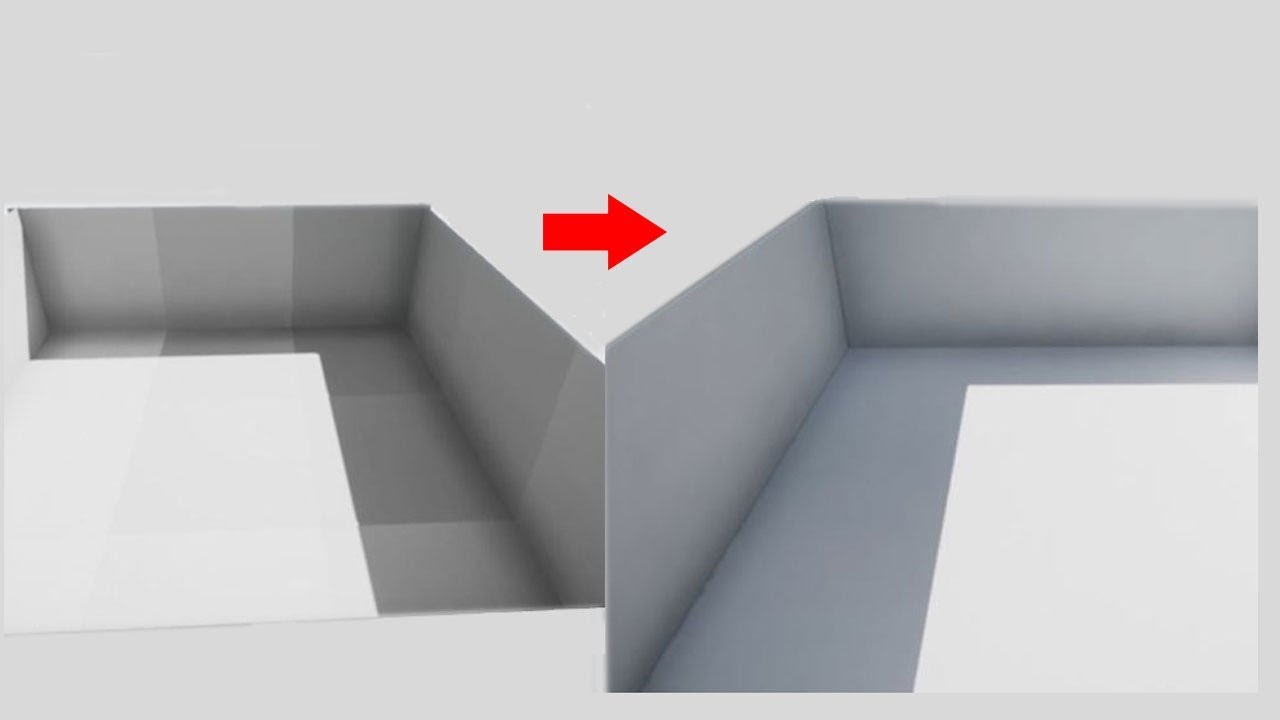
Grid spacing/snapping, best practices for materials and UVs, exports and imports, basic lighting setup, and post processing - get rid of those ugly seams between your modular walls.
I cut out most rambling and build/loading screens. Feel free to leave a ...
@rancid tinsel Thanks! I managed to mostly fix it now by just throwing in some rect lights to bring up the darker areas and lifting the atmosphere intensity a little, but this all helps. You guys are amazing 🙂
not exactly, you can however tweak the occlusion and it can get you close.
Guys, another question sorry. I just somehow parented every single material in my scene to something called' Opaque_master'. It systematically wiped every single material I've spent days making, and UE didn't let me undo nor load up my backup (it just re-applies the parent chain and doesn't give the option to delete it). To say I'm annoyed would be an understatement, and my first thought was that it's a malicious virus of some weird sort 😄 , but that seems unlikely so I wanted to see if this is just some stupid thing I did and if it can be avoided in the future? I've lost 2 full days of work because of this so just want to avoid it again!
I can't find anything online about it otherwise I wouldn't pester you guys again 😦 Appreciate any advice.
Sounds like you deleted the original parent material. I'm not aware of any other way to reparent every material in a scene without an editor utility.
There's a lesson to learn here - use source control.
So that's all it would've been? Huh. Well thanks for the heads up!
Absolutely will from now on.
No idea what the original material would've been that I could've so clumsily deleted. So yeah as you say, lesson learnt!
Hey, everybody, is there any way to do an upscaling kind of thing on a 3d model?
I have a 3d model that's pretty old and I don't know much about modeling.
I would like to redo the textures of my model but since it is old
You want to increase the res of the textures or do you mean poly count?
For the latter, you'll want to do some subdivision
I think it's a polycount
So you want smoother edges for example?
exactly
Depending on your software, it'll be called different things. But using Cinema 4D as an example, you'll want to throw a subdivision surfaces generator on which is easy enough. The skill comes into actually 'fencing' off the polys. I'd say watch a few videos though and you'll get it.
What are you using?
Perfect. I have cinema 4d.
Epic. So find your Subdivision Surfaces gen and put the mesh under it.
and I wanted to redo the texture with substance painter.
All right, I'm gonna go online and find out how to do it.
You'll need to ship out a new UV map then too, but cross that bridge when we get to it.
THANK YOU 🙏
Welcome! 🙂 Good luck!
Thanks
@velvet saddle the reason your lighting is splotchy is because your lighting smoothness is at 0.7 but your quality and static lighting scale are at 1.25 and 1 respectively
Less smoothing on indirect lighting also means you need more detail or you get artifacting
Also lightmaps and the quality level you build the lighting at make a large impact
For archviz you want everything to be green in the lightmap visualizer
For archviz you want everything to be green in the lightmap visualizer
@pale prairie in archviz you generally want it higher unless you're aiming for 60fps+ on standard hardware.
for sure, more lightmap resolution never hurts, but from my personal experience I don't usually see a noticeable increase in quality from making things orange and red if the lightmap UV's are clean and properly working
maybe I just don't have the eye for it idk, you can always crank up the resolution for your final build anyways
it definitely makes a big difference, you can't really get good contact shadows without using a high lightmap resolution. Same for resolving detail on thin objects like mullions or even just casting shadows from objects like that
Thanks for that, @pale prairie ! I think I've mostly fixed it now but I was still using the 0.7 value, so that's great to know as there's still a little splotchiness which it may fix. Most of my lightmaps are at least 128min 1024res, which only seemed to take the problem so far. But I'll bear in mind that it all needs to be green!
@sweet fossil So I want to be looking at more red values instead?
This is how it's looking
The only iffy thing still seems to be the cornicing. Just can't seem to eradicate that. This is using a 1/0 smoothness.
I should add it's only this room. The other 6 rooms of varying size and complexity all seem perfectly happy with green ranges.
When performance isn't a concern, a good rule of thumb to stick to is to make sure that your lightmap texels are at the very least a tad smaller than your thinest face. So for the windows you'd use the density view to get your texels to be about the same width as the inner frame
do that for the cornicing and see if it helps
just be prepared for longer bake times and higher resource consumption
Thanks that's actually really good advice, I hadn't looked at it like that 🙂
To be honest performance isn't an issue. This will only ever run RT on my own workstation.
And so long as I can try to keep it between 40 and 60fps I'm happy.
So far though, lightmaps don't seem to have hit performance at all so fingers crossed.
In fact I find it hard to believe my frame rate is still 120 even with all of this. It's insane after coming from conventional render engines.
But thanks again guys, it's really appreciated. Hopefully I can return the favour at some point 🙂
Lightmaps are just textures after all so if you have a good rig it'll take a far bigger scene before lightmaps start becoming a performance issue 🙂
I've cranked them up to 2048 but no improvement sadly
Starting to think my mapping might be dodgy, but not sure how
I mean it's bearable. I more want to know fixes so I know for next time 🙂
True 🙂 I'm fortunate that I got in on the Ryzen craze at the right time, so I do.
But still, even compared with Octane I'm gobsmacked what UE4 can do.
There's always likely to be a bit of splotchiness, you break up the surface a bit with some roughness or normal variation, it helps to hide some noise in the lightmap. Also if it's up the ceiling like that it's going to be a lot harder to notice. As with a lot of CG work, if there's something that's not quite right, just try not to show it in any final renders 😛
@velvet saddle splotchy is due to not enough samples, a good rule of thumb is to make sure your indirect lighting quality * your lighting level scale = 1
Also you can uncheck 'compress lightmaps' to get cleaner results
Thanks Wickerman, I already did thanks to previous advice from @pale prairie .
That's a good rule of thumb.
Going to see if I can put that into action. As for the cornice, yeah I agree. I think I'm fussing over nothing at this point.
Final deliverable will be just a video sample and some stills so should be easy enough.
Hello guys!
Can you help me how to fix reflections on the floor from windows. They a leaking to other rooms. In window frames I'm using Rectangular light. Reflection captures are placed correctly
Reduce the specular scale of the light
Or reduce it inside of the floor material @cloud kindle
@near viper but I need this specular level in the main room with windows
Hi everyone! I have a question for you all! It's regarding Raytracing Translucency and how it seems to have changed from 4.23 to 4.24. Let me know if any of you have experienced this or have any ideas as to what epic have changed as they have rendered a previously working feature to be unusable in conjunction with two-sided foliage.
The image below is of the same scene in 4.23 and 4.24. All lighting is dynamic and rasterized apart from translucency which is raytraced. As you can see in 4.24 raytracing translucency breaks two-sided foliage and also seems to affect the shadows of the trees too (Perhaps raytracing translucency is linked to lighting in 4.24 and it wasn't in 4.23).
Do let me know if you guys have any ideas on this - seems a shame to have to choose between raytracing translucency and moving to 4.24.
I have a bit of a balancing question for the interiors. Trying to use the 'Sun and Sky' blueprint but what I have an issue with is the realistic levels of the directional light. If it's set to 75000 lux (the default that sounds physically reasonable), my scene (a room with a single window, sun's the only light source) looks reasonably well lit with the fixed EV100 value around 7.0. However; the sky is a washed out white at that point which is obviously not the case with the actual human eye. I tend to think I need to squeeze the dynamic range somehow but I'm not sure if what I'm doing is correct to begin with. TL;DR: my sky is too bright when set to realistic intensity. What do I do with that?
You're eye can expose well enough for both indoor and outdoor at the same time. Cameras cannot. UE4 replicates camera. It's tricky to expose for interior and exterior without breaking the realistic lighting values
aha; so that's intentional then and not me misunderstanding something. Thanks!
Sorry guys but this one's driving me a bit mental. So I'm getting the dreaded 'Static mesh element count did not match mesh instance element count' error on baking. The reason I say dreaded is it keeps stopping me dead in my tracks and seems to have a different fix each time. Can't find anything online about it. Anyway, correct me if I'm wrong but I'm pretty sure it's just telling me I need to delete some material slots. Problem is, how do I actually do that? Another thing I just can't find online. Sorry for yet another probably noobish question 🙂
Learning the hard way that I should section off my different materials before importing into UE, as doing it in the mesh editor just seems to throw up this error.
I have a hunch it's to do with the mesh not realising it's been updated after reimport.
Any help vastly appreciated as always 🙂
you can enable the mesh editing tools in plugins, to then edit your assets and assign or delete material ids/slots
o, then i dont know
It's driving me nuts. I thought I'd just finally fixed it, then I added a completely separate new mesh in and now I'm getting it again.
I can't pin point what's causing it but something is.
But yes it's definitely linked to the mesh editor @cyan ether
As I only started getting it after starting to use that to section out my materials.
can you export as fbx and reimport to try flush
Problem is I don't know what mesh is causing it, and this is a pretty big project. Is there any way you know of that I could find that out?
I've since used mesh edit on quite a few meshes and disabling them doesn't seem to clear the error.
It also seems to have changed slightly:
I tried clean reimporting with datasmith but the problem persisted so I cleared then validated the cache which seemed to change the error into that one above.
Hello, Does anyone know how to get the glass to be transparent while turning on ray tracing?
@ripe crow Turn off cast raytraced shadows in the material
@ocean ledge Here's the mat settings with an Index of refraction 0.2.. unfortunately still not getting opacity not sure why
@ripe crow Use the search on top and look for "raytracing"
@ripe crow Then you should find a checkbox setting with "Cast Raytraced Shadows" Sorry meant search for "raytrac"
@ripe crow But you need to be in Engine Version 4.23 minimum I think
@ripe crow
yea its off 😦
@ripe crow Let me quickly double check my project
Thanks for your time!
@ripe crow No problem! I remember wondering about that too...try also disabling shadows on Static Mesh
i wonder if it has somethign to do with how revit imports curtain walls
@ripe crow The issue is arising from the current implementation in engine as far as I remember
@ripe crow Hm...for me it worked with these settings in the glass material
@ripe crow And these ray tracing settings in the Post Process Volume
does it work differently if i use a camera to do the ray tracing or should i just use the volume?
As far as I'm aware there shouldn't be a difference
I quickly checked my notes and indeed the only thing I had to change was set "Cast Ray Traced Shadows" to false in the material
okay let me try thanks ^^
Hope it works 👍
I was using the SunSky Blueprint from the SunPosition Plugin in combination with the HDRIBackdrop, but it consists of the same components so it should work as well
hmm i see well guess i broke something 😂 idk
Hi, i created a media player material and followed the unreal docs as a guide. Everything works fine on gameplay mode. But when i’m on editor, the video is not playing even though i set the playback to play on open.
Is it normal?
I've done it a couple of times but I don't have it fresh, what I do remember is that an image sequence was way more stable than a movie file.
@royal osprey it’s weird because when i open the mediaplayer, unreal docs said that it’s supposed to play on open but on my case, i have to doublec click the video first for it to play. Then while the mediaplayer is open and playing, i can see the video also playing on the editor. Once i close the media player, the video also stops in the editor.
hey i have a problem. baking skylight is not casting any shadows at all on landscape on 4.24. it was working fine in 4.25 but i had to switch to 4.24. anyone has a clue why this is happening?
the ground mesh is landscape and skylight is set to static. i have no idea why its happening
i setup this to block lighting. as you can see only the landscape is not receiving shadows
It looks like it is, just that your lightmap res is so low that a single texel is bigger than the building
Hi, i have a situation on my project, i built a main menu by following the unreal docs, and i have succesfully followed it, it runs quite well when i tested it on play on standalone game, the problem arises when i enabled pixel streaming, whenever i play the packaged game, it bypasses the main menu that i did, and went directly to the main level. My package is archviz so I decided to ask it here, but if this is not the correct section, can you point me to the right direction? Thanks in advance to all!
Lol, nevermind.. my bad.. i put the default game map to the main level not the menu level. Sorry for this!
Hi I am new to UE4 and I have some questions with the workflow for materials attachment. If I import the objects say from Layer_kitchen from Sketchup or Rhino into UE4, and after doing a round of material and lighting configuration, the client decided to change a big part of the design, and I have to go back and adjust the original file in Sketchup, go thru datasmith and import it again to UE4, is there anyway for UE to remember the materials I have previously attached to the various objects in that Layer so they would automatically be assigned the same material again? Right now, I am doing manual attachment all over again, which I am not sure if it is the best way if there are tons of objects to re-assign the materials each time client decides to change the design ?Thank you all in advance!
try #datasmith for help
no, landscape has enough lightmap res
@fickle halo i can’t pinpoint the tutorial wherein i watch something about your situation. But it’s on the unreal academy. Check it out, and watch the videos pertaining to working with datasmith.
@fickle halo here you go.. I think this explains how to reimport while keeping the changes. I`m not sure if this applicable to you. https://learn.unrealengine.com/course/2436632/module/5367571?moduletoken=UHxxnDLPW8Q6F9B7ujD1iW1PI4SyM-uJL2-9fxSBoFX36Uh94G6alhM-hwfhfe95&LPId=0
Hey thank you all for the reply. @fallow grove Thank you so much for the pointer, will check it out!