#aec-visualization
1 messages · Page 12 of 1
@analog egret the scene looks unlit
made some progress today 🙂 made a render pass to check if there was bleeding somewhere.
after an hour finnaly decided what floor to work with...
i have a scene with static lighting and animated characters imported from anima as an FBX. the anima characters are not casting dynamic shadows. How can I fix this
@jovial coral switch your directional light to stationary
Who knows of good tutorials for helping learn how to work with lightmass

What are some tips for interior house modeling. I'm following floor plan blueprints right now but I want to know how modular everyone else's workflow is.
there was a component in ue4 that came with the engine content, it was a sun/skylight all built into one blueprint iirc, i forgot the name of it and am searching. any ideas?
Anyone else get crashes with the datasmith export from 3dsmax 2019?
I'd I replace all materials with a blank white one it's ok
It's a straight up crash so no hint about what's causing it
could try vray scene converter
or corona scene converter prior to export
might flush the error
@mortal dove best guide i know: https://de.slideshare.net/EpicGamesJapan/practical-usage-of-lightmass-in-architectural-visualization-ue4-lightmass-deep-dive

@mortal dove I think this is a great tutorial if you start out using lightmass: https://www.youtube.com/watch?v=TzqpyNb0998&list=PL6nn6cJKU3LiYpv4QT7h-HK69CgYrgA_6&index=3&t=0s

joel is awesome
@sharp marsh I can give you some insight on my personal workflow for interior. I usually start of collecting a lot of refrence images of a certain style I want achieve, this way get a great direction of how the entire room is gonna look like. from that point i design my own living rooms making diffrent quick blockouts in blender. i gather feedback and choose one i want to work with based on that feedback. sometimes i also gather refrence of houses and just wing with the way the rooms are setup and put my own style interior in there. when i have my blockout i wokr it out and start using temporary props out of my personal 3d library to fill the spae up and get a feeling of what needs to go where. i keep the rules of third golden circle and big medium small in my hand to create scenes. ig you arent farmiliar with those i highly recommenden looking in to the theory as the could boost your skills as a designer by a lot. it helps to create final shots and create scene that feel natural and pleezing to the eye. after that i remove the temporary 3d objects with models i create my own that fit the style i am going for. for me this is a fast way of working. its like playing sims really. i go back and forward into unreal to texture things to see how it looks with al the colors together. inbetween i gather a lot of feedback and keep improving. Hope this helps you a little further
@fallen ember yeahh he has some great to the point tutorials his stuff helped me out a lot in the beginning!
yea same 😉
Thank you @pastel summit
@sharp marsh anytime. If you need some help/advice, don't hesitate to private message me.
Sorry if the question looks silly, but is there any channel for Twinmotion?
I was not able to find anyone in this Discord server
Another work in progress..walls/baseboards/doors/doorframes still needs lots of work...any feedback is appreciated..thank you
hey guys
is there a way to make this nice glossness decay?
mine is just too linear
@median rivet looks really good be carefull with the AO in the second shot it draws the eye pretty fast. i should tone it down a little. it breaks the photrealism of the scene
Update: made small progress on this scene. Not a lot of time recently but coming together the way i versioned it.
@pastel summit what lighting settings do you use to produce this level of quality?
@rose merlin depending on what you do with my answer its a difficult question to answer. If you want to know it and use in your own work it will have diffrent results as it is really depending on the way the level is setup, what HDRI you are using and the quality of the models, unwrap and textures. if so i suggest looking into each of the diffrent values on the forums to get to know more about the theory and what the purpose of each of them are. this way you are complete in control of how you want to scene to look like. personally i have a background in gaming so i know how to setup my models and unwrap in such a good way that it will result in good quallity and knowing the theory of al the diffrent values i know what i will get by tweaking the right stuff. here are my settings they are nothing special and besides that i tweake a lot with post processing and i also use an hdri sky
dont use these settings as a guide line because its really depending on the scene i end up tweaking it myself later on as i put more assets in the scene. this my result that the scene will come out darker and i have to up bounces or skylight intensity. and as it is an early wip its on medium build quality
@pastel summit yeah you're 100% right, i totally understand what you're saying here, because i take the same path, i know that it depends on huge knowledge of gaming dev, actually computer graphics especially inside of the modern game engines. In fact it's a wrong question i asked really 😄 it makes no sense, like you said it really depends or lot of factors, i used to tweak the ini files in the engine as well not only the world settings, and depends on the scene it ended up producing different results on each scene, and that's why i really appreciate what epic games done so far in the UE, it really replicates the real life unlimited factors affected a real scene.
ow yeah totally agree ue4 is really pleasant to work in. i also changed some of the files but i cant remember what i did asit was a long time ago haha😅
thanks for sharing this knowledge btw, lots of people really don't have a clue about lighting in UE, they deal with it like it's few settings to tweak and Voila, the scene is perfect, and you cannot copy and paste some settings to end up with the same lighting and feeling in every scene.
a lot of those settings are definitely scene dependent, the only thing that is definitely going to help your visual quality is to uncheck compress lightmaps @pastel summit
@forest depot yeah i was asking is there a game changing factor helped in producing such scene .. like a tip & trick in @pastel summit 's sleeve 😛
@forest depot yeah i tried it with some scene but my computer doesnt like it haha i run out of disk space to fast it causes a lot of glitches in the scene
and found out that he used to struggle like all of us lol 😄
its definitely worth it, the difference in quality is huge
textures become blurry i upped the ram usage in the fdiles but still happends
@rose merlin theres really no secret sauce there, my settings are a bit different, but thats not really why my scenes look the way they do, as long as your base lightmass settings make sense, it should be doing the right thing. the rest comes from lighting your scene to your artistic style
yeah i've tried unchecking the compress lightmaps, it ended up with huge difference, but it's not the only factor like @pastel summit said really. and i ended up taking hours of lightbuilds on my humbled quad core machine, i realized i need some kind of work station to ease the pain of building on a local gaming machine.
technically my scenes use lower quality lightmass settings than wes 😛
well if youre still using cpu lightmass, i guess the biggest improvement will be using gpu
@forest depot can you show me a screencapture ?
gpu makes a huge diffrence
screencapture of?
@forest depot yeah i heard about it but all i know it's a non official plugin (not Unreal) i mean, is it officially release yet ?
no and it wont be for a long time
but ive been using it in production capacity since it came out
here's the secret guys 😄 please tell me how to build through GPU
and been depending on it for big professional jobs
Unreal Engine Forums
Click image for larger version Name: image_138398.jpg Views: 1 Size: 82.0 KB ID: 1478783
Disclaimer:
This is a very simple and early version of my GPU lightmap
yeah i find CPU lightmass build taking half of my life there
will be a RTX 2060 sufficient to produce good stuff ?
yep
did anyone try RTX ?
yep
i dont think that really matters i worked on a laptop with a 960 before
😂
it was a pain but
i find 2060 struggles in this matter (RTX) i mean
I may have been one of the hosts in this webinar @rose merlin
Enjoy the videos and music you love, upload original content, and share it all with friends, family, and the world on YouTube.
😉
@pastel summit lol, i could use my laptop on lightbuilds, it's a rtx 2060 also 😄
cant wait to get my hands on an rtx dying to try out ray tracing
@forest depot thanks for sharing these stuff really 🙂 i will watch it now i guess. :d
in short, we only use it for reflections and still bake
RTGI isnt production ready for archviz
i try not to say that too much cause i dont think epic and nvidia likes hearing that : D
@pastel summit it's really an amazing feature but like @forest depot say it's not a production ready for archviz yes.
@forest depot hahhahahah
🤫
i think you need at least 2080 to run everything smooth and be satisfied with it.
theres some major problems with RT translucency
yeah indeed
my latest project that ive finished can run at 60 fps with a 2080 using RT reflections
guys this is slowly ruining my dreams of trying out an rtx 😛
i saw a webinar before addressing that technique
you can use it for translucency
but its not just a simple
'turn it on'
when it kinda is for reflections
@pastel summit i really find it not that much of huge difference btw
it definitely makes a difference but not that huge, you can achieve great results still without RTX
yeah i find it like that too
and im not leaving those messages 🙂
yeah 100% agree @rose merlin its just one of those tech things i would like to own as i am a huge fan of tech and just trying some new things out that i might include in my own work would be a nice learning process
just ppushing the limits a bit futher
you have to really look for it, this is all RT reflections and it IS a huge step up from the one without it but thats also because i was staring at all the things wrong with it for this project that lasted months
@pastel summit yeah i'm like you, i'm crazy when it comes to tech, no wonder i always tremble in all of the cables dangling all over the place especially when i first got VR 😄
but i recommend going all up to 2080, no less
and the last shot
only the stuff ive circled wouldve been noticeable at all
its really situational
@forest depot but i wonder how to reduce the noise found when using RTX
not much you can do until they make the denoiser better
this scene uses 2 bounces and i think only 1 spp
is it build in? or do i have to turn it on ?
it doesnt even work atm
congratulations with your work really it's an amazing scene.
where are you from guys?
this shot here really again only the circled wouldve been noticeable at all EVERYTHING else is achievable without raytracing
you will be astonished if you know where i'm from.
yeah i've noticed this one... definitely RTX matters here
I'm from Egypt.
in my country nearly i'm the only one working through this technology, the market here is still stuck with Vray and 3Ds Max
heh, pretty much the same in NZ
i'm trying to construct a team to work with, i find no one
yeah but in Egypt really i find myself pretty isolated actually .. not even near other studios.
that would be hard
interested to see what youve been up to
got anything to share?
it's like a a one man show in my studio. i'm the only one who has that knowledge yet
actually i have a very old stuff here, because i've paused for long time doing something else rather than archviz, but it's related to UE as well.
i'll get you an old video, it's not that good really, but i'll show it to you anyways
👌

Actually it took me a while to find it, it’s too old
The main problem was that our studio lacks lots of modellers really and material designers as well
looks like a lot of work
Yeah i did that all by myself, still not quite satisfied with the results
Need more people to work with, i really want just to work with people share the same passion, cannot find any here in egypt sadly
same thing I want 🙂
I thought of searching for some kind of internship in anyplace abroad
Maybe i can find a food environment anywhere
@rose merlin there are some great online mentorship you can follow with professionals
@pastel summit can you share some links? I’d really like to go through that really
https://youtu.be/yxOSO3nJFyk
This one’s much older but it was a coordination project with multi discipline approach not focusing on photorealism actually

@forest depot does GPULightmass work with 4.23? i see it's only with 4.22
somebody has made it work with 4.23 in the thread
okay then i guess i must give it a try 😄 it's a huge leap in my opinion
@rose merlin i can't give you an exact link but I know they are out there somewhere it's easy to find them on platforms like Artstation. It can be game related but they know a lot about lighting and those skills you can for example reflect back in your own work
@pastel summit Thank you so much really, i needed that, i will deep the search on this for sure
I never studied archviz I use my knowledge that I had in gaming to create my scenes so I think that might work as is kinda the same route. It's just depending on mindset I think it's more then possible. I think it's hard to find a mentor that focuses on real time archviz in ue4 as it isn't that big yet
@rose merlin anytime ☺️
yeah i think you're right 😄 but soon i think it'll be a new approach for people and studies to take that specific field, as more descriptive.
time makes everything 😄
never really played around with close up shots. looking for some tips what camera's to use that are good for these kind of shots
i have no clue how to make shots that focus in and out while making a video inside the editor. anyone has some tips or links to check out for that subject?
Unreal has some good documentation on how sequencer works
You basically create a sequence then drop cameras in
I think your woodgrain on your table needs a 90° rotate :p
Am I wrong in thinking the lighting I see in the viewport and what I see in real time should look the same?
here's what I see in the viewport
here's what I see when I press play
I'm working with Ray Tracing btw
its supposed to be the same
hmm I can't figure out what i'm doing wrong
@forest depot aw yeah its supposed to be rotated 90 degrees haha. i will check out the documentation, cheers
@wicked willow make sure your exposure for the viewport is set to game settings
@royal osprey yes, it is .
@wicked willow I noticed something strange, the sun comes in at different angles
@royal osprey yeah i fixed that part .. I'm using level streaming and playing with different lighting scenarios.. so now I've got to correct lighting level i created to load during run time.. the in editor settings and run time lighting are still looking the same .. like before runtime is so much brighter.
@royal osprey I must have accidently did something without realizing it to cause this problem :/
it is a bit bright
yeah alot bright ;P
well it depends on your client, some love that
the door on the right looks too small btw
@royal osprey my concern right now is getting the realtime in game lighting to match what I see in editor viewport.. here's what I got now ..
@royal osprey at least now can see they are using the same lighting scenario
do you have anything hidden with an eye icon?
they are hidden from viewport but show up on play (some thing do )
@royal osprey i just discovered something by accident.. i hit play in editor window instead of stand alone game and then the lighting is the same and doesnt get so bright!?
that is definitely odd
one thing you can try is copy everything, make a new blank scene and paste it again.
but.. you'll have to re-bake
if you are using lighmass that is
@royal osprey I'm gonna try that .. copying everything to a new blank level.. i did completely rearrange the layout of the apartment .. something obviously went wrong in the process
Standalone game probably isn’t launching with dx12 if you’re raytracing
Alternatively, if it’s baked you need to load your lighting scenario via blueprints
@solemn hawk ok enabled -dx12 it's looking different now but now even more bright!?
Screenshot?
with d12 activated
here's what it looks like without dx12
i'm gonna grab some lunch be back in a bit
any tips on how to reduce banding from a spotlight?
1024 lightmaps here, banding persists
if it's a lightmap issue untick compress lightmaps
ok bakc
thanks, worth a shot
i gave these settings a try, helped a bit (bumped up to 1.0)
i think its just one of those endemic things with a spotlight with not much falloff between inner and outer cone
(banding) city, due to gif compression though :v
@royal osprey @solemn hawk so I tried out turning dx12 on another project i have .. this one actually looks the same with in viewport or stand alone window.but it also brightens everything alot with dx12 enabled..
does this mean what i see in editor is not correctly displaying then?
I noticed that ambient occlusion is turned off in your standalone window, that’s probably what you’re seeing with the “brightening”
@solemn hawk if i adjust the exposure in the Post Process Volume of course that brings down the washed out look im getting but yeah i guess there's no way to get the in viewport/editor window settings to look the same in stand alone
I'm going to go through all the ray tracing documentation again and see if i missed something
You shouldn’t be having a discrepancy, somethings not loading when you “play” your game. Is your post process in your persistent level?
where should it be? ive changed around so many different settings trying to troubleshoot this im now totally confused lol
i put everything related to the lighting in the separate lighting level.. including the post process & light mass importance volumes & reflection spheres
Are you sure that is loading? Open your levels window and set it to always loaded by right clicking it
yes
hmm could this have something to do with it ?
should i only have the raytracing version of these settings activated?
You can’t have both ambient occlusion and gi, you have to pick one
as in, gi should cater for the ao effects that is usually achieved cheaply via ao postfx?
ok i set it like this now
A settings and properties reference for Ray Tracing features and the Path Tracer in Unreal Engine 4.
do i still need these spot lights outside the windows if im using the lightmass portals?
Lightmass portals are only for baking, if you have a directional light setup you shouldn’t need the spotlights
@solemn hawk man, really? great ive mixed info from different places.. ok i gotta take a break .. gonna go work out and have dinner .. thanks for your advice and input guys @solemn hawk & @royal osprey
hopefully i'll have an improved update to show later 🙂
🙏
wow stunning if that's ue4
https://i.imgur.com/FoafpjY.mp4
then you got me over here doing infant shet :v

wow man
you guys are at the forefront
been meaning to try and blueprint together an autofocus dof rig
i guess the dof sweeps in that vid are sequenced
yeah
I see no reason to use autofocus, part of the fun is changing the focus around
i sorta wanted it to be how some modern games handle it, they figure out what you're looking at then focus it/blur others, just cause i spend a lot of time walking around my scenes via fps control too
It's been such a joy doing arch viz with Unreal. Specially with finicky clients that change it all the time.
hopefully joining the ranks, back w an arch firm in the next weeks who have developed an interest in ue4, 3 hmds etc. vray still being the bread and butter though
i think its tough to implement the engine for exterior shot and photomatches
you've got some good wide city backplates in those vids, very valuable
yeah they cost a lot of money : D
it might be a little more difficult to set up materials and lighting than traditional render engines. But the joy comes when the client wants to change the camera movement and you can do that in 1 hour instead of 2 days
theyre at the exact height/position of the proposed building and 360 as well
oh so you guys send someone to site
i guess you could drone it to achieve the height pre build
https://youtu.be/DCnh_NMgGsk <-- we had to build a lof of the buildings in the background, but some are images.

integrating background 3d and photography seems really challenging
some do look a little crappy honestly, but there is so much going on that you hardly notice
specially the fountains moving
oh yeah
seems that light propagation volumes are abandoned, couldnt get it to work in 4.24p2
@wicked willow check that whatever camera you're viewing from in play mode doesn't apply its own postprocess effects. f ex archviz character, fps camera, static camera. priority 0 all of their postprocess values
We're one step closer to Unreal Engine 4.24. Download Preview 3 today to try out new landscape features, hair and fur, plus more! #UE4
See all of the changes and share your feedback ⬇️
https://t.co/EWDld9j5NH
Likes
103

Preview 3 is out lads ! 
🙌🏼
@cyan ether you mean set this weight to zero in the character BP? I haven't touched any of the Post Process stuff below
yep this, worth a try
nope ..that did nothing
the source of your lighting problem
i decided to look for new tutorials on Raytracing for Unreal
found an Non- Epic one that mentioned loading from the Epic Launcher will not load the editor with dx12 !? so did this
yes, with 4.23 you can forego even that.
settings > project settings > Default RHI > DirectX 12
now what I see in the editor matches what i see when I hit play!
finally i can focus on lighting! 🙂
https://i.imgur.com/IKFHBkO.gifv
getting black artifacts on full metallic shaders with a divot normal map, or any normal map
is this usual?

maybe lower the contrast of the normal map
I think its a SSR problem. maybe place some reflection probes to fill in the spaces where it cant reach. this should fix the problem, if not i have no idea what causes it..
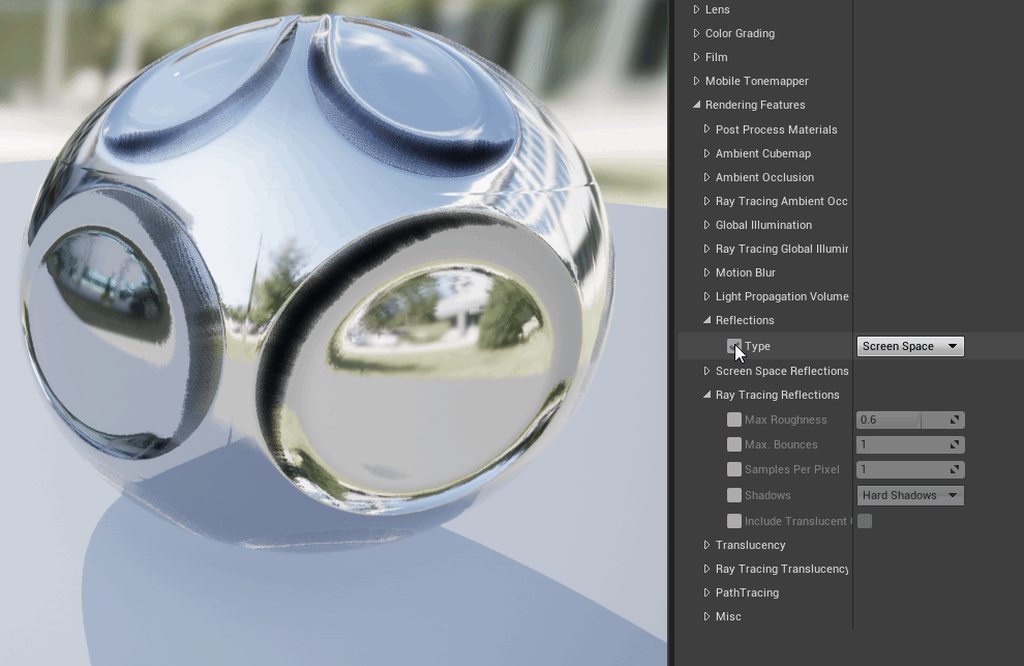
are you guys able to get the raytraced reflections on clear glass like they show in the documentation?
no im not and its really upsetting
might be because im using a 1080ti though
also thats not clear glass is it?
You have to enabled raytraced translucency
The table in the image you posted is opaque
Hi, just starting out with archviz on unreal and i stumbled upon pixel school 3d. They are offering a full course with assets, for a very discounted offer of 200euros. Do you think this is worth it or ill just stick with unreal academy and youtube? Thanks in advance
@fallow grove Well if you are just starting out I think it's a good idea to go through all the Unreal Online learning material first
@wicked willow thanks for you reply. Ill save my $ for now. Lol. I just got tempted because it’s priced at 1000euros at first. Lol.
@fallow grove also the official Unreal Documentation is very helpful
hhmm looks like Raytracing causes the Directional Light to just see all BSP models as invisible? the light is passing through all my walls as if they are not even there!?
never mind .. got it.. 🙂
Hey guys, does anyone have experience with the new cloth sim system trying to make curtains but I'm getting an odd error where the cloth sticks to itself.
for anyone wondering i use blender to create my archviz. yes its possible and i recommend to try it if you never have. working on the kitchen area for my scene blocked out some of the shapes and now starting to put evrything together
I have some other projects in here as well. they have there own category that i can hide easily i use the props in the other scene to quickly block out shapes in my current one. some of the small prop will be reused. this allows me to build quick from nothing and get a sense of direction were i want to go.
hope this small little insight gives people some ideas or their own workflows
Anyone knows how to setup GPU Lighmass on ue4 4.23.1? I'm kinda lost on the forum actually.
i finally got it to work 😉
now the questions is, Does tweaking the lightmass settings in the world settings, makes any difference to the output like the ordinary CPU lightbuild? or do i have to tweak everything in the BaseLightmass.ini to make effect ?
This thread is hilarious. I dont know if he is trolling or? @hallow arrow https://forums.unrealengine.com/development-discussion/rendering/1689418-visible-in-ray-tracing-option-and-sky-sphere-problem
Unreal Engine Forums
Take a look at this two screenshots. On firs one scene where Sky Sphere have option " Visible in Ray Tracing " disabled - it not visible in traced reflections ( it reflect Sky Light cubemap instead ). Second have " Visible in Ray Tracing " enabled - now we can see Sky Sphere ...
lol he is messing with Luoshuang, really ?! 😄 i don't know if he's trolling or not, but he don't know anyone from the community i guess.
🤷♂️ idk, from the point of physically based light transport, his scene should look blue with the default sky sphere, assigning a different cubemap makes the scene's lighting detached from the sky. But maybe he doesn't care about lighting consistency at all?
i mean, going against PB light transport is possible in this engine, but that's probably asking for trouble, for both developers and users
I found it funny, because he himself demonstrated how the skylight works. On one end, capture scene with the over saturated sky giving off "blue". And the other with his desaturated cubemap. Working as intended, yet complaining about it?
well, because that trick doesnt work with RT reflections
so he asked for more options to hide the sky sphere from certain passes
from my experience, the options will quickly grow into a matrix: one axis is the passes (reflections, translucency, etc), and the other one is effects (primary, shadows)
I understand some of those words you said 🙂 ... In terms of the Sky being present like you said in your response, the reason being is because of its bounding box, hence the benefits of the acceleration structure wouldn't be as effective? Am i even close? lol
yes, and sampling will be less efficient
if he complains about the captured cubemap being too low resolution to serve as background in reflections, thats legit
... but i really don't know how to answer the question of 'my sky is blue, yet i don't want things under it to be blue'
🤔 it is possible though that the scene is overly blue due to lack of skylight occlusion in reflections
I'll leave that up to the pros like yourself. 🙂 Thanks for your input as always.
@forest depot you mean my reply? Is it rude?
This from the thread
" Captured Scene " is useless s**t and you know it... Make scene looks artificially blue and can't be used in production at all.
Yeah i understand now : D
Does tweaking the lightmass settings in the world settings, makes any difference to the output like the ordinary CPU lightbuild? or do i have to tweak everything in the BaseLightmass.ini to make effect ?
It does have a large impact on the results
Do any of you guys have opinions on Twinmotion? Looks really cool but quite limiting. But the rate at which you can complete tasks is quite awesome as well as the exporting/rendering time. Im a beginner ArchViz artist
It's really cool. Specially if you need people/cars. You are correct in thinking that it is limiting but the ease of use and speed of creation make it a useful tool.
Thats actually great to hear that it is useful in some ways. Yeah the pathing tool with people and cars is amazing!
Hmm Im sort of stuck as I have a project coming up and Im trying to decide whether to use Twinmotion (for the first time) or just continue using UE.
hard to say really, I guess it would depend on if you need quality or speed. You can get better quality in unreal but it takes longer to get there.
Yeah exactly...
Does anyone know if there is a way to export all of Twinmotion's materials/animation models into unreal? some of them are beautiful and really useful .
I feel like my biggest weakness as a archVizer is my lack of ability to create high quality textures which Twinmotion has
Dowload quixel bridge, once you have it, click on "log in using Epic Games" and tadaaa
super high quiality images and rocks and stuff
there is also textures.com and a bunch of free stuff in the epic Bazar
Oh yeah I know about those fantastic textures and materials. Was just checking if someone new about moving Twinmotion stuff ya know. But yeh if not yeh def will use those
How do I clear out my baked shadow maps? I made the mistake of having two different Lighting levels.. one alll ray traced and the other without raytracing... now I've got this mess 😦 Enabling force no precomputed lights or trying rebake lighting is not fixing it
Try enabling for no precomputed lighting on all your levels rather than just the persistent
Alternatively you can just delete the light map asset
@solemn hawk I tried all that and it didn't work
I did find the fix though
Open the static mesh editor for the model with the problem and change the Light Map Coordinate Index
That’s not correct
@solemn hawk I dunno .. All I know is that it worked
That's probably fixing a separate issue
@forest depot hmm what's the correct solution then?
oh no I just tried rebaking the lights for they raytraced level to see what would happen ..
@solemn hawk I enabled this on the persistent level
ok just went back and opened each level separately and enabled it for each one
for deleting the light map asset you mean this?
Yes
@solemn hawk Man, I'm totally stumped. Nothing's fixing this .. 😦
Ok, you have multiple levels right, and you should have a mapbuilddataregistry asset for each level that you’re working with,
Delete them and you will not have any light maps to load.
@solemn hawk nope.. I'm gonna take a break and try some things later tonight
i meant nope that didn't work either lol
Could anyone rate my setup for archViz? My lighting is stucking loading on 0% im not sure why. maybe my setup cant handle production quality?
GPU: Radeon RX 590 Series
CPU: AMD Ryzen 7 3700X 8-Core Processor
RAM: 32GB DDR4
I think the GPU is the weakest part of my setup. But after spending all my money on the CPU (rookie mistake i know) I have to wait till i earn enough money to upgrade 😅
@tropic flicker Sorry I don't know anything about Radeon GPUs . Is the lighting stuck loading meaning when you are trying to play your project or stuck building?
Stuck building at 0%. hasnt frozen . just loads continously
Sometimes it stays on 0% for ever and then it works. Once it starts it goes pretty quick.
Try lowering all your lightmap resolutions and lightmass quality settings and render that when you're working. Once you're happy with the low quality look and feel bump it up and render it once
ok will do. thanks @austere hazel
Also, when the time comes to buy a new GPU, consider nVidia, since they can run GPU Lightmass, in my tests it runs much faster and has better results
ok will do! thanks
I understand that settings are usually pretty situational. But would you say these are around the 'basic rules' to achieve high quality lighting assuming the models and textures are already high quality?
- Make lightmap resolutions so its visibly green in the light map density view mode
- make lighting level PRODUCTION
- Setting graphic settings to cinematic
- Follow below world lightmass settings:
bonus: Using UE4's swarm agent network distribution for shorter build times
Im creating a little starting template for myself that i follow for every project
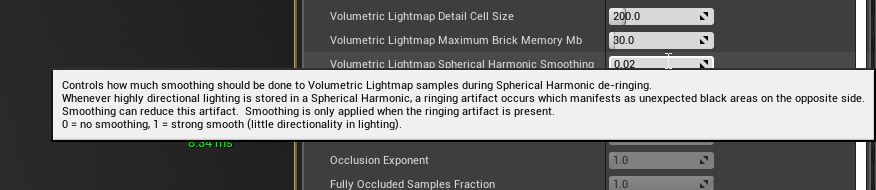
Yes, pretty much. I'd say you could lower the Indirect Lighting Quality (the rule of thumb is usually that Static Lighting Level Scale * Indirect Lighting Quality = 1).
I like to turn off the post process Ambient Occlusion and bake it in the lightmap but that might just be me.
The Lightmap resolution being green is also a rule of thumb, most of the time I tend to go into the red as I want high definition in archviz.
Are you happy with these settings? How is the result?
yeah cant really go wrong with those settings
if anybody gets bad results using those settings it would be from another cause
@austere hazel im pretty happy with them...sometimes im not sure if its the settings or the textures that make my projects not as crisp as i'd like. but due to the fact that the render time is sooooo long...i dont really test it out much : /
but thanks for the tip about Indirect Lighting Quality
What made me go "woah" and no one talks about is setting the resolution scale to 200%. It makes the editor a bit laggy for me so I only use it for screenshots but it helps a lot with the crispness of the image.
😮 where does one do that?
nothing worse than rendering such a great (for my level) detailed render then uploading it to utube and having the evil tube rip apart and blur ur video 😢
It's in one of those dropdowns
it's 100 by default, but you can increase it
(sorry I can't show you exactly because I'm not at my computer and couldn't find a perfect screenshot online)
I'm not even sure it's called resolution scale, maybe it's render scale. Try looking for something similar set to 100
will do. Thanks a lot man. really appreciate all the help
@austere hazel where do you set up GPU light mass?
you have to download the appropiate version for your engine, overwrite a few files from your installation and set up the quality in an Ini file
@royal osprey Luoshuang's ? is this just for doing baked lighting or will work with raytraced lightign too?
@wicked willow Yes Loushuang is the one that made it. It's for baking levels using GPU, not for real-time raytraced GI
@royal osprey I'm tempted to try it out .. but I don't want to add another factor to the problems I'm already dealing with lighting.. so basically it's just for using the GPU instead of the CPU for light baking? any other advantages?
Two advantages, 1. it's faster 2. it looks a bit better in general.
lighmass problems are usually from Bad UVs, bad geometry or wrong settings
same is true for GPU lightmass
No reason to use cpu, gpu is literally 20x faster
@forest depot ok so it's not gonna mess up anything on the unreal side and the way the light settings work? it will just redirect how lights are baked by the hardware?
Yes
If it does mess up something you can always reinstall Unreal and it should be back to normal
@solemn hawk @forest depot Ok I made some progress with my light mapping problem.. i went back and baked the light mapping for each Lighting Scenario separately .. now i only get the messed up light map on the lighting scenario not using any raytracing
the raytraced lighting scenarios just have this animated smokey effect in the shadowed areas
The messed up light map in the first image is because you switched the channel
@solemn hawk actually I think I may have figured out what it was.. all of the problem walls were created using the BSP tools as I was just blocking stuff out . I then converted them to static meshes but it does this for the first UV channel
I couldn't figure out to just delete that uv channel in Unreal so I went and remodeled the wall and unwrapped it in maya ..
wow just tried out GPU light mass .. that baked was so fast!
BSP really isn’t recommended for that purpose
In 4.24 there are new modeling tools but they’re still early in development so it’s not a replacement for maya.
@solemn hawk yeah, I know I always make everything in max & maya but I like using the using the BSP tools to quickly try out different ideas.. then I go back and model stuff properly.. i saw the convert to static mesh button and thought I'd try it out
@wicked willow thats awesome. What version of UE did you use? also Im assuming you have an NVIDIA card. Do you have any idea if this will work with AMD GPUs? I only ask because in one of the forums it states "(starting from here it requires NVIDIA driver version >= 398.26) "
ah nvm just did more research its NVIDIA/CUDA only : ( (at least as of 11 months ago)
@tropic flicker Why don't you just try to sell your graphic card to get a new one?
@wicked willow I 100% will. I feel like such a moron going for AMD. 🤦♀️ Didnt do my research now its biting me in the ass.
Yeah once I earn enough money, I'll def go for an Nvidia card.
Im not such a hardware guy so this might sound silly...but now im worried. I have an AMD CPU, that wont create problems once i obtain an NVidia gpu right?
i dont think so
are you in the US? if so with Black Friday you might get a good deal
I thought that was over.
Nah Im not in the US but we did just have white friday recently? I was hoping for Christmas sales to aid in my new GPU mission : P
AMD CPUs work fine with Intel GPUs
Intel makes GPUs? 😄
They do, I think. Aren't those Intel integrated chips gpus?
The keyword there being "integrated", and I know of zero AMD motherboards with integrated Intel GPUs.
🤦♂️
are there people that worked or have the amd version of the new microsoft surface laptop 3? im curious what the experiences are with the laptop. going to buy one myself next week not sure to go for the 13 inch with i7 or 15 inch amd. i heard some bad things about he amd version.. i want to have a laptop that i can use for simple things like mail and documents but if needed i want to do rlly basic blokout shapes in blender or do some basic stuff on photoshop on it. would be great to here someones experience
Besides turn up the lighting level to production + increasing light map res to aid shadows. is there something Im missing? it looks odd almost very flat looking, especially where the wall meets the floor? [im a beginner 'archVizer' so don't be too harsh : P]
@tropic flicker Is everything set to static? How do you light the scene?
For archviz there's different ways to light up a scene but I think the easiest is to use an HDRI map, you can't go wrong with them.
Also, could you post your lightmass settings?
As of now all i have is Directional Light Source, Skylight, skybox, lightmass importance volume, post-process (which doesnt do anything rn) and its all set to stationary (i thought i read here that you might as well set it to stationary)
Yes stationary is fine
try setting stati lighting level scale to .2 and indirect lighting quality to 5
could you also post a screenshot of how your scene looks with the lightmap density (I think it's Alt+0, if not you find it in one of the dropdowns in the main viewport)?
In case you want to try out an HDRI map, you can find some good and free ones here https://hdrihaven.com/hdris/category/?c=all

oh yeah I havent set changed the light map res yet, because i dont want the build times to be long as i am still throwing in furniture etc. but its all blue:
in regards to HDRI my skylight is using
i was just checking if there was anything else i was missing but i guess its too early to ask cuz i still have alot of work to do on it . so my bad
I understand, a low resolution lightmap gives bad results and can even be the cause for your curved shadows. I'd suggest you find a lighting you like with the empty room, with high density lightmaps and high quality. Once you're happy you can lower the quality, throw in the funrniture, raise the quality and render your final shot.
At least that's how I do it
I think it's important to make sure the room has great lighting and no artifacts as soon as possible
that is a great idea! makes so much sense.
you said i should use static lighting level scale at 0.2. is there a reason why not 0.1? or is it not really noticable (especially if you plan on putting on utube)?
Good question. The indirect lighting quality increases the rendering time quite a bit and the rule of thumb is that indirect lighting quality * static lighting level scale = 1. So the more you decrease static lighting level scale the more you have to increase the quality, resulting in really long render times. It's usually a matter of testing and evaluating the results, I usually and with something between 0.1 and 0.5, so I thought 0.2 would be a good value to start with
I know some of the tutorials on youtube leave it at 1, but I never had good results with that. You could try and play with the values and see what changes in the results
I set up a really small scene for this purpose, it's just a corridor with a window and a chair, just to test what the various settings do. I learned a lot from it and I would suggest you try something similar.
This scene
my god that looks amazing.
Yeah ok understood. Thanks again for the constant assistance. Unreal Slackers always seems to have people like you that really don't mind assisting the new guys. really appreciate it.
Its currently building so fingers crossed everything works out : P
It's a pleasure 😉 Let me know how it looks
If you want I could share that scene with you so you can test the lighting yourself without having to model the thing
Only thing is I'm not at home right now so I don't have it with me
Wow. I'd seriously appreciate that. Would love to tweak the values and see how it affects the scene using that, well scene.
Hmmm 🤔 thats odd it seems to have improved in regards to depth and lighting. But the walls are grey and look damp or something
🤦 oh maybe its because its on PREVIEW as opposed to PRODUCTION. lol imma try that now.
Yes that might cause that 🙂
@austere hazel what would you say was your longest wait to get build lighting?
about 1 hour so far but I've read of people that waited 12+ hours
consider I've been doing this for a couple of months, so I don't have a ton of projects under my belt
I use GPU lightmass which is a bit faster than the default one
ah damn...my longest i think was 5-6 hours. im so jealous of GPU lightmass users ha : P
You use an AMD graphic card?
yeh sadly
@tropic flicker trow in one reflection probe catching the whole scnene. they arent correct reflections but it helps you build when you start out
worst part is . its 3-4 months old. i consciously made the decision to go AMD haha
that way you can see how al your materials and world affect each other
it boost the quallity by a lot 2
@pastel summit oo ok cool. will do . thanks for the tip
AMD is fine as well. GPU lightmass is cool but you can live without it
i usually do my test build on 1024 lightmap size as long as you know some optimization tricks it will build pretty quick cpu will do fine then
these are my settings
for test builds
the fact that you have actual commas instead of dots for the decimals trips me out xD
haha
I usually have my lightmap resolution for floor and walls at 1024 or 2048, too
2048 never seems to work for
every bake will be stuck at 99
for ever
havent found a solution for it
haha mine is literally stuck on 0% xD for the past idk 10-15 mins
its loading but not moving from zero
also @pastel summit are u german? I only ask cuz of the commas : P
oh damn haha i didnt know
Yes lightmass does that sometimes, it stays at 0 for a while and then suddenly it starts working and then it is relatively quick. Some say you need to clear the swarm agent's cache but it didn't change anything for me
Just wait it out
placing refletive surfaces in your scene helps a lot in the beginning 2. just place cubes on spots you know that you want to be reflective like the table here it will help bounce the light. it gives you a feeling of how it all wil look
yeah exactly. i've gone too deep to restart it xD i'll just wait it out
Are you German, @tropic flicker ?
nah I used to live in Germany. So thats why i know about it. But Im originally from South Africa . but based in Dubai atm
you ?
Oh ok, I was asking because I was born in Germany, but right now I live in Switzerland
@pastel summit great scene, I love the floor material
thx, glad you like the floor i always struggle with them haha. i think i swapped this one out for like 50 times
i can never settle for one
Same
"Wow this looks great, definitely keeping this one"
one day passes
"Guess it's time to change the floor"
haha yeah. i save progress shots for a progress gifs on my drive when i start to doubt at night i check my drive and start thinking to wich one i can change back
glad i am not alone
on preview mode?
no production . 0.2 static lighting scale. 8 quality.
2048 light res map on floor and ceiling
maybe the 2048 is the problem i cant bake 2048 it will always be stuck
you can chop up the walls in places where it makes sence like corners
like . you cant ever use 2048?
thsi way you can use smaller lightmap sizes
no never
i have no clue
did a lo of research cant seem to find the problem
hmm damn. maybe hardware issue/limitation?
cutting up the walls will result in less bleeding and agnee in shadows
maybe i have never tried it now i went from 8gb to 32
i dont think thats a problem
i think i know the problem why yours is stuck
it seems like yourlightmaps are overlapping
maybe its compression of the image
cant tell
It might be a hardware issue, I have baked 4k lightmaps before
damn
hmm overlapping lightmaps?! : O
check your meshes maybe change the lighmap destination
looks fine to meweird
in this shot you see the uv is good beacuse of the sqaures
@pastel summit are u at ur PC atm?
when there arent any swaures it means your lightmap is incorrect
im at work not on my own pc atm
ah damn kk
nah all good. I just needed the default values for the [DevOptions.StaticLightingProductionQuality] section in the BaseLightmass.ini
I changed it like a dumbass because a utuber told me to xD
dont judge
lol
i never use youtube i find the forms the best source for info atm
but thats my opinion
yeah i should do that too
I don't think he has overlapping UV's. If you have them you end up with some really obvious dark lines areas on the meshes
although tbf it was a video based on Koola's work
I'm a bit uncertain in that aspect. Some people like koola change their lightmass.ini settings, but officials from Unreal Engine say we shouldn't
@austere hazel not neccerly overlapping but more like this
forget the term my brain is fried
haha
oh I see
just super tiny
Messed up texel density
yes thank you sir
um wat is that 😓
texes
texel
@tropic flicker i will hit you up just a sec

ArtStation
You can download the pdf here: https://gum.co/texeldensity
This time I wanted to explain another crucial topic for environment artists: Texel Density!!
I got few people to read through and they like it. hope you will like it as well.
Cheers guys, feel free to contact me if t...
this might be helpfull @tropic flicker
in my workflow i always use 10.24 density and procedural materials
this way my texture quallity stays super good beacuse its tilable and its optimezed
@pastel summit as far as using a Surface, I have a 3 year old one and it works great in Photoshop and Blender, handles them just fine. I haven't done anything too complex but I really like it for when I'm on the road. lot of my blender learning has been done in airports between flights.
and that way i dont have to wokr within the 1 by 1 uv space
@royal osprey does dont have amd right
I honestly don't know what's in it.
Damn a lot to read but looks like very valuable information! thanks @pastel summit
@pastel summit I use tileable textures as well, but if I'm not mistaken the Lightmap UV's still have to be in the 1-1 space, right?
its prefect it works good i need it exactly for what you use it for i thik it would be fine then
yeah, but they are auto generator by unreal
works pretty good
complex object might need a costum one but keepin an automatic map on a 1 by 1 works fine 2
you can make your lightmap UVs yourself then assign them in Unreal. I do that all the time because for non rectangular walls and ceilings I can do a better job than Unreal in straightening the UVs
are you using blender?
it has great plugins to do the work for you with rounded objects
safes a lot of tme making lightmaps
yeah tex tools is great
Tex tolls in blender I mean
Oh ok, I usually have the first uv channel for the diffuse and that one goes beyond 1-1. The second channel is lightmap uvs and they stay within the 1-1 space
I think this is what you do as well, if I understood correctly
For a second there I thought I've been doing it wrong for all this time
you are good
god damn . what u guys are talking about sounds intimating and complex af. but also cool : P
its super simple i recomend diving into some theory and basics to understand as these are the faundation of creating some good quality work
there are other ways to create good work dont get me wrong but its an amzing workflow
thing is im actually a the idk tech artist and my brother does all the modelling. so im quite unfamiliar with UVs, Lightmaps, etc.
(background game deisgn + programming)
but yeah i def need to learn if i want to take archviz seriously
i see, i have abackground in game design and art its a super interesting route to take and join the archviz
there are a lot of factors that play a part creating game art. with all the fundamentals and techniques used for that you can create amzing archviz in unreal
yeah im sure. ue is amazing
making good lightmap UVs is a bit advanced and tedious if you can't automate it somehow.
i find it quite relaxing work tbh haha
nice thee on a cold day a show on the second screen
well that is about 30% of my day so..
tbh im surprised there isnt a plugin in maya that creates them for u
I'm sure there is
there is an automatic mapping tool for lightmaps but by hand will always be the best if you know how to make good ones
but i dont suggest jumping into that now
it takes a long time to unerstand how it works and how to fatten objects correclty
you wil be super bored and unmotivated fast 😛
hahah
i do find myself wanting to do more art in UE... i've considered getting into mixer now. im just getting somewhat tired of programming
@royal osprey FYI you can make automated Lightmap UV unwrapping with datasmith and Dataprep 😉
😮
its not perfect like a manual UV would be
but its pretty much instant and works well
i only find having trouble with the automatic atasmith with complex models but those are rare like 5 or 6 a scene
i still havent catched up with 4.23
@austere hazel much better after changing the things you mentioned. I did change the light map to 1k instead of 2k cuz times. but im pretty happy with it. ofc final render or i'll change the necessary light map resolutions
and by a LOT I mean its a whole different tool performance wise now
feature wise too
yeah i was planning on to is there allready documentation avilable to read?
4.24 docs will be available with the final release
i am definitely excited for 4.24 in so many aspects
Glad you are 🙂
loos allready better @tropic flicker just a matter of playing arround with ao ssr and other feature
we've put a lot of work into 4.24's Datasmith and Dataprep workflows
when you'll be able to try it out, please post some feedback in #datasmith
@pastel summit thanks. yeah lots of features i havent touched yet as im still trying to grasp the basics of effective lighitng. will be adding in the reflection probe later on! 😉
I have yet to incorporate Datasmith into my workflow..
@tropic flicker it looks much much better! You're on track now 😉 I read you're tired of programming: this is exactly what got me into archviz and UE 🙂
on my to do list 🙂
You wont want to go back to the FBX workflow after trying Datasmith and Dataprep @royal osprey 😉
@austere hazel thanks!
yeah i mean i feel like i dont have the right to say that because im sucha novice programmer. but i think because over the past 8 months i've been pretty intensely into it. I just need an 'artistic' break : P so archviz and mixer is what im getting into . i've been drawn by niagara a couple times ha 😅
@vernal pecan damn tempting!
still not sure about blender and datasmith
The new release of mixer will come out soon and it'll be amazing, with smart materials and masks like substance painter has
exactly!
I'm actually using Lightwave/Blender..
we also have some very sweet Raytracing improvements in 4.24
And exciting tools for movie/still renders in 4.25 😉
haha damn . hearing all this makes me so excited for UE. its a weird feeling .like a sequel to my favourite game is coming out and its all free every time xD
This kind of UVs are the ones that automatic generation struggles with
@vernal pecan excited for next weeks corridor crew taking a peak at the new technogly for virtual movies
thats whats awesome about UE hehe
@royal osprey if you can send me that mesh I can do some benchmarking on it
sure
yeah i was confused with their second channel
@royal osprey i experience it struggles the most with the extrude going inside. the bevel wont be generator correctly wich causes bleeding
Did anybody attend the Post processing webinar hosted by Epic?
Hey, I'd love some early feedback on this from you guys. Thanks!
a good start. I feel the cone on your wall mounted lamps is too narrow, you can make out the polygons on upper corners of the chairs, and for most architectural firms it's a bit dark. (not my personal taste tho)
thanks!
I always get to a point where I can tell it's CG but can't really put my finger on what it is that gives it away. Other then the chairs polys, what screams "I am fake"?
You could also increase a bit the resolution of your reflection captures @austere hazel 🙂
@vernal pecan that helper, thanks 🙂
for uvunwrapping I still like using https://www.uvlayout.com/
also there's Nightshade UV Editor for Maya https://80.lv/articles/free-nightshade-uv-editor-for-maya/

Nightshade UV Editor extends the Maya's UV Texture Editor with tools, scripts and a UI that greatly speed up the time it takes doing UV work.
@austere hazel All I can say is that it looks awesome . Im too young of an archvizer to be able to give any other feedback . If I was able to make something look that good, i'd call it a day and not touch it ever again 😂
@tropic flicker thanks, I appreciate it 🙂
@austere hazel i cant tell if the floor is carpet or concrete. but if it is concrete i personally would at more roughness detail and make it more of a reflective surface. having snow outside really captures well on the councrete and bounces the light arround really nice. it also lets you break the conteats with the walls more and it will make your interior pop out in general
another tip i can give is using detail normals or a secendaire normal on furniture. personally i do this a lot and i love the results. using a secundair normal with wrinkles makes it look like someone has acctually been living there or is living there.
some little story telling details will go far when it comes to photorealism

here is an example of a project of mine. i use the same normal for almost everything. i use a diffrent one when i can see i used it more.
@pastel summit about the normal map, you mean for the fabric items like the sofa? I will try and work with the reflectivity of the concrete
Thanks for the feedback
is the arch viz industry easy to get into?
i'd say the barrier to entry is lower than game art
that sounds reasonable
I'd only want to do it as a side gig
while the focus on game art is the main goal
I think that archviz can give a steady income, while game dev is a bit harder: either you make it big or you struggle. I might be wrong though
if that's your passion
it seems that game art is very saturated, and it dilutes very high talent into medicre pay
in archviz, you can usually get paid more for doing less and having lesser skillsets than gameartists
your only limitation being yourself, so you could end up a highly skilled archviz artist, that knows offline renderers, composition, design basics, but also knows optimisation, ue4, realtime photorealism and interactivity. resulting in yet higher pay
I think the realtime product visualization/customisation field is also really interesting.
You basically described everything i do @cyan ether
I think the best path is just learning 3d in general, having a good foundation, being able to do everything from scratch, modelling, texturing etc and using an offline renderer to start with
hows fiverr as the platform?
@austere hazel do you create your own textures/materials ? (in regards to that scene you posted for feedback)
Some are made by me and some are downloaded
I bought quite a bit of assets from the Uneral Markeplace with the black friday discounts
@tropic flicker the things you see in the screenshot are mostly downloaded assets
@austere hazel i see. they look amazing. Would you say to really work in ArchViz you would need to be able to create your own models as well as creating custom textures?
I'm no expert in this field. I think you need to be able to at least model the building itself. For the furniture I think you can work with downloaded assets most of the time, but sometimes the client might be asking for a specific piece of furniture that is not available online
Especially if one is an interior designer he might design his own furniture and request to place it in a project before it's even built
Ah I see. Ok I'll look into it. Probably would have to find a large library of such models on a website. Probably a subscription based one
Yes, I got mine from the unreal marketplace for the easy import. Sometimes you download assets from the web and they're way too high poly, or have messed up UV's or origins. Google warehouse is a good source for free models but most of the time you'll have to do some cleanup on them
ah damn. I get scared buying stuff off marketplace...not being able to really determine their quality and such...plus a pain to buy a bunch of packs ya know
pity there isnt an all in 1 solution like quixel megascans but for models of furniture xD
i know they have some stuff but ya know
I think if you find a good deal it is worthy. Say, I would prefer have some base to start from. Sometimes tho it can be very broken.
Also I think you can refund or so? Never did it.
I bought them now with the black friday deals. I bought pretty much everything I need for 90$
I might still model a table or chair every now and then but it's definitely saving me a lot of time already
Some other sites let you filter by "free" and "low poly", those are also worth considering
turbosquit, 3dsky, ...
turbosquid*
true true. thanks for the tips . will check em out
You can increase your streaming pool size or decrease your texture res /amount of textures
R.streaming.poolsize ‘’size in GB, 1000 = 1 GB’’
@lean pebble what version r u using
checkout my scene i did with virtual texturing and gpulightmass https://www.artstation.com/artwork/v1O3OO

ArtStation
A room i grew up in for most of my life, where i learned a lot about myself and would go nights without sleep learning game development much nostalgia. But aside from that this a light study and also my curiosity to try GPU Lightmass by Luoshuang. GPU Lightmass is great 10x f...
everything in that scene is either 8k and if small or simple its 4k
and only hitting 1.8k mb with virutal texturing
Hey guys, Any particular tips for optimizing an ArchViz scene?
Another silly question: Are different LODs for objects very important for optimizing ArchViz scenes? or you u usually too close, at least for interior work, therefore LODs are not necessary?
I always have issues with optimization : / barely scraping 30fps once all objects and post-processing is done
dunno if this'll help
@tropic flicker it doesn’t look like your scene is baked, build the lightning and it should have significantly improved FPS
@solemn hawk It was actually already baked (just on PREVIEW for shorter build times). I did re-build though and the result is the same.
Wow Ok I dont know if this is normal however, i solved it by closing one of my open static mesh tabs?
went from 80fps to 120 (which iguess is where it is capped)
🤦 cant believe thats it
That can do it based on your system specs
I mean i thought my specs were ok but i guess
GPU: Radeon RX 590 Series
CPU: AMD Ryzen 7 3700X
RAM: DDR4 32Gb
They’re good, running two viewports is always taxing on gpus
Yeah understood. Thank for the info 👍
I've seen a lot of interior work (ue4 archviz) where the artists set the Intensity of the directional light to 10. which is insanely bright but i assume you get better GI ? or idk
@tropic flicker 10 for directional light is physically accurate sunlight for afternoon sun on a clear day
@pale prairie oh really? it seems insanely bright . I'll have to test it out
you have consider that Unreal changed it's lighting units, so what works for an older tutorial might not work for you
Yeah true
hey guys whats the best format to use to carry over my architecture from another program and preserve materials? Ive noticed that fbx. tends to mess with wall normals.
What software are you using to model your scene? I heard Datasmith works pretty well
i myself am a big fan of fbx. make sure to uot smooth normals on faces
I use fbx for everything, too
just make sure all your normals are facing the right and correct way/angle
Using Blender 2.81 you can export your scenes to a glTF 2.0 (.glb) file for Datasmith import. Default settings for the export/import work. That way you get Dataprep and re-import and solves all the tedious mucking about with fbx.
You'll need to use 4.24 preview to get Dataprep working for this.
ive always used 3ds max > fbx > ue4
dataprep looks kinda promising though, ive been very disappointed with datasmith in the past
I used to be Maya > fbx > ue4 via Import into Level. It was a minor nightmare to get anything worthwhile done.
Since switched to Blender - Free is a great price!
Datasmith and especially Dataprep is stil wip. It improves with every Unreal version though, I'm optimistic. It's had lots of time spent on 3ds max functionality. Give it another try!
not sure how datasmith helps with the process
It lets you re-import your scene without stomping over any changes you have made in Unreal. It tracks the overrides you make - In theory. Massively helps with workflow. Mine at least!
hmm
@junior path how does the glTF/Datasmith solution handle materials? Do they import correctly with thextures?
I do all my max modelling knowing itll be for ue4, when you re-export fbx and reimport to ue4 its the same thing
@austere hazel I've been concentrating on geometry and scene hierarchy, not being working with Blender > glTF > UE Datasmith for long. It does appear to have imported the one textured material I have correctly though. I'll send a pic of how it ends up in UE...
That would be a nice timesaver, I usually export every single piece as an fbx and have a material instance with just the default maps exposed (diffuse, normal, roughness, metal) to which I set the textures accordingly. It's pretty fast but faster is always good
@forest depot If you, say, change all your scene objects lightmap resolution's to 1024 in Unreal and then re-import because of updates in your Max scene you will lose the changes. Also if you delete objects from the world outliner the will be recreated on import. Unless you manage all this manually of course.
i just apply materials by hand, any material conversion is unusable
i export the whole scnene as one fbx works pretty good only down site is the pivots not being centered
Because that objects static mesh asset would be recreated to pull in the geometry changes. All the static mesh assets get reset to default losing any of your changes. Datasmith is a solution to this problem, amongst others...
I never had the lightmap resolution change when I reimported
ive never experienced this
Maybe you delete the old model and reimport a new one? I just right click -> Reimport and it keeps all the settings and materials I applied
i swear everytime someone mentions datasmith i feel like im doing something horribly wrong or im crazy
so far it does nothing
and ive worked on 30 or so comissioned ue4 archviz projects lol
@pastel summit how does it handle big scenes? I worry that with one single fbx you have to wait a couple of minutes for the import just because you moved a chair 2cm to the right
I'm talking about importing Scenes here. Using File->Import into Level or wherever it lives these days.
@forest depot you have an online portfolio?
you can move things independly in unreal
@pastel summit I know but then you'll lose consistency and if you reimport the whole scene your chair will be back in its original position, right?
im the lead realtime artist at buildmedia
i just bring architectural detail from 3dsmax and just build up all furniture/props in unreal, i thought thats what everyone does lol
@forest depot same, I populate the scene in unreal
Great video you have there! My dream is to set up a studio like buildmedia one day. How many people are working there?
15
May I ask how you handle the presentation side of your projects? Do you move your whole computer to the client and then bring it back? Pixel streaming over the web?
@austere hazel you export the scene as one fbx but all the object are seprate so i can delete the chair and export the chair manually if i need to. you export as one fbx but unreal will see all the seprate obecjst and create individual once
@forest depot sorry I didn't understand. You place a physical computer at your client's office or you mean you have your pc's in your office and he can then access them?
i work with iterations and thats how i save my files to. i can add whenever whenever and if something feels of i can move it in ue4 itself without having to go back
@junior path wow that's pretty complicated
@pastel summit ok I think I understand. I might give it a go in the next project but I have to confess I'm a bit skeptical
im at work atm but i can show you an example of what i mean it might be me having a hard time explaining haha
We courier/fly our PC's if they are not in our city
If the client is in Auckland then we set up the PC at the display suite ourselves
I see. Have you ever done a project that has to be visible to everyone, for example in a browser?
They're all available to the public
You just have to turn up to the showroom
We don't do unreal in browser because the quality is not there yet
So we do online 360s for webpages
@austere hazel Not really, it's just wiring up some multipliers for use in the instance. It works ok. Like I say I've not tested it with a complex materialed scene yet. I expect it's not perfect.
if people know their final output is unreal why not just leave materials until youre in the engine
Good things about Blender > glTF > UE. It handles pivot points correctly and they are easily editable in Blender. No sneaky scaling by 100 in some objects...
@forest depot That works if you never have to re-import the whole scene. You can manage all this object by object using fbx but it's so tedious. It's all about workflow, we all have our own way of working.
im genuinely curious, it feels like im missing something so im wondering what the workflow would be
If I have a remote artist working on a scene for an office building he may send me an updated .blend file at the end of every day (say). He doesn't need to have Unreal installed orknow that much about it's strange ways...
I can re-import this updated file without knowing what objects or materials he has changed. My own work in Unreal progresses in parallel in the meantime (improving the look of materials for Unreal or replacing static mesh actors with interactive ones for example) and the re-import doesn't stomp my changes.
ah yep that makes total sense
didnt really consider having to interface with someone who works in 3d who doesnt touch the unreal side at all
the way we work is, if you dont know the entire unreal workflow you dont touch the project 😛
Lol! 🙂
Behind the painting on the floor on the left, the reflection on the floor is white but it shouldn't be. How do I fix it? I'm using Space Screen Reflections, should I go Raytrace for the reflections? I only have a GTX1080 so I'm not sure it'll be able to handle that..
It's just one room so you can bruteforce it with a planar reflection
I have planar reflections on the window already, is there no other way to avoid this?
are you using a shadowbox?
Maybe that stops light from bleeding trhough those edges
I don't think I'm using one since I don't know what they are..
its just a simple 3d box traced along the outside of your buidling. on bake this will creaate a dark spot inbetween your building and the box. this way you insure that light cant leak trough the edges
Oh I see what you mean, but that thing isn't light leaking in, it's a reflection issue, when I move the camera it goes away. I am struggling to get good results with screen space reflections, if you look at where the pink ladder touches the ground, on the floor the reflection seems to be white instead of reflecting the ladder. I think it's because of how the reflections work, the object needs to be fully visible in the scene in order to cast an accurate reflection. I'm trying to find a workaround before I move to planar reflection or raytraced.
ow yeah makes sense when you explain it like that. on the static image it looked like light bleeding through, my bad.
these videos helped my scenes a lot with those problems:

Context - 0:00 UE reflection types - 1:03 Capture - 2:16 Projection - 3:20 Influence radius - 4:50 Line of sight - 6:20 Distortion - 7:27 Influence falloffs ...

End result - 0:00 Large capture & preventing light leaks - 1:10 Medium capture radius & checking diagonal lines - 2:54 Neighbor overlap & local override - 3:...
I'll take a look, thanks!
he wil go in on the theory of screen space reflectios and how probes the scene them and how to place them correclty
That's exactly what I need to learn 😉
@austere hazel All of my indoor scenes have black boxes around them to stop stray reflections and light leaks. I always export one with the fbx then sometimes add extra boxes still.
You can use raytracing with a 1080, but it is quite slow.
@royal osprey thanks
til to use shadowboxes
well that's p disappointing, these are raytraced reflections, they seem to be ignoring the bsp geometry
Would anyone be interested in a kitchen cabinet kitbash of sorts? All different sizes, a few styles and ready for drag and drop materials? Would sell it for a small fee on gumroad. Think enough people would find it useful?
@cyan ether raytrace won't work with BSP at all
have you guys tried playing HDRI Backdrops?
thanks waqas, i figured, but can't think of a technical reason why yet
i converted the bsp set to static geom and it's working as expected
Thanks, after watching the videos posted yesterday I fixed it with a better placement of the reflection capture probes
Nice one
Watch out for your highlights in your lighting, the wall on the right gets brighter than the sky which is usually impossible if it's being lit by the environment
@forest depot good catch, thanks. I'm still struggling with realism. In most of my projects I come to a point where I look at the scene and know something is off but can't pinpoint what it is, and it's incredibly annoying 😦 Maybe I should look at more reference images
Constantly using references from photography is really important
Try to stick to photos rather than other 3d
@austere hazel i missed the last time you were asking for feedback, still looking for some ? 😄
@forest depot always looking for feedback xD
sweet
its the first time im looking at this on my pc so i can see things now haha
these guys are here are looking nice
the chairs and table could do with some extra detail
the table looks too perfect
needs some kinda texture detail, whether thats actual diffuse detail or roughness breakup
similar with chairs
this detail is good
only thing there that is a bit 3d is how the timber panels joins up with the painted walls too perfectly
this guy looks a bit too '3d' as well
just the perfect boxy shape
plants are always really hard and i struggle with mine allll the time but it would help to have some SSS in there
❤️
It all makes perfect sense, can't wait to get home and work on this feedback
Would you model the wooden roof piece by piece?
🙏
you can if you want to go nuts, but prob not worth it haha
not gonna lie that part of the feedback is probably something i wouldnt do myself cause too lazy
🙃
I understand, I can probably get away with some displacement. I'll give it a shot. I'm also considering of removing all my artificial lighting and bake natural lights only and then re-build the whole interior light setup from scratch. I think I did too much fiddling with this one and I'm not happy with it
thats a good idea, seems like you have a good understanding of lighting fundamentals by going fully natural lighting first before any interior lights
I'm trying 🙂 thanks again for the feedback
youre welcome 🙂
Better? I think it does look a bit more realistic although the chair on the right might be a bit overexposed. How do I fix that without darkening the whole scene? Is it a matter of having a better lightning design by moving lights or is there another way?
I would adjust just that light.
it looks really cold outside, you should have fire in the chimney 🙂
ok I'll try and play with the lights intensity. I thought about the fire but could find a believable way of doing it, I'll give it another go
More realistic balance for interior/exterior
I would play up the warmth of the inside
theres a fire prefab that comes with the starter content in ue4, could scale that in
Try going in the project settings and search for "Reflection capture resolution", bump up that number
See if that fixes it. Do those triangles change if you rotate the object?
Found out my uv's were way off 🙂
That would have been my second suggestion 😉 glad you fixed it
do you find add an HDRI Back drop to a ray tracing set up greys out your models?
adding
@cyan ether nice ! all baked lighting?
thakz, yeah just intermediary bakes for now as its still in bsp format. with convert to static mesh when done. the mirrors trick is all realtime reflections no light contribution just visual
looks great
i was inspired by yours 🤠
pls no lawyers
I am a noob but have a trade show coming up and made this: https://www.youtube.com/watch?v=D-bdXCoLGGc&feature=youtu.be%3Fversion%3D3&vq=hd2160 using skp and datasmith. One thing that bothers me is some of the shadows on smaller objects seem botched. Like on certain logos, the shadows should not appear on the faces but the normals are all correct. Any idea what else might be happening? Like AO or shadow reso issue? Should I hit editor and do anything or is it a geometry issue?

YouTube
Hi, how can i make this dialog gone, every time i apply quixel material i had to go to the mesh editor and add, cant add it while in detail viewport
and somehow i cant do that anymore. material didnt show up
similar irrevocable prompts happen when you delete items embedded in groups
@gloomy timber The camera speed in your video is too fast to make anything out clearly I'm afraid. If you are using static lighting then your need to increase the lightmap resolution of objects accepting shadows. If dynamic then you try increasing the number of shadow cascades.
@junior path I tried light map resolution it didn't help, so I think it is overlapping UVs and the shading is inconsistent as a result. Some of the stuff was from the sketchup warehouse, so i am sure it may have been modelled sloppily. At some point I will try and recreate the logos which had an issue etc and replace them and see how it works out. Thanks for your advice!
just dont use sketchup, it pumps out geometry as bad as revit's
You mean I have to step up and pay real money? 🙂
Su actually with data Smith is pretty solid on stuff I do it just seems the sloppy internet stuff is no good. But I love unreal!
@gloomy timber Blender is a good alternative to 3ds max if you don't want to spend money
New guy here 🙂 Been working in unreal for about 8 months (But been 3D modelling for about 5 years now) and would love some feedback! I did some renders for a proposed sculpture exhibition in the atrium of the Ponte Tower in Johannesburg, South Africa (Seriously google it).
bunch of experimental Lightmass improvements, enabled by modifying Base/DefaultLightmass.ini
Official lightmass GPU, when? 🤔
no ETA currently, yet im working on it now
❤️
I have set up this cinematic shot, but when I try to render to video it picks up a camera that doesn't even exist in the scene. I've been struggling with this since yesterday and can't make it render the correct shot. What am I missing?
Figured it out, finally
what are peoples thoughts on Raytracing and Arch viz? @hallow arrow
@hallow arrow is this only for 4.24 cpu lm
@jovial coral 🤔 idk much about that, im mainly focusing on GPULightmass
@forest depot yep
D:
@jovial coral I've done some tests with raytracing and it works great with reflections and shadows, but could not get windows and other flat glass to look good (like on top of tables) I need to do more testing and try the newest engine.
I think it's promising and it might be the future but we're not quite there yet
@royal osprey that's interesting.. I found I could not get a flat glass table to look right with ray tracing either but I think my windows turned out ok.. at least the reflections look great in the window
does anyone know if there's a twinmotion discord or slack channel?
@austere hazel that scandinavian interior you worked on... are you doing that for a Norwegian client by any chance? 🙂
@dusky marsh nope, just a learning project. It's my second project so I'm not ready to have real world clients, yet
@austere hazel Well, it looks good. If we had a job that required something like that, we'd absolutely buy it if you'd put it on the marketplace.
@dusky marsh oh cool, good to know. If it meets a decent quality standard I might clean it up and put it on the marketplace for free, as a thank you to the community for all the free tutorials and resources online
👍
Here's my first export, I'd love to hear some feedback on it. Thanks ;)
https://youtu.be/a8kk8gBLQng
Enjoy the videos and music you love, upload original content, and share it all with friends, family, and the world on YouTube.
Nice job!
suggestion: add some motion blur if you're doing a 30FPS video
@hallow arrow yeah I noticed that. I will reexport the whole thing at 60fps anyway. Thanks for the tip
not strictly arch-viz but I guess this is best asked here since you guys are light baking experts... 🙂
why the heck are my lightmaps still so jaggy?
Could you toggle the Lighmap Density mode in the viewport and take the screenshot again?
@dusky marsh are you using pp and ligtmass volume
@austere hazel there was no visible difference between when my lightmap density was bright red and now that it is all green
@pastel summit does that affect static geometry? but to answer you, I don't know, I haven't changed the pp settings or lightmass volume settings
for the best quality make sure the density is on red the ligtmass volume calculates your lighting within the scene. using a portal on the open windows will help the engine direct your ligting to where it needs to go. it will boost the quallity
Are those two lights set as static or stationary? In my experience it can make a difference for that kind of shadows
try setting them as stationary just to see if it has an impact
also, wtf... a gasket has 3972 resolution and everything else is in the hundreds???
use power of two resolutions for lightmaps
for high quality, lightmap density troubleshooting is useless
do things by eye and a rough understanding of what types of materials will go where
eg. metals need less, glass needs zero, anything highly reflective needs less
and low reflective but bright stuff needs more resolution than regular stuff
glass needs zero, good tip thanks. that can be a lot of texture space saved
OK, bumping the texture resolution in that window now makes the build take hours instead of minutes...
are you using gpulm
no, not getting into that 😛
going to try a swarm with 5 machines, though
got 60+ cores now
even our 30+ node renderfarm was no match for gpulm
definitely not an exaggeration to say its more than 100x faster
a big scene took about 12h on about 30 nodes, ended up doing the same scene on a single 2080 in 3h
interesting... wonder why it hasn't been officially integrated, since the creator is an Epic employee these days anyway
all effort is going into RTX it seems 😦
hes the only one working on it
but not officially, I think? I haven't kept up, honestly
He's actually in here as well, I think, I'm sure he can answer your questions better than me but as far as I understand he his now part of Epic and they're working on bringing it into the engine officially, but I might be wrong, this is just what I heard.
I can confirm it is much faster. The scene I posted above rendered in about 30 mins on a single gtx1080
well, turns out the scene ran like crap on the laptop, so I need to merge a bunch of things so I won't have time to bake anywya... back to realtime I guess !:)
wait wouldn't realtime lighting be more demanding?
@austere hazel nice job, i think im the first one to put like on ur video. Lol. Btw, did u just use the unreal academy on learning?
@fallow grove Hi, thanks, I'm trying to upload a 4k@60fps right now, if it works properly I'll rerender the whole thing. I did watch the tutorials on the unreal academy and lots of youtube videos
Here it is, imho it looks better and I'm much happier with this quality. It'll take a while to render the whole thing xD
EDIT: Uploaded a better version - https://www.youtube.com/watch?v=dcvT-z81cQ8

My first shot at creating an interior visualization with the Unreal Engine. Rendered using GPU Lightmass
hey guys i am new to unreal engine archviz
and working on a project
i need to kow why my interior lights are not working
please guide me how to fix it
@austere hazel awesome work! Really nice cam transitions too 👍👏
Thanks @tropic flicker
@austere hazel I like it! I do have some feedback if you are looking for it. I would combine the second and third take into one. There is too much time spent on the bird and, it might be compression, but it looks out of focus at the start when the camera is only looking at it. There are a few shadow/bake artifacts (faucet, shadow of the lamp next to the plant, shadow of the cushions on the couch, shadow of the aplifier) They are mostly visible in the top down view. I really like the look of the amplifier/guitar, I would like that take to last a little longer and maybe move a little. You have my avatar on your wall 😄
@royal osprey thanks a lot for the feedback, I will definitely look into this things and fix them along other stuff I have noticed myself. Then I'll do a last video version of it and move onto interactive part (fps controller, swapping materials, ...)
@austere hazel Awesome job!
Does making an animation with RTX Achievable even when you get low fps, for example 14 fps, I really don't care about RTX with Realtime, all i need is to produce a realistic animation sequence with RTX. Or do i have to maintain a good amount of FPS to produce good quality Animations ?
my targeted Video Animation Framerate is 60FPS, can the RTX Results be cached somehow or stored (Pre-Rendered) or rendered to produce 60 FPS with very low ex: 14 FPS on runtime ?
you can make ue4 render frame by frame with sequencer, so nope performance doesn't matter technically
Nobel I have two post process volumes, one for interactive and another for cinematic with tweaked settings that only gets turned on when I want to render
So when I turn it off I can actually navigate the scene without pulling my hair out
@cyan ether so the sequencer actually renders frame by frame, no matter how the low fps on RTX it will produce high quality without noise, That's really cool, thanks
@mystic lynx yeah i do that really in some cases, like tweaking exposure for different spaces, but never actually did it to toggle RTX Features, that's will become very handy really. thanks man.
Np, don't forget to set it to a higher priority
So it overrides the interactive one when enabled
@rose merlin We are working on a High Resolution exporter that allows you to export your renders/videos at the highest quality possible, even with Raytracing enabled (you can tell the editor to wait X frames for RTGI to stabilize for example 😉 )
Another setup would be to just bruteforce samples and bounces and disable the denoiser !
basically using Unreal Engine like a pathtracer, but with realtime preview of your scene 🙂
hey guys could someone point me to a good unreal 4 lighting tutorial i cant seem to find anything that explains it in depth
@vernal pecan yeah that's exactly what i meant, to force the editor to wait for frames to stabilize, wow That's great news actually, at the beginning of RTX i really thought it can be used this way, to let all the hard work take it's time with render and gives me the advantage to view the final result in realtime.
Great work and good luck, but is there any time soon or estimated time for the release of this feature ?
I'll be waiting for that specifically .
@cerulean stratus I believe there is a very good Tutorials on the Unreal Learn Portal you'll find almost all you need to start with and get a descent final results with these tutorials, and they are really good in my opinion and are instructed with a very professional way by experts. you'll find all you need there for sure.
ah thanks that didnt occur to me
no problem 😉
I really got questions on how much could a company charge a customers for a VR Walkthrough or for a Realtime Archviz interior/Exterior scene,,, i know it's a very hard question to answer,i know it really depends on the effort and scale/detail of the project, but i really want to get a veeeery rough value as a base to get much clearer perspective for the market price.
for example if we can translate it to Price/meter square or somekind of a reference.
Maybe price/hour spent on it? I'd really like to know, too
I listened to your feedback from the last time and tried to incorporate it in this new video, I also decided to change the mood a bit and whent for something lighter, personally I like it better. Looking for comments and feedback
https://www.youtube.com/watch?v=77Je5TznLKQ

Cad import related question, what could be the reason for a spesific cad imported with method dataprep, not being able to be unwrapped? and crashes when trying to click edit in mesh editing in the static mesh window?
only thing I'd lose is the dust particles, or scale them down so they're tiny tiny and few
and does dataprep have a "bevel" opportunity? to crease edges more
@cyan ether yes I agree, will do, thanks
@half wind attach the file to a bug report and submit it
@dusky marsh it was fixed, prpb related to the model, just import into maya or any 3d software and export it again as same cad file, i think there is a processing that ue4 cant handle yet
@half wind and that is exactly why you should have attached the original file to a bug report and submitted it 😛
@dusky marsh i will, have you used the dataprep yet? Im trying to find a way to rotate the model after imported into the dataprep
I only used it a few mins to test... we're still on 4.22