#aec-visualization
1 messages · Page 4 of 1
sec I'm opening UE
right so my settings are
in order
0.07
10
10
2 or 3
1
and building lighting in medium
and how much do you wait for building lights?
well it depends on what resolution you've set on your meshes for the lightmap
and the quantity of assets
keep in mind that its better to have a like 10256 than 22048
yes ik
blue = too low
it's about the lightmap?
yah ik the lightmap is fked up. it's a project from archicad given by someone
aaaarchicad
what should i tick? light map res?
yeah I know the woes of these models 😄
yep tick it and change the value by *2 factors
ie 32/64/128/256/etc.
damn, this light map debug thing is hell of a trick
i didn't know about this
i love you
there's a plugin to kinda automagically do the balance for you too 😃
do you want to move the conversation to private so we will stop spamming the group? xD
Curious to know what the plugin is called, I haven’t heard of something like that before
LightMapUer @solemn hawk 😉
Neat, I'll check it out
it's not too many conversations here on arch-viz channel got to read everything you can get 😃
I wonder if light map resolution accessible via construction script
pretty low settings
@molten spear your lighting level scale a lot lower then it probably needs to be and you don't have enough bounces for your directional light or skylight. I would recommend moving both light bounce settings to 10, and static lighting scale to a value close to 1 and only decrease it if necessary. I would also up lighting quality to 4 or higher
i'll look on it. thanks for your advice
NP I would also recommend using HDR lighting aswell
Anyone understood how new lighting system work? I set up lumens on a spot as it should be in real life but it gets too bright after building
I wonder if there is some talks about it on forums?
I recall from documentation somewhere that lumens in the engine do not correspond directly to lumens irl
sorry, not documentation but a lighting tutorial
we now have candles lumens and unitless
in 4.19
and a nice bug with light baking
there your long lights turned 90 degrees
If it's consistent, we can add it to the new "features" list
just curious, what are considered "long" lights in unreal? I'm picturing either lights with a long throw or linear light fixtures
We're still working out 1:1 (or as close as possible) parity between lighting in 3DS Max and/Vray and unreal studio. We're trying matching Lumen values, etc. Has anyone found a process that works from them?
@gentle osprey I meant light that have radius and length/width English isn't my first language so I could use this word in a wrong way
Basically I use it do create effect of hidden led strip light
got it, just wanted to make sure I understood
so that I can keep an eye out for it
is it consisten in which way it rotates?
basically my led stips were rotated 90 degrees after update
Y axis I think
don't remember now
I googled and apparently it's already known bug
I got distracted by work pretty fast after that 😃
I am just don't want to go around a scene to rotate all lights back then they fix it
right hand rule rotation?
Sounds like it
My lights were also rotated
Also none of them are correctly setup all the time :D
Emitting black light and stuff
Hi everyone! I've a problem with collisions. I've to remove primitives collision (or in this case also call, "convex element and array elements") of many of the elements that I have in my scene. But I don't know how to eliminate this collitions at the same time from all of them.
Do I have to delete them one by one or can I select them all and delete them at the same time?
Thanks
@normal river if you want you can bulk edit all your meshes collisions
for complex models or projects with a lot of them I just switch the meshes to use complex as simple
that way you still get collisions on your meshes, even if its not really good for physics perf
@dusty gyroBut if you have a lot of elements and you don't like to switch, Can I modificate more than one element at the same time?
yes
that's the bulk edit function
when you have multiple meshes selected in your content browser
right click
asset actions
bulk edit via property matrix
from here search the collision property and change your values 😃
don't forget to ctrl+s to save the changes
Oooohhh THANKS A LOT You safe my life xD
👌
why i have those artifacts? i built light on production. i will attach a photo of my settings also
why there i have a shadow when it shouldn't be?
was about to ask for your settings 😄
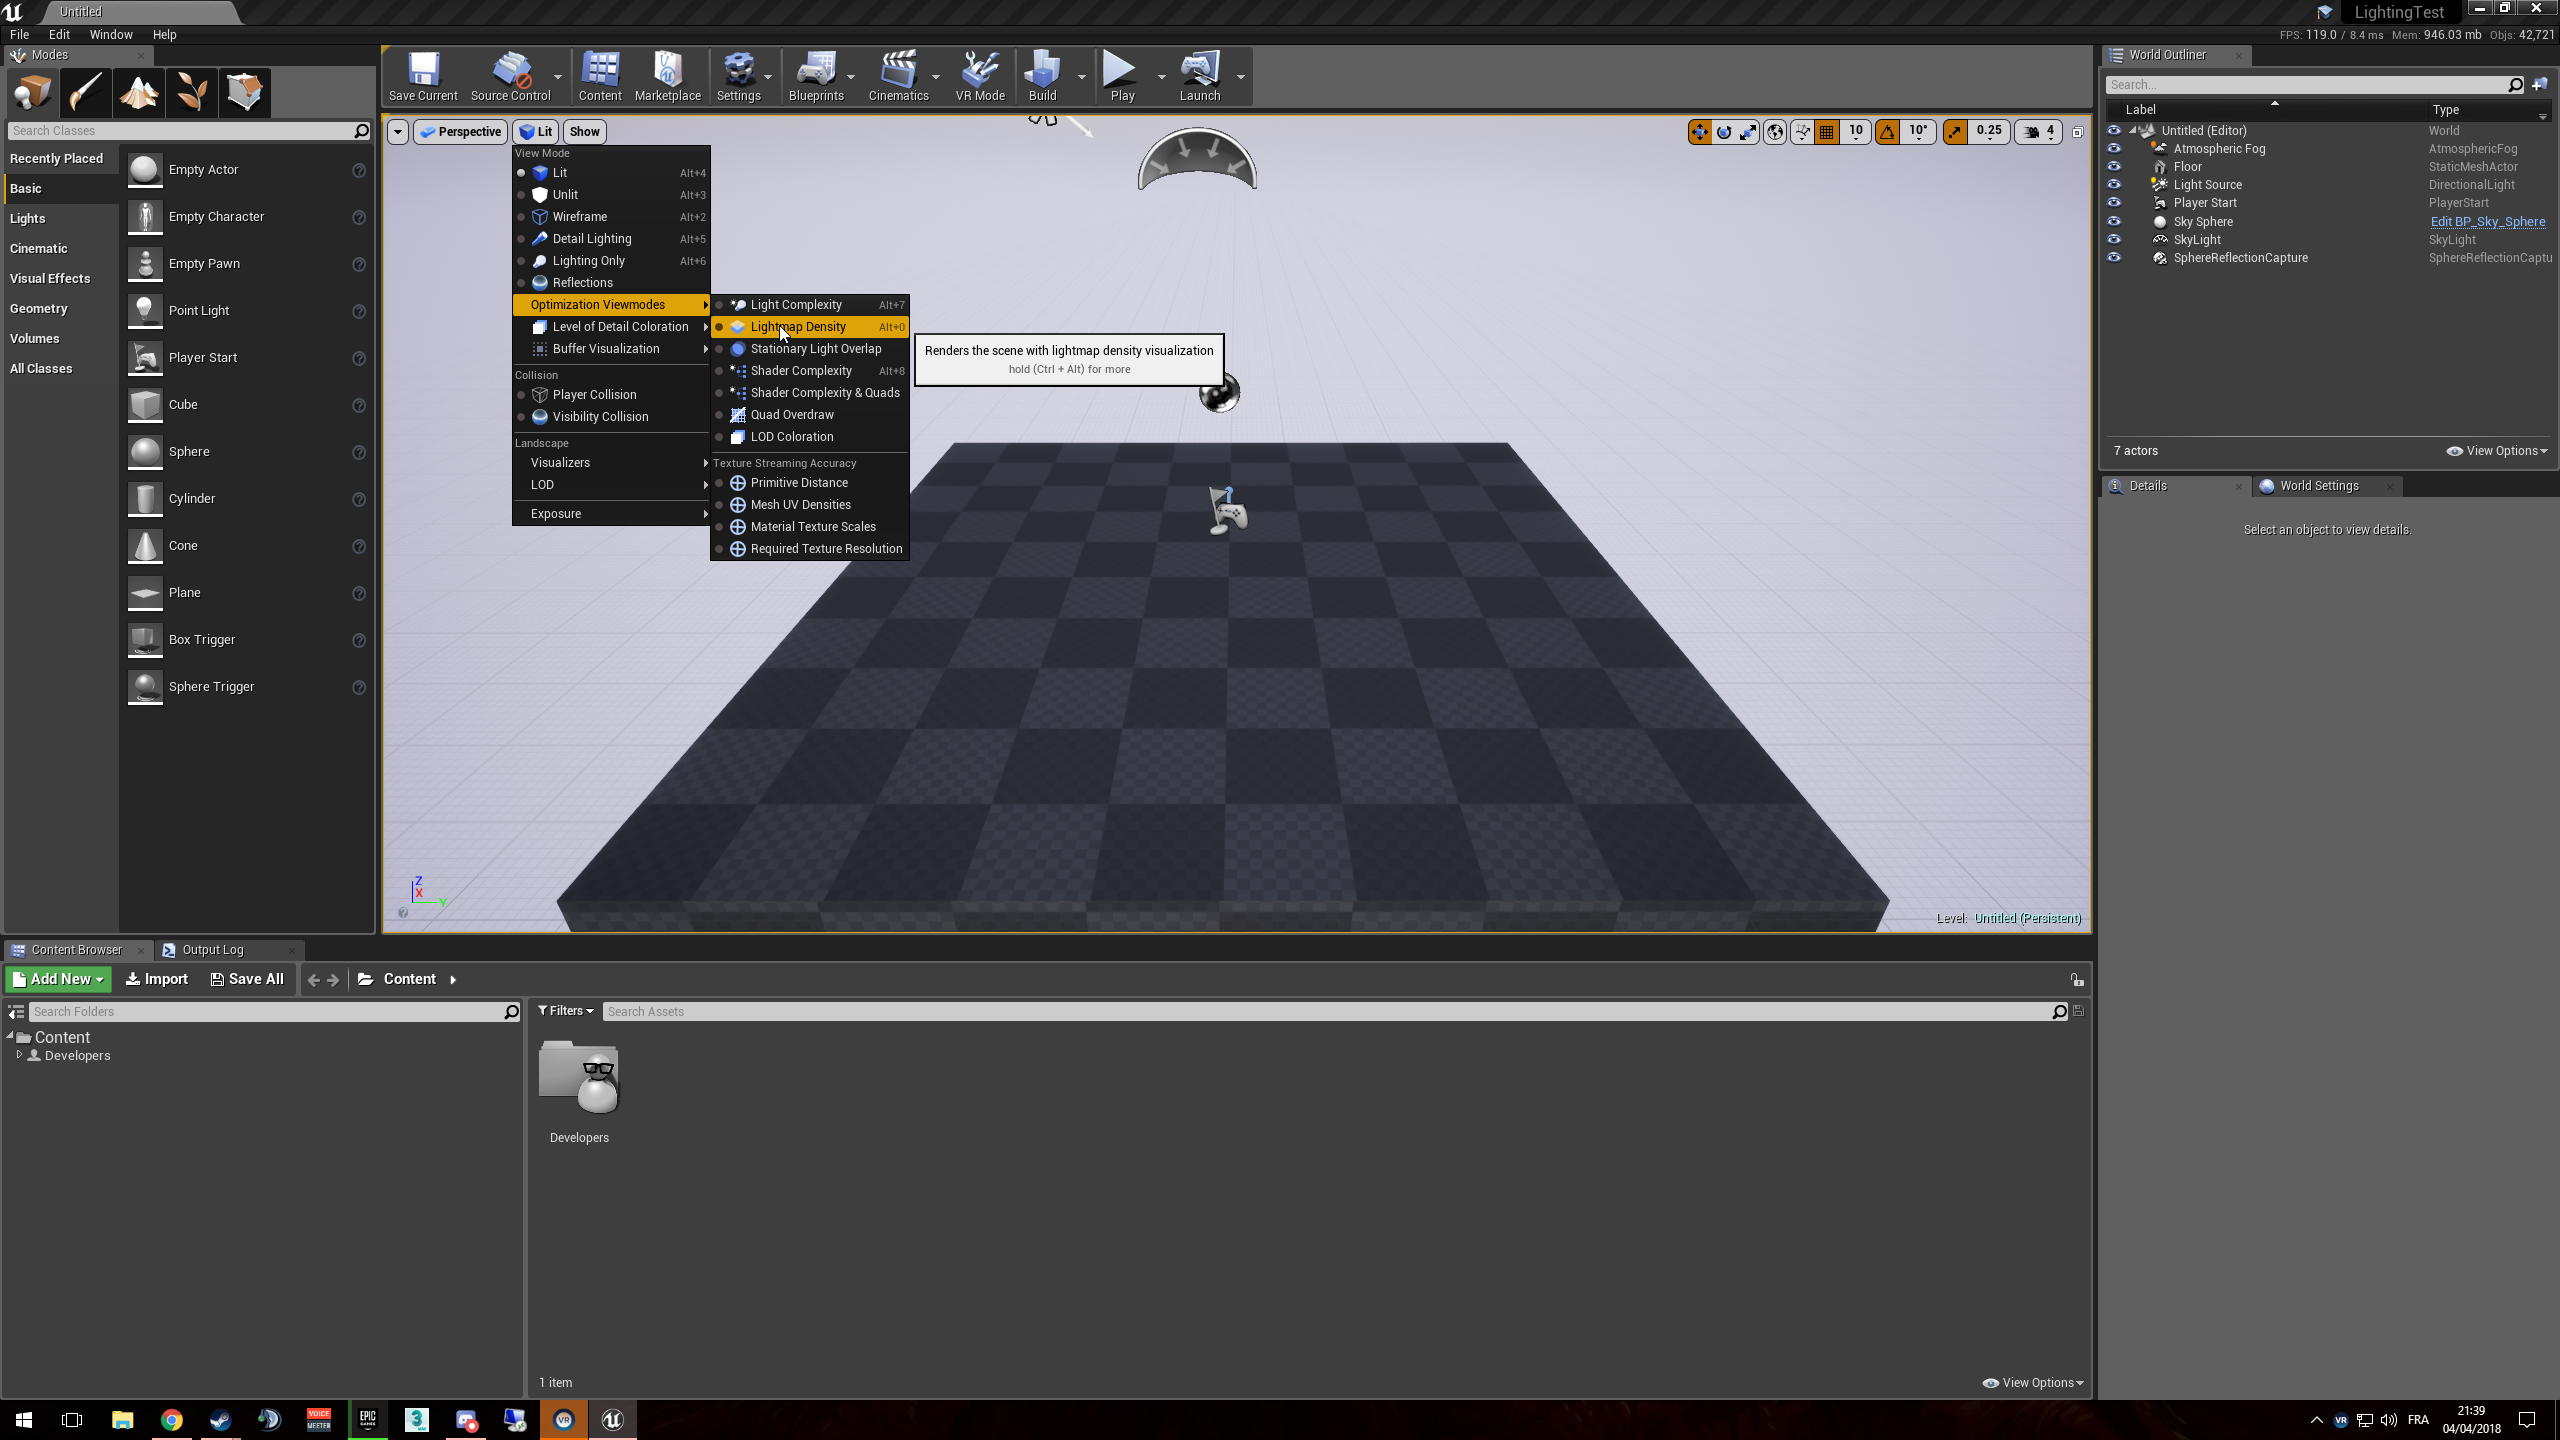
can we get a lightmap density view @molten spear ?
as far as I understand material not going to give you correct result so you will have to change that to light if those places are clearly visible
I might be wrong
you can see in the image that some places are having light dispersing on ceiling. but there are some parts where it's some shadow 😭
but idc so much about that light, i am more concerned about the artifacts
are my lightmass settings that bad?!
you might want to up the wall lightmap density a bit
it's already 2048
yes
2048 ? that's high
i took a little pause from it cause easter
how is your meshes look?
yah. i have some shadows going on on the wall and i want them to look good
alone
@median mural what do you mean?
a screencap of that wall mesh and its lightmap uv would be nice
either your UV is crap or your mesh is too big
like here there is some bad light on my scene but I just kinda know why this happens
I found that having big meshes is bad idea
@molten spear 🙈
pixels get color and if you cut pixel in half it can't know what color to be
you might want to split that mesh in smaller parts
So if you minimize cutting pixels you will have better results
and I get crappy corners because of that
is any one here who is worked with archicad -> ue4 ?
i am asking because this project it's straight out from archicad. i didn't put it through 3ds.
Uv's looks ok to me. Huge mesh is the problem no?
yeah
like it's complex and probably affected by a lot of lights
you get so little pixels for all these surfaces
in production you bet 😄
It's just anything longer then 30 minuts will kill me 😃
I use this settings
and it didn't =.="
they should be very low
my definite call would be to split your meshes in smaller parts
@median mural yeah that should be enough
I use 0.07 for the level scale
I render on high
that what I did
every wall in the corer
and there should be no seams in the middle somewhere
I think that you don't really want your mesh to penetrate other meshes because you get this shadowing
just to illustrate point I am trying to make
and you don't actually have any light bleeding
as you could expect to have in other renderers
like if your light mass pixel doesn't have shadowed area and area of light it's not going to create any artifact
ok. thank you for your help
https://youtu.be/ihg4uirMcec this video is helpful

The session by Lead Artist Jerome Platteaux will focus on the different ways to light a project in Unreal Engine and covers the basics of Physically Based Re...
bigger light maps = long time building?
and one more thing. bad lightmaps increase the build time?
also complexity of the objects plays a role
you can look for problematic meshes in Lighting build info
like 1st 3 objects have all have 256 pixels lightmass
where is that?
i just realised that why my walls look strange (and not talking about the wierd seams)
in first picture you can see that the wall looks pretty good (that normal map looks fine on it)
but in the second picture there is like no normal map there. only strange shaodws
- i split the walls and built light on high and that's the result 😭
Window->statistics
hard to tell about normal maps
probably just one have more "dramatic" lighting
if it same material and scale
@molten spear I can't tell exactly but it's might me just softer light area
and in this case normal map not going to do sharp shadows
normal map require light to show the effect
it looks like it is applying the map, but the light is washing out the shadows to me.
Sometimes clients doesn't want realistic result and actually want feeling from real life not photo
i need photos also
soft light on surface will remove detailed light on irl photo
what? i think we don't understand eachother xD
¯_(ツ)_/¯
i swear i don't understand what am i doing wrong. i remade the project by splitting the walls where it's needed. put them back in scene. built light at high with the settings shown and i still get those kind of things
lightmap density = green everywhere
make it more dense in problematic areas
don't hesitate to go in the orange reds @molten spear
that might cause the problems?!
no as long you aware about your lightmass sizes
like try to stay under 1024
thing is you will have problems and goal is to minimize problems by employing different techniques
like documentation basically tells you to cover problematic areas
i always hated documentation. it like never helped me 😭
i understood better from people than from there
it's strange that when i build in preview it looks fine, when i build higher it looks like sh it
https://photos.app.goo.gl/7T5Lc4vukfTkegKo1 <-- real photo from, natural lighting only from window. You can see on the right edge there is a texture to the walls, but as you move to shadows and light areas just outside of light range where the texture is shown the texture goes away

Google Photos
this is true with my eyes as well there is a very limited range of light in which the texture is visible
woah, that image link is weird. Be sure you click the original link, not the "open original" option when you click on the image.
I'll have to remember that for discord and google photos
It seems from what I read here, and what I tested - The best way to model walls for the benefit of a proper lightmass, is to have them meet at a shared edge. What you should NOT do is allow one wall to intersect and cut through another wall, which might create light bleed. When myself and my team creates archviz projects in max/vray, we don't model in that way most of the time, so we should re approach how we do such things. Mitering at a 45deg where to walls meet should work. Does this sound right?
this is what I am doing but test yourself
I also separate outside side of the wall from inside because it change how object looks. But I might be mistaken and I had problems from different reasons.
Well, it seemed to work, I just wrapped up a test. I rebuilt all the rooms of my house, as one object, quads faces, all vertices wielded. It helped with the light bleed from the environment light, but also I did mess with other settings. Im currently setting up all 20+ render slaves in my office to be part of a swarm! That should help make testing go faster!
I'm still getting blotchy penumbra results, even with my high settings, etc. Not sure what I'm missing.
Not to mention the shadows are not seemingly getting enough secondary light, but I consider that an issue to be figured out later.
if you have 20 render slaves you should be able to turn settings up to 11
I have just the pc I use :/
it's better to optimize anyway.
for example to not accidentally set every lightmap to a huge size
because playing it might be a problem
like on client machines or something, presentations
if they exist 😃
Yeah, ill be turning it up to 11 once 11 gets me 10/10 results! I'm trying to make it look good before I care about frame rate!
at least those things more interesting to fix compared to offline renderers
hi all, thanks for inviting me!
for the moment, I know that Epic is developing a plugin for fbx import metadata from BIM, but I saw that someone has managed already that 😃
who ? 🤔
I send you private link
Oh, no. you don't need to keep that to yourself!
We discussed with @dusty gyro we managed that for the moment is not possible to import data from bim (the plugin was called fbx+ fbxplus and it worked flawlessly) but the maintainer did not update to new ue versions so we have to wait the next Unreal studio build, which will manage bim data (epic said that onto the forum).
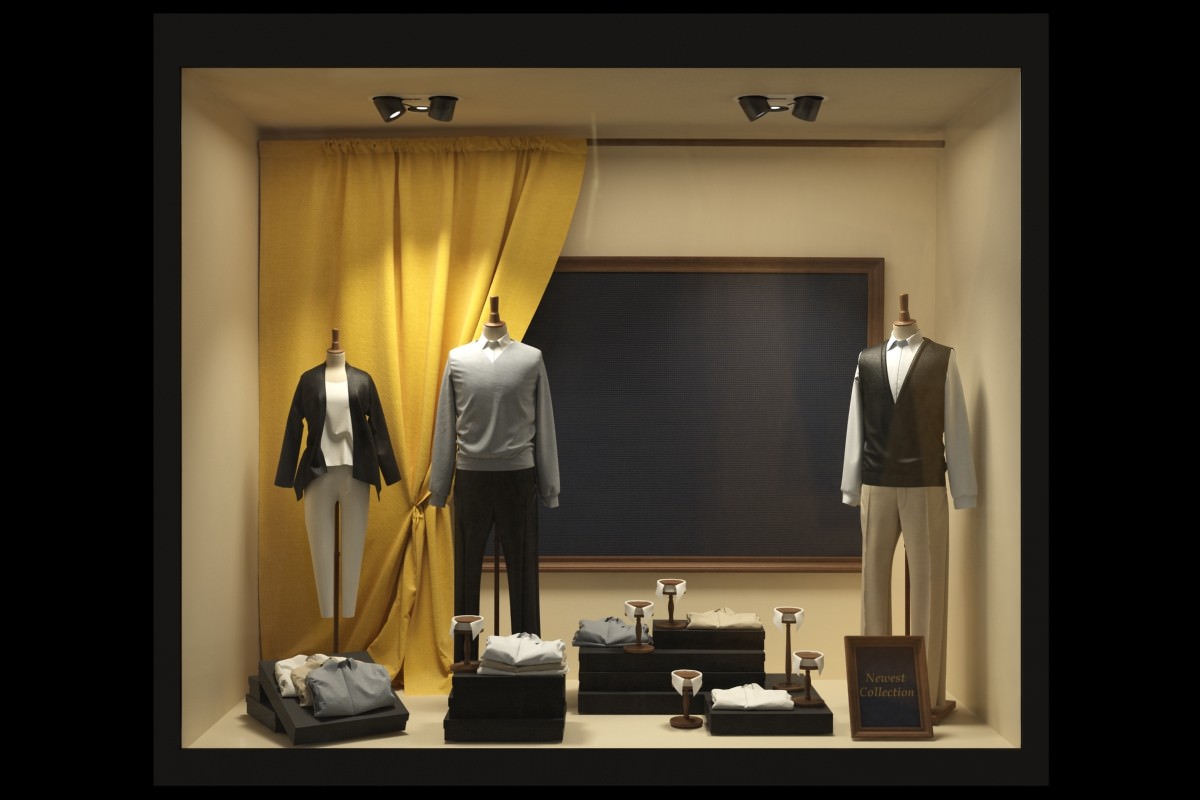
gosh curtains very painful to make
really can't find a good way to make them. They look very fake
I have a method for curtains that works pretty well
Start with this shape
then extrude it up and flatten the top. That should get you started.
I talking about shader
this is what I got now
I can't tell if it's an improvement from the last one or not
one before
and I like shadowing on the last one more i think
but opacity doesn't work that way
There are usually two types of curtains, the sheer and non translucid. Used for different things
And most hotels, for example, have both. Sheer on closer to the window and the solind ones in front of them.
your first picture looks like the sheer type, and looks quite good except it's probably too solid, the socond one looks like a semi opaque, which does exist but are less common than sheer and "blackout" courtains.
Making sheer courtains double sided and adding a frenel node for the transparency is how I've made them in the past.
yeah I really dislike how unrealistic light works on them
and they both doesn't look exactly as I need them to look. So not sure what to do yet
I will try to improve things with a texture but probably it's not going to really help
Another little touch of realism, is if you add an extra layer of geometry at the bottom and edges, to simulate how they fold the fabric.
it looks like the reference one has less light coming from the ouside, and somewhat of a shinny / silky surface
splitting it down the middle is also nice
I will add texture and will see if it's help or not
but this two refs is something that I am after
Texture should help. For bedrooms there is usually also opaque courtains so you can sleep when there is some light otside.
yeah there is blackout thing
Courtains are tricky because they use almost all tricks in shading
they need shinniness, translucency, transparency, fresnel, and maybe even blured refraction to get it to look good.
will try to do something about it tommorow
have you tried faking shadow with adding subtle emissive?
i remember having issues with foliage sss, it was too dark/ao was too noticeable
adding subtle light green emissive helped a lot
but drawback is you have to adjust emissive to scene lighting
it was good enough for a client. Got to try making better curtains next time
Hello all mates. I'd love to share our company first attempt to use Unreal Studio into Bim Revit workflow and VR: we'd like to show you our YouTube channel and social media pages, and please comment, if you want, of any improvement we can do with unreal workflow. Thanks in advance

This video has been created from a workflow directly generated from BIM Autodesk Revit and recreated in Unreal Engine 4.19 (we are part of beta testers in Un...
hey @cosmic goblet !
Good job on the video
Here's some tips
- You might want to rework your glass material and lower the refraction power a bit :p
- Camera paths have some weird movements here and there, open up the timeline and try to smoothen it out !
You can also use the Camera Rig Rail actor and use it as your path
there's no shadows inside your interiors, only AO :p
This is a very first work, we are looking to go deeper with settings, and we would like to produce real vr movements, like Doors, less cinematics, bp for showing object names and informations...is a wip! Thanks a lot for the feedback!
hey gang
general lighting question — Skylight + HDR map
what is the method to get long shadows? they seem to blur out much too early
^ blender, long shadows from doors
I see a very faint remnance of the appropriate shadow very near the door itself
it's not like i'm not getting shadow information
@stiff hull Are you using a Sky Sphere and a Directional light too?
Yes and No
Im confused as to whether or not I SHOULD be using a directional light or not
varying different texts im reading
i am using a skysphere tho yea
I have seen some people say they only light using HDR
and some people say you need to use Directional light to get sharp shadows
@sharp forge
@stiff hull I'm not an expert on the subject, I think in this case you should use. You can also check if the skylight is Stationary, same as the directional light.
ok
@stiff hull try reducing your indirect lighting smoothness
under lightmass settings
just created a quick scene to test out some lighting since I haven't used unreal lightmass or done interiors for awhile and a lot of the settings are moved around/different now
looks decent but something still feels off
some of the soft shadows look wrong
and it gets dark to quickly as it moves to the left
the area where objects meet the ground arent properly occluded either, but I think most of the issues are from my composition not the lighting itself
baked in with production lighting
no real noticeable difference
slightly better occlusion under objects
@sam#8417 you wouldn't get same result as offline renderers
so you need to find ways to fake things and think if you actually need to
you will have better time if you try to work on an image(make it better) and not mimic offline renderer
hey Alexius & Alexander - thanks for responses
looks like "fakeness" is inevitable
that's allright 😄
@stiff hull are you lighting your scene with same hdri?
you can put it incide Sky Sphere
@median mural what do you mean?
my skylight is using the SLS cubemap
HDR
but do you mean the actual image covering the skysphere?
oh sorry SkyLight
ah in that case yea im using proper hdr
but as a matter of fact, my skysphere is just a normal skysphere
I would change sky too
not sure ¯_(ツ)_/¯
hehe
I did whole thing then lit with hdri
result was close enough
but it wasn't interior
https://www.youtube.com/watch?v=kF_Ogi6CLQg i think this video talks about it
Ah I had heard that 4.18 made big changes to skylight!
multi bounces
and directioanl
my project is on 4.17 right now but this is good news
I would remove the default skysphere, all atmospheric fog, heightfog ectra... So that your sky is just black, then import your HDR image as openEXR, switch to skybox, make a it two sided, ectra... Then put it on an editor sphere (you can find in engine content) and then just set position to 0, 0, 0 and scale to like 1000, 1000, 1000
hey there! where did the 'build as if static' button go?
It wasn't here then I started baking
Hi
Can anyone tell a site where I can find some houses or rooms with measures so I can practice some archviz?
I've found houseplans
is there another?
arch daily has a whole bunch of really cool architecture projects, and usually include floor plans elevations etc. @agile reef
oh yeah you can buy physical design magazines they are pretty cool
Thanks @solemn hawk really cool this site
I also found architectural designs if anyone is interested
@median mural physical magazines? what is this.. 1995? 😛
well internet is full of questionable content so if you want better content there is magazines. They have ebook versions too i think not sure. It's not like I actually use them
Majart Unreal Tutorial
pretty nice tutorial to get a nice baked lighting from just one HDRi
@agile reef You can scale a house/room properly by finding a reference image, finding the dimensions of something in the image (for example you see a particular TV, you can look up its dimensions) then find the camera angle and horizon
@winged schoonerius#5125 Yeah, I was watching a video today and the guy said something like this, thanks for the tip
I will overuse this everywhere!
Light shafts or volumetric fog?
fog
I put a volumetric light (using another software) for a projector and the client told me to take it off, that it looked like people had been smoking in the room 🤦
well it sure looks like that
or just dusty room
probably will have to remove that too
I've been working on this Arch-viz project for a while i know my eye for cinematics and camera movement is just poop but i did try its meant to be run on oculus so yeah cinematics really don't count but yeah i'd really love some positive criticism https://www.youtube.com/watch?v=4Rzeh1ufZMc

Virtual Reality ArchViz Real-time Render with UE4 www.eyradesigns.com Link to Original Video:- https://www.youtube.com/watch?v=7Hity9GQ77s
Its really good
And it retains surprisingly good visual quality even though its VR
The camera movement could use some variation and improvement, but I definetly wouldn't consider it bad at all
@MrAKAPrime#0875 I am starting my first project in UE4 for arch so don't think I qualify for giving criticism but I think your work is awesome, is that cooker an electric or induction cooker?
for camera movements just look at some good drone footage and product reviews they usually do some sleek camera movements
I don't know if this is a good idea or not but for my first project I am trying to recreate an IKEA kitchen scene. I am using it to learn fusion 360 and UE4 😃 I guess if it doesn't work out at least I've learned something along the way
@pale prairie @left path noted will try to work more to improve my camera skills btw @left path keep posted on ur WIP would love to get a sneak peek at new designs
Hi! I have a huge model that has many different pieces. Is it possible to import that mesh as a seperate pieces, but still as a combined so I can drag it to scene? If i use "Combine meshes" It creates it just fine, but I don't have any control for the seperate pieces. Thanks
All you have to do is select them all and drag them in (zero out position too just to make sure it's all in place)
@MrAKAPrime#0875 yeah I am currently only in fusion 360 phase, blocking out everything at the moment 😃
Hi there,
I've been trying to get my archviz projects on the web. I have little success so far, but i was wondering:
Would a VM be a good solution for web archviz? Load the projects on a server and open them remotely
Hi everyone. have a little problem... i put 2 light sources and i would love to have a soft and uniform effect on my backpanel..but, i don't know why, there is a sort of a beam in the center.. anyone already got a problem like this? i have setted it as static light, if i move to Movable it doesn't happen..but i want it to be static
@hard oar baked static lights? 4.19 ?
if so you got to rotate 90 degrees there is a bug
Yes @median mural rotate the light source 90degrees in any direction?
Ok i give it a try 😃 thanks!!
i am rotating them around X axis (red)
can't actually on the Y cause it would set my light capsule vertically
solved. i had to rotate them on the Y, what a bug!! thank so much @median mural
yeah crazy stuff. Sad thing that on my end I was sending out small edits and didn't notice. So it was the client who told me about this problem 😬
note to myself is that updating to new version isn't small edit
hours and hours of work repairing it, in some cases
Is is possible to see what Scale is needed to make model extracted from .IFC to be the correct size? I have a building model and it is very tiny. I just know that the distances are correct, but the scale is very wrong.
UE4 uses centimeters, you need to make sure that your 3d app is using the same unit settings when exporting it
I think Revit defaults using imperial measurements, this results in small models when imported to UE4
if its using feet or inches
change it to centimeters and it should be fine
Go metric or go home
Anyone who can give me a good explanation how lighting works in 4.19 ? because I cant seem to control it at all, I get a totally different lighting setup compared to 4.18 I tried using unitless, lumen and candela. But even unitless has a totally different intensity than 4.18 and my scene is always washed out or too dark. No contrast at all
unitless should be the same as 4.18
has anyone seen lightbaking artifacts like this before? normally my bakes are super clean, but now I'm getting this
can you take a screenshot of lightmap density view?
@solemn hawk I am interested in pixels relative to your artifact
What's your static lighting level and quality
Static lighting level is 1, lighting quality is production
https://youtu.be/wSpuThF9iIo?t=1m20s . Can anyone tell me how to make the camera move like that when swipe? [ from 1m20 to 1m22 ] ? Like what we are controllingg ( a spring arm + a camera)? And I feel like there's some panning there, how to do it 😦

Rolling Ant is one of the world's leading companies providing high-end interactive 3D visualization solutions. http://rollingant.com .
has anyone been using Unreal Studio at all?
@rotund shuttle it's just interpolated positional transforms with a tracked object.
they could also be parenting the camera to the tracking null and rotating that.
at least one of the shots looks like they did that
actually at 2:15 they show you how they did it..
@royal osprey thank you for replying. So we'll control one which is the actor owns player controller contains a spring arm + camera then move it around or anything like that? I mean i tried to set the actor ( having spring arm and camera) to the touched location when finger touch and then rotate the spring arm while swiping but the feeling is just not right.
I really don't understand the tracked object part really 😦
what you need to do when swiping your finger is rotate an object, that is the parent of your camera (and the camera is also tracking, wich means, looking at)
@royal osprey thank you very muc !!
what's the best way to texture/uv map building walls? wider walls have lower pixel density than shorter walls. if i want to use a material that has a wood base running along the bottom, it seems like i would have to have every part of my wall split into squares and fitting into the 0,1 uv space which would require a lot of effort and materials.
either in sections like that or do the whole thing including texture before you import it
depends on the context though

i want to make a texture like the wall in that building
the only way i feel i can do it is if i have my wall split into squares, and having the UV cover the full 0-1 space
but then wouldnt i need to have a material for each wall piece? wouldnt that be really expensive?
it just seems like that route is so tedious that there must be an alternative i'm missing haha
not if it's the same material
I'm probably not the right person to ask though, I gave up on UV's
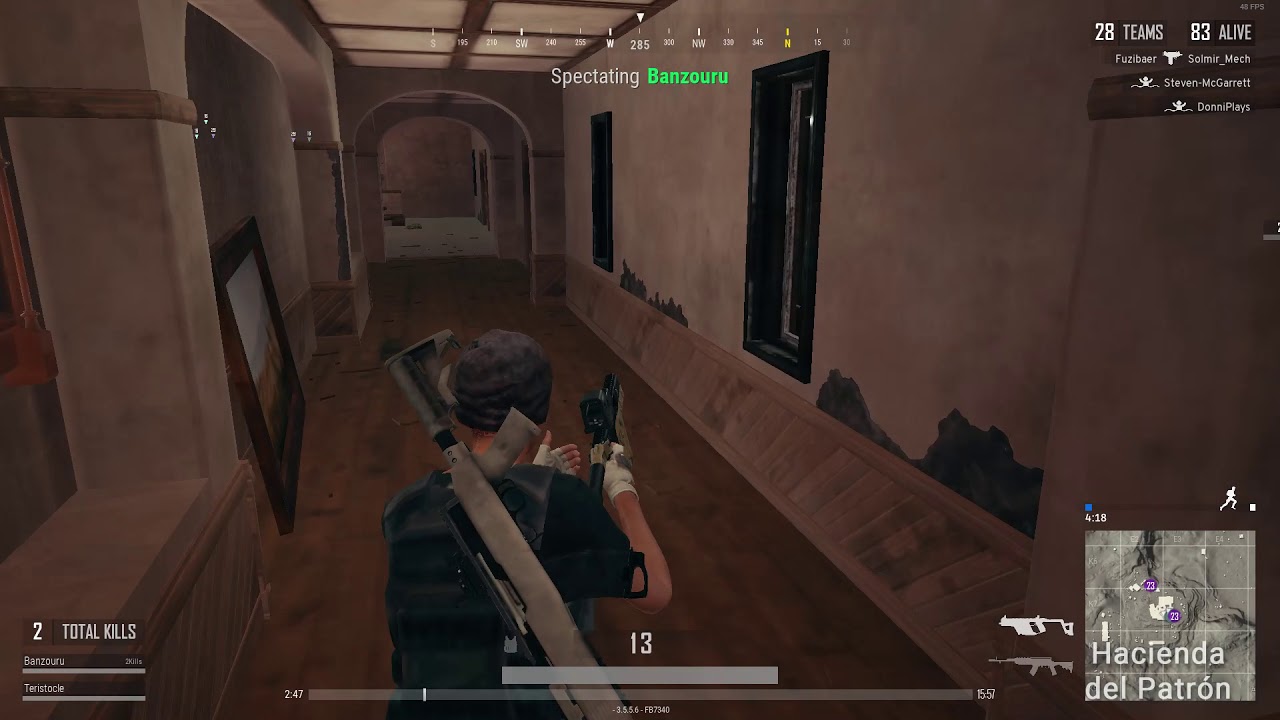
That screenshot is pubg though?
that uses dynamic lighting so no uv's at all
for a textured wall it is common to use a seamless base texture with the UV repeating, then detail is added with decals
details such as torn paint, humidity, dirt, scratches, exposed bricks etc.
or vertex paint
Vertex paint is not usually a good solution for detail, unless you use it as a mask, since it requires a dense mesh to be workable, and that is not always an option.
you can use macro textures to add a bit of variety in your tiling materials
but yeah, tiling stuff can look pretty bad in archviz
Vertex paint is pretty good for detail
you use same texture with damage or something
and it blends nicely on low density mesh because of that
and dense mesh isn't very big problem for performance
What I meant was not to expect to be able to paint graffity or a light switch with vertex paint, but using it as a mask to mix other textures or using it for slight color variations is a good practice.
decals can be pretty awesome too
Guys. Anyone know how to achieve photorealism in unreal? I am trying to get it done, but the results are unexpected.
show us
I don't think anyone could sum up how to achieve that in a few lines
there's people who spent years at it and haven't achieved it
current lighting systems make it virtually impossible
but you can get close
ish
So i tried gpu render
and it's considerably lighter
looks like timings is incorrect
it tells me that it took just 1 second
@dusty gyro can you show yours?
well quality is amazing I am happy
@cedar vault you have should put some example of the results you got so we can see what you need to improve
@median mural I'm not sure you should look at timings really, but you can look at the swarm debug with all the graphs
sadly I am back home now and on vacations until one week, so won't be able to show you anything 😦
oh ok
you can use those to see there is problems in the scene
well I can say that I don't run out of memory
Wait you can GPU render in ue4 as in light mass baking?
Unreal Engine Forums
teaser1.jpg
Disclaimer:
This is a very simple and early version of my GPU lightmap baker. Don't expect much from it! =)
Binary Installation:
4.19.1:
Thanks
wow
Its pretty limited, but definetly a step in the right direction
I really hope this gets more support so maybe epic will consider integrating a fully featured GPU renderer to ue4
Then maybe it won't take hours to bake a single room lol
surely they could partner up with Nvidia to do something
we don't all have render farms
Ikr I feel like it wouldn't be to difficult to create a GPU accelerated light mass baker
They are already partnered with nvidia for the real time ray tracing thing
But its not like that will be useful to anyone for awhile
Tim Sweeney reckons 20 Tflops for ray traced games, we aren't far off that on the high end
I'm not sure if we will be able to reach it within the next few generations considering they are already beginning to hit the transistor limit
its a lot clearer in the second shot, and you removed the neons right ?
Generations of graphics cards I mean
They will find a way, theres still room with current tech for huge improvements
@median mural looks a lot better
old one is the second one
That looks really interesting, will try this.
needs a better glass material, that refraction looks weird
it's just with this thing my emisive actually works better
I had the same problem with the default glass
There's a better glass material in 1 of the content examples
What are your light mass settings?
I was asking Alexander, but cool
You light mass quality is to high
Light mass scale x quality should = 1
So 0.1 scale should have 10 quality
takes no more than 5 minutes to bake what I posted earlier
hmm where did you get that ?
Only 5 minutes to bake what?
if so maybe I should up the quality a bit more or reduce scale

each lighting scenario is 5mn
Oh
pretty high density aswell
but this is gpu rendering, so all settings are different
one HDRi skylight only
I need to fix lighting things I turned off most of my post process settings
Does anyone else get issues when trying to simulate overcast diffuse lighting by using area shadows on their directional light?
I've noticed that gives really weird shadow artifacting even with really high light mass settings and lightmap resolutions
When I turn them down/disable them it looks fine though
hmm no.. to simulate overcast diffuse I use a skylight and a light portal
That's just normal
I mean like making it so that the direct lighting and shadows are a lot softer and not sharp and defined like usual
ok so it's 113 seconds to render this thing
dunno if there is any setting that would help you, have you tried with an emissive to fake the area light?
nice
Yeah I guess I could do that, but I'm trying to keep my light setups consistent to how light is in real life for the sake of consistency
This is what I mean
Vs
Notice how the bottom one is significantly softer
Like an overcast day
fixed a problem with hidden light
I very happy that emissive light is a lot stronger compared to standard thing
another scene
I think because I have pretty bad cpu I optimized a lot 😃
I actually wonder if with gpu thing having small lighmass object will slowdown process considering it works better with bigger images vs cpu
@pale prairie in your setup do you use directional light?
You can try lighting only with skylight and put nice hdri there
Hdris don't really give any directional shadows though
They usually only give off ambient lighting
I will try it though
I beg to differ, a well done hdri gives directional shadows !
You should have a look at the hdri heaven website, they give us hdris for free
or you can create hdri yourself in SD
Oh you can ?
yeah they have preset for that
you can export 32 bit
but not sure how that would work with sbsar
but you can preview how that
Anyone here tried UE4's HDR implementation on an actual HDR display and knows if using .exr's as textures has benefits (or is even feasible)?
@warm sentinel HDR images are more about lighting information than color. You'd want to use an HDR for your sky light/sphere. but not for ordinary textures like a walll material as they don't emit light.
ahh aye. thank you for the info! @solemn hawk
Any place where I can get good materials?
@agile reef https://source.allegorithmic.com/
download the Paragon assets
Good materials as in Readymade materials for UE4? or Textures?
I have crazy Idea that it would be beneficial to use one project folder for arch viz projects. To assemble library easier. But I sure it's bad idea but I not sure why.
Can someone help me not to do that?
easier to share things and a lot of settings require engine restart
I keep things separate just so it's easier to backup and share, but I don't see why it wouldn't work. An alternative would be to make a "base" archviz proyect with all the settings and materials you often use, then clone that before starting any new project.
thing is that you will need to merge your materials improvements and houdini procedural assets with every new thing
if you make changes to base materials that you used in older scenes it will make variations that are potentially unwanted tho.
or wanted just because they now better somehow
I just migrate stuff if I need in another project.
when proyects are similar I do make them in the same project in diferent levels
Working with several people can be better in smaller projects
but I am not doing that
yeah, I am
we have a central server and we keep all the base geometry there, including the fbx we import to unreal, We also have an unreal material library that we import when we start anything.
and sometimes we take a project from one machine to another (unreal projects are stored locally)
I think I will try to work in one project and find all the problems with that
atm it's better then opening two editors at the same time
I will doing those in the same time so it's more beneficial for me to not loose any time from migration process
I need some guidance too
Later I will post some screenshots
Need to come back to work
This is what I'm doing
but I'm getting some black borders
is this a lightmap problem?
Probably.
In this mesh I didn't check for UE to generate UV for lightmap
can be overlap then
Arch Vis guys, what is your software of choice for making buildings to bring into unreal
I guess max and blender are the top 2? Which 1 is better putting cost aside?
If i'm working from floorplans is there a better workflow using autodesk stuff?
@tulip helm
mostly depends on clients, what kind of source, files they provide
still, for residential housing & interiors 2D plans (pdf, jpg, dwg, dxf) are more than enough
i do it in Blender with occasional use of Archipack addon (http://blender-archipack.org/) and freeCAD (https://www.freecadweb.org/)
3ds max is pretty good
^... and also, Max has another advantage - Unreal Studio support (https://www.unrealengine.com/en-US/studio) which includes Datasmith (https://docs.unrealengine.com/en-us/Studio/Unreal-Datasmith/Datasmith)
For floorplan conversion we use DraftSight, it reads all but the latest DWG that the clients provide, if the client uses a newer version of Autocad then we use the free Autodesk DWG Viewer to convert them to older versions, then bring them to Draftsight to be exported as DXF. After they are in DXF we extrude the walls up and go from there. I hate it when they bring stuff in pdf or jpg since I have to re create the floorplan. I use an odd 3d app for modeling (Lightwave), but from what I've seen Blender is pretty good, specially if you complete the unpolished bits with addons that are also usually free.
Does floorplan conversion convert the DWG file to editable splines? So you can just extrude them or snap stuff to them?
Hey all.. I have a question.. why do my lights makes these jagged shadows (directional light, moveable)?? Hoe do I get rid of them?
This is killing me, and I have a deadline. How can I get rid of this? I delete all lights, and I still see it on the geometry. I have a camera a way out, but I can't seem to change the scene settings to fix this.
Thanks. I also found that I had things scaled x10 times out of the norm. I had the Bias maxed out. I fixed it by parenting to something then scaling the parent to 0.1
damn going through the studio tutorials rn, these are pretty well made
and there's a loooot of videos to go through
thanx
learning a lot of stuff for scene preparation
Revit users, rejoice ! https://i.imgur.com/6lMLwdN.png

Hey folks do you know of any good resources to buy 3DS Max Arch Viz scenes? I need to find something decent to demo Studio with
How about stuff from evermotion @fair hinge ?
their packs can be a bit expensive but they have some awesome scenes
Evermotion – 3d models store for your projects, HDRI, textures and tutorials. Downloads and articles about computer graphic, archmodels and digital art.
There's stuff for UE4, but if you want to try out studio they have a lot more max scenes
I'm sure you could get very close results with lightmass
I was having a look at Evermotion really nice stuff quite expensive but I think I will go for it
Thanks for that
no probs
If you want to do realtime stuff you might need to remodel/LOD their models though
Aye hopefully not too much work I just want to see how effective it is transferring all the data into UE4 from Max
maybe setup VR controller
if you use the product viewer Template you won't have much to do regarding VR controls
I think there's an archviz template coming in the next updates too
PV is more for small CAD stuff
that template will be nice for sure
@fair hinge do report back if the import of evermotion assets with studio goes smoothly, they have a few packs I'd love to integrate in our projects, like the industrial assets 😃
sure thing
evermotion got crappy non game ready UV's sometimes
Ever motion has lots of game ready assets built for unreal engine
But they also have a lot of super high poly bad UV mapped ones meant for traditional renderers
good thing UE4 munches on bad assets like a boss 😅
in comparison to what?
Unity
I mean with Studio I've been importing CAD stuff pretty easily without much problem
(the problem is to optimize everything to get VR ready scenes)
have anyone tried vray for unreal?
it doesn't do baked lights right? Just to export and render if you chose to do that
well it's just not fair to compare it to unity 😃
is it even available ?
how about all this realtime stuff for arch viz
and marmoset like software
keyshot
these are rendering tools
Unreal is a game engine
`Once your V-Ray scene is imported, you’ll be ready to take full advantage of the VR capabilities in the Unreal Editor.
V-Ray for Unreal makes it fast and easy to create high quality, immersive VR.`
they bakes fancy lights somehow
so you CAN bake Vray lighting ?
I'm kinda confused
no bake vray lights
like light as a light that illuminates not shadows itself
oh no actually looks like it's just hdri
like sky sphere
I think it's more use if it doing other fancy rendering with swarm like this gpu thing
so it's more for existing pipelines with vray to transfer to ue4
and I am looking for quality improvements with minimal steps 😃
arent we all :p
but this is interesting actually 2. Render ray traced images directly from Unreal
can be useful
well if your projects are made with Vray
the transition is going to be painless
studio can convert Vray lights to standard UE lights too
that way if you want to do realtime stuff its gonna require a lot less transition work
same with materials and textures
And I am basically not doing first step. My modeling software cares only about texel density there is no light or materials 😃
I really don't get why we would want to get Vray inside Unreal, the whole reason to use unreal for me was to get away from ray tracers..
(or more specifically their cruel render times)
You think that with the current lightmass solution that UE4 has is faster than Vray?
and Vray is only to render images here
we're all dreaming of Unity's progressive lightmapper in ue :p
I didnt seem that impressive to me in their demo. :/
Its fast surely but the demo they had was too dark to see the real results from it.
Been playing around with the GPU lightmass solution and that looks really good and is much faster than regular lightmass on my home system, and a little faster on the machine at work.
In UE4 or Unity?
Yep, a lot good results from it.
results were awesome with octane, but took a long time
mhm
I member seeing a lot of realtime octane related videos a few years ago
What kind of gpu card do you have?
the truck one was impressive
@royal osprey?
980ti at home 770 at work

A demonstration of full motion blur, available in the upcoming Octane 2.0 release.
Niice!
like in the starwars demo you mean 😃
that was pretty awesome too. too bad it was done with unobtanium graphics power for now.
it looks bonkers though
Wait for the realtime raytracing
Probably next year when the Volta gpus comes out commercially
I've seen a few examples, there was one even online, you would play around with the lights and stuff in a web page
Real time raytracing in html.. and that was like 6 years ago.
rumours for new gpus are november now 😦
I think we're just gonna get a Titan V and call it a day
it was admitedly a very simple scene
2018?
yeah
But guys you forget the real time reflections, they take a lot time to render realistically.
I think the demo was most focused on the reflections. XD
@dusty gyro Do you know what the price of the cards will be?
I don't really care about "realtime" as long as it's under a second per frame 😃
I've been rendering out 4k from unreal, and I think it takes more time to save the images than to render them.
😄
Consumer cards should be around the current price, maybe a hundred or two higher
Prosumer cards though... no idea, around the Titan V maybe ?
mhm, I understand.
there's so much rumours about GPU architectures, price drops and stuff right now
its impossible to make any prediction :/
I've been following rumours for 5 months now in hope to have a definite release window for the next gen architecture
our 1080 equipped pcs are taking a strain with the Vive Pro requirements
Yes, we have the same problem.
Tho it could be compensated with lower resolution output since the screens is higher resolution than the old Vive.
Performance wise*
you would only benefit of the lesser screendoor, but its a bit of a waste 😢
I'll just say what we are all thinking: Damn miners if it wasn't for them we'd have decently priced cards instead of 1080 that are more expensive than a year ago.
Well, you are right. 😃
looks inside cryptowallet, few litecoins sleeping in a corner
/ me curses @dusty gyro
I'm still in the green, but yeah twas quite a ride
It's just wrong, raping the planet by wasting energy, wasting perfectly good graphics cards, and driving them out of the market just to make pyramid scheme money
in some no shame part of my brain I do wish I had invested in them sooner tho 😃
no kiddin
imagine, if you bought a year ago
and sold in december during the bubble's peak
x17 profits on initial investment
The only coin that makes any sense is otoy's unreleased render token. The graphic cards are doing actual 3d renders, and you get paid for them.
crazy
anyways
where should I place our logo on the screen overlay ?
there's a bunch of view shortcuts on the right side
so that's a nogo
corners are generally less intrusive, so that leaves bottom left, top left
gonna go for bottom left
nice, the overlay doesn't even show up T_T
stupid proprietary softwares
I am liking new project more then previous one
It looks better even without anything in it and I can't tell that about last one. Just space is better probably will be able to do something more pretty
@median mural using the GPU baker ?
yeah
Your corner shadows look a bit too low quality, how big is the density here ?
with so few assets in your scene the GPU baker should render the lightmaps in a few seconds
even with higher res :p
64 by defult
go red or go bust 😄
that is sometihng I see a lot here, they want to see everything high quality from the start, before the intensities are even sorted out.
I have to insist to them to keep it fast till the end
with the GPU baker and a good GPU it goes so fast ¯_(ツ)_/¯
is your directional moveable ?
I'd up that light angle a bit
our GPUs suck at work, it is the next item on the to-buy list. This machines were bought with traditional CPU rendering in mind.
What I really need is clipping plane in the cameras

this why I am saying that this is what I really need from ue4 devs
There is a movie called Hugo, in the "behind the scenes" they have a shot where they physically move a wall so the camera rig can go there to get the shot they wanted.
Bake light and then hide walls?
I feel like it will create light leaks

from other stuff
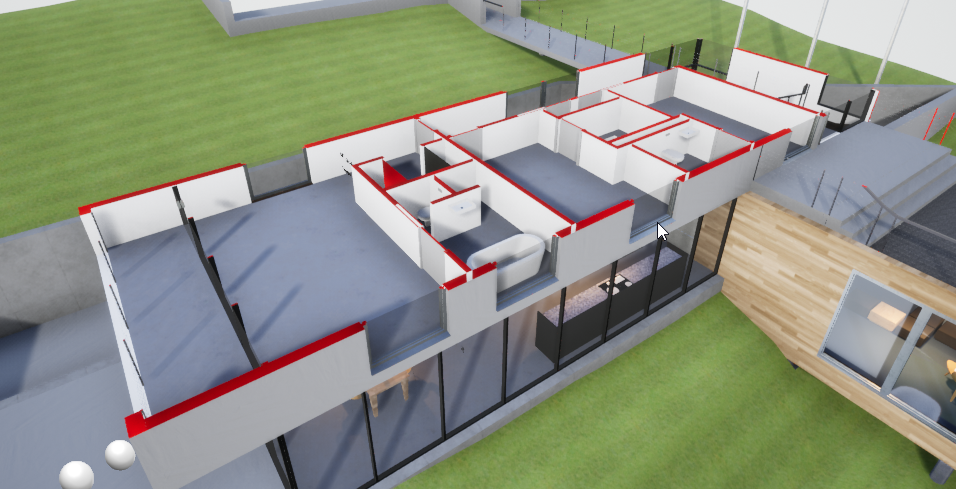
this is how I did it
in many cases you can go behind the wall without a problem, the problem comes when there is some kind of column, or painting or something else on the wall.
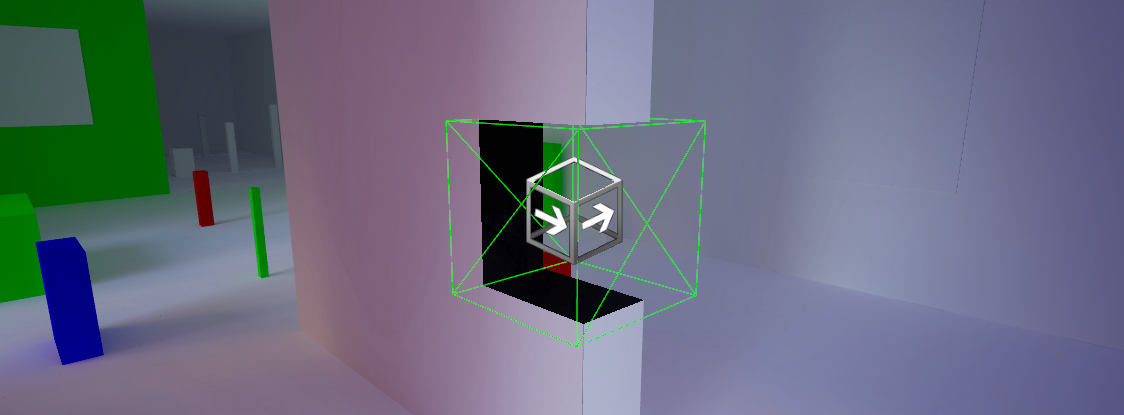
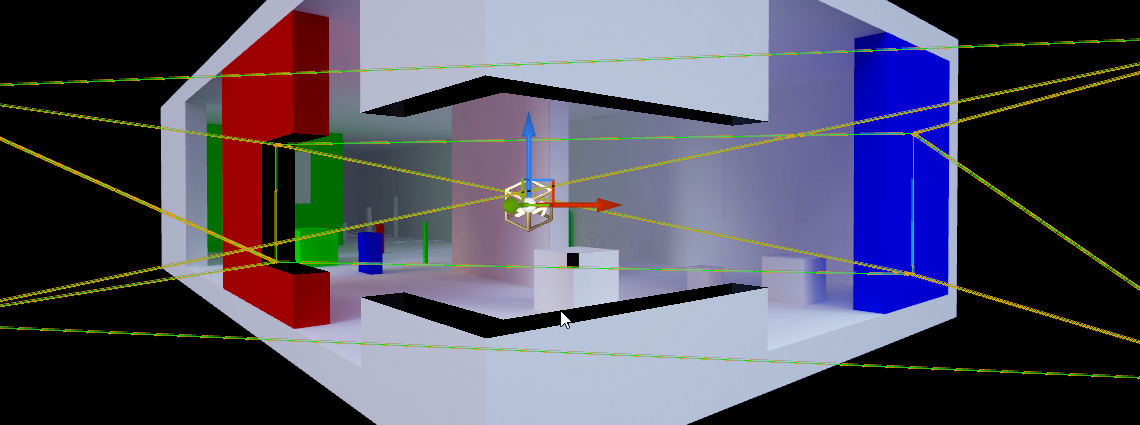
that's where a section box tool works wonders :p
it's something you get in studio?
we made it from scratch
and it works alright with baked lights?

oh you got to use special material on objects?
materials are masked
you just need to plug a material function to your master material
yeah I see how you do that
nice trick
👌
so you basically find this object and create mask from world position?
setup is as following
I have an actor bp that serves as a gizmo to move the box around
There's a material param collection
with box location, size, etc...
oh hm ok
all these parameters are updated in the construct
and are plugged to the material function with the collection
well now wait and I will do my implementation of the same thing 😃
aight 😃
Unreal Engine Forums
For discussions about Materials, Textures, Lighting, Particle Systems, and Post Process Effects.
good thread to do the material part
thanks
you can change the near clip plane, just not dinamically
it's in project settings
requires restart
clearly I don't want to do that 😃
I think masking method is best way to do what I want actually
and I am using layer materials now so it will be very quick change
they are buggy but very cool to use
another shot of what the section box looks like
migrated from the house project in a few minutes
plugged it into the master material for that project, bam 😃
I need to add the rotation suggested in that thread from earlier
just don't put movable lights there
Why?
they will cast lights through mask
but actually you can make this box shadow casting and that will fix that
Oh yeahgood call
do you have a master material to create your scenes?
best would be to have a master for each type of asset, ie props, props with transparency, foliage, glass, decals
and instantiate them
well if you use the same texturing workflow between the two, yep
what software do you use to make your textures ?
you just change the diffuse texture and bumps and etc
y
I'm just starting with archviz
I'm struggling a bit with my lightmaps
but once getting my mesh done I'm going to move to materials and lighting
what are your problems with lightmaps ?
they are overlapping
I saw a really nice tutorial about it
I think I know what I'm doing wrong
can you share the actual UV ?
and the lightmap density debug too
should be in the render mode drop down, in optimization viewmode> lightmap density
right so either go for a higher lightmap resolution
I need to work better the uv mapping in blender
or separate your islands a bit more
I'm using a formula
I don't know if its right
(1 / lightmap res) * 2
I will learn more in this subject along this week
formula ? 🤔
for texel density ?
you can use the automated unwrapper in UE for lightmaps btw, no need to do them by hand
I just saw a video of a guy doing this from blender to ue4
still learning
I will use the unreal unwrapper to see the results
I need to go to work right now
good luck !
@mellow crater sweet ! Using studio ?
nope, Rhinoceros. Had also a version with 2 columns at the "open" side of the tent-like roof structure, but without them it looks even more like the wind blew under the tent/roof.
hehe
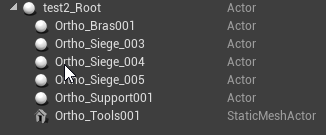
Hello everyone. I have a big problem. I do not know why, but when I use datasmith, Unreal changes all my static meshes into actors, and I can not reverse the change.
@normal river there's an import option to change that
wait actually they removed the option at some point
I've just imported a model and I have both, some meshes are actors with a static mesh component, some are static mesh actors
care to show us the world outliner hierarchy ?
alright so no particular hierarchy or layering
No no.
wait. Im doing the Datasmith importation in unreal
I'm actually having a different behaviour with the import I just made
compared to importing full revit models
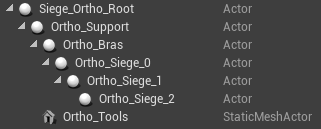
I can't figure out why its using actors for hierarchized stuff
and still using an actor for the latest child and a mesh actor for another last child
now I'm confused
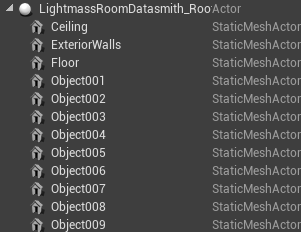
another test, and this one imports as static mesh actors
no hierarchy in max like yours
And how do you do that?
hmm
T_T
Its in the default layer
lets check....
funny, the unreal plugin is 0.182
Yes. Beta Version 0.18

Im start to think this is a joke. I cant change or resolve my problem T_T
lets check
well studio and datasmith are in beta for a reason :p
UnrealDatasmithMaxExporter_4_19_18_3
Thank you for your interest, despite everything
no worries
I'm doing some testing
your meshes are set as meshes or polymeshes in max ?
I tried both. Poly and meshes. Same result xDDDDDDDDDD
are you using instanced meshes ?