#animation
1 messages · Page 126 of 1
I avoid the hell out of state machines
and do most timing myself
but I have actually used sync groups
just very briefly
with sharks
and it did fix the problem i had with tail wagging
in terms of transitions
but the frame lengths of these things were identical
Yeah, in which case it wasn't actually doing the time scaling thing.
What's weird is that the 'sync group' scaling does work, it's only when the markers are added that everything fucks up.
hm
very curious if your sync markers are maybe just accidentally configured wrong?
how many cycles do you have?
Ah - I thought that, then I tested a linear blend with the same animation one scaled at 1.0 and one scaled at 5.0 and the dramatic obvious velocity popping was visible in precisely the same place.
is it just FOOT_L and FOOT_R ?
So, no, the sync markers are set up properly.
or do you have like FOOT_L_DOWN FOOT_R_DOWN FOOT_L_UP FOOT_R_UP
I timestamped where they talk about markers https://youtu.be/NRwMmHNs0KU?t=2793
WHAT Expanding on the content from the Animation Blueprint Setup & Walkthrough livestream, Jay continues work on Shinbi's animation system to show some more ...
Hmm - they're blending between animations of the same velocity though.
I think this is for anims where you character changes direction or something cause then the blend could just make the legs overlap or things like that maybe
They probably used sync markers here for example along with their trick (timestamped too) https://youtu.be/YlKA22Hzerk?t=663

From the nucl.ai 2016 conference, Laurent Delayen shows how Epic Games brings a Hero from Paragon to life. With a programming focus, this talk shows and expl...
I'm skimming through the live training and they don't show it being used.
He talks about it here https://youtu.be/YlKA22Hzerk?t=544 apparently
From the nucl.ai 2016 conference, Laurent Delayen shows how Epic Games brings a Hero from Paragon to life. With a programming focus, this talk shows and expl...
Ah yeah didn't watch the live training entirely too, just saw it in the title and quickly looked if they talked about it
Hmm - ok, but in this case they're controlling the play rate. This is the presentation where they talk about the stride scale and rate scale IK leg locomotion system.
In this case, the sync markers would likely be helpful because they're primarily blending between the four directional runs.
Which are all being rate scaled.
(this setup is necessary because they don't have 3D blendspaces)
Err... 4D blendspaces?
Forward / Right / Lean / Slope
But I think I'm getting it. The primary purpose is to pick a correct starting time when blending between disparate animations, not to handle rate scale. Rate scale needs to be handled independently.
You seem much more knowledgeable about animation than me lol so I don't think I can help that much unfortunately 😅
It just seems to be a way to avoid foot sliding and have more control than a simple blend using blendspace I guess
i believe so jack.. if you think of the way the non leader is introduced
Yeah basically it seems to give some points to start the blend from, avoiding to blend while a foot is in midair for example
in terms of time scaling jack
when its starting a transition to a new introduced non leader, the frame it starts on might be picked based on space between markers.. so thats not time scaling but it would definite affect things.. I wouldn't be surper surprised if it were time scaling with transitions tbh
if you really wanted to find out, would recommend just keying in some markers where it would be very apparent.
such as playing a whole walk cycle in between sync markers of another thing
that might be something you could get answers from
Thanks you two. I think I figured out where this would be useful. It's useful when you're controlling your rate scale independently, and the point is to pick the right starting point.
If you're doing a basic 2D blendspace for locomotion - it's not a good idea to use the markers.
If you're doing the 4D blendspace they did on paragon, it does work.
Yeah that seems to be pretty much the case, thank you guys, never used them so far but learned about them thanks to this discussion 😁
animation in ue4 has most things thought out
still find blending things on your own without blend spaces is the best answer when you have highly sensitive timings
otherwise animation in ue4 is just kinda like: good enough, approximately correct
same reason i don't use state machine really
I find the state machine quite useful. I can't imagine spraying the complexity of disparate states across the graph.
Seems... prone to mess.
I am a stronger programmer than animator so when i'm trying to tie things into animation i have issue with having to ask the animation whats going on
state machine and blend spaces can be kinda like a black box that might as well run on the gpu
but that said, they do work well for sure
just moment the game needs to care what animation state its in, it jilters the code
not a fan of notifies really
When it don't, it don't 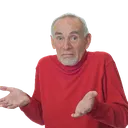
Hey folks, anyone know if I can create a "still" / "not moving at all" animation in UE
without loading up maya
or w/e
Do you have another animation with the pose you want?
yes but they all include movement
I thought about making a composite, but I'm worried with even 1 frame it would be jittery.
TBH I'm just trying to handle the character being dead and not firing animation events
that exist in his idle loop
You can copy the idle animation and just delete all the frames you don't want.
okay thanks that will probably work for me 🙂
It would be cool if you could auto generate a default pose tho
Or just use the bind pose
Someone was mentioning that yesterday. what does the timeline look like with one frame? lol
john l, yea if the bind/ref pose is the default pose (as suggested by HighTide), there is a node for that
skip the anim to the pose u want and create pose asset
u get 1 frame u want from the anim u want
nah
pose assets are not for that
pose assets are 100% for driving poses by curves
similar to how warp/shape targets work with vertices
think u can still use em for this
nope
only by faking a curve value
and you don't want this just to get a single frame of animation data.
overhead == large
ok, set playrate 0.000001 might do the trick 😛
just right click your play animation node
convert to evaluate
and set the time in.
Why does Unity's retargeting system work so much better than UE4's? Unity can handle pretty much anything I throw at it with absolutely no errors whatsoever, but nine times out of ten UE4 will have a forearm offset by about two feet or pretty much any issue imaginable. These are all random character meshes extracted from games like Battlefront or Arkham Knight.
UE4 is still my go-to, but damn if I wasn't impressed by Unity's retargeting when I decided to give it a try.
what your speaking of is only relevant to bipeds in unity. And even though unity is really good at it, its still not perfect.
Animations are in joint space in unity more or less. biometrics are captured on the avatar of the character
Hmm. And there's no way to make Unreal function similarly?
If i had to guess why unreal does not use this same method it would probably be because it would be an absolute nightmare to upkeep without closing source and restricting developers to a sandbox
You could potentially do this, but nothing like that comes with unreal
Working in joint space would mean basically having two separate animation trees
And i would not doubt if thats exactly what unity does. I have no idea though
But yea even though retargeting in ue4 is also biped related only, It is very much done at editor time and baked out in favor of performance
Alright. It's a shame, but it seems there's a reason for it. Thanks!
Just an assumption. I'm familiar with unity's retargeting though yea
I feel your pain, but its one of those things unity does for you that eats up a lot more performance than you could ever know about
in terms of what can be profiled
@molten jewel That's interesting, what do you mean exactly by performance ?
Like anim compression and such ?
unity tends to run like a dog because of gc but the engine gets away with such hiccups too or it uses threads in the background to do huge things that do not show up on profiler
working in joint space, you'd have to spend time articulating everything from biometrics at some state during the evaluation. animation curves in unity are basically like "ElbowBend" or "KneeBend" for humanoids. So it evaluates the entire state machine for these curves and then converts it to representative quats you'd expect
Idk about unity now a days but a couple years ago, you were basically limited to state machine consisting of one animation or one blend tree (per state). Then being able to manually control ik targets in code.
so trying to pass that torch on between nodes in ue4 would be quite complicated
Oh ok I see, thanks 👍
But what if you just retarget the model/anims, export them to fbx and then import them in Unreal ? Is that even possible
don't believe you can export anything out of unity
but
its possible with lots of scripting yea
then you just end up with retargeting in unreal already though
Apparently it's possible, not sure how well it'd work though https://docs.unity3d.com/Packages/com.unity.formats.fbx@2.0/manual/exporting.html
unity doesn't let you get out of their platform and its likely against the tos to do anything that could help you outside the platform
thats interesting
Oh yeah I was supposing that the retargetting tool was better for humanoids like Solaris mentionned, just wondered if such a tedious workflow would solve the issue
slightly confused what this exports tbh lol
lmao
Cause yeah since anims and meshes seem exportable you could just abuse the better humanoid retargetting and then put evrything in an fbx to import it in unreal
I wouldn't say their retargetting is better as in more accurate
The thing that is nice about unity's retargeting is that there is no output phase
you don't have to have copies of animations for different body types
it just does this for you at runtime
Ah ok I see
I assume this is what @misty dagger was referring to?
Thats what is desirable anyways
don't have to retarget manually anything
yeah that makes sense
Unreal does a pretty good job at retargeting, but it all depends on the pose yea
it would be nice if they did a little magic to give you a good standard pose things could fit
Like if you looked at all the frames of animations for where bending occurs you could probably approximate the better axes. Unreal just kinda relies on you to do it I guess.
I didn't try it myself yet tbh cause no real need, only watched how they did that for Fortnite and in some tutorials
But yeah I'll play a bit with this in the next days to see
I'm a bit curious about it
would recommend sharing skeletons
skeleton files are just bone names and hierarchy
describes nothing about transforms or poses
but having a different skeleton files means your anim bps are incompatible
but meshes can not include all the bones in the skeleton and work fine
Retargeting is still necessary between meshes of the same skeleton to get accurate movement but at least you don't have to have duplicates of event graph and anim bp
Noted, thanks a lot ! 👍
wonder how epic made Fornite use the same animations
for multiple skeletons
cause animations for me are stuck to the same skeleton
theres a video on it
control rig
@cloud lodge https://youtu.be/tWVZ6KO4lRs

In this talk from GDC 2019, Epic’s James Golding, Laurent Delayen providet a roundup of all the latest animation features built for Unreal Engine over the pa...
ill take a look thanks
Just curious, but would be the smoothest way of implementing a roll after landing anim, where it doesn't look janky based on character rotation
hello , how i can reverse an animation ? (not in bp) , from endline to startline
@half willow Don't have UE4 rn but can't you put a negative play rate scale ?
Like -1.0
Can I create a ingame animation in blender and export in ue4?
like walking and jump animation?
sorry for ignorance😟
That’s really the only way to make animations 😜
Of course there’s simulation input, pose to pose, and what not. Those are more so specialized techniques, not for overall pipeline
https://www.youtube.com/watch?v=50mIKB-NACU animation gold right here
Enjoy the videos and music you love, upload original content, and share it all with friends, family, and the world on YouTube.
I have a character push animation that causes glitching through the objects he is able to push. Any suggestions?
I tried expanding the capsule when he is in the push animation state, however it seems to enable him to utilize the physics from the capsule to push the object mush easier.
are there any good tutorials on rigging different meshes to an already existing skeleton? im using blender
@misty dagger the message would have to be the exact same size to fit the skeleton. You might have to rename the vertex groups if the phones have different names. But if they use the unreal skeleton you can delete the skeleton in unreal and replace it with the other skeleton you want to use. But please make a backup first I don't want to be responsible for you losing your project.
okay thanks, im fairly new so ima try to figure that out
is there a way to add a "direction" variable to my animation
i have speed but i want direction so my character will move in that direction when the different buttons are pressed cause they are stuck on the forward running animation when going backwards and left and right
i can GIF is anyone needs more insight on the prob
i do i can try 2d
ahh that'd be it thanks
do u know what could be used instead of "calculate direction"
hmm
could i get the velocity and calc the direction instead of vector length?
whilst still have a vector length
hey there, quick question, is this still a problem? https://developer.blender.org/T68495
"Importing FBX from Unreal Engine to Blender results in distorted bones and wrong IK bones locations and orientation"
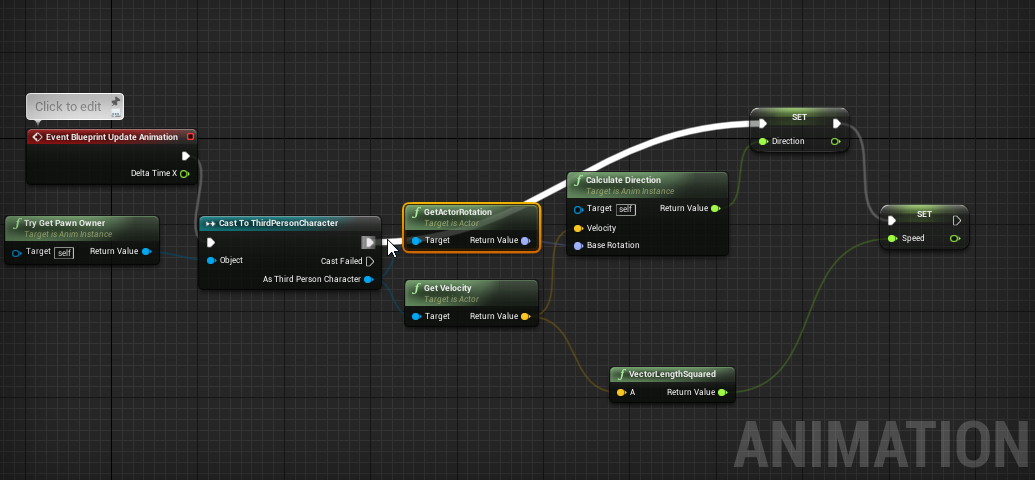
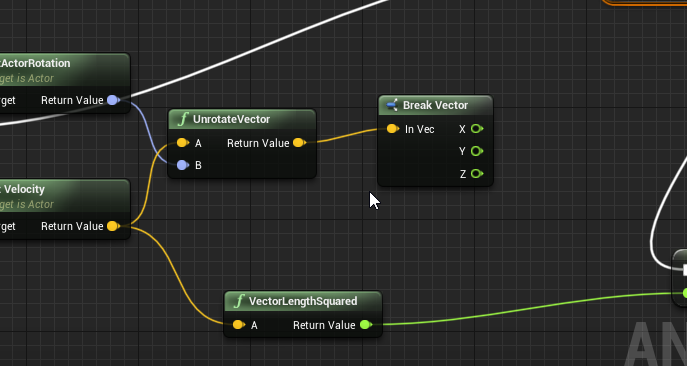
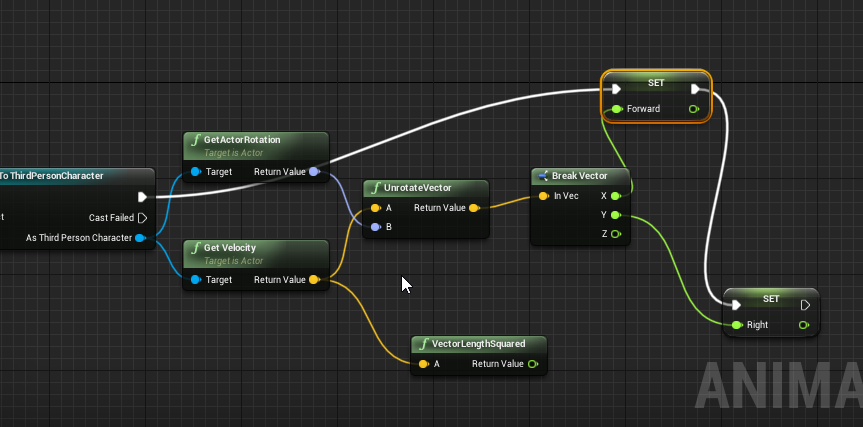
Take velocity and rotator of character. UnrotateVector and you have local velocity which is directional
That’s not a bug @glacial cedar
Blender only shows bones as y axis forward
Maya only shows bones as direction from parent
So axes in maya show just like skeleton in ue4 editor
Maya doesn’t require y forward, so they look all disoriented in blender because of the decisions on supporting some system that can be easily mirrored
Generally mannequin and other ART characters use X forward or -X forward depending on the side and arm or leg
Blender just cannot show it properly
It’s being imported correctly
Connor you are side stepping?
whats that mean?
Strafing?
No in the blend space
UnrotateVector will give you a vector where .X is forward and backward speed .Y is right and left speed
You can have these two things drive your blend space instead of an angle
do u have an example?
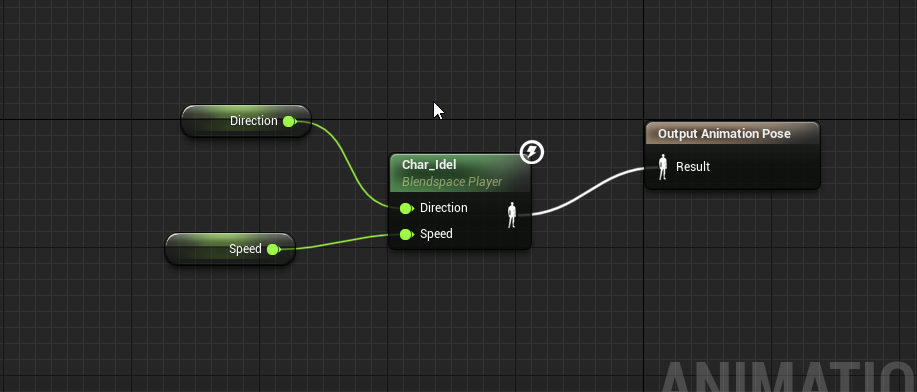
Nah sleeping but see any blend space 2D for mannequin
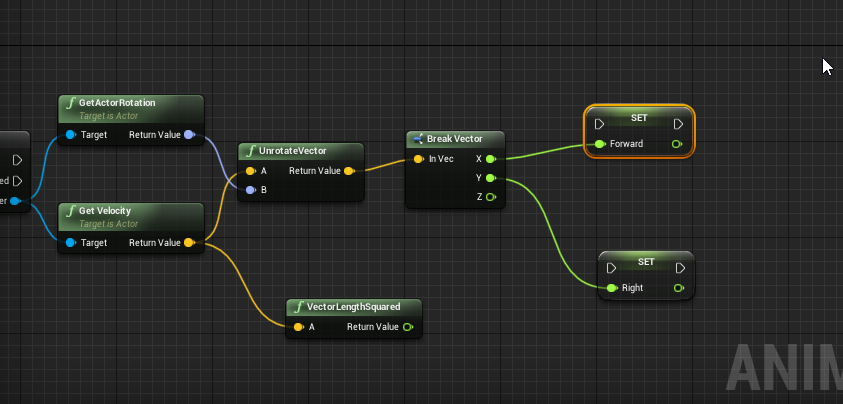
Take that rotator and “unrotate” the velocity
Now break the vector instead of using calculate direction
And pass X and Y to your blendspace 2D
@molten jewel Okay, thanks! So I should be able to import and export back and forth fine after I skin and fix weight paint, then? I am working on a reskin, and if I move a joint to better line up with my model, before I bind it, I will need to re-target the animations from the character who's skeleton I used?
*I move the joint before I parent/bind... but in the kit, I would re-target.
Yes. So long as you don’t reorient anything podcreature
ok thanks👍
Autoweights wont work so well but painting should be fine
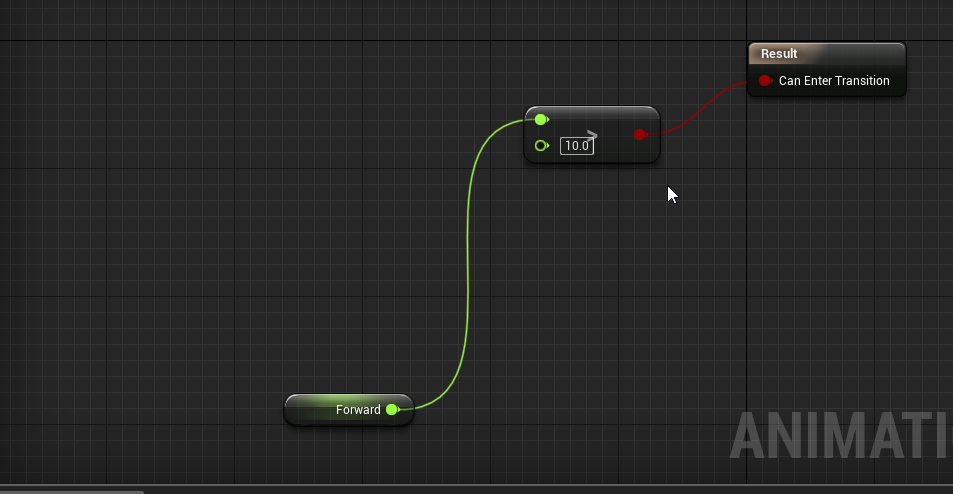
Connor look at anim graph
Where is your blendspace2D
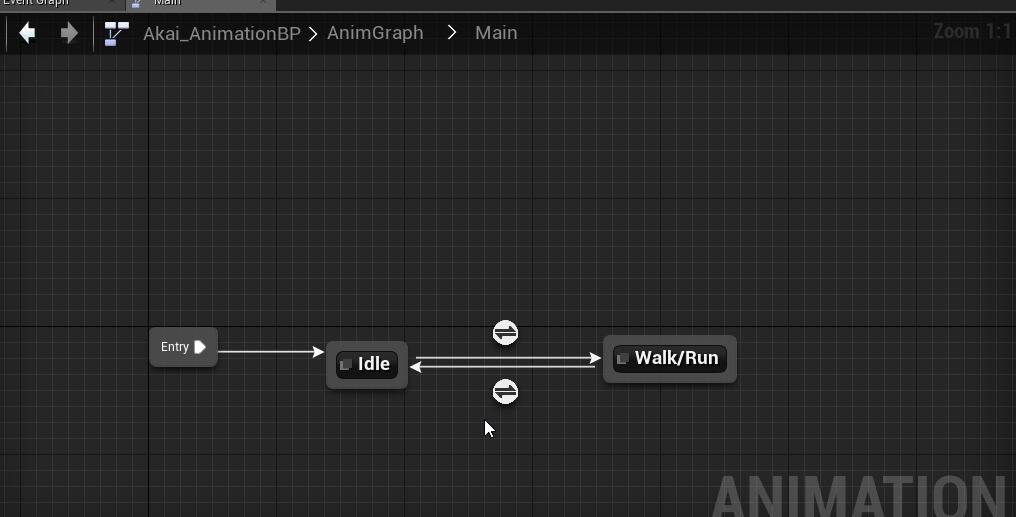
Enter run
Yes those auto-weights look attrocious, I just let it generate them so I have a reference to clean up. My first go, I didn't re-target and I think that was my main problem for why it animated badly.
Yeah blender assumes they point y forward in auto weight
When they do not autoweights not so good
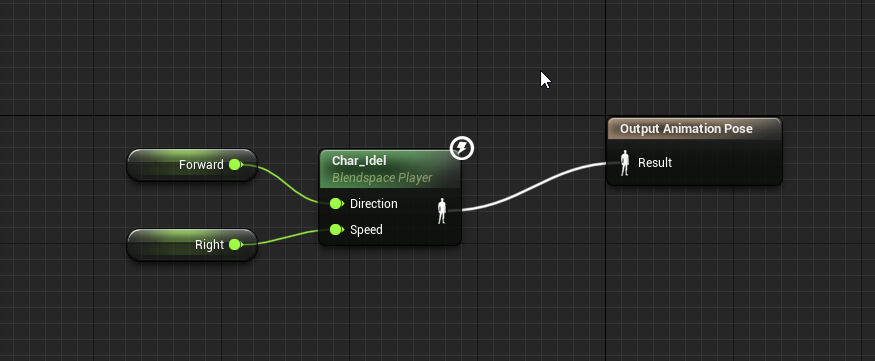
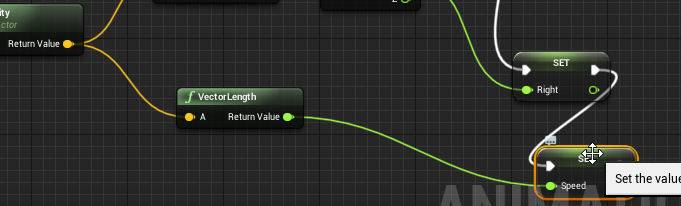
Connor make two vars
Forward, Right
2 more?
okay done
okay
they replace direction and speed im guessing?
Yep now connect the white lines
Your blend space 2d
right
yeah i didnt know why my char was going in solomo in the middle*
but now i do
lol
Solo?
its late lol
Yep
ok
done
why the hell is my char stuck in idle modeeeee
i did something i she wont move now


The arrow icon circles
oooof
i knew that
idk why i posted the idle walk runnnn
yikes
it was speed before but i changed it and it still isnt working
Yea didn’t say to delete speed. Just to add the two new ones
ahh
Make speed back, set it to length 2D off the velocity vector
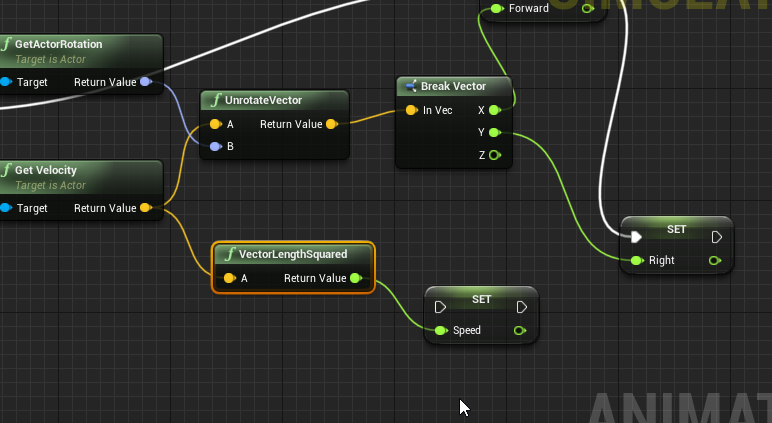

i spawned a vector2dlength but i cant connect it with anyhting
should i just do normal vector length?
Yea
cools
Work?
nope
Lol
okay did that
my char still jsut idleing
lol
such a hoeeee

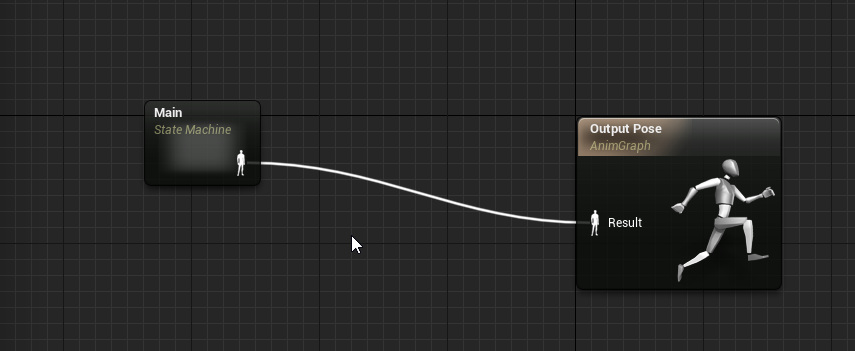
is this how i want my walk/run state set up tho?
Yea
wonder why its not working
Set debug object while playing to see
AnimBP
Somebody working with Blender who can tell me why making a box selection wouldn't select all keys?
And also, when I move them, the animation doesn't change properly. It just keeps playing normally. Then I have some twitching in the end.
This is in a file with multiple animations. Must have something to do with that. In a new file it just works to drag the keys.
Removing "Only Selected" from the Filters menu fixed it. Ofc one button, after searching for hours yday..
i think i have ran into an issue, I need my Ai character to play an animation when walking threw a box trigger. So far i am having no luck. Anyone got any pointers
Anyone got experience with Blender + root motion? I've never done it before. The selected bone in the video is the root, but it seems to not carry over to UE4, or I've done something wrong. Have 'Enabled root motion', and played it from a montage.
Expecting it to 'keep climbing' here
'Process root motion' under the Character->Animation preview is on
Root isn't moving in UE4 🤔
@delicate locust Can you verify your bone hierarchy in UE4 ?
Did you export with fbx ?
If so the Blender exporter adds your armature as a root bone by default, it may come from here, let me know if that's the case
@delicate junco I exported fbx. I seem to remember there's a trick to get Blender to skip adding the extra bone as the root, by naming the object Armature or Root or something
Mine is called 'rig', unfortunately. Renaming it and re-exporting causes it to be incompatible with the existing skeleton
Ok so do that :
Verify in unreal
@restive yew In UE4:
Yep armature is the root instead of the root bone
Locate your Blender FBX exporter script ( something like addons\io_scene_fbx\export_fbx_bin.py ). Open it, comment out the code below. After that, your skeleton should export without the extra bone created. If root motion still won't work, it is likely one of the settings you set in the Unreal Editor.
      empty_key = data_empties[ob_obj]
connections.append((b"OO", get_fbx_uuid_from_key(empty_key), ob_obj.fbx_uuid, None))```To comment just put # in front of each line
@delicate junco But how do I handle the incompatibility with the old skeleton's structure?
what do you mean ? Editing the script will prevent the "rig" bone to be added as the root, which is your issue rn
You won't need to rename anything
I have the current skeletal mesh with 100+ animations that includes the 'rig' bone. I suppose if my newly imported animation is missing the 'rig' bone, it can't use the same skeleton
You could just export the root motion anim alone maybe
Push your anim to an NLA strip and then choose NLA strip only or something like this in the fbx export options
Do backups first ofc
Ah, I already do export single animations. But when I import the animation in UE4, I need to be able to use it in my existing animation blueprint. Is this where I need to retarget it to the old skeleton? Or the other way around?
I don't think you'll have to retarget at all tbh since all the bones will have their match already
I'm not 100% sure though lol so make sure to do some backups and then try to import stuff
Will do, thanks!
@delicate junco So I'm able to import a skeleton now without the Armature as the root (so now it's root -> ORG-hips -> etc)
First I've tried to import is as a totally new skeleton. First issue is that the exported animation for that skeleton is tiiiiny. If I press 'Enable Root Motion', it becomes the normal size, and plays the animation as if it was animated in-place. But previewing it in the animation blueprint and in the animation window only shows it animating in place, even with "Rootmotion from everything", and "Process Root motion" enabled in the preview.
The second thing I've tried is to just import it ontop of my existing skeleton, but as I feared:
@delicate locust Ok so for the scale issue try just before exporting to put blender units in meters with a scale of 0.01, it should prevent this issue.
If it's animated in place when you select enable root motion then it's working so that's good news ! I don't remember if the other preview windows show the root motion anim in place or not so better try in game directly
Also remember that if you have z axis movement for your root bone you need to put your character to flying mode iirc cause the z movement is driven by physics in walking mode
(you can do this a notify state maybe or a blueprint node)
Ah that sucks for the skeleton :(
Only way would be to reimport everything I guess if that's doable :/
Yeah it's set to flying mode, so that part is fine.
I'm more worried about what to do once I get it working on a new skeleton.
I'm not very savvy with retargeting, but the main problem isn't necessarily re-importing animations, but to keep my animation blueprint, which cannot be reparented to a different skeleton afaik
And I don't know any ways to copy all variables, functions, graphs etc over to a new one
I'll try setting the units though!
you can retarget an anim bp
Ah cool, that could be an option then
@bronze osprey In his case he wants to retarget the animBP to a skeleton which would be exactly the same except for one bone, is that possible ?
yea should be fine
Duplicate the animBP and try that then runetass, hopefully it'll work fine !
R mouse and retarget, it wil take all the anims the anim bp uses aswell
you could even retarget a humanoid to horse animations
Woop, will give it a try once I verify that root motion works on the new one. Haven't fixed the scale issue yet, after setting the units to 0.01 before exporting only the animation. Migth still be my error somewhere. But I don't understand why it's different from the new skeletal mesh's scale, when they have the same skeleton
in blender u basically wunna apply scale all the time everytime from the start
B4 u rig it
It has (1,1,1) scale for what it's worth, all the way
when the mesh is 1.5x 1.2y and 1.4z and the skel is 1 1 1 it gives a lot of problems
Do you export both the mesh and the anim ?
nah u can just export armature if u just need the anim
I've exported the skeletal mesh alone, and for animations I use a script that exports the current action with only the skeleton, not the mesh
Ok didn't remember that
Both the skeleton and mesh have uniform scale
Don't really have a clue then that's weird... Did you select both in object mode, CTRL + A, apply scale, then unit scene meters + factor 0.01 ?
Oooooh yeah
When importing
Put a scale factor of 100 😅
Hmm good idea, let me try
Sorry forgot to mention that, been a long time I exported models and anims in Blender
Yeah that'll work for sure
That's my workflow and it works fine, just forgot that part lol
No probs of course ;D Hey btw, do you know a way to get the import dialog when importing animations you already have? Otherwise it's gonna auto-import
Unfrotunately i looked for it but never found the option, I have to delete the asset and reimport again everytime, it's annoying
import in a new folder?
Yeah I always do these workarounds, but it's okay =(
But you'll still need to delete the asset afterwards, would be nice to have the import options again when using reimport from file
for anims and meshes i like the quick reload
I also like the quick/auto reload, but when explicitly clicking reimport and selecting the file, I'd expect the import dialog =d
^
@delicate junco Yay, thanks, look at him go! The import scale trick worked nicely, and root motion works. Next I just gotta retarget the old blueprint. Will let you know how it goes afterwards (maybe tomorrow!)
Ah finally, really happy that everything worked ! I spent quite some time dealing with those root motion/scale issues with Blender myself so I know the feeling lol
Sure let me know ! I suggest you to write down all the workflow somewhere btw (script editing, scaling and such), you'll able to refer to it or help other people with similar issues then 😁
Good idea, it's easy to forget what the solution was!
Well that didn't work
I have a bone socket related question. my character looks like this when I run my game
nvm it just fixed itself thanks
https://gyazo.com/9febf1d12ea3989712122d2854d0571e.mp4
Anybody know what could cause this?
I have a problem with playing anim montages in unreal. the play anim montage node doesnt seem to work im currently using 4.22
Hey guys!
I exported PhysicsAsset file to *.COPY file format.
How can I import this file to editor?
if anyone has some free time and wants to call me up and explain creating animation from blender so they are FBX and ready for unreal, id appreciate it, u dont need to be a pro by no means just a helping hand
all the tuts ive seen online are outdated and dont really explain a lot
oh hey @molten jewel i got it working btw
yesterday
@prime hemlock you don’t iirc,
Copy is either the clipboard format or just this old format nothing uses anymore
Nice Connor
Most you can do with phat is copy and paste things afaik. No transferable format starter
Nothing fancy to get anims out of blender. The bone orients being maya style is painful to work with if your using mannequin. Nothings really changed tut wise though
gotcha, when i import the mannequin the bones come up and it looks really weird and demented
ill just wait for someone to come around and take like 10 mins to explain to me fingers crossed

Yea that’s correct
why does it look so demented xD
Maya draws bones differently
Maya and ue4 draw bones as if they are a line to the parent
Blender draws bones as Y axis forward
gotcha
so how do i make them useable so i can make animations?
You either: Don’t or you make another armature and set up lots of bone constraints to bind the maya one in place
so would a better bet just to kinda play with it in its deformed way like this?
UpperArm.L
UE4.UpperArm.L (child)
they are all combine in this mannequin i have
Then constrain real armature to child
Nah like I said you can’t touch the bone armature. Only thing you can do is made a duplicate of it, duplicate all bones again inside the duplicate armature, parent second version of each bone to its first version then hide the second versions and manipulate the first bones in the duplicate to point to the next bone in the sequence
The you set up constraints to copy bones on the actual armature transforms to those hidden second copies
so kinda like making a 2nd template that would make blender be easier to deal with*
May have an easier time looking around on google for a mannequin rig that already exists. Do think there are some out there, but you’d need to make sure it exports right first
Yea if your planning on using ik in blender
Y forward is important
Goal is to not change the bones in the imported ones
But bind them to the template
With bone constraints
So, I exported a dinosaur character, skeletal mesh as FBX from the Ark Dev Kit and didn't really pay any attention to the settings at the time as I am pretty new to this. I imported it into Blender and exported an obj to ZBrush and proceeded to recreate it, and UV there. I then Baked normals in Substance Painter and went back to Blender and skinned it to the skeleton of the original dinosaur FBX import from the kit. I've troubleshot some issues but I admit, I'm just not sure where to go to fix what when it comes to scaling. Because my computer doesn't like the kit, I had a friend export an animation for me and when it imports, everything is visibly the same size as my model and the version of the rig I have skinned to it. However, when I pull up the animation and play it, my model instantly shrinks. The animation actually looks pretty good, and seems to have worked in every other aspect, but, it is almost microscopic so hard to be sure. lol... I can see the scale is different from my model when I look at the dope sheet. The scale of mine changes as soon as I hit play from 1.00 to 0.01... A friend said this is a root scaling issue. Is it? Also, when I scaled the rig with the animation that I imported, to be the same number as my main model and rig, it got huge. How can the imorted animation skeleton be so much smaller than the other, even though they display the same size? Will attach a couple of screenshots.
here's the one I'm copying anims from
here's the one I'm trynig to use the animations with
here's what happens when I hit play
hopefully it's a clear simple solution but I just need to know where to navigate and what to change, wondering how far back in my pipeline I have to go to make it work
Was the scene set to cm before starting on this
Anyone know the easiest way to implement random animations into the anim state machine?
So like when my character performs an action, it can play 1 of 3 anims for instance randomly
@scarlet spade
Then in details put the sequences you want to choose from
Along with a bunch of other parameters like probability etc
Oh shit cheers! @delicate junco
Good morning
people I want to separate all my animations for the climbing system to be reusable. Like if I want to use them in another project to easily migrate that
is there a way to do that with anim state machine
All, having some weird issues, and of course using some non-standard tools/pipeline. Wondering if anyone has any ideas. Essentially for reasons outside my control (decisions made before I was a part of this project) we are using Reallusion iClone 7 for character animations. All of our animations are made in iClone and all of them use the iClone skeleton. Early in the project a consultant from Reallusion was helping to provide models, however he has moved to a different position and is no longer able to do that. This has forced us to create our own characters with Character Creator 3, which work fine out of the box. However we have a very limited set of clothing available to us, and they don't fit the theme or feel of our game. I thought I would be able to take a CC3 character, suck it into blender, modify clothing, and then suck that in UE4 with no issues. When I do this I get funky results in the arms:
This is the same model exported from CC3 without blender in the middle:
If anybody has any ideas about what might be happening I would really appreciate it
@warm zinc not really. one of my least favorite things with animation blueprints is the inability to share things between skeletons
i feel like there needs to be a psa about skeletons though
skeletons files are just names and parenting hierarchy.
so really you should only have one skeleton file for every biped in your game
meshes hold the ref pose, and which bones of the skelton are there or not. a mesh doesn't have to have every bone in the skeleton file to be compatible.
for real!
hello, any idea why making an aim offset the left hand does a curve when going up on the pitch?
i'm using the animation starter pack
and the poses seem good
but the interpolation from the center pose to the up pose
does that curve
Any animator in here who might want to barter his skills for a quick animation in exchange for some programming? (feel free to dm)
Hey all happy holidays! I had a question regarding Blend Spaces. I currently have some locomotion animations for walking and running. When I use W+A to move diagonal the animations of walk forward and strafe left looks smooth. But when doing it with W+D the strafe right animation jitters and doesn't complete. The strafe right and left animations are exactly the same the only difference is the direction. Any tips on how to solve this?
If more info is needed let me know!
hi all - how can I play a montage and do an action when a notify is triggered? Is it still only triggered in the animation blueprint or is there another way?
For montages, it can be and usually is triggered in the character bp. It’ll still need to be calculated in the animation bp though
Animation Montages are a flexible tool that enables you to combine and selectively play animations that are contained in a single asset.
I actually read part of it, couldn't find the part about character bp. It's still not what I'm looking for though; I'll just create a derived class of anim instance and handle it in cpp then.
Anyone know if I can treat bones as sockets?
Meaning anywhere a "socket" is required, I can put a bone and it'll work?
Might as well put this in the correct channel.
So, animations. if I disable root motion the character doesn't move (obviously) but if I enable it, after the animation played my camera/character movement/pawn is in the wrong place and seems to just rubber band all over the place. Can I set up animations so that the final position of the animation becomes the point the character then moves from?
Guys my walkinc backward animation not working correctly how can i fix it
this is my direction
-180 and 180 values are my backward values
but anim not working corretly when i walk back
surely this works better
i already tried but didnt work
how can you import a custom 2d animation and put it in a widget?
When I use Play slot as anim montage it breaks if i set it to loop as -1
is there a workaround for this?
@novel basalt If you've set root motion well then your character should start his next animation from his end position
There's something wrong with your setup
Is it possible to make transition duration in locomotion as a variable?
So I semi-successfully have implemented a basic copy pose from mesh modular character, but one segment is giving me trouble, and I checked my skeleton weights, and it deforms fine without seams in blender. I can't figure out why I'm having issues
anyone around that can help a complete noob with animation retargeting?
I am trying to use a crouch anim from an MP asset pack with a model from a different asset pack... the retarget worked, but the crouch animation pops the character up about 3 feet off the ground... I tried moving the root bone down so that all anims line up to the same ground but that didn't help... not sure what I'm doing wrong here and the more I poke around the more I'm overwhelmed with a bunch of words I don't understand 🙂
Standing
Crouched
gooner is there a IK blueprint?
no idea
I have an animBP and 2 blendspace 2d assets set up
super simple right now
@opaque stirrup What is an IK blueprint? I don't see that anywhere
not sure what you mean... super noob here 🙂 I right clicked on the animation and chose to retarget... everything except choosing the new skeleton was default settings in that window
What can cause my editor crash when I try to retarget a specific animation?
Korvax
This happens to me too
Something introduced in 4.23 I think. Hunch is it has to do with additive animations that try to also retarget the base
Is there workaround or something Epic is aware of?
Hi! do you know how the blending in a blending space is described? it doesn't seem to be just an average between the blended poses, it seems to be more intelligent than that.
Hi guys, I have a few idle animations that I want to put on my character's anim_bp, but I don't know how to do. I want the character to randomly choose an animation each time one is finished
I've used UE4 retarget function to retarget the animations in third person shooter BP to the Daz skeleton
This has happened to the fingers
helpp
Ok
so i want to animate something
ill grab an example
the doors on this video
how would i do this but also be able to interact to open it
with bps
Use timeline node
hey guys so i set up a blend space and when i walk straight my legs follow the direction of the body but when i rotate in any direction the legs stay in that pose and when im walking straight my chracters legs are still strafing as if i was walking left or right how can i fix this
Is there a way to rig and animate a cartoon character who has rubberhose bends for the arms like the Bendy bones from Blender?
on pc the bone limit is around 250
on some mobile platforms its far lower
but yea answer would be more bones unless you went into more cleaver tricks like using mesh offset https://youtu.be/4zNia9HVg7s

Typically a character uses a bone rig to handle animations. However this method limits the number of fish that can be active in a scene. Instead, the animati...
That’s just a normal unparented (vector) rig
Yeah. This kind of parenting is by offset
But still, I'm asking if there's an alternative to do these stuff like this. From Blender to Unreal.
just need more bones
vertices of skinned mesh can support no more than 4 bones, to make it look like a hose just use a chain of bones like for a snake
armature -> splines constrained (anchored) to it -> armature constrained to spines -> export
bendy bones are a blender specific thing afaik
I have a problem, i'm trying to create an aim offset, but for some reason i have this problem. This is how it should look like https://gyazo.com/29533c2fa42b1e0649f818c49473b9b6

this is how unreal does it https://gyazo.com/b799902ef937968722d030b90538877b

the hand goes way off to the right make it look off, how can i remedy this?
So I’ve been thinking about multiple ways I can cut back on doing custom animations. Is it possible for me to repurpose animations from one creature and give them to another, like for example the running animation for this horse to be used with this dinosaur?
@misty dagger how many frames is the look down animation?
@slate olive possible? Probably with ik, not sure it will look good
@molten jewel its 5 frames, but that doesn't really matter as i export them as single frames to turn them into an aim offset. this is just what blender does from center to down and what unreal does.
@delicate junco Oh, almost forgot, here's the results so far =)
By the way, does anyone know if it's possible to play an entire root motion animation, and then stop applying root motion after a certain point? I'd like to return movement control back to the user without waiting for the animation to blend out completely first
Oh looking nice ! Great job so far ! 😁
i did something similar : I placed a notify on the anim at the point when I want the player to be able to have control back and then I basically check if this notify has been hit + if the character speed is > 0
if so I make the transition to the next state. I do an OR boolean operation with the "normal" transition so that if he doesn't move during the whole anim it makes the transition to the next state as expected
@delicate junco Thanks ^^
Yeah, what I've done for now is to check if the character is moving at a certain point with a notify, and then simply stop the montage with a short blend time. It's fine-ish!
@misty dagger it does matter. Linear interpolation between one frame forward and one frame down will do what you see there. If your using ik in blender this is the reason it’s not doing the same thing
So you’d need to use ik similarly
When I create an anim montage from a 240 fps animation, the original animation has 104 frames, but the montage only has 12. Anyone know why?
hey guys, I've done some pose rotation inside an animation (directly in UE4), yet I can't seem to make the new pose stick. the pose is unrelated to the animation itself
hi guys im having a problem playing anim montages ive tried play anim montage and montage play nodes but I still cant play anim montages can anyone please help me on this?
@dawn salmon are you giving it a new name?
i kinda recall having issues updating poses in pose assets
i'm assuming your talking of pose assets yes?
what i would do is make a new pose name then delete the old and rename the new to the old name
Anyone here have a workflow for blender 2.8 to import a UE4 animation back into blender? When I import a FBX rig the bones are all sideways and everything is weird.
lol
its just how blender is, it only renders bones down y
I'm not your knight in shining armor.
maya renders bones from their parent as a line, just like ue4
Well my goal is to take an existing animation in UE4 and tweak it to match a custom character in the cases when even a retargeted animation are not matching right.
So I don't need to remake the whole thing.
you just have to work with the bones being oriented as they are or have some means of restoring them back to how they were before you export
a control armature is one way to do it
https://www.youtube.com/watch?v=1CPkHOw3p-s idk buster if your working with mannequin
No more re-targeting animations and compatible characters! This is the first release of an add-on for Blender 2.8 that gives the ability to export animations...
have not tried this
dunno if its any good
I was just curious if someone knew of a blender script to flip the bone postion.
Is there a way in the UE4 editor to tweak bone postions of an animation keyframes?
i don't think your listening thouhg lol
yeah I got that plugin,
Yeah I know
and export them
but the bones are all messed up
what i'm saying is no they are not
Okay
when you export they work
you could do that, or you could just use the bones that look badly oriented
Is there a way to tweak animations in UE4 editor?
believe so, but not familiar with it
Well if the armature is correct, I could just bind the mr mannequin control rig to it and use that
I'll give it a shot.
this is what i do
if you dupe the armature you import and then dupe the bones in it
parent each bone to its original
let me try that
then you can do whatever you want and just use a world transform constraint between the two
you just make sure to select the root armature when you export and hit export selected only. blender bakes down the constraints for you
Not sure I follow you
i'll make a short video quickly
Thanks.
I'm using AutoRig Pro, but it would be helpful to be able to reimport the baked down FBX armature since then I could delete superfluous bones
I like autorig pro but it's a bit of a black box in some regards
Thanks It's past my bedtime but i'll be sure to check it out tomorrow.
Really appreciate the help, as much as i like autorig pro it'll be hand to be able to tweak the final export manually.
anyone know why my animations (i do some special stuff like warping) look really choppy on remote clients ?
Would need a visual
ah i think it might be off of a calc based off an enum type that cant replicate
Coo

I have a model with animations I've made for it. I've been able to import the model and the animations, but I can't seem to get the animations to go through in Unreal
Dang ck
Can you use the anim bp debug thing on the one character?
Use pose watches to try and find where in the anim graph things go wrong
ah
how do i select the other character for debugging? ive had a hard time with debugging anim bps
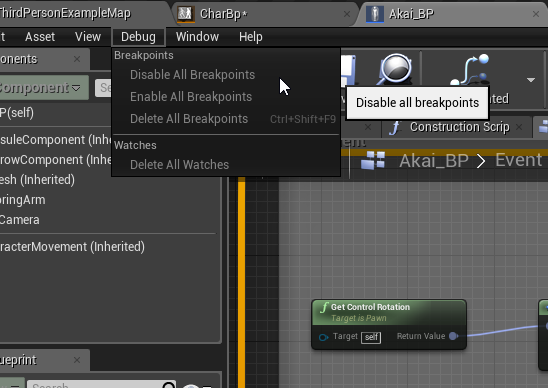
There is a debug drop down menu while in pie
It should list all pawns using the specific animbp
You cycle through until you find the one that correlates
(Moving)
You have an animation blueprint @pure vault ?
Would recommend looking into animation blueprint tutorials
It is how you apply animations normally
You can however choose to lick a specific clip to play on the skeletal mesh component of your actor but you don’t want this
ok
The blueprint is like the mixer
so I need a blueprint?
You’ll get a hang of it
@molten jewel
Guide to creating new Animation Blueprints from Skeleton assets

(0:05) - Intro and closing Blend Space (00:51) - Creating the Animation Blueprint (02:17) - Graphs in the Animation Blueprint (03:13) - Tabs in the Animation...
Animation Blueprints are visual scripts that are used for the creation and control of complex animation behaviors.
Maybe look at @molten jewel 's
if you're not too familiar with unreal the documentation can be kinda confusing
Sit through a video and you’ll understand
o @molten jewel i have never been able to get a breakpoint to work in anim blueprints, they dont seem to trigger for me
Pose watch?
You need to bring up the viewport
It shows you skeletons
Not breakpoints
Breakpoints would be in event graph on the bp
ah
So you can set a red skeleton to before ik
And a yellow one after ik
And observe what’s going on to reach final pose
You’d want to find where things get sketch
is there a way to select the other client actor
with pose watch i can toggle the red skeleton in the preview
Top of window
Combo drop down
You may need to click a ..> button as it won’t fit on 1080p
But it’ll say debug component or actor or something and should show all of the replicated things I think
The. That shows up in the viewport
Of animbp editor
yep fouind it
thanks this is helpful
and yeah i see the jitter
is there a way to pause the game in the middle of a jitter
ah thanks a lot
all of this really helps
this gif has a lot of artifacts but some computed variables have some erratic behavior

client 1 and the server variable sets should be equal
but they are not
Interpolation between the two delta angles maybe a bit hairy
yeah i think whats happening is
Would seem server is in radians
i think server is in degrees
yeah so when rendering another player some variable somewhere in computing the derived yaws are behaving totally erratic
FYI the between angles stuff in fmath does not repeat
That’s something that got me before if your dealing with values larger than 360 but those angles seem okay in value unless your double calling it
If you pass 720 in it will return 360
The check is only if >180 subtract 360
It got me a few times dealing with angular velocity
ah hmm
like the numbers in the server and client should be approximately equal
hmm
That’s a cool way to print numbers lol
UKismetMathLibrary::NormalizedDeltaRotator(GetVelocity().Rotation(), GetActorRotation());
i think that relative rotation calc might be messing up?
just on the replicated client
Do not like vel to rotation like that
A disturbance in the velocity with slow movement would be all jittery and unsure what standing still gives you
hmm
You’d be better just networking velocity
maybe replicate the velocity vector ?
Yes
is it a good practice to also replicate current acceleration or leave that off?
ohhh so the problem was that i was interping the rotation
It’s something you won’t be able to do much with
and setting a new rotation in a child class
Role >= ROLE_AutonomousProxy
over that block fixed it
doh 🤦♂️
Cool stuff. Animation channel helps networking
@molten jewel I wasn't using the controls to add keys, which works fine if you pose stuff and export as poses, but as soon as you add animations and frames it's not possible to do it seems
how can I get the total elapsed time in a notify anim state OnTick ?
I've rigged in Blender and also created 3 animations for a FPS game. Each animation works perfectly separately but when I'm adding this 3 animations in UE4 to a Blendspace, the transition from one animation to other (From idle to walking and to running) the mesh is deformed. I've done something wrong in Blender? ( I'm a begginer ) Because it looks like a bone problem.
Blender Rigging
Thank you! I'll start reading
Man what's the point of using animation trails if montages destroy your frames and half the time don't produce smooth trails?
I'm having some issues with my character IK visuals, when on an uphill surface the heels look unnatural .... does anyone know if the problem can be ameliorated while still using only the bones of the ue4 guy ? please @ me if you know anything about this
are montages really framed @soft trench ?
I kinda thought they were more or less like video editing or nla in blender
@simple star you have ball_l and ball_r bones?
your weights are too strong on the ankles too,
if your using epic rig, ankles should be fully on the twist bone
er not fully, but the back but it looks like the skinning on the foot goes too high regardless. you'd still want ball_l/ball_r to do some bending at the ball of the feet at such aggressive angles no one would stand like this
its possble your foot bone pivot is too high too. it could be lots of things really. but would consider the amount of times you've stood like that up a 45 degree angle
twist bones alleviate these kinds of joints by facing or counter facing the next or parent bone.
thigh twist undoes the roll of its parent (thigh), to keep the pelvis deformations consistent, calf twist rotates towards the roll of the foot bone.
oh and @molten jewel -- instead of replicating the velocity variable im using these settings now ```cpp
ReplicatedMovement.RotationQuantizationLevel = ERotatorQuantization::ShortComponents;
ReplicatedMovement.VelocityQuantizationLevel = EVectorQuantization::RoundTwoDecimals;
ReplicatedMovement.LocationQuantizationLevel = EVectorQuantization::RoundTwoDecimals;
in the character constructor (in case anyone else has jumpy replicated animations)
still don't think you should really use velocity to rotator thogh but cool :D
how do you handle entering, exiting and then re-entering a state while it's still blending? "always reset on entry" causes a pretty noticeable pop
perhaps you could use a cached pose sleg
zoom all the way out of your graph
add a cached pose
put in the stuff from teh state in question
and in the state 'use cached pose' and connect
don't know if this will do you any good but might stop the thing from re-initing
otherwise you'd have to have some sort of thing to not let it transition until so much of the anim has played
i personally hate state machines
I get the results I want from using duplicate states and switching between them using a boolean but it seems like a convoluted solution, I don't know how it's usually done in games
4.24 adds a new transition mode
that would help you here
but are you purposely trying to restart the animation smoothly or something?
like what are the animations doing
(don't jump to 4.24 yet though, just mentioning it because it sounds relevant)
turning for example, if you're in the middle of 180 degree turn and want to turn the other direction
so galloping more or less?
Sync markers will help you maybe
sync markers and sync groups
well the problem is the animation can't blend into itself, it either starts up where it left off when you exited the state or it resets and pops
I mean if you re-enter the state before the blend duration is over
yes sync markers may help you here
perhaps editing the duration of the transition would too
make it a tad slower to exit out of
if it is unmaintable, you could always switch your looping animation to an evaluation node
by right clicking on it
then you just need to calculate time yourself, in event graph
@molten jewel I'm fairly certain. Sometimes they work https://www.youtube.com/watch?v=s49qcSy70jc&feature=youtu.be. Then other times it's a slightly similar result but there's way less segments so it isn't smooth, and sometimes it's like that and it gets stretched. I can't get it to work consistently.

@soft trench open the console
type
slomo 0.1
while playing
and swing a bit
in the video it just looks like normal frame rate studder
playing at 0.1 speed should give you an idea if its actually the animation timing or not
It seems to work always with slow motion enabled. But it's weird, because even in standalone with consistent 100+fps it's inconsistent
very possible the logic you have to fire off the montage could possibly be taking extra time
making that first frame delay large
I tested it on a slower moving animation and it works much better
i've not really dealt with montage but if a lot is going on, or if your syncronously loading things with that button rpress unknowingly its possible that one frame takes slightly longer and with the faster animation it just drastically is more visible
like i said thought it just looks like microstudder
something in your game taking longer than it should
could be wrong again, i've not dealt with montage but would recommend looking into using unreal insights or something
I'm pretty sure with faster animations it's just not possible to get consistent results. I've found other people having this issue, never seemed to get resolved
for fun, just make the animation trigger every frame
and see what your frame rate is like
theres a lot more going on than just animation there
if your getting 100fps and then drop to one frame that is 30 fps because of the effects there being spawned its pretty much going to look like this with that jump in the swoosh
so might just be that you have to look into pooling effects better or authoring your effects in a way that they aren't dependent on the animation
if you look at that youtube video frame by frame. pay attention to the sword position too in each frame. the frame rate of the montage shouldn't matter really but that effect will only use positions that were actually used in the animation at the times it needs
it wont source data from frames between the ones it displays
Hello. Is there a way to properly import FBX animation with 10 fps rate? It automatically converts to 30 and if I try touching "Custom sample rate" setting in FBX import it just outright doesn't import
inside import settings after its imported
if you set Custom Sample Rate to 10, and then press reimport animation button does it not work?
For some reason it breaks
have an error?
I'm importing 2 skeletons and if I set the sample rate to 10 they try to merge for some reason
you are importing first, then changing this setting and pressing the reimport animation button?
Nevermind, now it worked...
👍
im sorry @molten jewel I couldn't follow what you did, when I duplicated the bones it didn't look like it did on yours, and the transform bit didn't look like yours either 😭
Yea you duplicate the bones and then parent each with keep offset to the original.
once they are all parented to their original bones in the duplicate armature, select the duplicates and set them to a hidden bone layer
at that point you can reorient the parents of them to whatever direction you feel like
that make sense @opaque stirrup ?
I'll have to try to see if I can get it figured out.
So I got to manually parent ALL the bones in the armature?
head.001 parents to head
and every bone there after like that
then you can reorient the parent of the target bones in bone edit
and the orientation of the target bones matches that of ue4, which are copied by transform constraint
import bpy

# ENTER EDIT MODE OF THE DUPLICATED ARMATURE FIRST!
# THEN DUPLICATE ALL BONES
# THEN RUN THIS SCRIPT

for bone in bpy.context.active_object.data.edit_bones:
    if bone.name.endswith('.001'):
        continue
    dupe = bpy.context.active_object.data.edit_bones.get(bone.name + '.001')
    if not dupe:
        continue

    dupe.parent = bone
    dupe.select = False
    dupe.layers[1] = True
dupe.layers[0] = False``` @opaque stirrupOh, thanks!
it does the parenting and hiding
I can't handle blender scripting so My thanks!
@opaque stirrup ```py
import bpy
ENTER POSE MODE OF THE ACTUAL MESH ARMATURE (not the control)
THEN RUN THIS SCRIPT AFTER CONFIGURING THE BELOW LINE TO MATCH THE NAMES OF THE CONTROL ARMATURE
control_armature = 'root.001'
control_armature = bpy.data.objects[control_armature]
root_armature = bpy.context.active_object
kill all constraints
for bone in root_armature.pose.bones:
while 0 != len(bone.constraints):
bone.constraints.remove(bone.constraints[-1])
make all constraints
for bone in root_armature.pose.bones:
constraint = bone.constraints.new('COPY_TRANSFORMS')
constraint.target = control_armature
constraint.subtarget = bone.name + '.001'
constraint.name = 'ue4 constraint'```
for making the constraints
name*
is there a decent technique for making the twist a bit less extreme on a right to left attack animation when strafing right

side stepping lol
if your using ik for everything, you could use FABRIK
up the spine
and put some twist in the pelvis
writing animation nodes is really easy though if you did want to try and corrrect it that way
im using layered blend per bone - 4 at pelvis and -1 at thighs
ah hmm
yeah i wouldnt mind diving into that i guess
havent done it before
and yeah the IK should be working
FAnimNode_RotateRootBone is a easy gateway node
you need an editor dll though if you don't have one
is that something from rebuilding from source?
no
you just make another module in your source directory
hm
yea i think that you'd want it, not sure its required though
it consists of the struct for the node itself and then an editor type for the anim graph
like this guy?
yep the code for that one is very easy
the entire anim graph
it executees from the sink node at the right back to the furthest left depending on blending
it literally goes that deep in call stack, its easy to use
hmm
can i just use the rotate root bone with a conditional yaw
i can definitely build my own node (these instructions are pretty clear) but why is that necessary
so the anim graph executes one character per thread
it means if you wanted to alter the twist based on the direction the head was looking, like that harsh 170 degree angle
to make it conditional based on that, you'd need to do it in node space land
because the event graph executes before any animation is updated
and if you have a if statement or anything complicated in the animgraph you loose your lightning bolt icon and that means your graph runs on the gamethread instead of the 1 character per thread model (it will kill performance quickly)
in the event graph i have strafe direction and aim pitch/yaw
so i think i could create another yaw for that
the thought was you'd like to power the twist delta to pelvis by the animation itself, if you look at the attack animation i mean, it would look more natural if it only corrected when it was at the end of the swing (or at least more correction there than at the front of it)
like if the character is strafing right do a clamped rotation of like 1/3 the twist to the right
ah
i see what youre saying
yeah that would look better
you couldn't do that sort of thing in event graph.
but you could do something based on teh variables like your saying there
animnode would be worth it imo if you really don't want side stepping
let me try to hack something together real quick w/o making a new anim node and ill post a gif to see if its good enough
and on the other attack (left to right), it looks a bit stretched at the beginning of the animation but its hard to see unless u slow the animation way down
other idea would be to add this info to a curve that would have counter-rotation variables when the character is at extremes
then feed those values into the rotation yaw
Could stuff a float curve into your attack animation and use it as an alpha
What is an animinstance used for?
Has anybody ever seen this issue before? It occurred when I started dragging one of my anim notify states. I noticed that in the first drag, the marker didn't move, and i had to press the second time.
@alpine flume Have noticed similar errors in the editor before, and have had to close and reopen
@delicate locust
Thanks for the reply! Hmm, we ended up temporarily "solving" it by taking the problematic anim notify state, and instead of dragging the sides, we just moved it around a bit (so the length stayed the same), and then saved...
I'm definitely worried about it though haha
Hahah, it's probably fine
Yo can someone help me out with the random sequence player? got no idea how to use it
Guys, is it possible to somehow override animations in Random Sequence Player, in a child AnimationBlueprint?
I can override simple animations but don't see how to do this for the Random Sequence...
how can you preview a blendspace live?
while playing in editor
so i want to play with a character, and see what point he is in the blendspace
@scarlet spade
random sequence player does exactly what it says
you put in some animations into it and it will play them randomly when the node is called
so if you have like 4 punch animations, and you want them to be random
you would put them there
@icy cove you could make your own random sequence player, with random integers to control which animation will play using "blend poses by int"
than you can override that in the child bp's
@untold marlin thank you! yes, there are several ways to implement it by myself, just was wondering if there is a "default" way to do this
Is there a way to replace the skeleton of an existing animation blueprint with a completely new skeleton? I've worked on a very advanced animation blueprint with lots and lots of code inside. Now the skeleton I created this animation blueprint with was a bit of a blockout / test skeleton. I now created a new one, but is there a way I can still use my animation blueprint with this new skeleton? Or do I have to completely recreate the entire animation blueprint?
I'm also redoing all animations. So if the animations of the previous skeleton are broken, that's ok because I will replace them all anyway
I just don't want to remake the entire blueprint
@novel viper
Aha, intersting. But how about the places in my other blueprint code which references the previous animation blueprint?
I'd still have to replace those references manually?
Or is there a way to fix that as well?
why not instead, retarget the new sk meshes, to the old skeleton
that way you can still use everything you made
maybe you could retarget that old skeleton to the new one as well, although if they have different bone setups
it might be fairlydifficult
I've tried that, but it seemed very messy to me. Main reason is because the old skeleton is pretty messy and missing a few important bones which the new one has
ah yeah, im not sure to be honest, if you do make/copy the new anim bp you'd definitely have to change the bp references
So I think it's better to get a clean skeleton, but replacing the animation blueprint references shouldn't be THAT much work, like an hour or so and most will be replaced. It's mainly important that I can save the time to redo the entire animation blueprint, because it has a lot of code 😛
hmm yeah, but it's not just the graph, there are a lot of variables and a complex animation graph
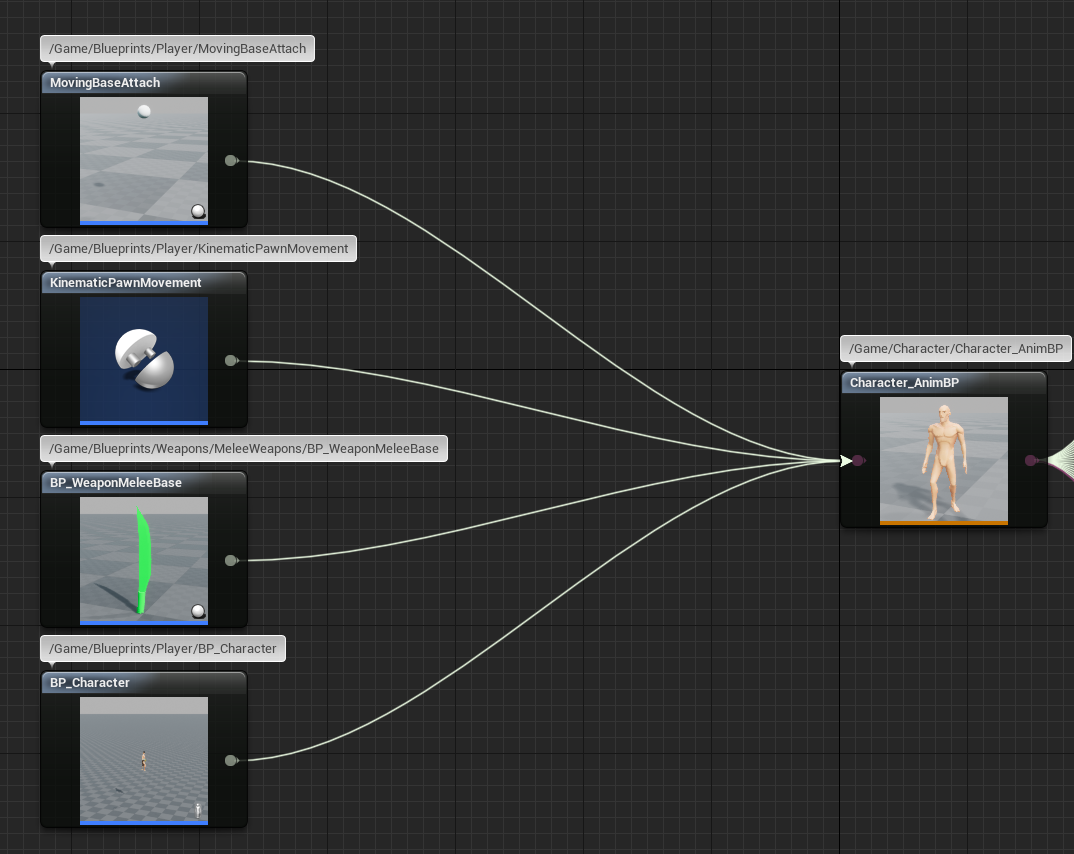

maybe you could duplicate it, and then set the parent of that anim bp as the original one and the references should still work, never done it personally
these are the only blueprints I have to replace the references in
but in theory
so it's fine I guess
should worklol
hmm yeah maybe that works
that's actually a sneaky idea haha
but in theory i don't see how it shouldn't work 😛
yup hehe, thats me trying to get around doing work
yeah keep me posted please
@novel viper
why do you need separate skeletons?
you might be under the wrong impression
skeleton files are just names and hierarchy
i mention it because if you don't have separate skeletons then you don't have to have multiple copies of the anim bp.
it does not save you from retargeting things, but it does mean you don't have multiple graphs
I have a skeletom (from mixamo) and 2 characters. The first one is great and all, and I just tried to import the 2nd one and it seems all messed up, but it looks fine in skeleton/mesh. Is there something I should do here? why is this happening?
(4 pictures of the 2 characters, each in Mesh and Animation window)
How can I delete bones in the skeleton in UE4? they no longer exist in the Skeletal mesh I've re-imported
You don’t
Thanks for nothing, I needed "assets/remove unused bones from skeleton"
You cant
hello , i asked this on the blueprint channel but i think this is a better place , i want to control an arm with the vive vr controller but the two bones ik does not look ver good , specially because the lowerarm get minimum rotation , what would you sugest for a smoother movement ?
If your sharing skeletons that’ll mess stuff up it’s better to just reimport
If you use that option it strips out bones that have no child bones with weight which will break ik animations. There is no way to selectively remove bones like what you asked dhingis
@dawn rose if your using the mannequin you want twist bones
You’ll want the root twist bones at the start of the limb to invert the parents rotation and the ones at the bottom to look towards feet /hands
Steps should be rotate thata way
Then look at
i see , i never used the twist bones but that makes sense
Yeah the thing bones make better deformation around hips and UpperArm around the torso/shoulders. The lower arm and calf twists make better deformation to the wrist and ankle
Play around with nodes but just cap it off with a look at node for the upper arm to lower arms and lower arm twists to hand
Like I said, the bones are not used - that includes animations.
Like I said djinghis it’s a very hair solution and it’s not selecting at all
i kind of tried using the "apply limits" node wich i was guessing could cap the rotations from no natural poses but i could not understand how it works
Animgraphs referencing the bones could corrupt. Your better off reimporting and delete with replace
By re-import you mean deleting completely and re-creating the skeleton? I know that will clean it up but some of the bones I added later that do nothing were cleaned
When you delete your given the option to replace it with something
Some facial rig bones won't - but i want to avoid 4 hours of intergrating it all again 😅
It makes a redirector in place to a asset
So reimport to new skeleton and delete and replace old with new is the best way to not lose all animations
and pray
Thanks (didnt mean to get snappy) I'll just set that aside for 4.24 (release) and hopefully I stick to the skeleton 👍
@dawn rose yeah it’s tricky just experiment with them but always end with a look at node specifying the target as the next bone in the chain
I wrote a custom node for it but I believe it could be done with some mixture of nodes
@molten jewel thank you i will make some tests using that idea
Hey I have a weird question about virtual bones in UE4. I've seen how they're used generally, but can they also be used to create a bone that mimics the same bone on another skeleton you're retargeting an animation from? Basically, let's say one character you made has two daggers that are animated as part of the first character (the animation involves throwing them around or sheathing/unsheathing them). Can you add two virtual bones to the new character that matches those of the daggers, and then use them as the target bones for the animation retargeting?
Right now I have a character with floppy long ears which are driven by physics, is there a way to save their physics position at a certain LOD or distance so I can disable the physics calculation without them resetting to their default position?
Hmm never tried that, are you using animDynamics ?
Cause you can then specify an LOD threshold iirc but I'm not sure if that keeps the transform before the change
The character makes a small leap in the direction of movement, moves only on X axis, the physics of the game can jump and fall, it is possible to somehow correct this lag? Perhaps input lag? although'm using the standard BP on movement, limited FPS not helped, fps 120 not drop, even under this really lag. Can anyone suggest any steps?
guys, how would you fix the camera attached to the head using a TPS animations? to get rid of jittering and jerking
@opaque stirrup a programmer could write such a node but i don't believe theres anything like that built in
actually
i'm not confident a node could do this
if it were anim dynamics: yes
I am using anim Dynamics
And I was looking at the ALS blueprints and they save the ragdoll pose for some blending for recovering from ragdoll
So I'm just wondering if the same method could be applied to a specific bone and child
Someone told me.about the fortnight video so I'm gonna watch that again.
so, say in post animation in event graph you you stored the local bone positions of those in the dynamic