#animation
1 messages · Page 120 of 1
Ok I think I may have an idea what's happening
So in JumpLoop is there an option where you can "Loop the pose"?
Not that I can see, but I've tweaked it a bit so that it's a 0.2 second animation of the character in a single pose
So the legs shouldn't flicker anymore
I tink what's happening is if the pose is looping, when you jump its trying to loop halfway between JumpLoop and Jump end therefore creating the bounce
Ahh
There certainly doesn't seem to be a smooth transition between the loop and the landing
Ok well hold on let me look it up for you. I'm afraid i cannot help you any further im sorry
Moving on in our Animation Blueprint setup, here we set up the conditions for Jumping.
Maybe this will help? https://www.reddit.com/r/unrealengine/comments/7wk5gk/question_jump_animation_starting_mid_jump/
reddit
1 vote and 2 comments so far on Reddit
Thank you, I just had a quick look and it seems as though my blueprint matches the example
So it may be the animation pack I'm using
The flicker of a different animation at the end was changed by altering the Time Remaining Ration from 0.1 to 0.5 at least
So you fixed it?
Mostly, thanks 😄 There's still the issue of a bounce before landing properly but I'll plug in a new animation and see if that fixes it
👍
I wish I could've done more but im a Unity guy just getting into UE4. I apologize
Oh please don't apologise, I'm massively grateful for your help here
So I have a set of animations that were exported at 60 fps and play at 30 fps on import. Is there any way to convert these to play correctly rather than just playing at double speed?
when I copy a skeleton, animbp and animation from plugin content to game content, how do I then modify the "new", copied animbp and animations to reference the "new" copied skeleton, and no longer the old one in the plugin content? 🤔
I dont find a button for changing skeleton reference of animations, without any retargeting involved
Hey!
I want to use spline IK for aiming. But it setted absolute coords. And my weapon is incorrectly turned. What am I doing wrong?
Zero angle.
anyone used the animation sharing?
Anyone got any good YouTube tutorials? I cant find any. I just need blendspace I know how to import
Guys, I have one smoking animation and I want it to be universal regardless of characters height (morph). What's the best way to make it universal? How to modify the target which is mouth and adjust the animation in real time?
hey sorry to ask
but a animation i play has it disappearing most of the animation

animation

script

the animation that plays with it
the gun sometimes appears in animation but often not

Hi! I'm producing an indie game, and I've got some questions for a senior-level animator about best practices. Would anyone be willing to take some time and help me hash some stuff out? Thanks!
To be more specific: I'm trying to figure out some best practices for animation statemachines, and how to best make one interact with blends. I'd really appreciate an @me if anyone thinks they can send some good resources my way.
Did I seriously just do this by myself?
I was watching a tutorial but i stopped at him setting up the vertices for the eyes then i stopped and followed my gut
can you attach a static mesh to a skeletal mesh socket without it being a character BP?
There a way to make a animation slower at the start?
like the start of a sword swing so it telegraphs a bit more
Anyone good working with Blendspace 2D? I'm quite stuck on my character.
how would you go about skinning something so it moves with a bone, but looks like theres something under the skin holding the shape, like an eyelid over an eye
@devout lantern one could possibly utilize a complex displacement map shader to implement this
like global coordinate displacement
is it possible to make new animations entirely in Unreal or do I need to put up with blender or ||totally legitimately|| acquire maya
Technically speaking you can create animation assets in editor then fiddling with the keys you can have animations but i guess a dedicated art application with plethora tools is more favorable than programmatically dealing with these type of stuff
Would an Animation Composite or (additive?) Blend Nodes be better for playing two animations together, such as combining a first person shooting animation and a first person walking animation to play both in a natural way?
Guess a walking animation goes under the pelvis and shooting is only above, so you have to play them both together but separate them by bones. Then you may want to twist the bums and legs a bit with a curve from the shooting anims that will look alright. There was a tutorial in the epic yt channel showing this how to implement the twisting. In the end it looks rather natural.
I've done this with melee sword type of moves and it worked out for me.
Sorry. I wasn't clear enough. I meant the bobbing up and down, in first person, seen as the character walks.
Actually you specified first person anims, and i'm thking about third person. Maybe it won't apply to your question, ignore me.
Hi there... I've done a bit of work in Unreal (mainly used to Unity) but making the switch.
I'm getting this error... "mesh contains root bone as root but animation doesn't contain the root track"
I've seen this has been posted before. but not a lot of info out there. anyone got ideas how to fix this either Unreal side or Maya side?
it looks like Unreal is requiring that the root joint actually be named 'root' ?
is this for real?
fffffffffff
Not quite what I had in mind..
💔
not sure what happened. Maybe I exported it wrong
the good news is it wasnot because I had "convert scene" checked in importing.. that made it do this:
It looks to me like the animations is assigned to different bones, eg left arm plays on spine and pelvis etc
checked that first thing
as I click through them they all seem to check out properly
Does the number 15 indicates the bone's index? It should be less than that, like 5 or 6 maybe
no thats the animation frame
it was playing as I took the screenshot
its in yellow cause that happens to be a keyframe
when it's a white frame, its not a keyframe
upperarm_l : 6 just checked, maybe it's different for your rig that's why it will assign the keys wrong upon import
again, that's not the bone index that's the animation frame
i understand, read it at first :)
But maybe you want to check your rig in blender perhaps the bone indices are off, that would explain (to me) why it plays them on wrong bones
haven't sued blender since 2007 before this past hour it will take me a hot minute to figure out where to find that again
as far as I can tell it's going off a hierarchy tree not an indices array..
Yes i see the parent is ok, but the animation only care about bone index and if that number is off, then it will assign them to wrong bones when you import them
Tho i just guessing here, maybe a majick button or checkmark in blender will fix this and export it correctly
can't find anywhere in blender where it indicates the bone inex
probably a goose chase i was guessing here
but I also don't see it in unreal
In unreal you can print it out with a node (which is what i did)
so is all animation replication besides movement controlled with booleans? i see tons of examples for like crouching and other stuff which is toggled, but what about something like a punch or an attack, which just does it once
or maybe im doing it entirely wrong? im having the AnimBP play a montage, but it isnt in a state machine. it works for non-dedicated server though =/
Sequences outside of the scope of locomotion should be played as montages. You can maybe RPC the array index of it, a struct, the animation itself etc, it's question of design really.
The way i did it is player triggers the sequence, i send it to server, it get's distributed multi and everybody plays the same thing
hmm... im not very good with replication in the first place, so adding that to animation which im also new to... tough to figure out
but my character bp has to call it in the anim bp right?
You can't replicate from animbp if that what you mean
You do the rep from character bp. Then you call the montage play on multi event maybe
You can also use a simple replicated property with notify event, so essentially -> player press attack button -> play anim locally -> send server RPC (anim_sequence to be player) -> server plays anim -> server set the property -> everybody receive the property (except owner) -> onrep event play received anim
that is kinda how it looks good
Actually, the onrep event won't happen if you try to play the same anim again. Use multi RPC instead.
can i show my terrible hack job so far?
i havent been screwing with this for very long, but its something id like to figure out so i can learn it correctly
this is in the character bp
this is in the anim bp
Head is on top and the right arm is moving, we have actual noticeable progress xD!! now to figure out why the legs and left arm are so bloody contorted..
It's okay for a listen server
im aiming for dedicated though
Yes the indices are getting there, but the balerina leg is still off
also, no idea whats wrong with that skeleton. i made my own rig in blender and didnt have those issues o.O
of all the issues ive had... surprising that isnt one of them
If you aim for dedicated server, you need to send it server first, then distribute the multi rpc from there
I wouldn't say ok, but it will work. You can trigger montage on the mesh, there's no need for implementing events in animbp for this.
well i thought i needed to to get the AnimNotify to know if the player is still attacking or whatever. theyre in the animation o.O
without those, clicking attack just restarts the anim
That's ok, tho you can use interfaces to notify the character "hey i'm about to finish here" and open the gate (set the boolean in your case).
ya interfaces... i have some links open cuz i was gonna look into that soon anyway. hmm...
Interface is better than using cast in the anim notify. But you can use cast for testing things, then move this to interfaces later
but i guess i could ignore that whole thing for now, just for the sake of getting it replicated for the actual animation part
ya, for now ill just remove the check altogether.
For this to work in dedicated server, just send the seeuqnce to the server first, then distribute it from there
On a listen server, your player is the server, so that's why it currently works. But on a dedicated server, this player is a client only, so it wont fire the event ever.
The little note on the top of the event also states (if server) - but it's just not in this case.
on listen server it replicated to all, on dedicated it only showed on the one doing it
Yes this is what i try to explain why :)
ya im still lost. and hmm maybe more of a multiplayer question than animation question. i thought it was more to do with the animbp
Replication has nothing to do with anim at all :) Except for root motion but that's different topic
ya im not gonna even try root motion
i just meant that i thought animations in general were replicated differently
Just add a new event, that is running on server, call it from your current input chain, then on the server this event will call the SRV_Attack1
Also i recommend use a different name for it, is not really correct :) Would be better to call it "SERVER Attack1" and "MULTI Attack1" that makes things easier for ya
oh ok, so i got it working with like 3 nodes <_<
so, i need the character to tell the server to run that function for everyone. i thought the player itself could do multicast (i thought that was the way to tell the server to show everyone)
These events can have a property shipped with them, use it to send the montage, so you dont need to implement more of this chain
i didnt have the inbetween
No the player cant do multicast, it can only do one thing, calling the server
You can remove the character owner thing, it's not needed there.
ah ok... pretty sure something i did a long time ago needed that info passed through and it became habit. then again im terrible so who knows, prolly never needed then either <_<
In this context you dont need it. The self is available everywhere you send this event here.
You may need it in different cases, but not here
is this secure though?
Define secure
will the client be able to have this function run when it shouldnt be?
The server can do a validation and distrupt the multi cast if you don't want it to be played. Eg, if already is attacking, just dont multicast
mkay. sounds easy enough (i will regret saying that im sure)
next thing i gotta study is interfaces then. thanks a lot 😃 you simplified this thing like 95% -and- it actually works so... ya o.O
The animBP will still receive the events. Use that to pass that information back to character pawn, and set the boolean.
Since the server will receive this event too, you will have a chance here to avoid the attack triggered twice
You may be running into an issue tho, when the dedicated server will not fire you events.
This is an issue with the engine. I modified it so it works for me always. But you may find it sometimes just skip executing the event, or fire it much later
ill fall off that bridge when i come to it. im not gonna worry about something funky in the future until i have it working under usual circumstances now
I just say this because it was rather confused me for a while why the dedicated server not executing anim notifies. So it was an error (kinda) in the character class code.
One liner engine change, but have to recompile.
hmm, well i may not touch it any time soon i do screenshot/save suggestions for stuff like that. any way to summarize what you are talking about in 1 little snippet? O.o
Vyktori, https://answers.unrealengine.com/questions/843716/animnotifies-unrealiable-on-server.html engine bug basically
But can be solved by modifying the engine
I think ik_foot_root and ik_hand_gun imported into blender wrong in the beginning, so the whole animation is [redacted]ed and I gotta start over 😦
I think the keys will be bound the bone, you just have to reorganize your rig in blender
thx btw~
this point right here
seems to be in the wrong place the whole way through
it somehow got imported center mass, didn't notice cause I hid those 3 bones before beginning to animate the skeleton
Yeah it should be locked to the hand_r, so you can use it for IK sorcery later
I see, yeah it's messing with the hierarchy then i guess
yup
It has its uses, keep it if you can
moving those around in ue4 doesn't change anything at all on the mesh/skeleton
so I just hid them
didn't know what theyw ere even for tbh
Ah yeah. They are for IK things, holding a gun with both arms etc
still, them being locked center mass all animation, that couldn't be what's causing the funkyness
if moving them doesnt change anything
I must have missed something else..
It should help
giving up for now bleh
should be simple. Position, set keyframe, position, set keyframe, position, set keyframe, and so on.. then interpolate in ebtween (linear, cubic, etc settings available), save results. If blender can do it and it look so good INSIDE blender, unreal should be able to 😦
These tools are far better than what we could have in unreal. Many artists are also used to their equipment, no real need to invest effort into creating a yet another animator tool. There are some more pressing issues of the engine :)
I vaguely recall something a few years back tho, but that was some basic thing really
Hello, does anyone know how to add more custom slots to the retarget manager? Cheers 😃
@misty dagger afaik for state machines you'd make blendspaces for the different states, f.e. OutOfCombat and InCombat. In these blendspaces (2d) you use a float variable to control the transition which would be the speed of the character, so with this float variable it blends between Idle, Walk, Run. Then you make transition rules between the states when to transition between them. Also check out these tutorials:
https://www.youtube.com/watch?v=YVC-DL9Ibf0
https://www.youtube.com/watch?v=nkj6PAbGYtM

In this stream, Wes Bunn takes a look at the quickest way to get a humanoid character up and playable from a Skeletal Mesh and a series of animations. We’ll ...

Wes Bunn walks through how to set up and use Animation Pose Snapshot to create more natural looking ragdoll-to-standing animations. Ragdolls are fun, but sna...
Np, also one thing to keep in mind before making all the anim montages, you can only play 1 animation from a group simultaneously, so if you want to play multiple animations you have to make multiple groups
You'd usually cache the animations, like coming from the state machine, then use the cache, make it go through a slot and then cache it again. If you want to only affect certain bones you use a "blend poses per bone" and if you want to only play animations under certain conditions you use a "blend poses by bool"
Depends on what can transition to what
So I suppose Pain1 and Pain2 are knockback animations?
Yeah I'd rather make these anim montages
When you cache the state machine and then make it go through the slot of the knockback it will play them with a higher priority.
Better plenty anim montages for different categories
So I usually use "play anim montage" in the blueprint itself
but the node just works with character, for other things it is "play montage" i think
np
yeah i think so
realllllyyyy stupid question: How the hell do I remove preview assets from a skeleton? There seems to be nowhere an option or button to remove them o_O
anyone know what this issue could be? https://gyazo.com/832b96a7f2bda9379362c535f4dfbed4

@novel viper is it only in unreal or also in your modelling software?
only in unreal
It might be the bone roll
I'll look into that
yeah maybe check the bone rolls if they are going near 180°
ok!
should try to set them to zero when rigging
beware though this will most likely mess up your animations
question. I'm kind of a noob when it comes to rigging and skinning and such. What would be the most easy and time friendly way to skin and rig a character so i can spend my time animating? it doesn't have to be pixar level, I can get away with pretty much a very basic biped human skeleton that i can animate myself. I'm currently using max but it's a major pain in the ass to skin the character which does have quite a bit of vertices as it's pretty high poly. The enveloppe system is just insanely time consuming. We plan to add clothing items too and if each clothing item will take as much time to skin it will take a million years to finish haha. I've seen some plugins for max which look pretty cool like (weightpro and bonespro) are there any others? What is the best one? Or should I drop max completely and go to Maya or something else? Perhaps there is an Unreal plugin / tool / addon? At this point I'd love to hear any kind of advice you can spare!
we are a very small indie studio and I'm the one that has to make the characters but I'm also the programmer and the more time I spend on the character the less of the game that is being made 😂 So any kind of thing that can help me win some time would be a blessing really
@novel viper So I never used 3ds max but for the skinning high poly thing, in Blender you'd usually keep it a low poly count and use a subsurface modifier
when I import an animation for a character from blender, the animation that gets imported is just a blank thing in animation window in ue4, are there any reasons that could cause this?
well, started over from scratch, exported the static mesh (last time I exported the idle animation and modified it) from unreal as fbx2014, removed the mesh objects, hid the root, ik and twist bones, and then did 8 simple keyframes from scratch, exported fbx (blender uses 7.4 aka 2014), imported into unreal. Still getting the same result.. I do not understand for the life of me what's happening to the model's right arm and left leg
The UE4 FBX import pipeline uses FBX 2018. Using a different version during export may result in incompatibilities.
https://docs.unrealengine.com/en-US/Engine/Content/FBX/SkeletalMeshes/index.html
Setting up, exporting, and importing Skeletal Meshes using the FBX content pipeline.
This however doesn't mean the issue is incompatibility. I think it might be a different error in the current case, the bone transforms are flipped maybe and they point the wrong direction, so the relative transform will be messed up.
I'm thinking right now it may have something to do with the rotation mode
as opposed to the actual rotation values
starting over with a fresh t-pose skeleton again
If you can find a blender project that has the epic skeleton in it, try to use that. The UE forums sometimes has resources provided by community members for this purpose.
so uhh
if I reimport the mesh
instead of applying the animation to the mesh the skeleton was exported from
it looks fine
I think I'mma have to just dump the mannequin and remake all the default animations on a new skeletal mesh made in blender to get it working..
also if I apply prebuilt animations to the freshly imported model from blender, I get the same weird arm and leg bug. Not even mirrored in rotation or position, the exact same result..
Is there a Maya user that want to show me how to mirror an animation 😄 ?
I know how to do it in blender, no idea about maya, too ludicrously, ridiculously expensive software-as-a-service for me, a quick search of youtube of "how to mirror in maya" gives this as the first result @urban crater https://www.youtube.com/watch?v=yaueNw4rATM

In this tutorial I will explain how to mirror objects while box modeling. This will save you a lot of time when modeling a character etc.
You miss understand my question, I try to mirror a whole animation
ah
but thanks for making some research! I'm also a blender user and I know how to do it in blender, but unfortunately, blender suck with unreal engine 😢
oh believe me, I know xD
Hehe, we are aware of this right, but I was suprise how better it was, last time I tried this was like 3-4 years ago and now at least it can get back into ue4****, but have to much deformation
I find blender annoying because of the control-scheme, that being said, the wierdness that unreal puts onto blender's files I almost feel like is intentional, they push maya so much on unrealengine.com after all, and maya is so [redacted] expensive
it is really expensive, especially compare to our lover blender 😉
so you are trying tomake bones on the right do exactly what bones on the left are doing
yes
or are you trying to rewind an animation in the next frames
no reverse
just inverted (like one of those plugins does on the marketplace if you are aware)

"My Oh Maya" Blog - http://area.autodesk.com/blogs/stevenr Maya Bonus Tools - Mirror Animation
I found out some plugins (for maya) but they cost money, just trying to see if it's worth
Saw that one
you can mirror between or individually
it's a old version of Maya, maybe that the one I should download
I believe if you leave it on "individual" it will edit the primary focus to match the secondary or vis aversa
The problem is that, this tools is no more in 2019
and I'm unsure if it's not actually an external tools for maya
ah
thanks again for your research, I guess it's about finding a Maya user that have done this previously
https://www.youtube.com/watch?v=6TER2qPVyAY that one may be what you want aswell

Maya Mirroring Poses And Cycling The Animation Tags. Maya Review, Maya Complete Revies,
looks like a newer version
dunno, never used maya
can probably be used with multiple at a time with a box select or shift-clicking?
Maybe I should give it a try
or just do it one bone at a time
what afraid me is that I have to do it for each frame
going to keep you posted 😉
I've gotta remake a bunch of animations from scratch and am procrastinating.. I need to get back to work 😦
feel you
By the way the video is using a plugins only available fro maya 2015, at least this one is free
eh
I don't see a plugin being used for the actual animating, the copy-pasting and putting in the reciprocals where necessary, you sure he hasn't just changed his layout?
I see a plugin he's got on the top, but he's not using it
eh either way
make your keyframes and let the program interpolate whatever's in between, it's tedious but honestly doesn't take that long
I have to do it on more than 50 animations
So I kind want a 1-2 minutes workflow in between all file
if you used common nomenclature for the bones
make a quick batch script for blender
let blender do it
then import it into maya
does it do something like this? https://cdn.discordapp.com/attachments/221798806713401345/586648981552234506/2019-06-07-1509-02.mp4
and fuck it up even more after exporting to fpx
no it's just suddle change I can't have
if it's turning the whole thing on it's side,it's your Export as FBX options in blende,r change your "up" and "forward" axis,a s well as your primary and secondary armature axis
if it's doing like the video above, then you have to export the mesh, materials AND animation as one fbx from UE4 and reimport the first animation with a new mesh from blender
than all of your other animations need to use that NEW mesh
don't change the mesh at all
just import in blender, export from blender, then reimport in UE4
I was getting really really close
but you have to redo all the animations for the mesh
just a little retargeting after could enough by the way
thats what I've learned over the past 2 days of dicking with it
you don't have to remake all the animation
no one seemed to be able to help me figure out why its arm and leg were doing that 😦
but retarget your new animation to the original skeleton
hey you want to make a vocal instead ? xd
you mean record dialogue?
Is there anyway to use montages in a blend space? I need certain things to happen during the animation
I mean, call 😃
oh hop in voice? sure why not
No you can't use montage in blendspace @sour storm
I'll hop into the support chat on the left there
Yeah didnt think so 😦
@sour storm playign a montage shoudl override the state machine's slot animation and fire notifies
What are you trying to achieve during that blendspace?
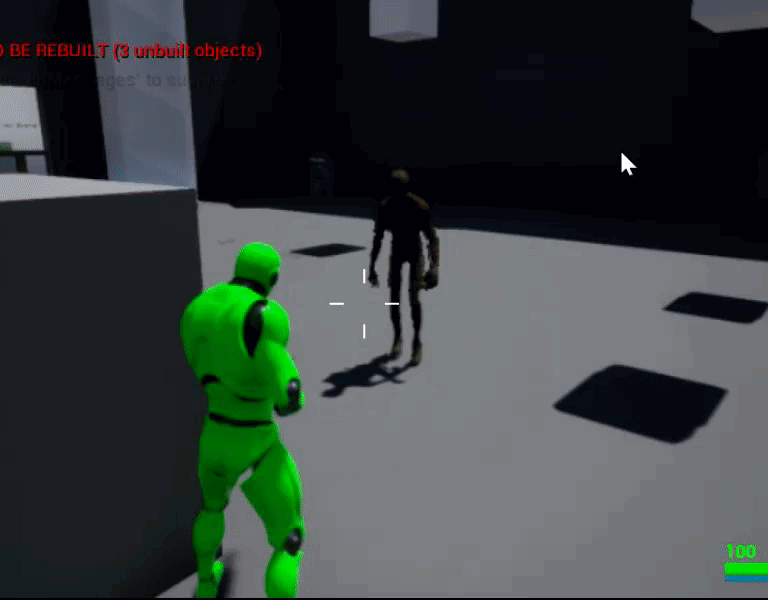
Well I want to have roll animations for different directions and I need the player to be immune to damage during a little part of that roll.
I have tried to get 8 axis's before in the anime graph but that seems very messy for a roll with 8 montages
if you make a roll animation you should be able to sue it in any direction, you can do in the on-damage event
check for aniamtion isPlaying
and check for the roll
if it is playing, don't deal damage
if it isnt (on false) deal damage
I need it really to only be immune during the middle part
ah
Notify event 😃
Basically you set your notify directly inside your animation
Ahh didnt know that was a thing loil, Okay i am sure i can find that
i appreciate the hel
Bleh hate FBX, I had tried and failed 100 times to try and import FBX animations from unity into unreal 😛
Soo realized after a long while of messing with stuff I am not 100% sure how to implement a blendspace for rolling properly.
Every tutorial I have seen does dodge rolls with a single animation and directions
just gotta set isRolling to go into "roll_start" animation (where you curl up and do your first rotation) then go into "roll_loop" (just repeatedly spinning) after TimeRemaining("roll_start")<0.1 continue until isRolling is set to false, then play "roll_end" (uncurling and standing back up) then back to Idle after TimeRemaining("roll_end")<0.1
well no the blend space is more for rolling in 8 directions the roll is one entire movement
if you wanna do it that way
so in other words if im pressing back on the controller for instance
i want ot roll backwards
no, its a lock on type game like Kingdom hearts, zelda, dark souls etc.
if it's 2d that makes sense, but if it's 3d it should just be one set of animations used for all direction
have you checked like https://www.youtube.com/watch?v=nvaClkmCkAI ?
Rolling and dodging are two systems that are frequently found in game, especially those like Assassin's Creed or even For Honor (Talking about dodging here)....
his rolls are based off keyboard keys. which is fine for computer but designing this around a controller too
ah
so you press w a s d and it coralates to an animation
cant you grab the stick's direction and do the same thng
I imagen so, however I don't know how to go about that per say
actually i think i can get 4 directrions its the forward left, forward right, back right, back left that i am unsure how to fully grab
https://www.youtube.com/watch?v=YA1r_gwS9yg looks like it goes over using control stick input pretty well

In this video I will show how to setup basic forward/backward and side-to-side movement from the ground up, with controller input setup too. If you have any ...
I'm getting a weird effect where after using a root motion enable animation leap for a character, that character seem to hover a little bit above ground before dropping, and its axis rotation is all screwed up afterwards
does anyone know what could cause stuff like this?
lift the capsule collider a little bit
sounds like it reached below the feet afterwards
I think I fixed my issue, but I found another: it seems I have a notify that gets triggered twice, despite only ever being triggered once at the start of a composite animation
it seems my notifies were skeletal notifies, is there any way I can just make them notifies for a single animation?
blender and unreal really love to disagree about the _twist bones on the default mannequin skeleton
Notice For people not ready to lie about their student status, willing to break the law and pirate maya, or not willing to shell out the cost of rent of a studio apartment in Florida each month to be able to make and animate their 3d models and thus use blender or another more accessible 3d modeling and animating program. If you are starting with a premade asset for unreal, and you have made a new animation, and the bones go absolutely insane when importing the FBX you made in blender, how to fix it is to export the mesh and animations FROM unreal, import them in blender (auto orient bones), export them as FBX (uncheck "Add Leaf Bones", check "Only Deform Bones", set Armature FBXNode Type to root, and make sure your Primary/Secondary bone axis, and your forward/up scaling are set correctly), reimport them into unreal. Use the freshly reimported mesh and animations instead of the original in your animbp/etc. Now any new custom animations you make for that skeleton in blender will work as you expect them to.
(For example, when using the default unreal mannequin)
couldn't find anything on youtube about the problem, anyone in any of 4 different game dev discords, and no one streaming unreal engine content on twitch that I hit up was able to help, had to trial and error myself and this was the only solution that reliably works. Hope this helps other people
https://docs.unrealengine.com/en-US/Engine/Animation/Persona/BoneManipulation/index.html Am I missing something or is the record button the only way to save an animation after modifying the rotation of a bone ?
Overview of the Bone Manipulation Mode that allows you to translate or rotate bones while previewing animation assets.
no button to just save the changes ? seems archaic to have to click record then click play and sit there watching it play through and record then trim it afterwards when it started the right size....
bowen - add a track, then select the bones, hit "Add" up on the top, modify bone, hit apply, do this for several frames throughout the animation until it all looks right, save
better to make the animation in an external program (e.g. Blender) then import it
if you are updating/editting an animation someone else made, export it from unreal, import in 3rd party program (like blender), modify, export, import
@spiral vortex hey, ye I was using the big library of mocaps that had been converted to unreal https://forums.unrealengine.com/community/community-content-tools-and-tutorials/1361031-updated-v2-free-cmu-mocap-animation-library-2500-retargeted-to-ue4-skeleton, some of the arm or leg rotations are off because they all used different subject skeletons batch retargeted to unreal skeleton and if you just modify the bone rotation slightly on the very first frame the rest of the animation looks as they should, but those changes are not saved unless I use the record function to make a new animation, I will try adding a track like you suggested but I feel we should just have a save button for this hopefully it will get added at a later date would save a bunch of time. exporting to blender... I can see the animations how I want them so it's just like a tease...
you can just go to frame 1 and rotate it, click the big "+" for add key at the top, then hit Apply To Mesh
if you can't seem to get the add key to light up, add a track manually then do it
Hey,
I'm trying to create an animation for a spider walking from the floor to a wall (the transition).
I've seen that I will maybe need to use procedural animation. Someone have any idea on how I can make my spider go from the floor to a wall with an animation ?
best case would be using IK and procedual animation, but the easiest way would just be to use a 90 degree transition animation and lock the input until its complete or something...
@severe ravine kk thx
https://gyazo.com/5b21be2c68ebfa386a438c0d2782e3f5
How to fix that in every animation the gun is right?
Because i use a socket thats attached to the right hand
In the walk animation the weapon is good, in the others its wrong 😦

@steady shore You could change the guns rotation based on animation or rework the animations
Hmm I dont know there could be plenty ways: First make out the axis, probably X or Y, then f.e. use the speed variable and f.e. when it's normal at 0 and too far at 600 speed, you divide the speed by 600, use this output for a lerp node on the character blueprint and in the lerp node you lerp between 0 rotation and fully offset rotation at 600 speed, then you plug the outcome into the rotation of the gun
and call this on tick
so based on speed it would interpolate between the rotations
but I dont know if it works that good in your case, sometimes the hand seems to go up a bit
Or add multiple sockets and switch between it? @misty dagger
Oh sure why not
Is it MP friendly you think?
MP?
multiplayer
No idea why not
Oh good to know
Gotta do a finish in touch, but it works
It feels a lil hacky tho xD
But idc
it does what it needs to do
I never made gun animations though, like if you cant rework the animations the only other way that would be less hacky would be something like calculating a rotation off of a directional vector between the 2 hands
@steady shore For this you'd have to get both the hand bone or socket locations, then use a "get unit direction (vector)" with the 2 locations, and with this vector you use a "make rot from... x?" for the gun or socket rotation, but the vector to make rot is a bit tricky you should look it up
like it could be the axis have to be changed
it should be make rot from x or y: "Well it's self-explanatory. Say you have a vector that points in a direction, you use 'Make Rot From X' and apply that rotator to an object in World-Space. The object's X-axis will now be facing the same direction that the vector was pointing."
https://forums.unrealengine.com/unreal-engine/feedback-for-epic/36121-vector-to-rotator-conversions
Unreal Engine Forums
Tell us how to improve Unreal Engine 4!
@steady shore There is also a look at function and a "find look at rotation" node
So for the "find look at rotation" you'd just have to use the 2 hand locations and then use the rotation for the gun hand socket
Maybe you have to exchange some axis or multiply them by -1
Can someone help me please? For some reason the mesh isn't showing up in the retargeting thing and won't let me do anything with it
anyone know how to fix this?
Quick Asset question, I'm making my first animated import from Blender and my lighting interacts poorly with my object. What have I done wrong?
you probably have all smooth edges
try setting them to "hard" in blender
@shy plaza
I'm basically just now starting blender
where do I find the setting?
and thank you very much
I think it's because I skipped UV unwrapping
I'm about to UV unwrap
well it has a texture and a UV map
but the lighting is still similar
I'm not entirely sure how this has happened as I imported another model which was okay
I'd just make another one but I'm not sure what I've done to it so I'm likely to do the same thing again
I'm really stuck on this
I've discovered UE4 no longer autogenerates lightmaps if you animate using vertex groups
I've gone through my modelling process step by step
and whenever I get assign my armature weightings using vertex groups, immediately after that UE4 switches off a whole bunch of options regarding lightmap generation
Can someone tell me what's going on and if i have to manually bind the mesh to the skeleton or not? I saw some video's online where the mesh automatically imports with the skeleton. The only thing i am getting is a skeleton. ☹

I'm trying to play two animations in two different groups and slots in the level sequencer. In this case, a lip sync animation and the body movement. It looks fine in the preview, but when I actually play it in the scene it looks wrong. Anyone know what might be going wrong?
is there any way to disable animation notifies for an animation montage that's playing? my scenario is that I'm playing animation montage A, and towards the end, I re-play animation montage A'; I want to disable the animation notifies from montage A, but keep the ones for A' firing?
Heya, is there a reason why Import Morph Targets option would be missing from the Import FBX options, even though the FBX has them? The is from Blender 2.79. I double-checked the shape keys are in their by opening the FBX and I do see and can use them.
I have an animation that moves the character, is there any way I could calculate how far an enemy is, and shorten the animation time by how far the enemy is?
I may have figured it out. I created shapes but not keys for them. Trying another export/import, hopefully this was it!
@shy plaza I might be wrong, but aren't lightmaps just for static objects?
Yep. I thought it was failing to generate a lightmap for my mesh, but rather an animated mesh doesn't use one. I thought something was broken with my mesh exporter because my meshes were also broken in ThreeJS as well, and rather spectacularly at that emitting a blinding level of white light. Still not entirely sure about that on as mesh exported in a different format works perfectly. The UE4 issue was solved by adding a normal map to my model. I'm not entirely sure but I believe UE4 was soft shading my models as a default when normal maps aren't detected.
Ok, so im trying to figure out the best way to have a character with a necklace in ue4. I have a character in maya, i also have a separate rigged necklace. I want to know the best way to export these entities to ue4 so I can have the character with the necklace and an activated rigid body node so i can have some physics going.
does anyone have a good tutorial or documentation how you set up your rig for physics animations
im making a truck but I keep thinking I'm missing some info
I tried to look for it in the unreal documentation but it doesnt really give a clear view what you should import in unreal and how it should be setup
Would anyone have the slightest clue as to where to begin thinking about interactive animations in VR? For example, shaking a characters hand with your own, punching them, etc.
How can i loop x times a montage
Hello! I'm trying to animate my character that i got from Mixamo but i think that State machines are obsolete, and the tutorial i am using uses them. Does anyone know the new way? I just have a blank animation blueprint.
Hi! Do I have to make the entire character skeleton or is there a way to get only the arms animations from an animation to use for my first person arms?
Anyone know why only 2 out of ~15 animation actions are importing from Blender into UE4 when I import my mesh and skeleton? The two animations that do import work perfectly, but the other animations are simply ignored. Is there a way to forcibly include every animation or import the specific animation actions that are missing?
Halp, I need halp... plz
Whenever I animate this foot in blender, one of the bones rotates on it's own inside of unreal, but this rotation never happens in blender
I have a question about corrective morphs (Neck, elbow etc). Should I bake the curves into the animation, or would it be better to set it up in blueprint somewhere? Is Post Processing Animation Blueprints what I should look into for this?
@autumn flare Any drivers on the bone? Might it be weight painting?
Someone else did the weight painting, and they did have foot issues before that was also imperceptible in blender, but visible in unreal
looks like its weighted to the other foot or the root bone
hey if I hit play on a physics actor and get the physics sim from it, is it possible to then save that off as a static mesh?
for example, if I make a physics actor from a skeleton, dupe it around a few times, hit play, and let the skeletons fall to the floor, then want to save the pile of fallen skeletons as a static mesh
yea you can
@pearl swift use sequence recorder its great
now u have an animation of him falling and u can turn it to a mesh
cool thanks! I'll check it out
OK, I have a Sonic FBX, now how do I import it to DAZ3d?
anyone have any experience using Blender 2.8's rigify rigs in UE4? I'm using the Human metarig to generate my character rigs and I'm wondering if these rigs cause any major performance issues? There really is a shitload of bones in them but I've seen it mentioned that the performance impact should be negligible
Could anyone help me figure out physics based animation? I followed the official unreal tutorial online and it didn't work. Basically, my animation runs while my characters physics is turned off and my character ragdolls when it's turned on. The blueprint seems to do nothing
@steep rain try set physical animation settings below
for test
it should not completely ragdolll like this btw, pelvis should stay where it is
alright i'll try that and see if it works
you might have misspelled profile name or something
or ur profile is to weak
notice the numbers bottom right try something like those
Did you have to do anything in the animation blueprint as well? it's still not working for me
nope, what happens?
Animation runs with no physics, ragdolls with physics
Im using a custom model, I'll post the bones
I've been trying multiple bones to see if any of them work but so far none of them have worked
im going to try and watch the unreal live tutorial again to see if i missed anything
yea spine should work here
Hey guys I'm having a problem with IK. Everything works flawlessly except my character's feet are stuck in a really weird angle (Using the ALSV3 IK code). Where would I look to solve this?

Nevermind, I found a solution. 😛
Is there a way to adjust animations in a montage or in general to slow down one part of the animation? A example would be say a character swings a sword, and i want the wind up to telegraph a bit more.
@sour storm you can specify the playback rate of animations as well as the start and finish so you could either create new animations from the existing ones focusing on the parts in question or you could overlap the same animations in the montage, setting the start/end of each section to achieve the same thing. Then adjust the playback speed of the desired sections.
its not the right way to do things but it'll work just fine, depending on what your expecting
I finally figured out what was wrong @bronze osprey , I had been naming my name variable the bone and not the default value inside of it
i feel so stupid lol
Hello! Does someone here have experience with importing rigged characters that have child meshes like a coat added to them into the engine? Because the character keeps getting imported without the coat when I try it, maybe I'm overlooking an option that has to be checked?
This is how it is combined together in the 3d application but the orange cloth piece, red skirt cloth, hanging bandage pieces and the ponytail are missing when I import the character into UE4
As you can see things are missing in the engine, but if I look at the .fbx with windows 3dviewer I can see the pieces (the seperate materials of the missing parts don't get imported either)
When I rigged the character using the Mixamo auto rigger I didn't add the parts to the character because I want to add cloth weight painting to them in the engine
I'm probably doing som ething wrong, but why doesn't my jump animation show up here?
transitions does not play animations
@pallid granite remove the apex cloth and it will export
Hi, I tried to upload a character to maximo and use their animation. Things were going well as displayed on the page
but when I imported it in Ue4, it became this nightmarish blob
have anyone encountered this problem?
welcome to Mixamo
Been reading about the history of Mixamo after Adobe taking over, doesn't look good
Hahaha working with Mixamo at the moment as well, wondering now that creating the rig and weightpainting the character by myself would've been a lot faster in the end😂
Does someone have experience with Cloth Physics?
in UE4
What are Masks used for with the Backstop Distance and Backstop Radius targets
An overview of Cloth creation using the in-Editor tools with Unreal Engine 4.
turns out mixamo export is different than what programs like ue4 and blender accept
i gotta run it through 3ds max first to sort things out
insert 3d technical terms
normals and stuffs
if you're just importing and exporting, noesis is good at doing that in batch
@sudden sedge Thanks I will check it out
was a tool designed to poke at game formats, but it can convert to and from a variety of formats
I assume we can derive from animation instance class so that we can type are anim classes up strongly? not a fam of blueprint maintainability
i want to create a walk left animation by rotating the walk forward animation by 20º but it keep getting reset as soon as i leave animation editor
is there a way to do this inside ue4
silly me, no key and apply
i got it now
does mixamo work with all kinds of skeletons?
An animation pack I bought uses a T-pose. My character is in the A-pose . If I have to set up the T-pose to accurately and successfully retarget the animations, I'd like to know if there's a way to do it that doesn't just involve guessing the angles? It seems there are twists in arms and fingers that aren't straight-forward and so the result of the retarget is quite off.
I always wondered why there wasn't some kind of 'shadow mode' so that you can see the bones of the skeleton you're trying to match.
So I'd like people's opinions on using a face rig for in game characters expressions, mouth shapes, etc, or making shape keys off that rig and exporting it without the extra bones?
everyone have using character movement component?
lol
Good morning! Does anyone know if it's possible to find the ART for Maya 2014?
@sudden sedge thanks for sharing the documentation, though what I'm not sure about is that if Masks can be used to prevent the cloth from clipping through the character mesh
Does someone maybe know a trick on how to prevent the front part of the red cloth from clipping through the pants when the character runs?
I just got this message, reimported my character after adding a root bone to the skeleton (mixamo rig), it didn't have the root bone when I first imported the character, do I have to press Yes or No?
i need some help, i'm trying to import an animation from blender into unreal engine 4, but since I used quarternion in blender, UE4 is missing the rotation values for W, giving me the following errors
how does one import with? quarternion instead of XYZ euler?
Hi guys
@pallid granite I don't know if this would help but.. https://youtu.be/myZcUvU8YWc?t=1331

http://www.gc-academy.net/ Judd Simantov, 3D artist and Co-founder of Game Character Academy, presents his work on Naughty Dog's latest project, The Last of ...
about 22:11 in they talk about a second bone set to displace part of the clothing when the leg is rotated in it's direction?
@opaque stirrup damn that really is next level, especially compared to a mixamo auto rig😂 😂 thanks for the video it's interesting
Yeah a lot of it is beyond that I can even think about implementing, but it certainly gave me some ideas.
Same, you got to start somewhere though so it is interesting to see what all their tricks are and how things are set up
I honestly haven't got into the UE4 end of things as much as I would like but is there anyway you could make a blueprint based on the leg bone position that displaces that cloth forward a bit?
maybe a shapekey would be enough, depending on how many animations you need to deal with or ragdoll?
Not sure, but maybe I can play around with the physics asset of the character, like place a extra capsule which keeps the cloth from moving inside the legs
Hi, I'm using TwoBonesIK, how do you block the character movement when it reaches the maximum arm extension?
hello, i've been searching all night how to blend animations and this is what i understand so far (this is my second week using Unreal, so bare with me)
https://gyazo.com/486b747f47480e8fe527ec9198c13f2b
either i use the "Blend poses by int", or i modify the state machine
i don't like either of those options since all depends on when an animation ends in order for the next one to start, and i don't know how to do that
i tried the "Task wait delay" for waiting X seconds from one animation, changing a bool to transition, that didn't work
i also tried using this node:
https://cdn.discordapp.com/attachments/324344135677116418/589386018201796612/unknown.png
any negative value returns the first animation, any positive returns the second one, which makes sense but there's no transition between the two
i'm thinking this HAS to be super simple...right?


Theres 3 animations, one for "Draw arrow", another for the "Charge" and the last one is the release
I think it has to do with the 'Blend Time 0/1/2' Floats at the bottom of the Blend Poses by Int
up them to something like .5 @vague plaza
I too have a question about blending two animation together. I have it nearly there but seem to have some problem with the Lookup axis being ignored when shooting. https://gyazo.com/4155df9dd26967de485aba83397778c1

How Can I prevent the character from going away from the IK target? I want to be able to move when I'm still close to the target, but not away like that and still having my hand trying to reach the target.
Hey @sterile linden thanks for the answer, but even when i put 0.5 values it doesn't do anything, cus it will only change when the int at the top changes
@vague plaza So you're using BlendSpaces with a 0 float input, Could be the problem?
i think the way would be to have booleans that return true when one animation ends
and that true would make a value go to 1, or 2 for ex
no, look

see? the int changes which animation it plays, so a value of 0 plays the first one, a 1 plays the second one, and so on
so the thing is, how do i check wether 1 animation ended to change that value
Maybe a Time Remaining might work
if the animation has less or equal to .1 left, then add 1 to the Int
@vague plaza if you wanted an auto transition, you'd generally use a state machine instead of blend. If you really want to use a blend then you may need to leverage notifies. But this looks like it might be something that should be a montage?
Hey 😃
montage? i'll look into that, thanks
yeah i tried using the state machine but i don't know how to transition between states from another blueprint
and it's not like i need to get an input for it to start playing or something, i just want it to play the 3 animations in a sequence and loop

Why won't it let me change my skeleton on my skeletal mesh?
My character is swinging his sword more so swinging it at the ground, is there something I can do in the blueprint to override/correct a bone somehow without an additional animation?
Can someone point me in the right direction on animating projectiles from a vehicle, and hit detection?
how would I go about making an animation in ue4 that includes 2 characters
similar to the ones in splinter cell
Same as making any animation. The caveat is that you need to create a system that’ll sync the animations of multiple characters. Here’s a start. https://docs.unrealengine.com/en-US/Engine/Animation/SyncGroups/index.html
Sync Groups allow you to maintain the synchronization of animations of different lengths.
I'll read over that thanks @restive yew
Hey guys! Does anyone know any software/website for automatic facial morphs/shapes creation? Please, I've currently got 2 jobs and it's really hard for me to get some proper free time to do everything manually.. I would just like to experiment around with my own characters and learn..
Thanks everyone!
Hey guys , this is mostly out of curiosity
was PSA / PSK fully deprecated in UE4 ?
Mostly curious since I see Gildor's tool is able to export assets from UE4 games
Hey guys! I am looking into how the Blender > UE4 character process works. I imagine the simplest solution is to make characters work with the base skeletal mesh that is found in UE4
So far my attempts to make this work have not gone well, and I am not quite sure on the best methods of doing this, is there any advice you could give to lead me in the right direction?
when i import my artv1 maya animation to unreal it becomes broken
" imagine the simplest solution is to make characters work with the base skeletal mesh that is found in UE4 " Not necessarily 😃 If anything trying to slap new assets to a pre-existing skeleton is pretty difficult @green walrus
That said the almighty @unreal cosmos , I think, made a UE4 constraint rig that allows you to not lose your mind if you want to make animations in Blender for the UE4 mannequin
well it taught me how to tackle problems
I made a copy of it based on the same principle back then 😃
works wonders with anything really
Hey everyone
question
i cant use animations that don't have the character's skeleton in my montage?
like i have an animation of an arrow being shot and travelling through the air, but i wanna connect it to this montage
and said animation doesn't appear in the Asset browser 😦
No, you can only use the animations that share the same skeleton. In you case, you can add a bone for your arrow, but if you are making it for gameplay purposes, I don't recommend that.
I think you'll have to set the arrow's movement in BP. With projectile movement, or by hand with vector maths. @vague plaza
//
Someone can tell me what those indexes are exactly? it's rotation limit per joint, but the value is a scalar. Is it limiting the rotations by the given value in the 3 axis? Or is it one index per axis, like the first three indexes are the X, Y and Z limits for the first bone?
There's not much about it in the documentation
Oh thanks a lot @wise spoke !! Yeah i think i'll do it with a bone, since it's only for show
has anyone tried the 'bonebreaker' plugin? I wasn't able to get it to show up in the blender addon list when I added the zip or when I tried manually placing it:

This is a tutorial on how to utilize my custom Blender addon in blender 2.8 Beta. The software is designed to allow everyone to modify the default Unreal ani...
may just be a 2.8 issue where they changed an interface or something
Is there a way to check if an animation is playing in the previewer (as opposed to ingame)?
How can I fix it where my enemy death animation doesn't reset? He pops back up after playing his death animation. https://i.gyazo.com/6b9b4e1f52f6260fe6836fea173acb72.gif
What do the bold letters stand for in the skeleton
is it that the bone has skinning data linked to it?
or are there other options
Why is it so hard to align a bone in a given direction in world space?
I trace towards this mesh, get the impact normal, and I want to align the foot with the normal, (the inverted normal actually), but look at how the foot is articulated
I'm just using MakeRotFromX with the inverted impact normal (x-1), and I plug that directly into a transformModifyBone in world space in the anim graph
@opal jackal is it a montage? make sure looping is ticked off
You know how to fix that ? https://www.youtube.com/watch?v=0oKakUx6Nk4&feature=youtu.be he does not make movements to go left, right or behind. It is exactly the same movement as for going forward 😄

@sudden sedge I couldn't get a montage to play so I just played the a animation. It's not looping
Have cache poses been removed because I can't seem to create them.
so how do i make a mesh only rotate on X axis and not move at all relative to its parent
Does your mesh currently orbiting some point and basically moving while you rotating it?
what do you mean?
right now it's just a single bone with two joints
i want the bone to only move rotationally
with simulating physics
so i used the constraints to do that
but it doesn't move with the actor
hello, is there a way to get the current play position on a animnotify state ?
How do you fix the root motion for a anim montage where it doesn't snap back to where it started from? My enemy skeletons lunge at me but then snap back to where they began attacking and it doesn't look right. https://i.gyazo.com/51e5b64e18f294574a2f850a30edd4c5.gif

@misty dagger that's super easy to do. In your animation blueprint you just add a blend by bone node right before the final animation node. The click the blend node and it has a spot to type your bone. Use a bone like spine 1. That way it's going to play attack anims above that bone and walk/run anims below. U also have to make a cache of your locomotion as well a a new slot. I'll post a screenshot when I get on my PC. I'm on my phone. You'll select your new slot in the animation montage your using.
For a simple first person reload animation, would it be better to implement it as a part of the animation blueprint or simply play the animation as a montage? Perks or downsides of either choice?
I think my skeleton is missing a root which is messing up his root animations. How do I fix this? https://i.gyazo.com/37398cf51274dc75ac4d70330aa451fa.jpg

How do I get rid of one of Sonic's two mouths?
Anyone done an export of a GLTF from blender to an import into UE4 (as GLTF) ?
In my case - with animations. Not a humanoid rig - just a cube moving
I'm trying to wrap my head around when you want to use nodes in an anim blueprint or in a montage, does anyone has a good guideline when to use which? Where i come from in other engies it's always been all the animations in a graph/blueprint but unreal uses montages which from an animators point of view is less controllable as it gets triggered in other files if you use GAS or similar. its also super hard to debug compared to using the live link between the game and the animation blueprint. To me 90% of the content should be in the anim blueprint but as i understand it thats not the case in unreal? I know that you need montages if you want to replicate root motion in-game but if you don't need that then what is the biggest benefit from using an montage over an animation blueprint?
Trying to get the mannequin rig into Blender. If anyone's done this before they'll know it's....difficult. Would it be easier just to create a new metarig and ditch the old rig or is it really worth it to use the old rig to make the new one?
@opal jackal if you use montages and extract root motion it won't snap
To get montages to play, you need to add a slot in the animation blueprint https://i.imgur.com/hqYlW3P.png
@sudden sedge I have the slot but what do you mean extract root motion? Wait I think I may have got it. https://i.gyazo.com/d11e67e0a6e67e86129654a43d07732b.gif


Thank you for your help it works now. 😃
In Paragon asset, any idea when setA/setB should be used?
Anyone here called things like 2 bone ik solver in c++ before?
@stoic remnant - Kind of, what do you need to know?
Wanting to get some of my IK logic hard coded, not a fan of blueprinting for long term projects.
I will say that premature optimization is the root of all evil.
But calling it in c++ is easy, provided you're working with other FAnimNodes.
Just call the EvaluateSkeletalControl_AnyThread function.
hey guys
i want to play a montage from outside of the anim bp, but the the character has a anim bp running, how could i do this, currently it doesnt even start
Is there a way to mix and match animations for one skeleton, I want to know if I can use one animation with rifles, but have another animation that brings the weapon up for ADS?
Has anyone had an issue with notifies playing inconsistently on montages? I have a notify and sometimes it doesn't trigger. I've verified that the weight is 1.0 so I'm not sure what the issue is. I can start the game, play the montage, and it doesn't trigger, then restart the game, play the montage again, and this time it might.
Hi, what should I do if I want to edit a pose of a character and place it on a level as a static mesh?
confused with all these skeletons , skeletal meshes and physics assets lol
I've got a paragon character to play with atm
Is there a way to ignore the animbp and use a animmontage ? Example: I cast a spell and my spell has an anim montage linked, while my character has it's animbp, how can i run the animmontage without having my animbp know about it ?
hi, i have a problem to solve can someone help me?
Wondering if anyone uses ART
@fast juniper The skeletal mesh is a very basic skeleton with no intelligence. If you just want a pose with no logic, I suggest just dragging the animation clip (if you just want a static pose use a single frame animation clip) directly into the scene.
You can create a new animation from a single frame of an animation clip as well
@static falcon This is how I ended up doing it so far: I opened an animation sequence, adjusted the bones, pressed record and stopped it to create a new animation. Then I placed it on the level with the updated pose. I wonder if this is what you mean as well? The way I'm doing it now is a a bit tedious when doing small adjustments since you have to keep hitting record and stop and update the mesh with a new animation. Am I making it too hard for myself? 😄
I mean I found how to get what I wanted but I'm wondering if there's a better way
That works how you're doing it. UE4 isn't a DCC program per se, so usually you put data into it through other software. Ideally you would have a rig in an external package and you would pose the character there, not in UE4. IF you have Maya, Blender, Max, etc. you can export the skeletal mesh as an fbx from unreal, import it to your program, and then do your posing in there, and just export a single frame or a clip as long as you want
That makes more sense. I have to figure out how to do it with blender
A bit tricky import so far 😄
woah that doesn't look right
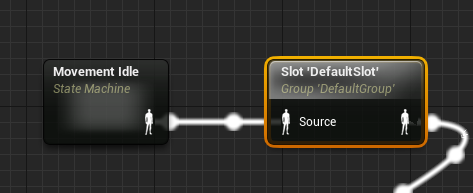
@torn flume - Heya. What you want to do is, in your animBP, to use a "Slot" node. When you play an Animation Montage, the Montage always plays into a "Slot", and then the pose can be displayed in the animation blueprint through the slot node.
There's information for how to do that here:

Describes how Animation Montages can be played back at runtime.
how do I implement a sliding animation for my endless runner game?
@next pine Thanks man this worked, i'm having another issue now thoe, the anim montage is blending wrong with the upper body.
Your blend weight is 2?
Well, all right - but that would make it blend weird. When you say 'weird' what do you mean?
the animation i'm trying to run with my montage is a one hand spell cast, the locomotion state machine is in idle for example and the character does some stuff with his hands like looking at them, when i trigger the cast montage it looks like its half way in between even with the slots.
should i separate them even more ? i'm not used to these animation tools.
What happens if you disconnect your state machine entirely?
So you're just playing the montage?
yes
to the second question
if i dont to the blend it seems fine
but i guess i do want to have some blending happening with the running animations and so
maybe make a lowerbody slot ? instead of blending the default slot and the upperbody ?
What are you Branch Filter options in the Layered blend per bone node?
Try setting your Blend Depth to 0.
And think hard about whether you really want to blend your Root Motion there.
yeah i guess i need to look a bit more into it, i'm not confident at all i'm setting things up right. The Blend Depth 0 had the same result as the 2
Hmm, odd. Based on your setup, the blend should be a complete replacement, not a partial blend.
Unfortunately, the visible effect your seeing (animation not display quite correctly) is one of those things that can have an enormous variety of causes.
i can imagine, it's also odd that if i remove the blend it works fine.
When you say 'It works fine' what do you mean?
By which you mean, the upper body animation is the montage animation, the lower body is the state machine?
the state machine should be a full body animation, it has the idle for example if not moving around. While the upper body is what i'm using to get the anim montage in there for the spell cast, he closes his fist and the "throws" something
Right, but I would assume that the montage itself has, for instance, a pose for the lower legs? However, right now, when you said that it works fine, you're seeing the lower legs of the state machine, and the upper body of the montage?
no it's all the montage
it completely replaces the state machine, i guess that's not right
Well, it's what your structure would create, which was why I was trying to be so precise about what was happening, because when you said "it works fine" I was surprised, as I couldn't see any way where you would get the upper body over the state machine given what you posted.
To do that, you need to use a blend.
ok, we'll i think i will look a bit more into how all the nodes work and if i can't get it to work i'll be back hehe 😄
Good luck.
thanks for the help @next pine
Wish I could have done more. Best of luck.
Hey Everyone. I'm trying to implement different weapons in the game without creating complete animation sets for each of them. I've different poses for each one of them in different states(ADS, Relaxed, etc.). What I wanna do is, blend the poses with various locomotion animations like jog, sprint, etc.
Everything works fine for the ADS state, but the relaxed state gets all messed up as I'm struggling to keep the weapon specific pose intact.
does anyone know how to reference a control rig?
could probably use ik to push the hands back
you might be able to extract if from the raw animation then add it back, but I'm not sure how you'd go about with that
Hey i have a problem with rootmotion, My root bone moves very slowly compared to the original movement is supossed to perform. It is like the movement of the bone is scaled.
I used blender to export the animation
in FBX
Hi, I am exporting from Blender to UE4. In Blender I am using Weights > Limit total to limit to 8 vertex groups, then exporting to fbx. In UE4, it says "skeletal mesh count 15 exceeds max count of 8. maximum ignored weight 0.003"
I realize it's a very minor amount, and will most likely not affect the weight of the model in any way, but limit total to 8 has always worked for me in the past and it started giving me this warning now. What could be the issue?
for some reason, applying subdivision and mirror modifier, limiting weights, then exporting did the trick
¯_(ツ)_/¯
You guys work with animation; how do I get started doing it
hi there
How can I create charge skill
like this video
#Dauntless #PlayDauntless #Sh4d0wStrider A quick update video for my Axe Speed Build for Dauntless. Totally fun to play not soo much high damage but gives in...
What do i need to learn to rig my own characters like the mannequin? Is it easier in Maya? Can I still use ART even though its not suported in 4.22 anymore?
can someone talk me through some stuff? im having trouble understanding some animation stuff. if i could screenshare or something that would help. Its all very simple but im just very new. im trying to figure out how to make my character aim down sights
Guys, i wanna use the AnimStarterPack pistol animation to make an AimOffset, but the thing is I don't have the animations for all the directions like the rifle
The one provided is only the one to the center
Am I missing anything?
That's what i mean
Hi guys,
I have a question regarding clothing/cloth simulation in UE 4.22.
I would like to know if there is a way to set the cloth simulation to have a specific rest state or even a state it conforms back to after simulation.
Example of what I mean would be for hairstyle say...
If you have a hair style that combs from front to back over the head with some volume, If I paint cloth weights onto the hair and hit simulate it will move out of the required hairstyle position and lose volume. I understand that the gravity etc will affect the style of the hair straightaway and of course it will move dependent on the painted weights value, but what I'm hoping for is a solution say for the hairstyle to be affected with inertia or wind, whilst retaining the volume and shape, allowing movement, but once the movement of the skeletal mesh is stationary it then conforms back to the initial state/hairstyle.
Have anyone seen this error when importing FBX from UE4 to Maya?
I'm losing the skin weighting
some assets affected, some not
Hey everybody! For some reason when I set up a PhysicsAsset and press "simulate" some bodies go through each other ... I need the bodies to collide with each other. Anybody got any suggestions?
Hi guys, i have a question: how can i make the next effect in a static mesh when i do click on that?
Hi there! I have a question! I'd like for typical animators to answer it, as I need an answer with experience and knowledge!
I'd appreciate it - in advance!

does anyone here use 3dsmax? I'm trying to convert a bone animation to a vertex animation for use with unreal but I cant for the life of me work out how to do it
Hello! I'm trying to set up Animation Dynamics for the character's ponytail, but the results are a bit weird😂 . Does someone know what I'm overlooking?
Could anyone tell me if this is possible for First Person? I mean, how would camera follow all the bending and twisting?
Using an Aim Offset, a character aims a weapon in the direction of your mouse or controller.
Anyone?
does anyone know why LegIK would work in the Animation Blueprint preview and not in the game itself? Kinda stumped here.
Turns out it is the mesh, for some reason, despite it having the correct skeleton.
It was missing the IK bones for some reason, and reimporting the mesh with the corrected skeleton fixed my problem.
@ivory parcel Download the Shinbi paragon asset, pretty sure she has an example of how to use mouse yaw and pitch to drive your aimoffset
@static falcon Thank you. I will try her out. I hope she is also compatible with FP because I tried other one and was only for TP.
She's not built for first person, but aim offset can be used in the same way for either one
The easy way to do it is do what they do in the example file, parent a rigged torso to the camera
Oh good ty
Hi; can someone help me?
Does someone have a good example of how a ponytail should be weight painted if anim dynamics are added in ue4?
Is there a built in way to add a little.bit of random motion to bones on a character so they gave a bit of random sway without hard coding that into the animation itself?
Hello, unreal gurus! I'd like to ask you guys a question. How to fix the bug that happened after retargetting animations. My retargeted animations started behave weirdly, those which has root motion.
@ivory parcel why do you want to use aim offsets for first person, you can just attach the first person arms to your camera, or do you want to make first person where you can see the body too?
@ivory parcel I use a really shitty system for my first person
I have a dedicated "camera" bone that stays stationary during most animations
which is parented to the head
I attach the first person camera to that, then rotate the camera based on mouse movement
then use aim-offset for my character
so they look around
@mortal storm, Yes full body. That's why I need AO.
@sudden sedge, I found parenting camera to the schest and adding an object to the distance for the head to always look at to work great. Less of that head bob that may cause sickness for some.
hey guys, is there a better way to handle attack animations than to plug them into an animation blueprint?
i want to avoid making a spaghetti monster out of my movement state machine but having them play from the character blueprint doesn't trigger notifies, as far as i can tell
@ivory parcel You could also make the camera bone parented to the root then loosely follow the head in the animations
Hi there, everyone!
So, I just need someone to identify the level of difficulty to create such animation as the one presented in the following example:

So, here is the animation-job-peaks:
If you check the video above, at 00:05-00:07 they both do a special, exclusive move at the beginning of the battle.
That is, in itself, a special move which every character has 2 of. Those will be implemented for every single made character. It is a special move made for each character, to kind of hit off the feeling of getting into a battle.
Second, you see at 00:35-00:50(the video is a bit slow) that the screen turns vague and one of the characters starts energizing themselves(with chakra, assumingly - if you have watched the anime), and pulls off their 'Secret Technique'. Every single character has, at least, 2 Secret Techniques, whereas some exclusive made characters has a bloodline-secret-technique that gets pulled off as well as their 3rd Secret Technique. This will be a move that's made to kill-off the opponent as a 'finishing move'.
Lastly, the battle ends with a victorious-move; at the end of the battle(00:49-00:51), the victor, Obito, makes a special, exclusive move to end off his reign. That is, also, a special move, which each character in the game has 2 of(yup, 2 is a magical number!).
Here comes the question I am going to ask: To experienced and knowledged animators; how difficult will forging animations like this be?

(feel free to tag me when answering my question )
@fallow kindle on the scale of 1 too 100 its like 90 difficult if you never done animations and only 5 difficult if you do a lot of these kind of animations
its a question w/o a real answer
Trying really unsuccessfully to test Live Link. Anyone got it working?
hi there, stupid question: can you have 2 windows or tabs with 2 animations open at the same time? I want to keep the blendspace open in one window then look in the animations in another, but everytime I open another animation it will replace the bs by the anim I open.
hello 😃 is there a way to do a get curve value from an anim ignoring the weight multiplication?
i know i can get the weight from the anim montage and calculate what's missing, i was trying to see if there was a straight way to do this
something like a GetRawCurveValue
I appreciate the answer, @bronze osprey. I'd love to discuss this matter further, though. Like, about a respectable(min/max wage) payment towards experienced and knowledged animators.
Thanks in advance!

@fallow kindle ahh dunno what an animator would ask for this, i actually have a hard time spotting if its 3d rigs, 2d rigs or flipbooks 😛
or a mix of all 😛
Ooof. And I know nothing at all. Do you know if there are some discord servers/other mediums out there focused on knowledged and experienced animators?
struggling with getting some fast path stuff working
i'm use to doing stuff like this
Does someone have experience with adding a ponytail to a character?
@pallid granite depends what route you want to go with it
could just do simple ik on it
@tiny mirage Hmm, atm I'm not that experienced yet, this is the first time I'm trying to create a character with a ponytail so I'm not sure what my options are, I've read about AnimDynamics and now I'm looking into adding physics bodies to the ponytail but I'm not sure what the best way would be
simple two or more bone IK should fit your needs just fine.
Does that have to be done in the 3D software or in unreal?
Im a newbie at Unreal, but from prior experience with unity, maybe i could achieve this with a blueprint and a trigger
@sudden sedge Yeah , I am thinking that might work too. Thanks!

anyone has an idea how to setup the guns to be holding the same direction even when moving
it's hard to set it up only through animations as the reasons it rotate is based on the spine
How to convert animation of one skeletal mesh to another skeletal mesh
@frank ibex retargetting
@frank ibex https://gfycat.com/HonestEsteemedGrasshopper

this is only if they are the same skeletal structure
@oblique vortex use aimoffsets
@sudden sedge the issue with aim offsets is that the skeleton is split in 2 and is running 2 instances of the animation one upper body the other is lower body and because of that If I apply it on the upper part it will happen and I'll have to make animations that are stabilized and the aim offset won't work for the stabilized ones
While I figured out I can apply ik in the end after the split that makes it so I can have it stabalized
I would need to still offset the IK using a direction
I think I could use a rig
So I can setup an IK that would work correctly
wouldn't it be way easier to treat it as one part
one skeleton
then delta the top half and apply animation
@sudden sedge issue with that is i would need to animate every weapon to have a separate run animation :|
not sure if anyone else has this issue, but the 4.22 animation sharing plugin seems to be broken. If you have additive animations it just t-poses, and if you don't have additive anims all the meshes sharing animations flicker in and out of visibility
hey guys. I have a problem between ue and maya. Same bones have slightly different locations, like in the picture. Left and right foot in maya are almost at same place, in ue in same frames there is 5cm difference
anybody knows what's this? I imported from maya to ue, exported from ue to maya, same thing
is there a way to append two animation sequences together with a bit of transition between them ? (similar how you would crossfade between two video or audio tracks)
Hey is there a place to get free mannequin friendly sword animations that isn’t Mixamo? Because I don’t feel like they have a lot to work with
is there a way to... not hardcode animation assets inside montages or inside AnimBPs ? i have a few body types and i would like to use different anim assets for certain animations while only referring to them symbolically
i guess i could do it by making a custom play montage node and then ONLY EVER USE MONTAGES and never AniMBP
hello, is there a way to blend to an animmontage first frame and only when it's in full weight does it play instead of doing a crossfade?
Hey does anyone know how you can rotate Two IK Handle so it moves in the correct direction after the rotation of the bones has been modified?
Hey, I'm trying to figure out ART but I've encountered an issue, I've found other people with the same issue on the forum but nobody has seemingly known how to fix it
Part of the model seems to be transparent, couldn't tell you why.
Greetings, I have started working on a project to increase my understanding of using the Unreal 4 Engine and its various pipelines and workflows.
I have encountered a problem with adding custom animations to my player character blueprint.
I am using the ladder & climbing example character from the marketplace pack (free for the month), which is an extension of the third person character controller from the default template.
I am a bit confused with what to do first and where I am setting things up incorrectly.
Would anybody be able to explain this in a really friendly-for-dummies fashion?
I have an animation I would like to apply, when the character presses a key.
I have set up an animation blendspace – with my idle pose and my roll forward animation.
My intended output – is that when the player presses a button (player input) – the character blueprint changes from idle state to rolling state – and triggers the animation – then returns to the original idle state.
Can anybody give me some times or dm me with some help?
I think I need to set up Boolean variable for (is button pressed) – and set up the character blueprint so that the button press changes the Boolean flag, and triggers the Roll state. Upon completion of animation, it should then return back to idle – with new player positioning.
My first aim is to just get the button press – animation playing bits working. Then I will explore how to use speed and velocity to influence the player ‘launch’ upon the animation playing.
I’ve dug through quite a few videos and pieces of documentation, and I feel like I must be making a really basic mistake.
Any points are welcome.
Many thanks
- Mr Bubs
Hello I'm just wondering if there's any YouTube channels or video out there that have references of weapons not just firing them I'm talking about like a GoPro with reloading firing and all that sort of stuff for animation
The stuff on finding it's not showing the reload or they look away
How do I install ARTv1? Could some friendly soul send the plugin for Maya 2018 to me?
Hey guys
I'm using ARTv1 in Maya. And I have a problem with importing to editor.
Why is my animation broken? https://cdn.discordapp.com/attachments/357887842078162946/595664532236664842/unknown.png

what's the best way to fix elbows without using morph targets? I've got a driven key on an elbow joint that pulls out as the arm bends, but wondering if anyone knows any other solutions
Is anyone familiar with the fast path functionality in AnimInstances? All my variables are local to the derived blueprint, but never used in the event graph, and I still get a warning for all the nodes.
Ah nvm, needed to do a deep refresh of the project.
hey with weapons on UE4 does the whole weapon supposed to be grouped on blender or only the parts that supposed to be taken off are grouped on there own because when i want to make a animation for the whole gun it only makes it for 1 of the grouped parts not for all
@misty dagger https://www.youtube.com/watch?v=Q7JXMmy1VRI

In this tutorial I show how to install "Maya Animation Rigging Toolset" (ART) Into Maya. To have access to ART, you will first need the Epic Games Launcher, ...
well blender kind of glitched and exported these files XD
Can someone help me with my animation overlay ? NSFW: there is a flaccid penis in the picture ||https://i.imgur.com/033Kuin.gifv||
I don't know why the tip of the physics body (penis) is not playing along :/
please @ me if you can help !
if I just assign a standard value like this everything works fine but the physics body cannot be altered in real time ?
See: NSFW man at 0.5 scale as picture above naked ||https://i.imgur.com/RuY7jd9.png||

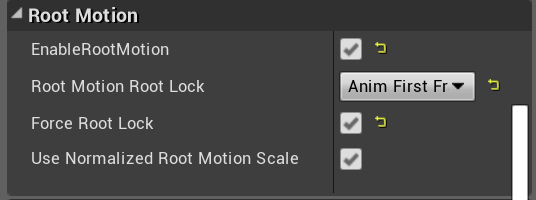
even simply scaling the mesh (Set actor scale 3D) is messing the physics body ? NSFW: naked man ||https://i.imgur.com/PHsBVRt.gifv||
@nocturne whale Yeah that's not 4.22
@misty dagger i did the same in 4.21. thought its the same for 4.22. since its a plugin
so i have to install 4.21 just to get a plugin for a third-party software?
1 sec i'll check if its there for 4.22
ARTv1 is only compatible up to 4.21
you can try to use https://www.jeremyernst.com/artv2 as alternative to using 4.21 and ARTv1
Jeremy Ernst
@nocturne whale no thanks. i dont think you understand my question
what is there not to understand you want ART plugin for maya...
exactly, and you talk about artv2 (which sucks) and "using 4.21"
it's a simple plugin for maya, it doesnt matter which unreal version you have
k
my question was if someone could send me the plugin so that i didnt have to install 4.21 just to get it
How do I install ARTv1?
@prime hemlock looks like your gun is slightly smaller in unreal engine
Hi all forgive me if I've posted in the wrong place.... i'm very new to this.
I've manage to get my Char mesh working correctly with movement animations with WADS keys however, im wanting the walk movement animation to work when clicking to move in topdown mode rather than sliding around the screen.
Could anyone by any chance please point me in the right direction ?
Might be the skeleton was imported with a wrong size
I’m using a custom rig with animations, and whenever I try to use a version that has working root motion UE4 takes a LOT longer to process anything involving it
It takes 5 times longer to import animations and uses up all my RAM to do so, the asset viewer for the animation is extremely sluggish
anyone figure why that is?
@eternal sigil A Video of the issue would be helpful
anyone know why my exported blender animation with animated bone scale would be twitching slightly in UE4 when I make it an additive animation?
it's such a small thing but it's driving me nuts and I can't find anything relevant about it anywhere 😬
video?
sure, one sec
small, small subtle twitch, but noticable when you get real close. only happens when animation is additive, and has bone scale animation
what are you adding to it
it's a breathing animation, so just adding it to the main pose
point is though, the additive animation shouldn't twitch when the animation starts scaling things (like the chest bone and the nostril bones). This happens in local and mesh space. When it's not additive theres no twitch
does it occur on loop, on just on start
it occurs any time I have a keyframe with scaling curves
like, curves that are different than the binding pose
yep, there are no spikes. in blender the curves look perfectly smooth
Hmmmmm. But wouldn't it show up in the non-additive version of the animation too if there was a spike/dip there? Anyways I will take another look at the curves. Thanks.
Just redid the animation differently and stopped seeing it. Not sure what was going on there, but I suspect it was probs a curve issue like you said. Appreciate the help!
👍
hey i got a small issue but i cant find out what it is when i single fire the gun it kicks back into the camera if i auto fire it its fine it stays still
@sick halo hi sorry here you go
if i change the game mode and use WADS to move the animations work fine.
how can you make a weapon animation but for example make a weapon reload animation but know how far the mag need to go for the hand to grab it anyway to preview the character reload animation at same time but in same window?
that's the issue i'm having because i don't know how exact all the weapon animations are because all of them are not in the exact location and rotation
How would you make an animation where two characters interact ? My guess is that I would make two animation assets, one for each character but how do you correctly position the characters once you play the animation in the engine ?
@orchid egret try doing the whole animation in blender or 3ds max so both animations will be in 1 animation
Wouldn't that be all messed up if I imported an fbx with two characters in it ? I'm already planning on doing the animations in a single scene but I thought about exporting each character's side of the animation separately, isn't that the recommended way to do ?
Have the Root-joint in the same position for each character in the animation - then you'll only have to align both characters to the same position. (Alt. more 'advanced' have a separate joint that isn't the root as an align-joint and use that as base)
ye or do his nerdy way of doing it lol joking XD
@tidal canyon Thanks, I can see this working. I'll do some tests
how do you set the length of animation time in UE4 anim editor?
never mind found it
@eternal sigil it appears you are not setting your variables in the animbp for direction, forward, and speed. Reference your WASD input bp to see where these variables are set and used by animbp blendspaces.
Hey guys. If I have animations for pistol and rifle but I do not have for shotgun (cannot find it on the store) is there any possibility to convert/create aimoffset/procedural/whatever animation for shotgun or will I have to animate in Maya myself?
@ivory parcel just copy the rifle one and pause the animation and set it to the start then move the arms and hands and fingers to the right position on the shotgun then click the key button then every time the hands and fingers go out to the wrong place just go to the time it just went off and pause it and then change the positions and click key and keep doing that until the hands and fingers are in the right place the whole time of the animation do this is UE4
@rugged tinsel That is what I though of doing but you just confirmed it. Do you know if there is an easier way to approach this issue? Also, if I have to do this animation in UE4 would it not be better of doing it in Maya? Just want to see your opinion in this matter. Thanks!
i use this idea and it seems to be going good so far its a quicker way instead of having to remake the animation and if you do it in maya it would be harder because in UE4 you have the mannequin and weapon already there and it is much easier to just click the key button and change it in timeline
I guess you are right. Thank you.
no problem hope it works out for you
I hope. Now, I have to find a tutorial that will help me with this. 😃
its easy trust me only problems i have is my gun offset to the hand etc is different in every animation which causes the gun to change position every time that animation activates
Ah, I see.
here for example when i single burst my gun it flicks back to my camera but if i auto it the gun is fine
i used unity a very long time ago so funny what i tried to do on it all i did was try to make the character walk but the collision on unity was sooo hard to understand so my character would tip over lol
then i moved over to UE4 and omg so much better
Yeah, they added rigidbody constrains now so it does not happen.
hehe
you can see here this is a smg animation but all i did was change the hands at the start then added a key frame
yes
Also, what about FPS animations that do not have full body...is it possible to intergrade that so it works with TPS?
i guess if you somehow put the arms with the body like modify the body on maya then put the arms with it or maybe there is another way
but if you want body movement with the shotgun you have to do it again so the body moves too
I know is Star Citizen they animated all the parts of the body individually.
I guess you are right. Will try your method.
wow i didnt think the ue4 fbx import pipeline could get more messed up but tehy managed to do it
bConvertScene applies differently to skeletalmeshes and animations (from the same fbx file)
when importing a skeletalmesh (and by consequence making a Skeleton out of it) bConvertScene will actually convert any joint matrixes to the new orientation (Transform Vertex to Absolute is required to be checked if you want the vertices to actually match the joints now). however when importing animations, the scene conversion is done just by setting the transform on the root node (this is how skeletalmeshes were done before, before Transform Vertex To Absolute was required). but this means that any retargeting or anything using the animations is now wrong wrt the skeleton
Anyone know if there's a node in animation blueprint that can choose one animation based on the highest alpha? So I have 14 input alphas, I'm using blend multi, and it's okay, but it's blending all of them, when my desired behaviour is it sees what alpha is the highest and uses only that one. I suppose I could write an algorithm to determine highest myself, but I'd like to see if there's a way to do this anyway
i documented my problem here https://answers.unrealengine.com/questions/907587/fbx-skeletalmesh-reference-pose-is-imported-differ.html
Okay
So maybe someone can help me, i'm setting up the ragdoll physics constraints for a physics asset of a skeletal mesh
for the life of me I can't actually constrain the rotation of a joint in a controlled manner
I tried rotating the constraint and it dosen't seem to effect anything
if I set a leg to bend a certain amount it always wants to bend forward and backwards, regardless of the orientation of the constraint marker
Once you duplicate and retarget to a different skeleton an animation asset, you are free to delete the original, right?
Hi all, can someone point me to a tutorial that covers rigging in UE4? Things like footrigs and terrainfollowing... Thanks in advance
@plain ledge well if your character isn't rigged you have to use a 3rd party program blender,3ds max,maya ETC
@rugged tinsel I was thinking about importing a skeleton from my DCC software and setup the rigging in UE4. I have seen other do it, so I was wondering if I can learn it too.
if your character has no bones on it meaning no rig you have to do it in another program if it has bones all around it connecting to the right parts and if the bones are the same as another rig then you can quickly for example rig a animation onto a different rig
all of the stuff you see on the left you cannot do in UE4
That part wont be the problem. The part I need to find info on is setting up IK and BPs for footrigs and such..
the foot IK has to be set in another program i think because i'm sure 3ds max has a IK option on it
Uhm, I don't think it works that way.... Rigging from any other DCC-app doesn't get imported into UE4...
what is DCC?
because anything done in blender,3ds max and maya does get imported into UE4
in-engine IK needs to be set up in engine
you cannot export a character that automatically reacts to the terrain / bumps and other similar obstacles from a package
you'll have to set up some sort of in engine IK, and for this process there was a wiki page
which I'm trying to google so I can link it to you BAROBA 😃
wait so you want to make the characters legs and feet ETC to move with the terrain?
DCC is the grab-all name for all Digital Content Creations applications: Maya, Modo, Max, Blender, C4D and others
https://docs.unrealengine.com/en-US/Engine/Animation/IKSetups/index.html + https://docs.unrealengine.com/en-US/Engine/Animation/IKSetups/index.html#footplacementiksetup Should be it @plain ledge , the tutorial may be outdated however
although re reading your question
thanks @molten lodge , I will read it with interest 😃
this doesn't tell you how your rig should be set up beforehand in your package
For terrainfollowing it doesn't really matter
I don't remember if there's any catches or "gotcha"s to it... it's been a while
Good luck 😄
Thanks 😃 Seems old, I hope that the same nodes are still working 😃
if not the editor will say its old and tell you to use new node and give you a name
I didn't know that, very handy
https://docs.unrealengine.com/en-US/Engine/Animation/ControlRig/index.html I think that Controlrig is a more modern version?
Control Rigs in Unreal Engine 4 is a scriptable rigging system that is based on Blueprint and is mainly designed for controlling properties to drive animation.
Control Rig is different from animation blueprints (but is a set of things you would use from inside them)
and is available as an early access plugin only
you want to do runtime IK stuff in anim BPs
the use case they showed for Control Rig is migrating animations when they added a bone in the middle of 2 other bones and that stuff needed "scripted retargeting"
you can watch the youtube videos on UE4 channel about control rig if you want, its a brand new feature
Control Rig is a highly flexible tool based on Blueprint that can be used to drive animation inside UE4. In this Unreal Engine Learning Theater session by Ep...
@stoic thistle Thanks 😃 Will look at it
however you probably want to know all you can about normal AnimBP's first
Probably....
Foot IK is commonly the first IK people do in ANimBPs
https://www.youtube.com/watch?v=ffuq5k-j0AY animBP basics here

Epic Games has released 20 character assets from Paragon and now we want to show you how to get started with those assets! Shinbi's animation Blueprints are ...
That one was on my playlist to watch 😃 Thanks for giving a bit more info about it
is there any way to make a gun reload animation without having to do both the weapon on its own reloading and the character reloading the gun i just want to be able to use the character reloading animation because when i try to use both the weapon reloading the mag of the gun ins't in the hands of the character i want to be able to use just the character reloading animation so the mag is always in his hands
do you have a mag bone
you can define an IK node in your BP to attach the hand to your mag, and then for the intensity have it be driven by a curve in your reload anim
oh so the animation of just the gun reloading the mag of it will attach it to the character reloading animation
no, the opposite
since the mag is easier to animate, just have it follow the hand's animation
oh ok thanks
why do i even have to have 2 animations just to reload
you dont
most people do it
you can probably use ControlRig for this lol
ye i don't want to use that it seems like way to much work just to reload a weapon
you either generate the gun's reload animation