#animation
1 messages · Page 112 of 1
getting some tendonitis here guys
and it crashed
ive really gotta report this bug...
happens all the time, trying to make animations from new frames...

Have you ever tried to instantiate thousands of animated skinned meshes in a Unity Scene? Even with GPU Skinning enabled (quite obscure feature in Unity) and...
is this possible in ue4 ?
without modifying source code ??
seems like no matter what I do, play rate does not change unless i Loop the animation?
even if i go into the animation itself in persona and change the global play rate, nothing changes
which asset type does an aim offset accept? (I'm getting an invalid additive animation type error when I'm trying to drag an animation sequence in)
Assertion failed: (Index >= 0) & (Index < ArrayNum) [File:D:\Build++UE4\Sync\Engine\Source\Runtime\Core\Public\Containers/Array.h] [Line: 611] Array index out of bounds: 523 from an array of size 101
UE4Editor_Core!FDebug::AssertFailed() [d:\build++ue4\sync\engine\source\runtime\core\private\misc\assertionmacros.cpp:425]
UE4Editor_AnimGraphRuntime!FCSPose<FCompactPose>::CalculateComponentSpaceTransform() [d:\build++ue4\sync\engine\source\runtime\engine\public\bonepose.h:594]
UE4Editor_AnimGraphRuntime!FCSPose<FCompactPose>::GetComponentSpaceTransform() [d:\build++ue4\sync\engine\source\runtime\engine\public\bonepose.h:568]
UE4Editor_AnimGraphRuntime!FAnimNode_ModifyBone::EvaluateSkeletalControl_AnyThread() [d:\build++ue4\sync\engine\source\runtime\animgraphruntime\private\bonecontrollers\animnode_modifybone.cpp:48]
UE4Editor_AnimGraphRuntime!FAnimNode_SkeletalControlBase::EvaluateComponentSpace_AnyThread()
I'm getting fatal errors and I think it's due to an anim graph...can anyone point me in a direction on how to start debugging this?
im loosing my mind, retargeting animations + montage when applied to new character i get the error playing montage for the wrong skeleton, i look at the montage its skeleton is correct what am i doing wrong 😦
Can someone explain these animation artefact
which is shown is this video

And happens under these circumstances:
- certain paragon characters
- when camera is zoomed out
- FX is attached to a finger bone (in this particular case index_03_r) , the problem cannot be seen if FX is attached to a hand bone
It seems that's it somehow connected with the size of the character on screen. See how it can be reproduced with a smaller character when i just resize the window:

How to convert FP animations into TP animations? I've tried re-importing them using TP skeleton. Some of them looks awkward.
@ripe yew That doesn't really make sense. You typically have two different skeletons for your first person mesh and your third person mesh, the first person consisting of typically just the arms. You should design your first person animation separately from your third persons.
Guys how to add a weapon equipping animation
and a recoil kickback animation?
(Tps game)
@vague ether Create montages for your equip/recoil and play those.
Right click on your animation in the editor, go up to Create, and select Create Montage @vague ether
What of it?
anyone know a good way to bind oculus motion controller trigger data to an anim blend space?
or at least get it to interpolate on button presses instead of snapping between poses?
(I'm not sure if this fits under animation, VR, or Blueprints sorry)
how to procedural animate?
Hey foks! I'm an audio designer tagging a few stingers into the Sequencer and I'm curious to know if there's an easy way to insert a chunk of time at the edit cursor. I'm on 4.18. If there isn't, is there much of a risk to rolling back the green "Start" marker to, say, -1 seconds? I'm trying to add a pre-roll to the sequence. Sorry if this easily google-able, but the reference materials didn't have any such feature listed.
Hey guys is there a Maya rig floating around for default UE4 skele?
like just the skeleton, or a full on rig
I'm trying to use blend by bool for animations, but when the boolean changes the corresponding animation plays from start? how do I get them to blend, or just finish playing the first animation
How important is it that a character Skeleton is 100% symmetrical.
I mean in a typical, symmetrical humanoid character
The bones seem to all be symmetrical. But the helpers arent for some reason.
You can see in this orthographic image from the side.
Bones are 100% symmetrical
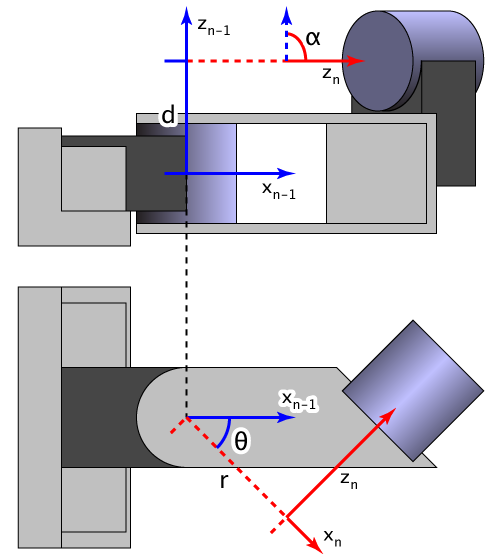
how would you get a tank to aim in a specific direction? I'm an artist but the programmer's first plan was to just rotate the different parts in the direction they need to be in but considering the base of the gun is at an angle it complicates things: https://i.imgur.com/NnI7XhN.png
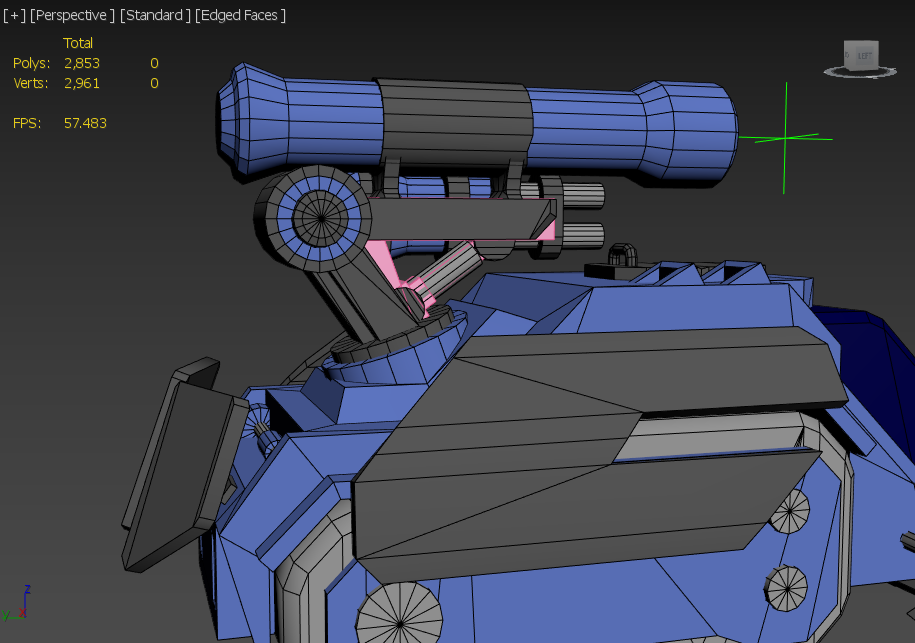
I'm an absolute noob when it comes to rigging but I got a simple FK rig on the arm right now. I tried to do a lookat constraint but stopped when I realised you can probably not export those to unreal
@leaden osprey
https://i.imgur.com/01i2Yyg.png
https://i.imgur.com/0zpln8b.png
https://i.imgur.com/wfKQofU.png
https://i.imgur.com/aEZzC3R.gif
https://i.imgur.com/zvNtd1h.gif
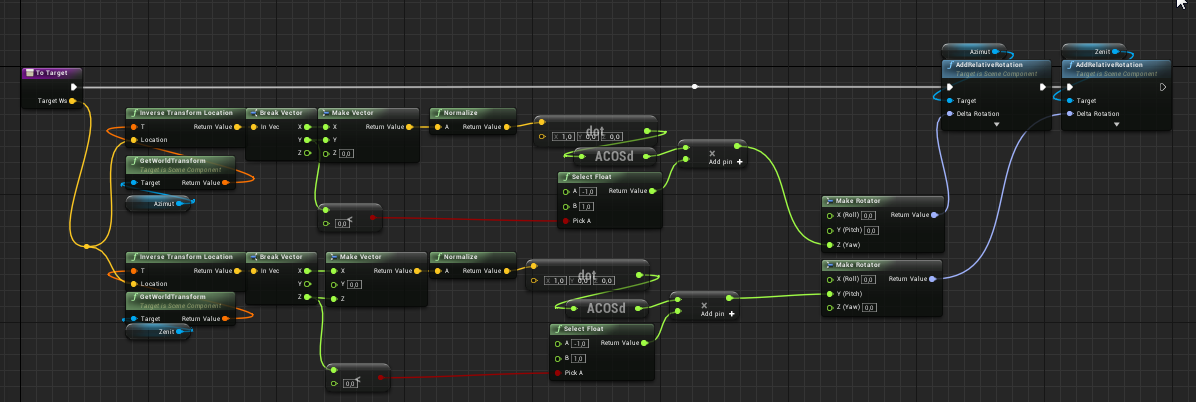
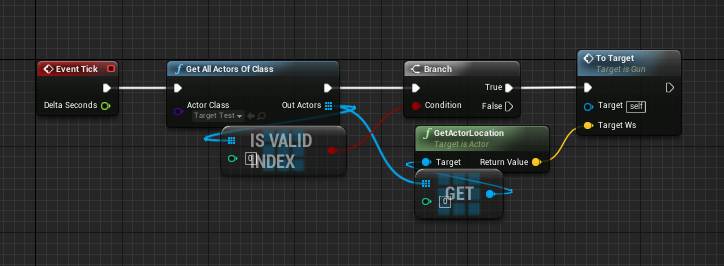
This is just an example of how to calculate the necessary rotation.
will it be bones or geometry as in the example, it is already your choice.


Why would my animation not be valid for my 1D BlendSpace?? o.O
I have made blendspaces before, and was sure I just droped the animations in the blend space. But it did not work, looking at a tutorial I saw that was just what they did. And now I saw my animation was not valid. <.<*
Did you see my ping to you from I think last week? I can send you some screenshots to show you what I meant
so i think the issue im having aswell is im trying to blend upper anim into lower anim
which is causing him to hold the gun wrong
Alright, let's see what you have going on
so thats not helping my situation 😄
i can code anything, this animation stuff is hard
Can you provide some pictures of your anim graph?

bit of a mess just trying stuff
so base pose, he just locos, im trying to blend in upperbody anim for holding guns etc
Hang on opening my project

Alright, so nothing that I can see is immediately wrong with your anim graph
What's it look like with upper body blending?

Looks good so far
So did you try and implement the IK system I was talking about? If so how far did you get?

Also a tip: You can use multi-bone blending to distribute bone blends across multiple locations along the spine, in our game we use 3 spinal blend points.

That's an issue with your attachment process
yeah i think thats where i need help
so i attach it to a socket on the player skeleton
Alright, well that isn't related to IK but what you want to do is have an attachment offset transform (just loc + rot) in each weapon class that defines the hand attachment offset
right but let me align the socket again
You then attach the weapon to the hand socket on the player, then move it in local space by the offset
cause i messed it up, and ill show you the IK problem im having
Alright

So I can clearly see some bone offset is happening there, so let's see how you're applying IK


Also, you want Copy Target Rotation for the rotation source

Also we use upperarm_l as the root bone, so changing that might help you as well
this is what happens when i enable bonespace
Yep so it's just a matter of how you're converting coordinate space
Get the fabrik node parameters straight then we'll work towards the socket calculation
The hand

For some reason I have mine set to the right hand, can't remember why that is
thats how its set now
Set yours to hand_r
ok made no difference
Oh right, it translates relative to the hand
buts hand_r now
So yea it should be the right hand
Ok so that looks good, let's see where you're calculating the transform

Yea that's 0,0
you can see his targeting right hand
Now you need to offset relative to that right hand in bone space

What comes before the cast, is this on update animation?
Hey unreal slackers, just wanted to vet a question with y'all. I'm trying to use the "Transform Bone" feature in anim blueprints to replace the rotation of a bone to look at the player. However, I'd like that look at to clamp at about 70 degrees to avoid Exorcist moments.
This math works well until the player goes to the right of the character. It'll then sort of flip around to the other direction like a gimbal lock. Anyone see something dumb I'm doing with the math here
i feel like world rotations in unreal may be expressed as -180 to 180
I remember I had issues with socket spaces so I just manually adjusted the numbers in the weapon class for the grip offset, but it should work with a socket.
Try a static transform and see if that works for you
yeah thats what i might end up doing, storing it on each weapon
ill try it now
ill just make a quick non cpp variable to test
Ping me when you post again, going to be away for a minute
Oh just a side note: I remember why I never got sockets to work
It's because you can't (or atleast I couldn't find a reasonable way) to calculate the bone space transform of the socket in the mesh's bone space
When you get the socket transform in bone space, you get it in the weapon's bone space
And the issue in converting from the weapon bone space to the mesh bone space is this fun little thing called socket transform tick delay
a static transform tho would be fine
per weapon
wonder if i can make a little gizmo to help set the transform up on it
@river meteor

Unless you override the update rate of the transform to properly update every frame
Nice!

Umm oh you're dealing with wrist offset, that's fun
So damn I did this ages ago I can't remember off the top of my head how I solved that
:/
But what you're seeing is this fabrik solver is moving you hand by the the wrist bone location, so you have to account for that and offset your target transform location by the distance from the palm to the wrist
I think I used a socket on the palm and calculated the offset of palm - wrist

Yea
so i subtract palm from wrist and feed that in?
Uhh now I'm thinking that was how I did it during the first iteration, but scrapped that due to lazy socket updating
:/
this is quite tough
like it holds the gun fine till i aim could i not fabrik from the palm?
Yea, for now just have two variables for each position
There is no bone in the palm
You could make a new bone in your skeleton for that...
no cause it has to be a bone
But it can't be a virtual bone! I remember if you set the bone target to a virtual bone it crashes the engine
right so there goes that idea
seems hacky using two diff ik variables for aiming/not aiming
but i suppose its the only way
Not necessarily, you could modify your skeleton to have a palm bone 🤔
I actually never thought about that at the time
Yea it's pretty hacky
right but i dunno how to do that, and i dont have maya or anything
blender might do it but no idea how to add a bone
export the mannequin, import it into blender, rename the skeleton to "Armature" (to avoid the extra root bone bug on reimport) add your new bone, parent it wherever you want and import the new skeleton into ue4
speaking about twist bugs, just found this one today while retargeting and posted to the answerhub https://answers.unrealengine.com/questions/857653/view.html
😯
I'm having a bug with my state machine, but for whatever reason when I enable showdebug animation it goes away. I can replicate the bug perfectly but the moment I enable that command it goes away and I can't replicate it anymore. any idea why this happens?
hey
i want to sync an animation to a position, so at position 0 the animation is at the start frame and at position 1 the animation is at the end frame. any idea on how to do this?
dupe the animation and remove frames 0 to end -1
oh you mean like a montage section?
maybe this is the right place to ask
does anyone know how would i be able to use FABRIK and use hand ik with shoot animations
i actually have the ik in place, but when i play the shooting animation only the ik doesnt follow
You can. Kaos and I just had a large discussion and breakdown of this, so if you scroll up a bit you'll see the fundamental concepts of achieving what you want. @edgy shale
The concept in your case is to use bone space offsets relative to your hand
thanks a lot!
When re-importing an animation, is there a way to automatically update any montages that are associated with this animation to reflect a new length of the underlying animation in the animation segment?
Can't seem to find any reference to such a feature anywhere, and right now it means when animators update their anims they (or we) will have to go in and update any montages, which we'll need to do anyway most of the time to update notifies, but it would be nice not to have to update the end time, especially for when animators just want to test a new anim.
Also, unrelated - does anyone know of a middleware or solution which might allow us to have animators swap out anims in a cooked build? (allowing them to update anims without access to the source)
I'm imagining something like the live link pose node, except for allowing it to work on the binary content and in addition with montages 😄
@cloud lodge i basically want to sync the animation to a grid, the animation frame needs to be sinced between 0 and 1 depending on where the actor is in the grid.....i have figured out how to do this with setposition, but im wondering if this will work with blend spaces too
I know this may sound dumb but i recently got into blender animations and i dont know how to drag the camera around. It always just moves the charicter.
@steady delta Middle click and drag to rotate around focused. Shift + Middle click and drag to pan. Mouse wheel to zoom or hold ctrl + middle mouse for fine adjustments in zoom
. (Del) on your numpad to focus selected.
Also
https://docs.blender.org/manual/en/latest/editors/3dview/navigate/navigation.html
RTFM?
@floral horizon thank you
OOF
been while sincei messed with animations in engine
trying to recall what notes i use to apply a blend pose by bool into something to only affect sy,, spine3 and up
blend per bone @simple karma
thats what i thought - tho i used an animation that should add a up to the right arm, like recoil and instead he moved its arm down lik dragging a sword behind him :lol:
i'll figure it out though ive been at it too long time to play some games, thanks 😃
ok i do have a question now
i'm trying to modify a 1 frame animation
i add key adjust the bone, click apply
eventually after moving a few things around
it reverts everything when hit key
oh wait, my poor english, you hit key then edit everything for the single frme and hit apply
Getting there... i know ezpz amspace right
The original rigger of this model was eh and retarged to the ue4 guy looked like his shoulders were inside his chest
they start to leave some verts behind in animations that are rotating the mesh too much making it skewed and weird
Im trying to retarget the animations from UE4_Mannequin_Skeleton in the Animation Starter Pack from the market to the skeleton of a Paragon character using this tutorial https://docs.unrealengine.com/en-us/Engine/Animation/RetargetingDifferentSkeletons . I found out that the skeleton of the paragon character has got Paragon_Proto_Retarget set as a rig. Can this already made rig help me skip some steps from the tutorial?
don't skip steps learn everything it'll payoff later
Hey guys. I try to change the Animationspeed (Scale Rate) in the Roll_Montage since last Week. (Maybe it isn't even possible to do it, i dont know anymore :D)
It should be be possible to adjustable the Speed in all Montages with Curves "Rate Scale Curve" dynamically if they have it, but I dont know where to exchange the Curve-Value with the Scale Rate of the Montage.
I can move and attack fine using this
As this includes a blendspace (red line)
But after adding montages to it and trying to work with that, I can't animate my movement while attacking anymore
how is your bones setup?
need help with retargeting

but it ends up looking like this

supposed to be like: https://gyazo.com/ba74017ef8ef61162f23e7b850160ed5

sorted it i hope :p
How can I animate this cone to play an animation for itself? To go up and down for example
write a vertex shader
its easy just a sec
like this @candid kiln
period is the speed and the min max is the minimum maximum height in this example it goes up and down to 800 and -800 of current position
Oh it's that simple?
I thought I had to code it lol
Alright thanks a lot @spiral carbon
writing a normal shader in unreal 4 is clicking nodes together 😄
u only have to code if u wanna do some fancy thing that is not yet supported by nodes
pleased to help btw

it uses sine to calculate the position it means it will be a sine interpolation u can use linear interpolation too instead of that sine node
if u want linear movement but for that specific thing u need it for, like floating that marker, i think sinus seems the most natural. and since it is just a shader only the gpu will do the work which means it wont hurt cpu performance like a skeletal one
I legit have no idea what you just said
soz i meant sine*
in eng they use sine instead of sinus 😄
it means it will do a wave like movement
like this

this is eg a linear solution
this does not ease in/out at the minimim maximum positions like the sine one
but the sine is better for what u need it 😉
I mean you can imagine what I'd want, right?
yeah
I'll test out the first one in a moment
like a floating quest marker
Yeah exactly
sine best for that 😄
Sure thing
btw how about ur montage problem?
how come?
I legit had no clue how to fix it
its relatively ez
Spent the entire night trying to figure it out
whats the problem with multiple?
aha

Let's see
u need to break it in like the spine
u sure u need the blend depth to be one?
just a sec let me test it
Sure ^^
Latest
I'll redo that in a bit and try out what you're doing atm then
doing this in char bp and it plays the montage each 5 secs
while walking in blend space
the lower body walks upper plays fine
Wtf smh
BP
And I'm in-game atm
Trying out the marker thing now
What's this? @spiral carbon
u leave everything as it is just plug the thing i made into the world position offset

this one
Gotcha gotcha
I'll go for that
the linear before had some redundant nodes so i removed them D:
is it attached to ur character?
Yeah

oh
Does it have to do with the float3?
does anyone know how to turn off the damn compiling shaders every time i start my game????
silly me
XD
Yeah
for x and y u just use 0 0
o
just use the sine output

the first linear was good i deleted it xD
the second was not
but no matter tho
u get the idea
i deleted both pics XD
What would the linear do different though?
Yeah
the linear just do it on a constant speed

yeah sine is better for hovering
now i made a character which have a hovering sphere above its head and it walk constantly and hits the air every 5 secs XD
ill be gone i think
uw
I'll remake the montage thing in a bit and apply what you adviced
ue4 is best game ever xD
game
game about making games Xd
bless Epic
they gave us infinite possibilities with ue4
yeah dont faint of hunger 😁
@copper dawn hi could you help me please? i saw u have a video about vertex animations, do u happen to know why this is happening? i set /did everything as the tool said.
make sure you have accurate uv's enabled, make sure textures are set up correctly, and that you disable the merge vertex whateveritsnameis-idonthaveu4open option on import
i did with textures and high precision uvs
but i don't remember merge things
oof
i did not apply changes in mesh, thx luos
works?
need to disable tangent space in the material
though, sometimes it actually works better by keeping them tangent, and not using the normal texture created for the vert animation entirely
#justUE4things
XD
thx for the help
now i just have to tweak the material function a bit
ill figure it out i hope 😄
to be able to control which range of frames to paly
so i can upload all animations to the gpu and choose what to play
done, seems good
i think you are already playing it then it starts it again so it interrupts the already playing one
how can I make a pawn teleport while in animation played through a montage? I try making the actor that plays the animation move smoothly to one point using this bp but it won't work(the location of the actor moves a bit and then it resets itself)
does that montage have root motion by chance?
maybe because of that
and you don't set it to handle root motion correctly
what is root motion?
when the root bone of the character (start of the bone hierarchy) moves
the animation i have imported should be moving but when I preview it it seems like its static
Is there any way I can export morph target animation from an animation sequence?
how can i only blend a few bones and not all children?
only want to blend spine 1 to 3
not the clavicles and its children
@cloud lodge That's what blend depth is for.
so a blend depth of 2 will do 1 - 3?
1.0 blends all children, while reducing (or increasing? I can't remember off the top of my head) restricts how many children it will blend down to
I don't see any docs for it, but I think reducing the value is what you want.
Look at line 1111 in Engine/Source/Runtime/Engine/Private/Animation/AnimationRuntime.cpp - this is the only place it seems to actually be used apart from its declaration in the struct.```Are you blending an upper body anim into the waist in your gif?
the base anim is the holding rifle, and im blending another full body anim which is the locomotion
just trying to make it look more natural
the top half just looks solid when running
So the locomotion anim should be the base, where you then blend the rifle animation on top

If whatever that boolean blend spits out is your rifle animation layer, yes
okay
So in that case you'd probably want to blend on the spine bone upwards with a full depth
If the animation is a rough transition from legs -> spine, do a distributed spinal blend

👍
That will override the entire locomotion with your rifle pose from the spine upwards
but like i said the top half just seems solid
and when he runs there is should wobble
That just means your rifle layer is solid
it is, but if i use there jog rifle anims
its out of sync with legs and looks horrid
That's what sync groups are for
which is why i was trying to blend the loco into it
o_0
i tried sync groups and ended up crashing UE4 last time
Honestly I have no idea how to properly use them because I never needed them, but in your case that sounds like what you want.
If you don't want to use them, then what you can do is break the loco -> rifle blend into multiple blend stages, starting off with low weights and approaching 1.0 as you reach the clavicles
That way you can mix the loco chest movements with the rifle layer chest movements while still maintaining full rifle layer arms
But I mean if you already have full anim sets for every weapon + locomotion, you're going to get the best results out of using those


So that's blending loco layer + rifle layer, where the rifle layer is its own locomotion state machine?
Sync groups aren't magic, you have to do the whole sync flags procedure
it does look better tho
For example, you'd place a sync marker on each foot down or something like that
even without doing the flags
Yea, but you can do better
yeah sync markers in the animations?
yeah
@river meteor not sure what you mean byu If you don't want to use them, then what you can do is break the loco -> rifle blend into multiple blend stages, starting off with low weights and approaching 1.0 as you reach the clavicles
I meant having three different bone blends, one for each spine bone (ex spine1, spine2, spine3). The weight for spine1 would be something small, like 20%, so it would be mostly loco layer + some influence from the rifle layer, and as you approach spine3 or the clavicles etc, the weight would climb and ultimately reach 100%, where the rifle layer has full control.
That way you get a distributed blend and not a harsh visible artifact at the blend point
oh right, so multiple layered blend nodes?
Yep
ok
where the blend pose will always be the loco
i mean the rifle
and base pose always loco?
oh
ffs im a idiot
For the first one, not the rest. You have to pipe the output of one into the other otherwise you lose the blended data
i feed the first blend into the base on the second blend etc
Yep
Yw

manage to achieve this so far
but thinking i can blend it some more
getting some weird ik issue aswell

Is this the right place to ask about exporting animation out of UE4? I'm trying to export a morph targets animation to an FBX and having no luck.
if you can export the individual targets then you can reconstruct it, there should be a way. i have no morph anim at hand, except vertex ones, but those are already in the proper form
does it matter that the ik bones in my skeleton are placed before the pelvis in terms of the order connected to the root?
In Epic's examples the IK bones are always under the main hierarchy, but maybe it doesn't matter?
I totally need a tutor in blender or maya to get animations from my mocap skeleton's animation data cleaned up, frames reduced to a less realistic state, and then retarget the animation to the unreal epic skeleton.
OK I'll try that then
This is a really good, informative lecture by the Lead Technical Animator for Fortnite breaking down in detail how they use AnimBPs for all of their rigging and animations: https://www.youtube.com/watch?v=YjQRBHvltOk
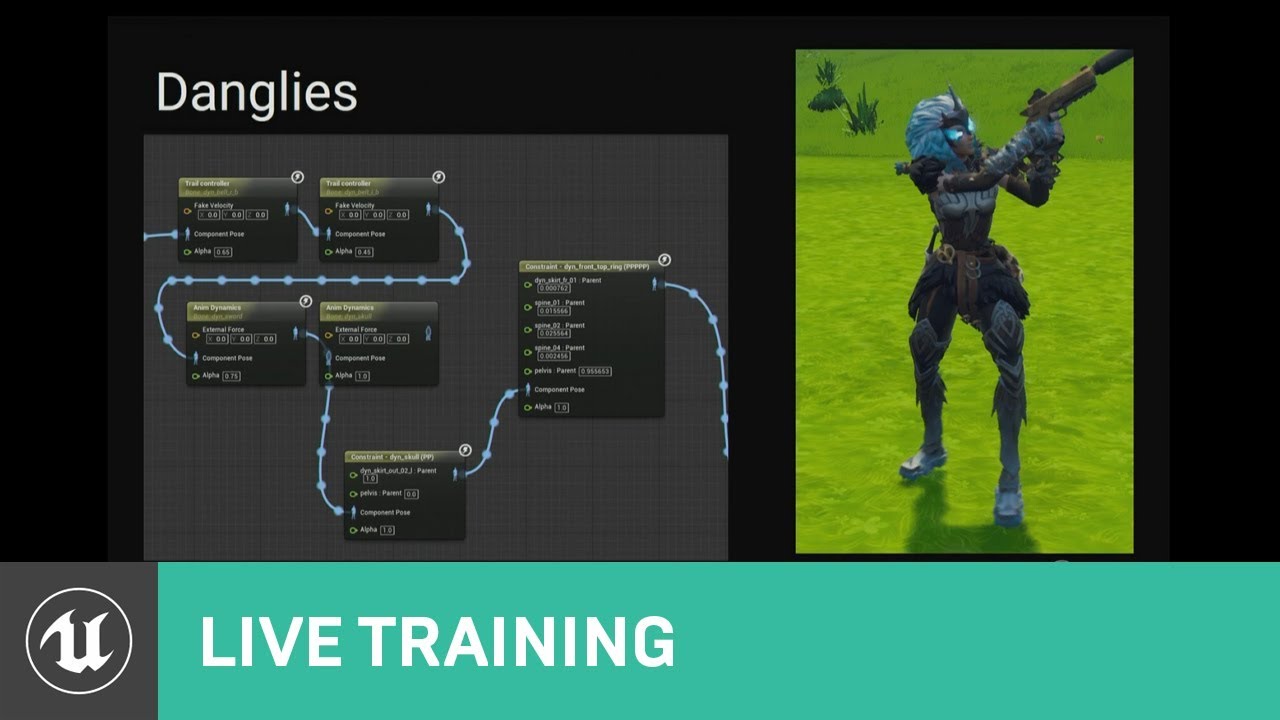
This talk covers Fortnite’s use of animation Blueprints including the use of Blueprints for gluing together character parts after retargeting, dynamic soluti...
Hey <@&213101288538374145> can we get that above thing pinned here? It's really really good.
thank you for dropping that gem, im stuck at animation and really needed this lmao
It's a frame from an unfinished animation I made for a game
i have setup a walking blend space and had it working for a while. for some reason today it decided to stop working. whenever it goes into the no movement pose, the character shrinks into nothing. any ideas?
i have gone into the blend space, removed and added the animations. then it says "animation should be additive"
so i went through and changed them to be additive and it looks like it works in the blend space. but for some reason that doesn't fix it in the actual game world
ah, now he shrinks into nothing when i start moving at all
anyone getting corruption problems after updating to the 4.21 version of the ARTV.1 tool?
The plugin suddenly can't go into the animation toolset
Hi folks. I'm using artv1. Is it possible to rig & skin the artv1 joints to another mesh such as a cloth robe?
Ok, you can, just figured out how. Another question: does anyone know how to invert the skin paint weighting value. Kind of like how in photoshop you can hit 'x' to toggle from, black -> white and back again
what are good places to find animations for quadrapeds and other creatures?
Why does changing one animation effects the other anims?
Any idea? I was trying to adjust the arm in one anim. Then I found out the all the other anims arms are changing too.
Are you editing this in unreal or another program
unreal
Are all your animations made this way?
ofcourse not
I'm trying to reuse some existing anims. For example, I want to alter crouched rifle anims for bow anim. All I have to change the arms a little/
Alright, check the two most obvious ones: your additive animation and the base pose
I'm modifying individual anim. Not the ones being used in blendspaces.
if i would attach this compass to the hand what is it called to make the golden ring simulate physics?
is it done via clothing sumulation?
or rig it and do a physical animation ?
rig and add a rigid body node
thats what i was searching for Thank you @frigid drum
Hi Guys, i'm with problem with Root Motion. The translate i did putting the translation of hips in the Root bone, but the rotation is impossible because the Quaternion rotation...Please some light guys
hey guys, can anyone help w a simple question? I have an animation open and I'm trying to put an Anim Notify on it, but the Anim Blueprint associated with the Animation isn't the one I'm using on my character. How can I reassign the default Anim Blueprint, or how can I access the Anim Notify from a different Anim Blueprint? Thanks in advance..
It's not even showing up when I uncheck Context Sensitive
oooh is it bound to skeleton?
@torpid lantern you can use an interface to send this message for all listening. Your BP will listen that
yeah I just want to use the Anim Notify like normal
even if it's a different animation blueprint, different skeleton... for some reason I'm not getting my Anim Notify to show up
it's been a minute, am I forgetting a crucial step other than adding the notifty and trying to access it on the anim bp?
(even if I have to use a different bp/skeleton for each different character I mean)
If its another ABP you will not have this option. The event will be able to show only in the BP that is playing.
right but it's not showing up even if I try the assigned anim bp
like, this wolf howl animation I have is associated with this wolf skeleton and wolf ABP... I added a custom Anim Notify to it, and I can't access it on the wolf ABP??
Ok , anim notify in Animation Montage will have a Pin that trigger this event
it has to be on a montage?
Yes! For Anim Notify
oh really?
I'm pretty sure I've used them on normal animations
yeah for certain
so that's not it :/
o wtf
I restarted editor a few times already
but now it wants to work 😂
:smh: thanks for your help anyway @neon falcon - wish I knew more about quaternion rotations
Yeah? its worked? Uow
I didnt know that! Great.
Root motion man, this is a hell on the Earth
😛
Goal: spawn another bp character using same skeletal mesh with current bp_char mesh pose
Context: running as one character jumps and change into another and have that logic take over or explode For example.
Q: how could I save the pose from the character bp to pass to anspawning actor to assume the pose? All the animistsnce stuff I found seems to live in animation bp
Another context would be spawning a dummy ghost character that stands in place where you were in the last animation frame. Which would be useful if say you were a character that could ghost leave body behind and appear elsewhere
@wheat badge Moving here since it is more relevant here
So this works, but it is really hacky
            for (int32 i = 1; i < 1000; i++) {
                GetMesh()->TickPose(i, false);
            }
            GetMesh()->RefreshBoneTransforms();
In case others have any ideas: I have a mesh that is purposely not ticking on the dedicated server (for optimization reasons).
I am trying to get a bones animated position on the server when dropping weapons, so I can drop them from the correct player hand location.
So I am trying to force a pose refresh
But there is some kind of smoothing/transitioning or something that is causing me to have to call TickPose multiple times to get the correct location
@rocky brook A little late, but you should be sending the world delta time not some random number. There must be some interpolation time somewhere, I'll see if I can find it
I tried this at first, with the delta time
GetMesh()->TickPose(GetWorld()->GetDeltaSeconds(), false);
GetMesh()->RefreshBoneTransforms();
Yea I saw that was only getting you partially there
But that didn't work unless I kept dropping the weapon over and over again
bool bDoInterpolation;```Which is why I threw it in a loop. The 1000 is overkill, iterating something like 20 times works
Ohhh look at that
Try turning that off
It's inside struct FAnimationEvaluationContext, not sure how that connects to the anim though
hmm that is interesting, I wonder how I update that
MySkelMesh->AnimEvaluationContext.bDoInterpolation
Ah it's private wait
PostAnimEvaluation()
There
Build a FAnimationEvaluationContext before tick that has evaluation to true and interpolation to false, then call PostAnimEvaluation(MyNewContext), then tick it
Yea probably, I would imagine there's stuff in there you'd want
hm not sure how to do that since it's private
Hmm you'd have to make a child class of USkeletalMeshComponent and expose a GetEvalContext(). I guess just try it with building you own, make sure to pass in the UAnimInstance* and USkeletalMesh*
Wait
okay
AnimEvaluationContext.bDoInterpolation = bDoEvaluationRateOptimization && !bInvalidCachedBones && AnimUpdateRateParams->ShouldInterpolateSkippedFrames() && CurrentAnimCurveUIDFinder != nullptr;
            FAnimationEvaluationContext AnimEval;
            AnimEval.AnimInstance = GetMesh()->GetAnimInstance();
            AnimEval.SkeletalMesh = GetMesh();
            AnimEval.bDoEvaluation = true;
            AnimEval.bDoInterpolation = false;
            GetMesh()->PostAnimEvaluation(AnimEval);

            GetMesh()->TickPose(GetWorld()->GetDeltaSeconds(), false);
            GetMesh()->RefreshBoneTransforms();
ah okay I'll remove the tickpose then
Well the issue is bDoInterpolation is set inside Refresh
yeah 😦
Maybe... you post the context and tick but don't refresh the bones?
In refreshbones
// We bypass TickPose() and call TickAnimation directly, so URO doesn't intercept us.
TickAnimation(0.f, false);
hmm yeah I saw that line too
There's nothing to do with interpolation in there, maybe a call to just TickAnimation will work
with deltatime?
okay I can try that
I tried doing only GetMesh()->TickAnimation(GetWorld()->GetDeltaSeconds(), false); without refresh bones
and it doesn't work at all
not even when dropping and picking up over and over again
Ok so we're missing something between TickPose and TickAnimation
TickAnimation looks like it just handles the actual anim graph updating
What happens if you run TickPose in that for loop, but without the refresh bones at the end?
Ok so scrap that, I think forcing bDoInterpolation in RefreshBoneTransforms is the way to go.
okay I can't remember if I tested this so doing that now
            FAnimationEvaluationContext AnimEval;
            AnimEval.AnimInstance = GetMesh()->GetAnimInstance();
            AnimEval.SkeletalMesh = GetMesh();
            AnimEval.bDoEvaluation = true;
            AnimEval.bDoInterpolation = false;
            GetMesh()->PostAnimEvaluation(AnimEval);
            GetMesh()->RefreshBoneTransforms();
Yea no that shouldn't work
I have an idea give me a sec
Here, set bEnableUpdateRateOptimizations to false
That should do it
That has a huge line of if conditions that should lead to bDoInterpolation being false
That is false by default tho
it's set to false in the constructor of SkeletalMeshComponent
? Then bDoInterp must be false as well...
Can you breakpoint in the refresh and see if it ever gets to line 2038?
bShouldTickAnimation is false
Ah wait I forgot that is anim graph stuff, not pose ticking. Break on 2061 and see where it goes.
okay
bDoParallelEvaluation = false
AnimEvaluationContext.bDoEvaluation = true
AnimEvaluationContext.bDoInterpolation = false
hmmm
Arg
Argh indeed, where is this smoothing/interpolation/transition coming from
PerformAnimationEvaluation -> PerformAnimationProcessing -> EvaluateAnimation, I have no idea
Ok idea, I think the animation is being evaluated properly to the most recent frame, but it's being blended with the previous frame after evaluation @rocky brook
const float Alpha = AnimUpdateRateParams ? AnimUpdateRateParams->GetInterpolationAlpha() : 1.f;
        FAnimationRuntime::LerpBoneTransforms(BoneSpaceTransforms, CachedBoneSpaceTransforms, Alpha, RequiredBones);
In PostAnimEvaluation
Ah okay yeah I thought it might be blending
Try breaking on 2253 to see if anyone changed bDoInterp
okay, trying now
After my RefreshBoneTransforms call, bDoInterpolatoin is false at line 2253
🤔 I don't see any other interpolation code anywhere
I thought we decided it was blending and not interpolation?
Bigger question, should I be doing this for dedicated servers?
if (GetNetMode() == NM_DedicatedServer && GetMesh())
{
   GetMesh()->VisibilityBasedAnimTickOption = EVisibilityBasedAnimTickOption::OnlyTickPoseWhenRendered;
}
Or is that going to break things like line trace checks / collision / etc. that go against the players mesh/phat on the server?
Yea by interpolation I was referring to blending. I would imagine it would break especially if you have server side shooting. I believe I tried that in a past shooter I worked on and never had much luck with it.
Also if you have anim notifies they will break with that.
Right, yeah that is why I use always tick for my other project. Because I rely on anim notifies for pretty much everything. But this one doesn't have any that we would need. But we do verify clientside weapon traces serverside
Have you profiled to actually prove that ticking on dedi server actually is a big performance hit?
@ruby sapphire What VisibilityBasedAnimTickOption do you guys use for Fortnite character meshes? I'm assuming you are using heavy URO since your maps are so large. But I'm wondering if you guys are ticking character meshes on dedicated servers at all?
No, I should do that tho
So I have the UE4 mannequin in blender. I'm creating animations and then reimporting those animations into blender with the option set to UE4 mannequin within Unreal. The animations looks completely wrong and it looks like the local orientations of bone is completely wrong. Is there a way to fix this?
@rocky brook I was hoping that u guys would find answer, was reading ur converse with excitement. I really want to know if its possible to do this instant transform without the hack with loop :/
I currently use always tick flag for dedicated server as well cus of these issues -.-
Yeah it would be nice to figure out for sure. I don't like the looping solution
a curious question, is it possible to disable ticking at all for non dedicated server tho... like a host client
this way its easier to test the manual ticking
im better at seing things visually in real time when debugging than to look at code variables and how they change
ye
I'll give it a go here in a few and see if it works
yeah if you play with a listen server and set OnlyTickPoseWhenRendered for all you can see exactly what is happening. It might actually be something specific to crouching since that is how I was testing.
i found an article about animation not sure how hard coded into engine this is
. For example, the bones are always being interpolated between two consecutive keyframes.
found this sentence
can you link the article?
Anyone familiar with animation notifies and why they stop triggering on blendspace animations?
@rocky brook hm sorry i forgot. Was researching a bit more and couldnt find viable solution for this :/ But there is a way to reduce the update rate with URO and also only run tickpose on server. Only refresh bones when u wanna do ur thing, this should save some performance
kinda work around again...
So setting the VisibilityBasedAnimTickOption to AlwaysTickPose on the server?
And then call RefreshBoneTransforms when I need them updated?
@rocky brook No if the mesh is always ticking you don't need to manually update the transforms.
Oh okay I thought you would since I said AlwaysTickPose and not AlwaysTickPoseAndRefreshBones
Oh I read that as including refresh bones
I would imagine you're going to run into the same issue as before, since "ticking" seems to just refer to ticking the anim graph
@rocky brook i saw on stackoverflow someone use this solution of TickPose only and URO to reduce update framerate. I believe refresh bone is to transform the bone to match the pose, which gets uodated in TickPose i believe
Let me know if you find that link again
someone tried MCO Mocap Basics? i have a mesh with epic skeleton, but when i try to retarget, it says it need some kind of preview mesh to convert animations
Did they break Mixamo animations in UE4? I've been following some tutorials that have asset packs that work off Mixamo. They've worked fine so far I've even imported animations from different asset packs and they've worked fine. I tried exporting an animation from mixamo myself but it warps the model to hell and back
@tranquil willow they should work if your using the same skeleton they were generated for. They do like, move the pelvis around when they should be moving the root, so i have to adjust for that but that kind of issue in your screenshot looks like the fbx was generated with flipped x axis bones or something?
hmmm maybe if I mirror the animation...
it does use the same skeleton for sure, all the bones are named the same
do you use blender? I was referring more to the x axis of the limbs not the world
these animations are generated by mixamo, I used 3dsmax to edit them
like it looks to me like the bones are facing the wrong direction.. but that doesn't really explain them being translated properly
and your using the same character on mixamo.com?
yep
does 3ds max key all bones?
or i mean, i should ask if you see this issue in unmodified stuff from mixamo first?
on mixamo.com are you using like an fbx of the character from 3ds max or from ue4?
I'm using the the fbx of one of the mixamo characters, both in mixamo and in UE4
oh the character is from mixamo too?
yeah
i'm not sure whats going on then, but if the issue is only with stuff brough into 3ds max and re-exported you might want to check if the import settings are flipping the x axis or something. Do you know the retargeting settings on the character by chance?
like on the left side
I've made a temp solution because the only reason I found this issue was that the tutorial I was following used an unrooted animation and asked me to use the UE4 root tool, which made the model wobble a little bit. So I got the rooted version from mixamo at which point I discovered this issue.
I went back and edited the unrooted version of the animation to be rooted and exported it. This works fine minus a weird camera issue in the viewer
oh is it because the names of these bones are different to the export of the new aniamtion by chance?
hm, yea because if you have your retargeting settings set to skeleton its ignoring the location inside the animtions and might explain why it only looks a little messed up
yea if you check the video i sent, i 'show retargeting options'
all my targest are set to animation
try setting LeftForearm to 'Skeleton' as a test
and see what the animation looks like
is it different than when its set to animation? hard for me to tell
it goes up a little, doesn't look like it should
arm should be by his pelvis aread
or the hand rather
then it sounds like the fbx is using an entirely different coordinate system or something. when you set it to skeleton it makes it so the left fore arm's position isn't read from animation. so i think the fbx from max is doing some kind of extra space conversion
that you might be able to turn off, or perhaps you need to turn something on too
i'm not familiar with max unfortunately, but i would bet others who might be would know whats wrong right away
I'll have a look. Right now this is just for some protoyping so it's not too big of a deal. Might just have to settle using the model and animations I have for now.
See every layer and compare in 3ds max, see if evey layer is on the right place
is the camera moving in the blendspace something I have to worry about?
as I go from one animation to the next the camera zooms out for some reason
is the camera a bone or something?
oh, might not be the camera then? try rotating the camera in the viewport of the blendspace and see if the character itself is moving
I got it, turns out the viewport angle you export a file from also effects how it looks in UE4
thanks for the help
hey nobody noticed a bug with animbp when used with simple bp actors?
could you expand?
well animbp not ticking.
im not sure whats happening, i tried every configuration (including tick always and refresh pose etc.), but animbp refuse to trigger any tick.
weird, because animbp "debug" list also not listing my actor(aswell animbp shows nothing), but if i stop the game animbp ticks
if i press play animbp tick only once and no more... i tried with another bp actor based skeletal mesh component.. same result.. also i tried with 4.18 and animbp works perfectly (means tick running in game and in editor too as it should)
here is some video: https://youtu.be/GhF9PaAEBdA

gents having an issue. rigged in 3ds, when i export the retargeted animations break. the standard animations work fine, any animations that are edited are broken however. anybody have an idea what i might be missing here?
@molten jewel Try to Change Spine_01 into Animation
@tranquil willow For better Results in UE4 the 1st bone from the hierarchy must be named > root
For Blender there is an add on to add root bone to Mixamo skelton.
Also in UE4 Skeleton right clic on any bone > change all the bones to Skeleton and change Hips and maybe root to Animation in translation retarget
Here the result with a Mixamo Skinning > Add root bone with Blender add on > retarget in UE4 > Animations from UE4 skeleton
https://www.youtube.com/watch?v=tGmeB7C0a0o&list=PLlwJ8V-ghUTPJ0EKcAZxuC7i-Hc7aoy-M&index=8

UE4 Test Retargeting Overwatch WidowMaker Unreal Engine 4 Desktop 2018 10 23 07 10 19 03
Guys, who here has extensive knowledge of animating first person arms and weapons?
I really wonder how it's done in big games
Specifically, I want to know if people generally make separate weapon / arms animations and then import them separately
And also play the animations on both the arms and weapon separately
To me it seems like this results in massive duplication, however everything else I tried didn't work as well as I wanted to
i did a massive system in this week, but not really for first person..
we are doing third person game where character should play different idle/hold/throwidle weapon animations and i really not wanted to do million states just for the weapons..
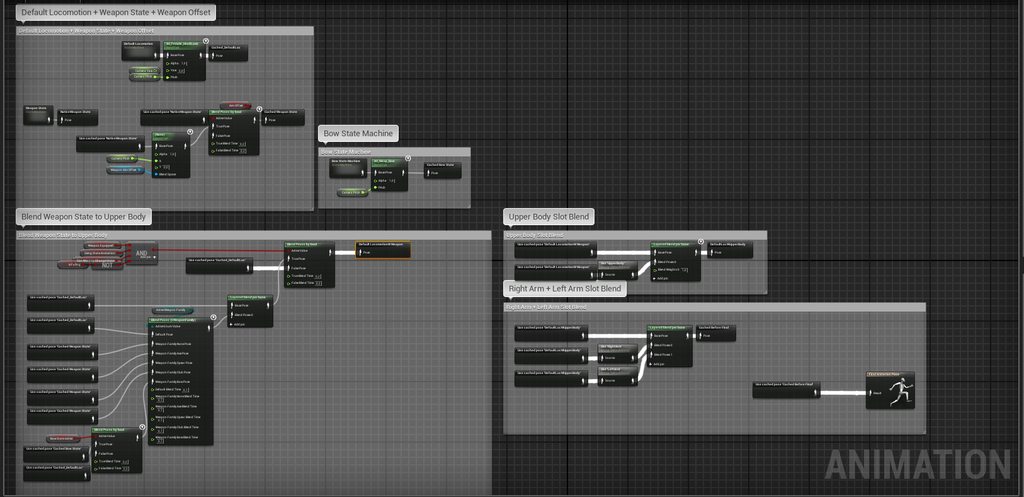
my solution is this.. i have a normal locomotion setup for the character contains basic things what we need and i have one dynamic state machine and special state machines for weapons which require full unique setup (like bow)
dynamic state machine works in this way:
all weapon is configurable through bp and contains all the animation files what that weapon using like idle, throwidle etc. etc. etc.
when weapon gets equipped im loading those assets with assetmanager and referencing him in the animinstance ... state machine using this referenced animations in different states
all of this is blended together with per bone blending
some pictures for better understand: https://imgur.com/a/3xFWW1H
Hmm yeah makes sense
I assume you mostly use animation montages and not plain anim sequences?
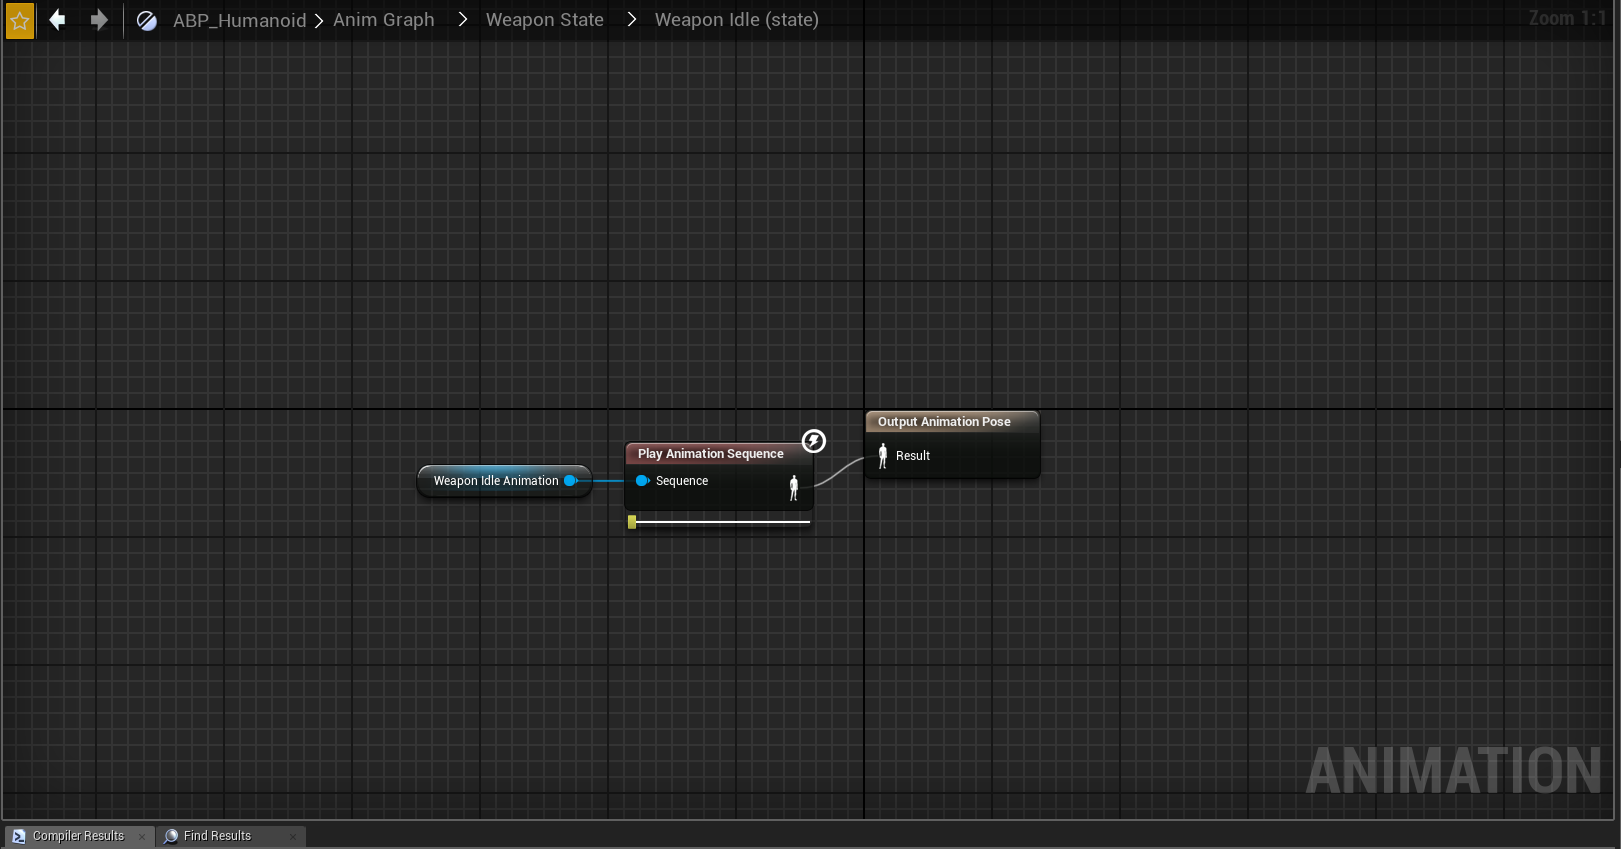
im using anim sequences for states
states final pose accept any animation as "pinned value" that means you can use referenced animations too 😉
https://i.imgur.com/bopmNGZ.png like in this picture
my aimoffset yaw is working, but pitch isnt. the pitch value is working however, the AO asset preview works fine. It all seems to be hooked up correctly, but for some reason the AO doesn't update with the pitch. Just the yaw. Probably a simple fix somewhere but I cant figure it out
pitch value is updating -90 to 90 when I look up and down, its just the animation not updating
@vagrant vigil what does it look like in the editor? the aim offset
If I change my animation's play rate to -1 to reverse the animation, in preview it looks fine. But when I play it using blueprint, it jumps to the last frame. What's wrong?
what is the best way of doing Turn in place?
@rocky brook Sorry to bother, but did sion ever get back to you about fn uro? I was interested in that as well.
does anyone happen to have the Unreal mannequin rig in blender?
nvm theres a blender addon 'UE4 Tools' that can help with this
@river meteor No bother at all, and no he hasn't replied. He is probably on holiday
@rocky brook found this, seems useful https://gist.github.com/ikrima/a900a50c1d4b7293d44b
Gist
Mapping Out The UE4 Animation Architecture Flow. GitHub Gist: instantly share code, notes, and snippets.
Hmmm
Thanks for linking that @wheat badge
The blend weights are the issue I think. Evaluate() seems to produce an up to date anim pose, it's just being blended back into the current frame's pose.
hi anyone knows how to make the Transform Bone not lag one frame behind?
or more like, the entire anim blueprint really
nvm found a way thanks to the blog from @raven lantern 😃
is there a way to add a ik_foot_root with a sk mesh that shares the same skeleton as the ue4 mannequin in the ue4 editor?
the below uses the same skeleton, however it does not have the ik bones
since theres no #persona i figured animation would be the best place to ask...
@naive wing can you share the link?
thank you 😃
That was a random mention for me haha, glad it helped somebody :D
that blog was nice, i also did read about this in a C++ tutorial somewhere, but Froyok certainly put things in order
Any reason why an animation wouldn't "scale" correctly when importing via FBX? I scaled up my mesh and skeleton and applied it and the animations look fine in Blender. However, upon importing the animations themselves don't seem to have scaled and are only moving slightly.
Can I do a soft-body simulation in blender and import it into ue4 as an animation?
Hello I'm in a state machine in an anim bp and I cant get the length node for an animation. How would I achieve this? Searching with context off doesn't seem to help...
can someone explain why in UE the center seems to be its pelvis
whereas in blender the animation is as intended?
@rancid charm do you have a bone at 0,0,0?
yes the 'root' bone
@frigid drum im using UE4 Tools addon for blender if it makes any difference

worked fine for me with that armature, had to delete a random bone on the elbow and rename the skeleton to "Armature" to be able to import but it worked
what are your export settings?
@rancid charm
@left kindle hopefully you solved your import issue. If not, simply rename the rig to anything BUT Armature
Good day. I am working in (Maya 3D ) and I need to add an bone to the skeleton, but I don't wont rebuild all skin weight again. if it possible sent me message please. Thanks for attention.
@restive yew#484 I fixed it. That was what I thought originally happened, but I've learned that I shouldn't mess with the skeleton after I've created the animation. Thx4input
Does anyone know about this new CCD IK feature? It says that it can dynamically solve IK with constraints, but the only "constraints" I can see there is just a symmetrical rotation limit per joint, I mean I want to setup it the way like one joint can rotate only on one axis... Anyone?..
There is a video on youtube where the guy seems like set it up with actual constraints... So it is possible, I just can't find where too look for those...
https://www.youtube.com/watch?v=nSo_YLdsGks
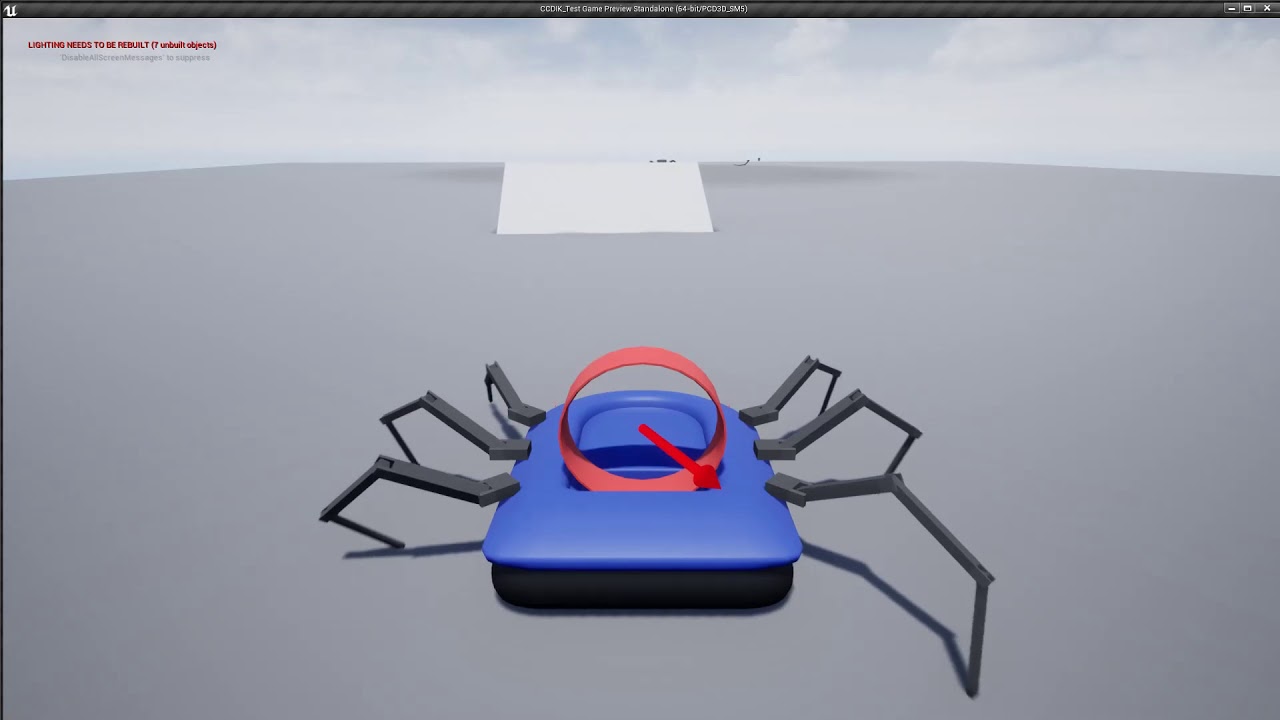
Added the spider legs to a hovercraft pawn to test them out in a realistic player locomotion situation. Extreeeeemly happy with the result.
@rocky brook What I did for my setup was add a camera bone that i can transform in any way I wanted parented to the head.then the player just directly moves the camera. This way you can author pretty much any animation needed then smooth out the motion by adjusting the camera bone.
I think you were asking about it?
yeah it can help solve that
since camera rotation wouldn't be reliant on tick
then you can use the relative camera rotation to set your aim blend spaces
ahh okay cool, I think that makes sense
any one know how to sync shoulder + pelvis for separate body parts blend animations ?
Generally should one off animations like firing or reloading be done with Montages triggered from the weapon instead of in the anim BP?
hi can someone help me with some export issue with blender?
i have too many animation files
Check the NLA editor in blender
im new to blender what is NLA?
general new to 3d models and animation
so i would need a step by step explanation :/
ah yep understand what should i look for?
@restive yew
Each tab is a saved animation sequence. You make them to bulk export animations from a single file. Simply delete the unwanted sequence in the nla editor.
so every tab has the animation for one object in my scene
there are only 3 sequences one for every object
Are you exporting each animation individually?
it seems so
my plan is to have one animation
to have ONE animation for the right mesh
when importing in unreal i get the hundreds of files, that you see above
could it be that=?
Yep, disable it just to experiment
have to import 100 gestures, so glad, when everything works
The nla track was the issue?
just trying to get used to the tracks
i have one animation, but some tracks are broken
but i have only 3 tracks, the exported animation does some wierd motion. The squence in blender is fine
one works 😄
will try adding more gestures
will have a good night 😄
Can anyone enlighten me on the "Epic Skeleton" and should all of UE4's animations, across Paragon assets, marketplace content etc, be compatible with it with out the need for animation retargeting? I noticed one major difference between a Paragon skeleton and the default mannequin skeleton which is that the arm twist bones sit midway down the upper arm on Paragon but are in the same location as the shoulder bone on the mannequin
Which can lead to some awkward thing happening when sharing animations
I'm wondering, if we want to create our rigs to have the most use out of animation assets already available on the marketplace and from Paragon assets, what do we do? Do we have to choose one way or another and apply a fix to every animation which isn't compatible?
Oh my mistake, the Paragon upper arm twist isn't part of the hierarchy 🤔 It just looked like it was
So anyways does anyone have advice for my previous question - I don't have access to ART since I'm on Maya LT, what's the best way to start with rigging my character? My idea so far has been to grab the SK mannequin skeleton or a Paragon skeleton and use that as a base, and make sure any bones I add are only "leaf bones"? Will this idea work? Is there an ideal skeleton to start with?
@restive yew got everything to working 😄 now its just work
I was taking a closer look at the Matinee Fight Scene with the troopers and noticed that the Trooper 1 animation FBX file has the knife hidden before frame 350, and the knife suddenly appears after frame 350. Is hiding/hiding meshes something that can be done directly through the Animation Sequence Editor in Unreal? Or, is this something that is done in 3rd party software (ie. Maya) and then imported into UE4?
I meant hiding/unhiding.....sorry
@steady ether
The skeleton should first of all be suitable for the needs of the project, everything else is secondary. no need to have compatibility with "Epic Skeleton"
transfer of animations from the skeleton to the skeleton is always done through retargeting, it is better to do this in specialized software.
In addition, I believe that the "epic-skeleton" does not meet the criteria for standardization, nor the epic themselves, nor the generally accepted ones
https://docs.unrealengine.com/en-us/Engine/Content/ContentStandards
Orientation: All models should have their forward dimension facing in the direction of the positive X-Axis.
https://en.wikipedia.org/wiki/Denavit–Hartenberg_parameters
does someone now how to set up the collision for ncloth on characters? my cloth is falling into the character mesh. is this handled in the physics asset or somwhere else? Im talking about the new in-editor ncloth function
Right now I have a set of roll animations left, right, forward, and backward with root motion. Is there a way to blend these in a montage rather than a blend space? I was hoping to only use root motion from montages in my animation blue print.
Or is it possible to use a blend space with a montage? Just looking for a way to go about this.
Select the In Place flag before exporting from mixamo
Hm
I have a question if anyone happens to know the answer 😃
I'm currently trying out a few different things in ABPs
the problem I'm trying to solve right now is if I have a state node where I want to select between two different animation assets/blendspaces depending on some condition
I've been mainly trying to get this to work using the blend poses by pool function, but for certain input assets, this causes animation hitches
when the state is entered
I can solve it by creating two different states, one for each pose, and then use transition rules to select, but it would undoubtedly look more nice to do it inside one state
Hey there i have a problem with my weapon fire anim. I made some changes to it in the anim tab itself (just a simple movement for the slider) and applied the changes after setting keys. However when i drag the anim into my scene it didnt update/plays the old anim without changes. Any ideas how to fix this?
😃
i forgot to mention that i have the fps game starter kit and i feel like MAYBE thats what is conflicting with it :/
cuz it has alot of systems
😦
so confused
can you provide a screenshot of your bp? Specifically your skeletal mesh component
because it stops when i am looping it and then press left mousebuton that makes me think its conflicting with the whole asset
allright!

this?
i have seperate for third person and first person but its basically similar when it comes down to animations
i also tried it like this
and then we got the event graph that gets linked to the hugeeee system from fps game starter kit

I mimic what you did. This is all you have to do. Unless I'm misunderstanding your goal of course:
what do i have to do?
basically i just want a shooting customization that i made with the pistol skeletal mesh
well and that doesnt work for whatever reason
i am thinking
because "weapon_mesh_fpp isnt the pistol itself
its inherited
but i am not sure and wouldnt know how to fix it if that is acutally the problem
alsooo

when i do that
it doesnt givem e the options for animation to play so
XD jjust very confused
You set the animation mode yes?
yup

i am thinking its something that is conflicting in this huge system once agin
to be exact this system

Don't ref the skeletal mesh, just the component
it doesnt work man 😦
i am telling you
hmm 😮
it doesnt even show the print string @restive yew
no wonder it isnt working
not even if i just do press key on its own @restive yew
well then
Always gotta ask. You've set your game mode and pawn yes? 😛
yup i can just play the game ;p
if i do it in the player character it works
just not in that weapon bp
appearantly
At event began play, make a print string. Just gotta check something
in the weapon bp we are working on right?
jup that works!
it does it twice tho :/
hello
hello
but i just tried to put it in some other bp's and those didnt work either
so far only the character bp
Ah, its the bp you're working on isn't the player character correct?
it seems like theres just problems with input
no its the weapon bp 🙂
it seems like it doesnt read input from the weapon bp event graph
were making progress 😄
Note, the character bp is the one that receives input. There's your problem. Make a bp interface or bp component.
your weapon bp is "listening" for any input from the player character. It won't receive input like a player character would
you're trying to give it input directly. Which isn't possible in your case
Watch this weirdo cough for the concept
What is a Blueprint Interface in Unreal Engine 4 Blueprints? Source Files: https://github.com/MWadstein/wtf-hdi-files
Doing this will be messy but hopefully this will help you get started on bp communication
Hi -- Is it easier to do the rigging for a human game model in Blender, and then import the rigging into UE4, or import the model without rigging into UE4, and then rig it in UE4?
Tbh i'd like to know opinions on this too!
Rig in blender and/or use mixamo
Mixamo screeeee
okay i tried rigging in blender and importing the rig into UE4, and you have to go through the "retargeting" process and i couldn't figure it out / get it to work -- if anyone has gotten that to work, and can send me the tut they followed, i would appreciate it. i will look up mixamo. ty. =]
is it possible to change rotation order for a local component?
I want to add pitch for a poseable mesh spesific bones, but one of the components is sticking the other way, so i change the rotation order in Maya, but on import it does not follow the set rotation order
you can not rig in unreal. only retarget bones and transfer animations over
you can edit bones and its position in an animation but I still dont know how to keep them applied, they reset when I close the asset.
anyone have an idea, i have this mesh going across a spline and i want it to play a walking animation but when it reaches the end i want it to idle
Hello, all. I see there is a way to create curves in animations, but I cannot find how to use these curve tracks to drive material instance values. Is there a simple way to do that, or do I have to jump through AnimBP, casting, and other hoops?
Not sure this is the right place. But is there an easy method to get the Epic Skeleton into Maya to rig a character with it? Or should I recreate the skeleton structure in maya?
I have been having trouble gaining traction on this issue. Or I am getting over thinking it.
Exporting the skeletal mesh will include its rig.
weird question
I have an alembic cache animation, because of vertex movement in the red zone, but i need to be able to move the left and right shackle freely on a joints axises. (yellow) Is this possible?
they are one mesh
basically a rigged vertex animation
btw, is there any reason characters would be stuck in place even with root motion montages?
there is no way to use custom time dilation for physiq objects?