#animation
1 messages · Page 111 of 1
Are you not talking to a dev right now?
@celest orbit Why I should split the anim ? I just want to hook to already playing anim and just change the speed
but through the internet people lose interest so quickly
My rate is $0/hr. Sorry, I know I'm expensive.
xD
Only catch - I will give away any animations that I make for you on the Unreal Market some day
do i count as a dev ?!
ummm , i am really good with modeling
^_^'
i can model for you
but i'm pricy too
0$ a day
i know i know ,most people can't handle my price
If you make your rigs adhere to the Epic Skeleton (or retarget it yourself) I'll be of help
no wait just give me a "Modeling" Challenge
Hello there anim experts!
I have a quick question 😄
We are running a VR app, and set up the char mesh in a way that the root bone is moved under the HMD, to maintain correct position
That is all perfect. Also, we use the HMD rotation to drive the head rotation, again this is working completely perfect
HOWEVER, we need to 0-0-0 the root rotation of the mesh, so if we modify head roll for example, the mesh stays in proper orientation, and only the head rotates
All good so far, the problem is, that if we look up, even though the mesh rotation is 0-0-0, it stretches up. If we look down, we become like a dwarft
*dwarf
i'm no expert but i think you have rotation hooked up to scale
nah, that would be way too obvious
hi does someone know how to export anims from blender nla editor into unreal without frezing the anim?
hi guys, I have trouble with rigidbody, mb anybody can help?
At first I set up a hip cloth. she worked fine. after that, I switched to setting the ribbon on my arm. when I finished the tape, the bandage began to behave inadequately
if I remove the capsules from the hand, the cloth starts working well again ...
what I noticed when I turn on the simulation, the first bone of the tissue shifts. this must not happen! what could be the reason?
and again; resume my discovery
forward cloth set up correctly now. but backward clothes now fell similar troubles, the 1st pones shifts down... D:
Guys, I have an instanced door, that is animated to move via a blueprint/code. No skeleton, just a static mesh animated to rotate on its pivot. When it was non-instanced, it ran perfectly fine. Now that I have setup instancing, the door flickers/blurs when it's animated and it just looks terrible. Nothing else changed other than setting it to instanced. The material is checked to work with instanced mesh.
https://drive.google.com/file/d/1t5ilNHrdyMAc3fR2uscIk6gYanyCQ5bs/view

Google Drive
Any help would be much appreciated, I've hit a wall, scoured google

@barren zenith How about using Timeline? Is it still persist?
Updating rotation of instanced mesh on tick seems to be overkill.
Anyone know how to set up face rig in animation and rigging toolkit ART? this one https://www.youtube.com/watch?v=KHGyVJ4LD6Q&list=PLZlv_N0_O1gb2ZoKzTApbv3LvhaXJ9elg&index=16

In this video, learn how to import your character model into UE4 using the Animation and Rigging Toolkit (A.R.T). A link to the wiki for further notes is ava...
Does anyone here happen to have any opinions or experience on using the new character creator 3 and getting retargeting to work for UE4 mannequin anims?
Does anyone have any good resources or tutorials on dealing with animations and physics? I just realized after adding some vertical things to my levels that some of my animations become a problem. Like melee characters that do a forward roll. Works fine if they're on a flat area, but if they're on a slope, they roll off straight out, then when the animation is done, gravity sets in and they drop. I'd like to make them roll with the slope or otherwise interact with stuff around them. So I need to learn more about this kind of thing.
@tropic seal we cant use the timeline with the way we are instancing the mesh but we are mindful of the cost thanks. i actually ended up solving the problem though. it was the TXAA antialiasing causing the mesh to have trails. Changing to FXAA/MSAA was the solution.
@grizzled basin Root motion might fix that
@carmine cove root motion is enabled and the animation has a root bone. Root motion seems to make sure that the character position follows the animation but it doesn't seem to really make the character reference to physics
I feel like instead of using root motion to move the pawn with the animation, the animation should be set to animate in place and another method should be used to move the pawn along the surface like normal movement
Hey guys! How reliable can usage of AnimNotifies be in low fps scenarios?
If I use an animnotify to for example trigger damaging event of an character attack, can it be skipped due to the frame being skipped? Or maybe the animnotifies are somehow queued and guaranteed to trigger?
Good Morning Guys
i have a question , i heard of creation animation using the UE Editor
with the Rig Control
so the question is using mocap in this plugin is possible?
hey guys when i tried to download assets for animation a bunch of errors popped up and it didnt work. I connected it to the mannequin and changed nothing else
Hello everyone! In ARTv1 plugin for Maya character is facing -Y by default (is there any reason for that?) Is it possible to turn him so he faces +X on the rig creation stage?
Hello!
can someone tell me why this doesnt work as usually?
the skeleton is on the actorblueprint
as usually
the animbp is attached
and set for the sekeleton inside the bp...
but it still wont cast
Are you positive the BP is an L_AI or inherits from it?
and that youre debugging a game world and not an editor world
What I wanna find out if it works:
"Draw" procedural mesh of a leg (already done) and replace a leg of a skeletal mesh with the proc mesh geo?
Anyone with experience setting up a control rig in 3DS Max for a character skinned in Maya?
Examples of really complex state machines? I'm just curious
Hey everyone
new to unreal, and still learning the basics of animation

I have a pretty basic setup going, but know that I'd like to add blendspaces for when the character has a sword attached
it feels like it becomes a mess (it's not quite down yet, need to add crouching, jumping for both, and the connections between all the states)
you want to use two different State Machines and blend them together (I.e. Upper Body and Lower Body)
One of the things I'm worried about though, is my sword animations do have changes to the lower body

I got it working this way, and I'll comb through it to clean it up with blending
it's not so visible in the video but walking sideways and things are pretty different
Not sure if this is the correct place. But I have a multiplayer FPS game and I am getting an error in an animation blueprint. The players and weapons each ahve a 3rd person mesh and a first person mesh. The first and third person meshes for the players each have their own anim blueprint and the first person mesh for the weapon also has an animation blueprint.
The Animation blueprint for the weapon is crashing the game with the error
Assertion failed: Index >= 0 [File:D:\Build\++UE4+Release-4.19+Compile\Sync\Engine\Source\Runtime\CoreUObject\Public\UObject/UObjectArray.h] [Line: 445]
It only happens on clients as far as I have been able to tell.
Here is the animation Blueprint. As you can see, I am checking IsValid on all relevant data, but looking at the call stack, it looks like the IsValid node is what ends up crashing the game.
Has anyone seen this before? https://youtu.be/DTTy_NHr1R4 at the beginning of the video, he runs normally, but for some reason, right after a melee attack they do this weird shuffle, sometimes for a few seconds, sometimes a little longer. You can see a really clear example around 0:23. At the beginning you can see him running with full motion, but later on, he does like this subdued motion. His arms don't seem to go the full range, and neither do his legs.

But I don't have anything that alters its speed or animation after a melee attack
Now that I look at it, it almost looks like the character is playing the backwards run animation while running forward.
Why would it do that?
Hey , has anyone had an issue while importing an animation where the animation sequence is rotated 90degrees? The skeletal mesh and physics asset are right side up, and the model in maya seems fine, but the anim asset in unreal is rotated...
One of the side affects of remapping my adventure animset to my paragon character are these weirdly placed hips/legs

What's the best way to remedy this?
I am tempted to try and edit the bones myself but ...
Anyone ever see an Animation play in Editor but not in-game? I created a Character based off of ACharacter, set both an Animation Blueprint and an Animation Sequence - it previews just fine in the editor, but when I hit Play it just defaults to T-Pose and nothing ever happens
I dragged the skeleton over without the Character Blueprint, and it plays just fine
something about the Character Blueprint is causing it to fail.
Dunno what was causing it - but I did a full rebuild of my source code and that fixed it
shrugs - 3 days of head banging
I had an issue where I had "enable rootmotion on everything" enabled
and it caused a crazy amounts of issues with the BP

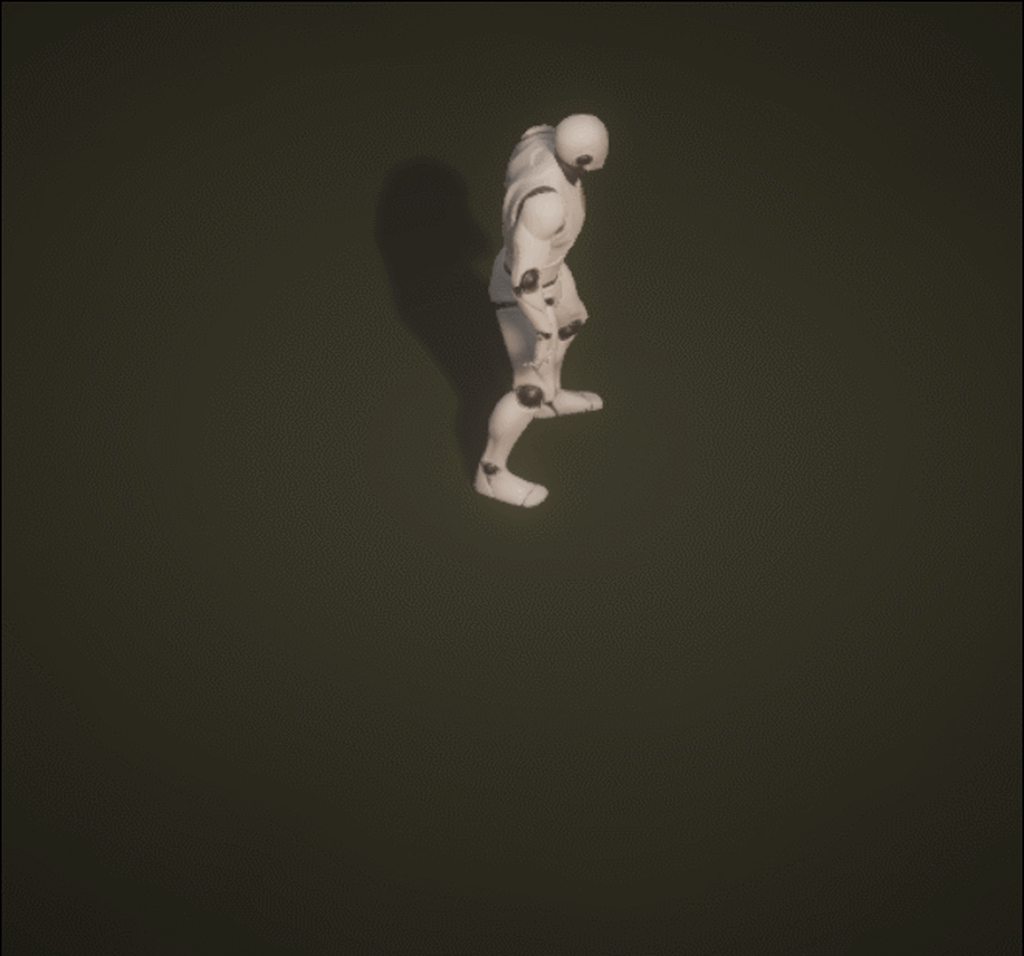
is that flying - to backkick to continued flying?
@hexed wedge those are the start and end animations provided to me by the commissioner 😃
@dapper trench I've seen an animation look fine in preview and then go to crap in the game, but never fail entirely like that.
@potent forum You can change the rotation in Unreal. Just change it and hit the reipmort.
Is there anyway to control how the anim bp blends two different states together? I'm working on iron sights for an FPS and was looking for an aim idle that doesn't drift so much. I've got a character set up to use mixamo assets. So I found one there, and imported it, and it looks fine in preview. It's hugely off-set though (down and to the right). So in my case rather than move the camera, I'm actually resetting the position of the arms while aiming. So that's not a huge deal since I was already resetting the arms' position. I figured out the correct offset to get the gun right in front of my camera, but the issue is when it blends from idle to aim, for some reason it pulls the gun way over head and then brings it down which causes a momentary flash in front of the camera of the gun flying past.
Two questions :
-
If I create a rig in blender and use the same bone names and hierarchy in blender, will it work with animations from the project files? I know I could just grab the skeleton from the mannequin but I'd like to do it manually so I actually know how it was done.
-
If I switch from Blender to Maya, can I get my rig to work on Maya somehow without any conflicts? Or would I have to start over? Would I be able to modify the rig in Maya or can that only be done with the .blend file?
@grizzled basin I've tried rotating in unreal but then the skeletal mesh is rotated
what's the best way to have an animation always running?
essentially I have a bone I want to keep far under the level
@potent forum On the animation itself, you should see an "import" rotation on the left. Can you show some screenshots or video of what is happening?
What's the best way to setup transition from jump start to jump loop?
Anytime I involve a wait for the animation, it makes the character "float" and when I don't have it, it just looks awkward as it just goes from jump start instantly to jump loop

Current settings are that it moves instantly from state to state but start -> loop has a .5 duration blend rather than the default .2

Greetings! Is anyone here using Allright animation rig 2.0 ?
If we could get some help with an animation issue, that'd be great.As you can see in the video, at the end of the animation, the character flashes to a different pose about 90% of the time. The end of the animation and the idle are the same animation, the legs just need adjusted. You can also see in the video that in the last animation before the video resets, it doesn't flash and does what we're looking for. https://imgur.com/a/Eb9r2wL
how is your blueprint setup?
Is possible to loop an animation 3 times from an animation blueprint state?
auto-answer, animcomposite can do that
hey folks is the unreal mannequin available anywhere with handles or anything?
and what's a good way to handle the gun bone
I'm working with an artist to make some low poly zombies for my game End of Days. The mesh is coming along fine, but then I take a look at the skeleton and I can't help but think this is not the way it should be set up
He's working with blender so i know there are differences in practices, but I'm thinking this isn't going to be good for physics bodies and it seems like this isn't going to be something I will be able to retarget animations to. Could I get another opinion here?
I work in blender a bit too so this is a rig thats totally ok in blender, but having been in UE4 so long this rig seems like it will be difficult to work with? Or am I being paranoid?
I feel like at least it should have more spine bones right?
please @ me with your response
@tiny mirage I've worked with a few different Blender rigs in UE4 and most of them work fine, I'd agree that there aren't many spine bones there but that shouldn't hinder you too much. IMO, if your animator is using Blender and you're worried about getting the right rig for UE4 I'd personally recommend using the "UE4Tools" addon rig for Blender as this has the same base structure as the default UE4 mannequin and has a great rig for it in Blender to work with, also auto-exports the physics collisions perfectly too.
For my latest game, we have gameplay working, but now trying to get our 3d avatars to sit opposite each other. Our animators haven't done much in ue4 before, so I'm trying to give them the right advice in how to implement the animations. Essentially, each player will hold an object in their hand and throw it onto a small stack of similar objects. Non-UE4 based wind offset of the throwable object currently plays a factor, after power and accuracy are calculated based on player input. I'd like one throwing animation to somehow deform to any throw a player makes. The playable area is anywhere between the two players, essentially in a sidewalk square sort of range. I can provide a current video of gameplay without character animation, if you'd like. Just need some pointers is all. Thanks in advance 👍🏻
@upbeat mirage personally I use Auto rig Pro. Or I straight up just model the skeleton around the ue4 skeleton. Or like, maybe make human. the thing is this game is VR multiplayer and I'm trying to squeeze every bit of performance I can out of this because I would like to have a decent number of zombies on screen. And he is correct that using less bones is better for performance, it's just that this game is also physics-based so they ragdoll and I don't know if I like this setup with physics bodies. if we can use this skeleton that's totally fine if someone could suggest me a better way to make the ragdolls work properly
anyone used the motion matching plugin from marketplace? does it worth it?
hey
I have a weapon that i want to be "held" by the hands, but I dont want to attach the weapon to the hands, rather, i want to attach each hand of my character to a socket on the weapon
any idea how to do this?
IK?
So this is a bit embarrassing, but I'm new in animation, and I was wondering if anyone could spare some time to help me
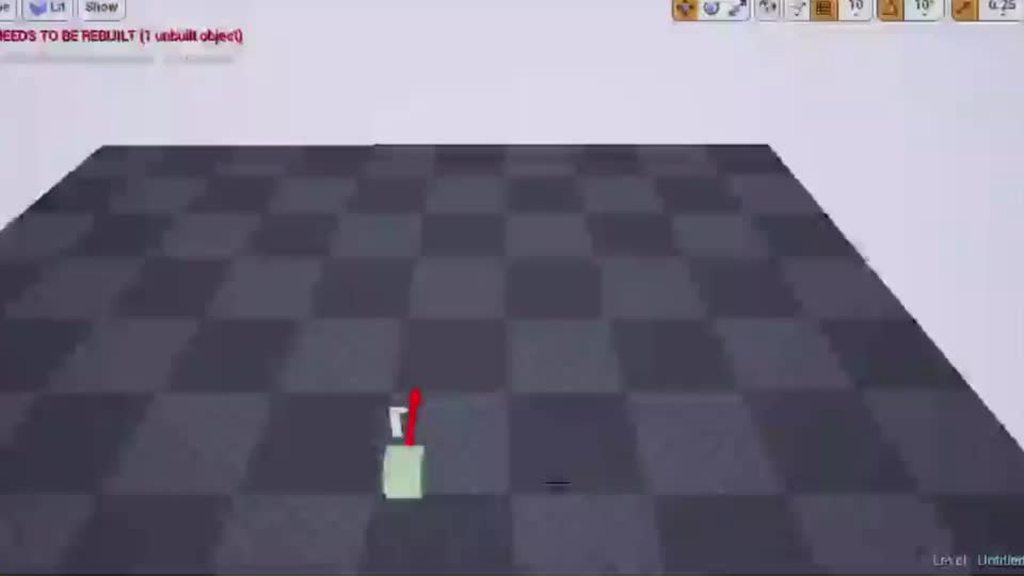
I've spent the past 5 hrs trying to simply get a windmill's turbines to simply rotate in UE4 😦 I can't get the bones to work, and yes I did watch like 5 youtube videos, and followed the instructions but it still doesn't import properly at all, or the closest I got to it working was the turbines rotating, but it was separate model
If anyone has any mercy on a newbie let me know if you can help me out. I'm still struggling to get it to work atm.

Ok, I've got a character, its rigged, but I havent made any animations yet. SHould I attempt to import now? or... avoid the inevitable?
Anyone have any recommendations for combat/combo tutorials? I tried two different ones and they both aren't working properly.
does the unreal mannequin come with some sort of handles setup anywhere?
I have this structure in maya. The bone is completely optional, I'm keeping it because the tutorials talk about the joints.
Then I export and when I import in ue4 I get an error
Any idea of what am I doing wrong?
Hello Guys, I'm trying to get my current ai character acceleration in animation blueprint but always return 0 , when i use this function on my player character everything is ok, the weird problem is when i reduce acceleration in ai character i can see he starts to walk slowly it means the acceleration works but i can't get it in my animation blueprint, any idea?
hey i need some help with my anims
i did a retarget for my model and it wont work that well it seems to be broken
I did retargeting for my character long time ago, but you need to try different setting for your mesh as i can remeber
wait do i edit the root on the defualt player or my custom model
ok
ok i just found something weird wtf

look at the last one
Hello all, I'm really having a lot of trouble trying to import a custom rig into Unreal, and I was hoping that maybe someone here might have an answer for me. Essentially, when I import my skeletal mesh everything seems to be okay, except that the animation asset is rotated 90degrees. The skeletal mesh and physics assets are right side up, but the animation sequence is rotated. Any ideas how I could go about fixing this?
Thanks in advance!
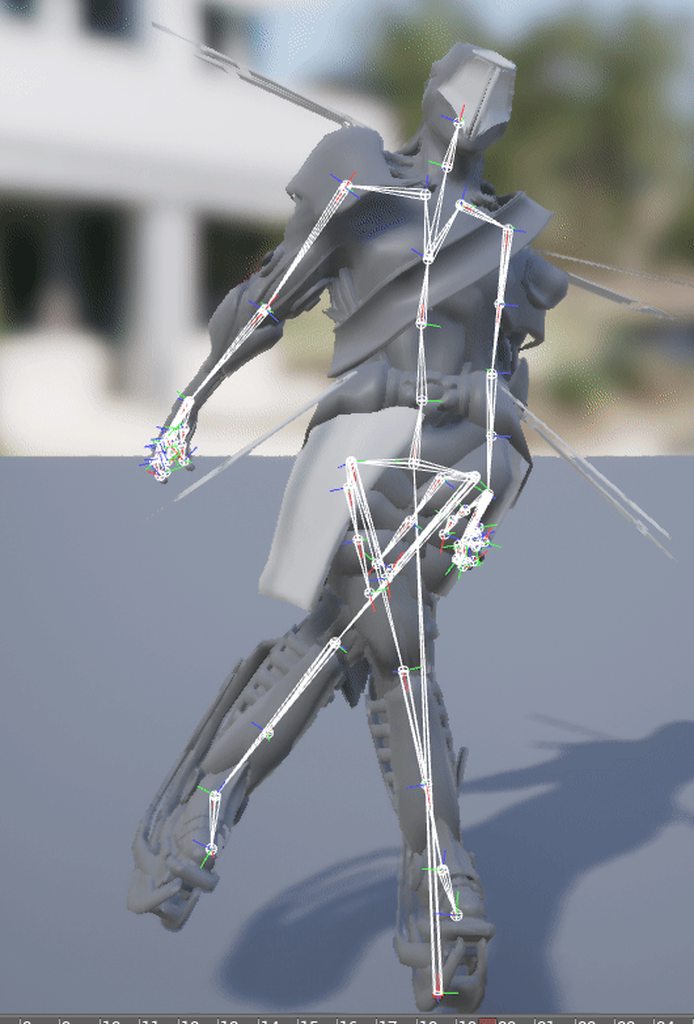
Gonna try get this guy going in UE. He's an all bone rig system. You think He'll work?
@misty dagger when you retarget both skeletons should be in exactly the same pose (or as close as possible). Based on your results I assume your body, head and legs are well matching poses but your arms differ between the 2 skeletons.
I am trying to import a skeletal mesh from blender to UE4. Unfortunately the bones come out all shifted by 1 bone. So for example the Chest bone appears where the torso should be, upper arm is in shoulder, and my root bone is size 0, with the torso bone where it should be.
as a result there's no bones at all in the hands and feet, and they actually LOOK like flaps of skin in UE4
Well I got it working... downloaded this: https://github.com/xavier150/Blender-For-UnrealEngine-Addons
GitHub
I have created this addons for export asset from Blender to Unreal Engine 4 - xavier150/Blender-For-UnrealEngine-Addons
is there a way to stop animBP from updating once AI character is "dead" ?
thanks

Was that a flash animation?
I must be getting this really wrong because all the animation tutorials I find are about pawns.
What I am supposed to connect in the object pin when it's an actor?
"Get Owning Actor" ?
i am new to animation, i created a walk animation, every time it ends in the same position it started, if it loops there is a slight delay, why is this, i have tried to make the second frame in the animation the start frame so that there is difference between the first and the last frame but this doesnt remove it.
Following a blender animation tutorial, did the walk animation in 33 frames, and it looks good
his next section on the run animation is only 13 frames long.... Should I follow that? or make it longer?
Hey Guys, I have an issue with the Bones and having the Root bone. Right now in Maya I have Rom_jaow and Solving as the Parent bones but their translates are always at 0,0,0. The Main Root Bone which translates is the Hip bone which I want to make as the Root bone in Unreal. Does anyone know how I can do that? Attached the Bone Heirarchy above ^^
is there a way to get length (time) of each individual section in the montage in Blueprints ?
Hey guys, i know that you can mix 2 animations together, i just don't know what it's called 😅 Do any of you guys know what it's called?
animation blending
I want to rig my custom character with the Epic Skeleton. What's the best way to do that?
P.S. please ping me so that I could get the notifications!
can anyone please tell me how to animate a spot light's position in UE4 ?
Hello guys, in the Action RPG sample project i found a ComboEnd notify in some attacks montages, but i can't find where is that event... any idea?
Or maybe they're not used in blueprint!

hi has someone ever encountered the blender to ue4 bug where the armatures gets added as a rootbone?
yeah, but as of 4.20 UE4 removes bone called "Armature" on import
so after you import FBX from Blender, you won't have that issue, assuming Armature was not renamed in Blender
@pliant venture AFAIK, with Maya. not MayaLT. Maya. If you find a way with blender, let me know too!
So reasking, the blender animation tutorial I'm following for my custom character used a 33frame at 24fps cycle for the basic walk cycle. and for the idle. But for the run animation, he's using a 13 frame animation... is that ok? or should I extend that?
@subtle matrix but how can i fix it?
@devout dagger is there a way to do so in 4.19?
Don't think so
animations for games are generally done at 30fps right?
probably
sometimes I have to decrease or increase playback rate in UE4 if movement speed doesn't match anim speed
(which isn't the best way to do that, but I don't feel like re-animating several walk/run/creep cycles 😛 )
a few forum posts mention that ue4 default is 30fps, but I couldnt find it in hard facts, and was following the tutorial that was at 24fps so.. 🤷
@eternal ivy is there any documentation or something like that for the same? :/
Hey guys
im trying to play a montage inside the gameplay ability for like a gun animation montage and it shoots the gun ie like trace goes off and does damage but theres no muzzle flash from the montage. so its like its skipping it and moving on any ideas?
my animbp no longer updates since i implemented a behavior tree on my enemy
any idea why this could happen
?
hey guys, can anyone share their blender animation export settings?
whenever i try to import mine (just a bolt moving on an SMG), it gives me 4 animations, and none of them work
these are my current export settings
@lofty helm answered you on the blender discord
so...
this is one animation
it's like 6 frames
this is what it looks like in blender
here's where i've animated it
idk why it's doing this :(
guys please >.<
someone help
i'm going insane from this 😅
It imports my model just fine
but the animations
it imports them, but it says that there's no animation data
and it's a clip the right length (6 frames - 0.1s)
but there's nothing in it
and i has 0 frames
i've tried with even a basic animation
and i get the same result
all i had to do was check import bone tracks 🤦
trying to figure out how to get artv1 working 😓
so when I import the figure its looking down, how do I change the maya import axis orientation
does anyone know how to import the 3rd person model in a different project?
I just copied the folder with the .uassets inside, the mesh works but the animation doesn't, it imported with errors
@silver badger use migrate then especialy the anim blueprint (orange file)
@sinful smelt sorry I didn't understand a word of what you said
I see, I'll try that, thanks
for some reason maya keeps crashing just working on animations, really annoying
Do people store every animation in a single blender file? or a seperate file per animation? Its kindof annoying importing animations and importing new versions of existing anims
I use a file per animation
and name it what the general animation is
death.fbx
yah know
Ok, I'll probably start doing that
Yeah me 2
It also makes it much easier if you need to make an anim
In ue4
To have it seperated
So you can just duplicate it and make it all in ue4
once imported they're in seperate animations, but right now all my anims are in one blend file. So everytime I import a new animation, they ALL come with them
I've got 3 meshes bound to a skeleton in an fbx file, how would I go about importing the meshes as seperate skeletal meshes in UE4? Try as I might, it only imports them combined into one skeletal mesh
Have you tried "export only selected" ?
Yea, result stays the same though
Oh you mean literally exporting them into 3 files
yeah
Right, I guess that would be an idea
export 1 mesh at a time, into seperate files
I could swear UE4 imported these as seperate before though
Suppose there should be an option to retain the full skeleton even though none of the meshes use the entire skeleton by themselves? If I export them seperately it seems the unused bones get removed, I don't want that
I think you need to import the full skeleton in first, then as you import the other meshes, select that skeleton
np 😃
Hi all, what is the main reason for this error? I don't know where to look at in my model:
If I want to use one animation for one part of the skeleton and another anim for the rest which node should I use? Blend ...
found it, layered blend per bone
having trouble animating the models in the polygon city pack when i follow the instructions of the tutorial in the description of the pack and re-target the animation of the third-person mannequin after changing the base pose to more of a t-pose the result has the arms swinging way out further than the original animation. Did i go wrong somewhere any help is great?
Are there any good primers on combat attack animations? Things like tips on frame counts or where to get good references, anything really
nothing really pops up from my quick web search ... my free adivce would be to try pose to pose animation and adjust the timing as needed.
these attack animations are really hard to make 😫
@prime basin I did a retarget of that pack to the default UE mannequin animations. I found that there were two problems. First, the T poses are slightly different. To fix this, I think I leaned the characters forward and adjusted their arm positions. Secondly, the small hand bones don't quite match up. You have to find the bones by picking "advanced" or something like that in the retarget bone list and then retarget the hand bones and some of the other bones because for example the pinky is matched to toe, etc.
@hoary knot I haven't done that myself but I would guess that leg IKs would work against you if you are doing kick animations since they prevent the legs from moving in an arc.
do you think forward kinematics is better?
@hoary knot probably if you are trying to do just a few quick and dirty animations, otherwise maybe set up motion paths? I am unfortunately an animation newbie myself. I can barely make a walk animation 🙃
what happened with my IK set up was... I set up IK for both the arms and the legs, then found I never liked the IK arm motions because the arms would always bend between keyframes, often in really weird ways. But I was too lazy to re-rig so I just added a bunch of extra keyframs
hmm
Any one know in Anim BP how to make the Pelvis and thighs follow the Shoulders movement in a limited angle to make the animation more realistic when attack and run ?
In exchange i can help you with all Blender/UE4 Animations and retargeting related, i'm a specialist in it.
https://www.youtube.com/watch?v=33MQcz8aryg&index=2&list=PLlwJ8V-ghUTPJ0EKcAZxuC7i-Hc7aoy-M

Hi peeps! Quick question. Ive created an animBP and popped it onto the level, then added this skeletal mesh to a sequencer track, but i cannot add the anim instance as a track inside the skeletal mesh. The option is simply not there
I'm having a bit of an issue with my animation and my character not being on the same page haha. Has anyone had this problem where the animation goes through the collisions?
well, animation probably has root motion and you most likely need to enable it in UE4 on that animation.
can anyone tell how to fire off a animation without having to hold down the action button
Anyone had a problems that looks like this https://streamable.com/cpn34 when tried to implent getting up from ragdoll?

Nvm turns out I wasnt setting it as a montage etc
Sorry about this dumb question, I loaded my model in blender and animated it with a bvh file.
It works except the model jumps forward with every loop, I can assume the fact it's not centered here has something to do with that?
How can I fix it?
I have 2 copies of the same rig and some animations are bound to one while the rest to the other. How do I merge the rigs so I have all the animations bound to the one obtained?
Hi! Quick question for animators 😃
I'm swapping additive anims based on an enum
These anims are looping by default, and it's probably just a tick-something kind of error, but how do I achieve that when I swap to that enum, the anim plays from the start once?
The problem with turning off looping is that once it's played, swapping to the same enum again does not play the anim from the start because it's not looping and it's just sitting at the end frame.
Asked around a bit, and so far the only solution seems to be putting every single additive in a state machine
I'm working on adding sitting animations into my characters. I do have an issue when using root motion animations that the player could walk up next to an NPC and they'll collide and not follow through with the root motion. Is there a simple way to "force" the animation to complete, shoving the player out of the way?
Hello everyone, small question that I couldnt find the answer online. Anyone can explain why montage are always 1 frame less than the actual source animation? I would like to know the exact behavior. Thank you
It's because unreal engine indices start at 0
yes I understand that but let me share you a screenshot 1 moment
@river meteor They both start at 0
pickup is a montage that only play the anim_get animation, nothing else. We just do not know what happens to the last frame.
So you're telling me the expected anim lengths are 17 and 16?
yes so the animator came to me saying I made this animation, it has 15 frame in maya/unreal, but when I make a montage of it it has 14. do you know why? I thought it was because it starts at zero but yeah no its something else.
? Maya keyframes 1-15, and when imported to ue it has keyframes 0-14. Did you mean 1-16?
Ah I've got to run, I'll try and get back to you in 15 mins
the unreal editor clearly shows that the source animation has 15 frame. But the montage only has 14.
yeah thank you I will continue to search
I'd just say not worry about it, all of your keyframes are there. I've never heard of an issue with a single frame being sliced off when imported
@knotty copper
@river meteor thank you
Hi guys!
Could I get some links and references to start with animations in UE4. Specially regarding AimOffsets and Blending poses and animation.
How to get the world location of a bone of a character?
I have no idea how this would be accomplished, but animation seems to be the most likely place to me. Is it possible to create a system where an explosive can put a hole in a wall that projectiles can then pass through?
so i'm setting a character location movement via "move to target location like this"
but the animation isn't smooth :
how do I fix that ?
please if you can help @ me !
having a bug with my skeleton because maya won't let me parent the middle finger to the rest of the hand properly
anyone know how to fix?
click on the middle finger and move it to where you want it to be parented.
in that window
grab the icon
This is what controls idle-walk transition in my state machine. Does it make sense? It works most of the time but randomly fail (doesn't trigger the walk animation) once in a while.
@white pike I did that it just made a new transform
I tried deleting history but that didn't work either
:scratches head
@charred palm that happens when the bone you are trying to parent has non-standard scale values. What you need to do is set the scale of that bone to 1,1,1. Then try again.
I mean the parent bone
wanna share here? Or text me pm, Im quite knowledgeable with maya and rigging in particular
Beginner animation question; I'm looking for the name of the technique used to update parts of an animation in real time. E.g. The location of a button or pickup the character is going for.
hi guys. i have a problem with my animation. i exported bone from default unreal fps mesh. then animate it in maya. then when i import and play the animation . the mesh rotates to the right and does its thing. need help XD
I am trying to animate a skeletal mesh and I'm trying to set the rotations of the spines. But when the spines are all (0,0,0) the mesh is fucked. Why is it happening?
I've played with it and it seems like the engine changes all the 3 axis when I'm trying to change only one. Why is it doing so?
I'm somewhat green on animation - if I take an anim from Epic's starter pack, how do I use that with the existing mannequin in my project? It's the same skeleton & mesh (different paths), but I can't seem to do anything with the retarget manager or whatever
if its the same skeleton, you dont need to retarget
it's an identical skeleton, but UE does not recognise them as the same, it seems
ooh! I think I got the retarget to kinda work
had to tell the manager to show 'incompatible skeletons'
Hello there! My name's Asher, I'm a game designer at Naughty Dog. We have something that is so core to our engine and I was wondering if it existed in Unreal. It's a really hard thing to google because we definitely give it a strange name, but it surely must exist in Unreal.
So it's incredibly simple, it's just the ability for animators to author multiple transforms inside an animation and play them relative to that instead of the origin. So for example, we may place this point for a door open animation where the door would be, and then we can play it off the door's align.
I feel stupid asking this as I'm sure it's the simplest thing to do, but we call it an 'ap-reference' and I can't imagine it's referred to as that. Any help would be much appreciated!
isnt that just the origin of the object the animations is being played for?
@hasty laurel animations modify the relative space of the mesh, so yes, it is already built into the engine.
Right, but how do you play an animation, not from the origin of the animation but from other authored points the animator can place in the anim?
so for example, for a door opening anim they might place one of these points at the origin of the character so you can play it player relative, and one where the door should be so you can play it relative to the door for perfect syncing.
Does anyone here know if there is a simple way to make a nested blendspace? I have a system that works OK using a blend pose but I was wondering if there was a way to streamline it
Hey, hi.
Got this issue:
I have a mesh with a bone with some local position offset, but one I import the mesh into unreal, that offset is reset and the bone goes to 0,0,0 (local space)... does anyone know what could be happening?
Anyone here good with animations and control schemes in general that would be willing to help out? I'm a C++ developer who's previously learned how to do environmental design + lighting, and now I'm finally diving into core mechanics, but am having a hard time getting attacks and animations setup properly
Hello guys, I'm trying to use three animations in one single anim montage and using anim montage is my only choice, the problem is there's no blending between animations playing in section and the transition is very ugly, any idea how to fix this problem in anim montage without using anim states or blendspace?
you need to make your animations seamless
i cant appear to fix these malfunctioning joint rotations
can someone give me a quick rundown on how joint rotations work/are-used in unreal?
Hi, I have been struggling a lot with root motion, can I have some help please?
My problem is better explained on reddit: https://www.reddit.com/r/unrealengine/comments/9vyduj/root_motion_seems_to_work_everywhere_but_the/
reddit
1 vote and 0 comments so far on Reddit
A good tutorial about aiming with the upper body for a 3rd person shooter?
ok, found the official one I guess: https://docs.unrealengine.com/en-us/Engine/Animation/AnimHowTo/AimOffset
Can I not use pose assets for the Aim Offset???
So I made this FPS hands with makehuman, I deleted all the bones in blender except the arms ones, is there a way to animate them with mixamo?
Hey guys, do you know how I can sync two animations between two different characters? The animations get interuppted quite often and everytime when I start them, the are more out of sync. Both are loops and should theoretically match.
hello, quick question about the Alembic and materials, i can't have the material created or found even when in the export option i check Write Face Sets, i'm trying from Maya 2014 / 2017 and Max 2017. Impossible to assign or create a shader when imported. Thanks
can someone help me figure out how slots on animations work? I'm trying to debug a retargeted montage that isn't playing ingame.. there's a Slot node for the correct slot that's in the montage set before Final Animation Pose on the anim graph, but it's not working
is there somewhere that tells bones what slot they're assigned to?
nevermind! I didn't realize the first person character had two meshes 😐
played the montage on the correct mesh and it works 👌
trying to reskin the hand mesh from the BP_MotionController but it doesn't like the skeleton I have for the new mesh even though they should be the same
there any work around for this?
eyy gang - just wanted to ask about Sequencer a bit. So I have two animations in sequencer for a cutscene. Occasionally, when one sequence anim flows into the next, the keyframed positions seem to drift and not be 1:1 with the animations anymore. I think it has something to do with the Sequencer animation option of "Keep State." Shouldn't subsequent sequencer animations override anything from previous animations? It's very weird.
(by the way - the repeating Es and Ds aren't all the same animations, I just censored a bit since this is stuff for my job)
Are ragdolls supposed to be replicated? I have my characters replicated but when they die and ragdoll kicks-in then the ragdoll clearly detach from the regular version in the server(that stays put where they died)
ragdolls arent replicated by default no
in order to fully replicate them you would have to keep transmitting the position and rotation of every individual bone
and that's alot of bandwidth for something with very little gameplay relevance
In my project I keep them roughly in sync by only updating a small handful of limbs and pulling them in place with physics handles
I have a robot Character that is supposed to have an attached arm appendage of some kind. I'm thinking that it needs to be extendable outward from within the robot, and I'm not sure of the best way to implement it.
Animation States and poses are not something I have fully wrapped my head around. unfortunately.
I'm thinking of implementing it with a simple FSM to extend/retract the extendable arm, but the way I understand things right now is that animations in games are meant to loop, whereas here I'm trying to keep a pose or secondary idle pose steady with the arm out.
Maybe I guess what I need to do is just make the FSM work like that official example that demonstrates how Jumping works: jump_start, jumping, jump_end. But instead it'd be extend_start, extended, retract_start.
why do i keep getting this error
Hey, I have an animation of a player walking, the animation he sent me is not moving in place, when I try to "Enable Root Motion" or "Force Root Lock" with different root motion locks it make the player walk funny, like side to side
I know its because of the root bone, but how can I fix it without make the animation itself in place?
Or the only way to solve it is telling the guy to send me an in place animation?
Is there a more advance version of root motion/root lock? like choosing what axis to lock?
@rugged tinsel Mixamo no longer supports UE4 exports out of the box, you need to edit their animations externally to make it work.
well that sucks so bad wtf
this chat has a very low answer to question ratio
it does, @hasty laurel , but hey the answers that do get through can teach everyone a little somethin'
Is there anybody here that knows how to work with twist bones?
i really can't figure how why my bones are doing this, even with twist bones. https://www.youtube.com/watch?v=D_d4UEKuRAI

Hey I have an odd question.
Is it possible for an .OBJ/.FBX file to always have cloth simulation no matter what software the model is in? Or do you have to put it in in UE4?
i think it always has to be done in UE4, unless it's not simulation and instead bone-based animation (or alembics)
Also what if there’s an item on the fabric, like a pocket, that’s more rigid than the rest of it?
What do I do then?
How does one add a keyframe in the animation tab
And how does one extend the time of the animation
@fringe oriole I believe you can paint weights in UE regarding where the most slack for cloth should be
@misty dagger in most cases, there should be a little plus symbol
Uhhhhhhhhhhh
actually, @misty dagger I'm thinking of Sequencer. Are you in an animation itself
outside of widgets, i don't believe you can? i could totes be wrong. I am not an animator heh
i just know of like "additive layer tracks" and stuff
Welp. Fudge.
i usually would have to make curves and such, and then in the anim blueprint feed those curves into Transform/Modify Bones
that method is purely for procedural "look ats" and IK recalculations and such
i believe the simpler way is animating in maya / blender
but keep in mind - again, i may totally be wrong
if anyone in here has better knowledge of keyframing SK meshes in UE natively
Ill do it in Blender thats fine..
i could only tell ya how to do it in Sequencer
but that's usually for cutscenes and such
YEah no, not for AI
I'm... currently doing it for AI because of some silly business and I want to die inside ha ha
in an anim blueprint for the pawn, Sequence animations play to a Pose Snapshot called "SequencerPose" and I feed those anims in above the waist, then play normal walk cycles and such below the waist
ha ha yup yup
I have a few questions. 1) Is Makehuman viable source of quality human models. 2) Can I export with the same skeleton as the UE4 character skeleton?
hey gang, does Level Sequence Actor animations applied to character slots support Root Motion? Initial tests appear to say "No."
I have bought the longsword animation pack from Kubold, and I noticed there are locomotion stop animations which are different based on the currently grounded foot. What would be the best way to play one stop animation or another based on that? Is the only way to do so, is to create AnimNotify each time a foot is on the ground (they would be at the same positions as the sync markers), change a flag in the animation blueprint, and blend one stop or another based on that flag?
Could someone tell me where to start on gun slide animation I am not new to unreal just wondering the best way to do gun (pistol slide) animations 😃 thanks.
i'd do something like a blendspace that goes from slide out to slide in, and then whenever the player fires you play a float curve. that float curve value drives the blendspace position
( @grim atlas )
is there a way to add more Custom bone for retargeting?
@ivory warren I did a bit of browsing around. I believe the answer is no, but you have some alternative options to achieve what you need
Unreal Engine Forums
Animation discussion, including Animation Blueprint, Persona, Skeletal Meshes, and more.
@ivory warren these Bones are within the Skeleton
@frank bluff @dusk dove thank u for ur answers. well i can't find the other way in the link u've sent. let me explain what i'm trying to do.
I have exported Sparrow from unreal to 3d max and changed some of her accessories. then i've imported her back to unreal with a new skeleton. now trying to retarget her animations from the initial skeleton to the new skeleton, all is working fine (after i've set the humanoid in the retarget manager), except for her bow, it is getting offsetted and not receiving the animations. so in order to fix it i tried to use the custom bones in the retarget manage, but they are only 5 and the bow has 10 bones.
any idea how can i retarget the bow animations to the new skeleton?
fixed it by exporting the animation to 3dmax, and then back to unreal on the edited skeleton
does root motion get rotation as well?
Hi guys, I'm trying to retarget animations from UE4's Free Animation Pack to my model. I can get it to retarget and animate, unfortunately the arms and hands are particularly broken. I'm quite a beginner with animation/rigging, can anyone point me in the right direction?
Thank you!
@coral hatch Im not completely sure but maybe just because the way you moved the hand isnt natural. Like ive said. Thats just a guess. Since if you try stretching your hand the same way as you did in ue4 you wouldnt be able to animate anymore afterwards
lol
@opal laurel Fortnite emote
@kind chasm Sorry?
@opal laurel lol. nvm
Can I get the "reference pose" from the animation blueprint? How?
Fixed it! Imported a T-pose to the ue4 skeleton and then matched my model's pose. Seemed to have resolved the issue.
Matching to the default UE4 mannequin skeleton pose wasn't working but T-pose was a lot neater.
does anyone have an Epic SK holding a fishing pole and casting animation they would be willing to share?
:)
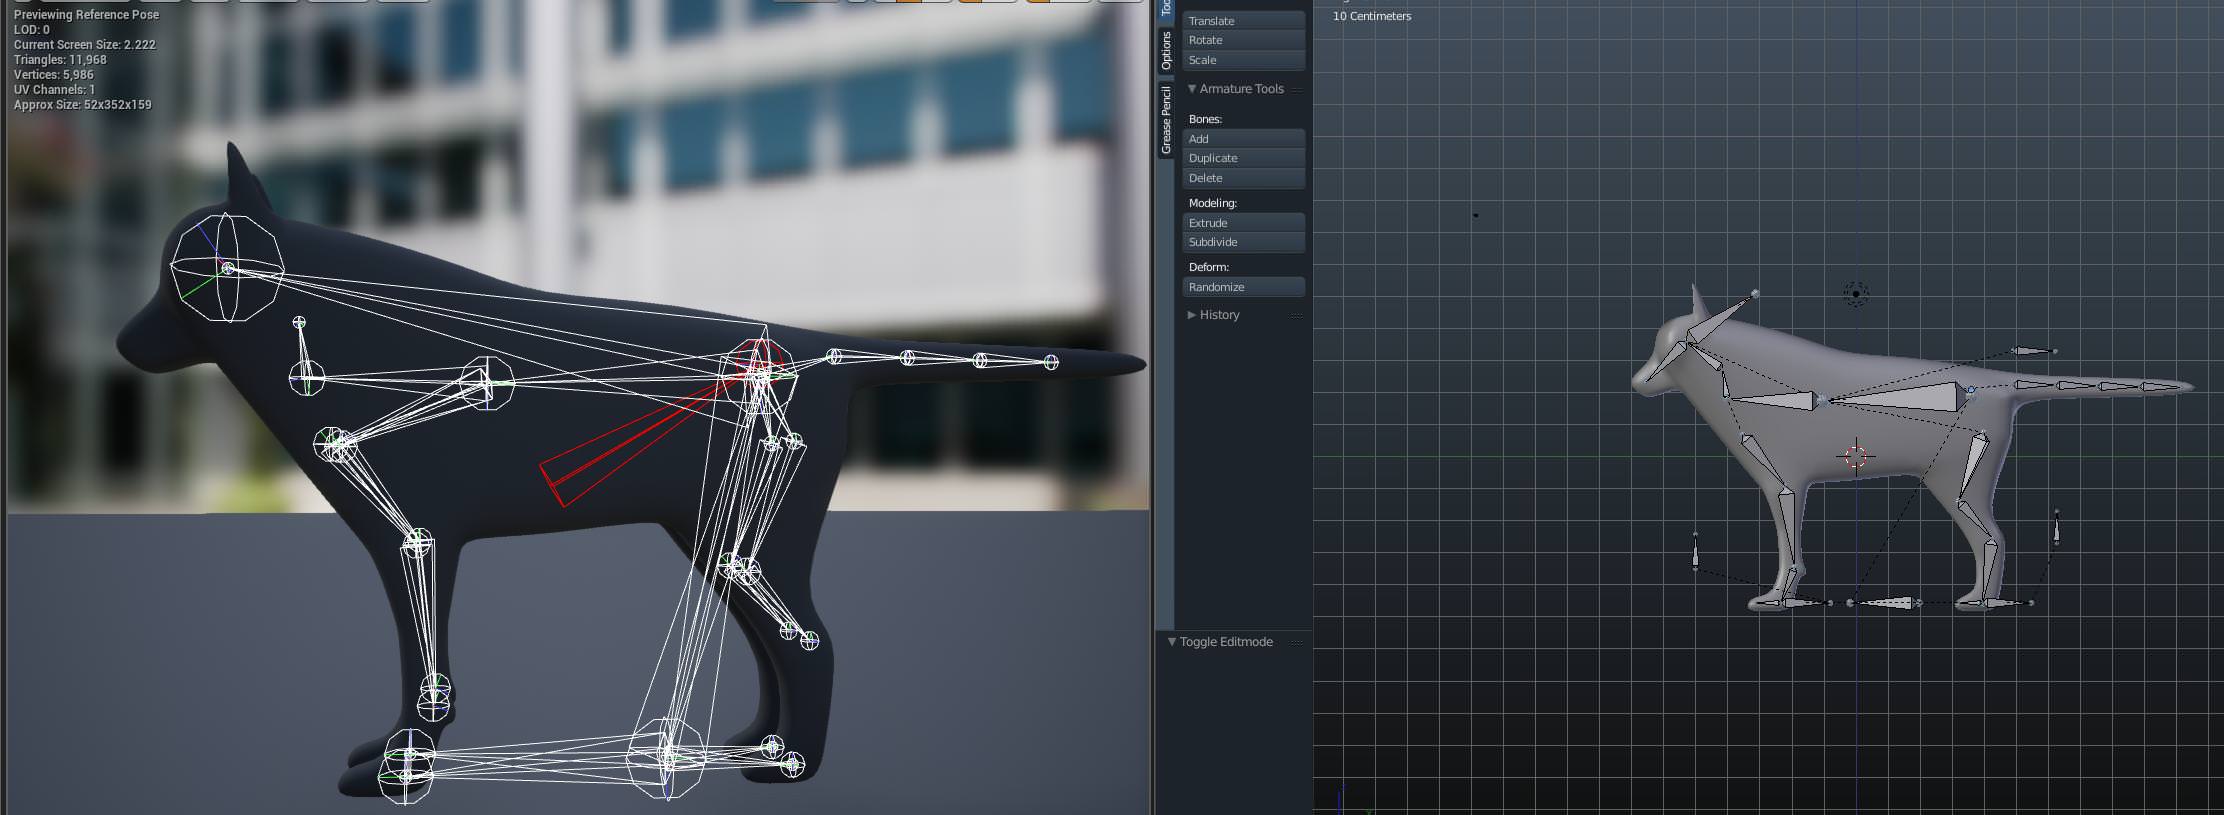
anyone know if this would cause real serious issues? i have been using auto rig pro for my dog model however certain joints the rig creates goes wild with the skinning.... it looks good in engine i just dont want it to cause wild issues
Soo I'm trying to set up IK in blender for the default mannequin, and I am running into an issue with how the ik bone already present is set up. Judging by how they are placed I would have to apply an IK constraint from the IK bone's head to the foot bone's head, however blender isn't letting me do that. Are there any workarounds I could do when exporting the mesh?
can I just shorten the bone in blender without any negative side effects?
@serene perch are you trying to create your own animations for the mannequin?
if so i recommend purchasing the auto rig pro from the blender store as it has a really good export to unreal function... i exported the mannequin from ue4 (just the mesh) and used the auto rig then created animations and zapped them back into ue4..... sorry if not
yea the goal is to use it to make more anims
any solutions that dont require commercial products?
Unless you learn how to build your own rig really I found exporting the mannequin and its rig really difficult
mhmm aight
I think there was something on UE4 tools plugin (which is free)
although i never really went in too deep... i remember chatting to someone who used that then retargeted the animations... could give that a shot
hi all, I've got an actor with a SkeletalMeshComponent underneath two SceneComponents (so RootSceneComponent->SceneComponent->SkeletalMeshComponent), then I have code moving the SceneComponent beneath the RootSceneComponent, which is working fine, but the SkeletalMeshComponent doesn't move. I'm guessing there's just a setting somewhere I need to update. Any ideas what I've missed?
are you trying to change the component hierarchy or make something physically move?
@serene perch trying to make something physically move. I have local animation on the SkeletalMesh (not involved in the code part here), but there's a number of things I put underneath the SceneComponent that I want to move independently of the other elements under the RootSceneComponent.
I have a BoxCollision under the SceneComponent (sibling of the skeletalmesh) that I can see is moving correctly when I show collision.
so what exactly is supposed to move the component? Is it supposed to inherit from the root comp?
does the animation have root motion?
@serene perch there's C++ code driving the movement. It seems it may have just been the engine in a bad state. It's started working now and I don't think anything changed other than perhaps a restart.
mhmm alright
that happens sometimes
especially with hot reloads
for me usually when I change members of a class that is referenced by blueprints
a restart forces all of those to recompile
@serene perch thanks very much - I appreciate your time
anyone know a good way to replace the default hand mesh for the motion controller blueprint
I had a mesh I was trying to replace it with but I keep getting a bunch of issues even though the skeleton should be basically the same
here's the mesh I'm trying to replace it with
What's the best way to rig your custom character with UE4 Skeleton?
how to change animation when i jump?
@pliant venture I think the best way would be to create your skeleton in your anim program that matches the UE4 skeleton, then retarget within the editor
My animation bp is missing my animation notifies, I don't even have the Add Anim Notify Event dropdown when trying to add them. Did something change since the UE official tutorials?
I'm an idiot, I was adding a new montage notify instead of just add notify
@opal laurel , what's happening here is that the weights may not be limited to 8 influences per vertice or that some of your arm bones axis have been inversed in the import before retargeting.
hello all! I would like to ask for some assistance on helping me keep the character on the floor
I export my models and animation from autodesk maya btw just as a heads up
is this a pawn, @misty dagger ?
if so, then pawn's gravity and such should take care of most of it
otherwise, you could do some business with raycasting downward and moving the root bone to wherever the raycast finds ground
Hey guys! Sooo I am currently working on a skyrim clone in UE4 as a personal project. My current task is the character customization and I want to use Skyrim's meshes.
Do you know of a fast way to "retarget" the meshes to the UE4 skeleton? I don't want to use skyrims skeleton, because its a bit messy and I want to use some animations from the marketplace. I'm hoping for a way where I don't need to reskin every single mesh manually... ^^
hey guys is there anyone here that is very good at different skeleton animation retarget...its for my final year project and i could really use the help 😃
Posable Mesh can have IK and manually moved bones in C++ will trigger the IK?
i myself have issues putting on twinblade animations onto aurora from paragon 😦 the Virtual weapon bone is stopping hand IK from working properly
and i dont know where to retarget the hand ik so that aurora's sword does a spin rotation like the IK
How do I flip keyframes in a matinee
as in, play it in reverse?\
if that's what you mean, i've never tried negative numbers on it before but maybe something like this
https://docs.unrealengine.com/en-us/Engine/Sequencer/HowTo/TracksPlayRate
anyone tried anima with ue4?
@timber imp
Anyone got time to help me with figuring out IKs?
hey all having an issue with aim offset. right now the character is aiming slightly off from the crosshair which is placed via blueprint widget on the players camera component. how would i get the character mesh to always point at the center of the cross hair. the biggest issue is when i'm moving sideways the character turns pretty drastically.
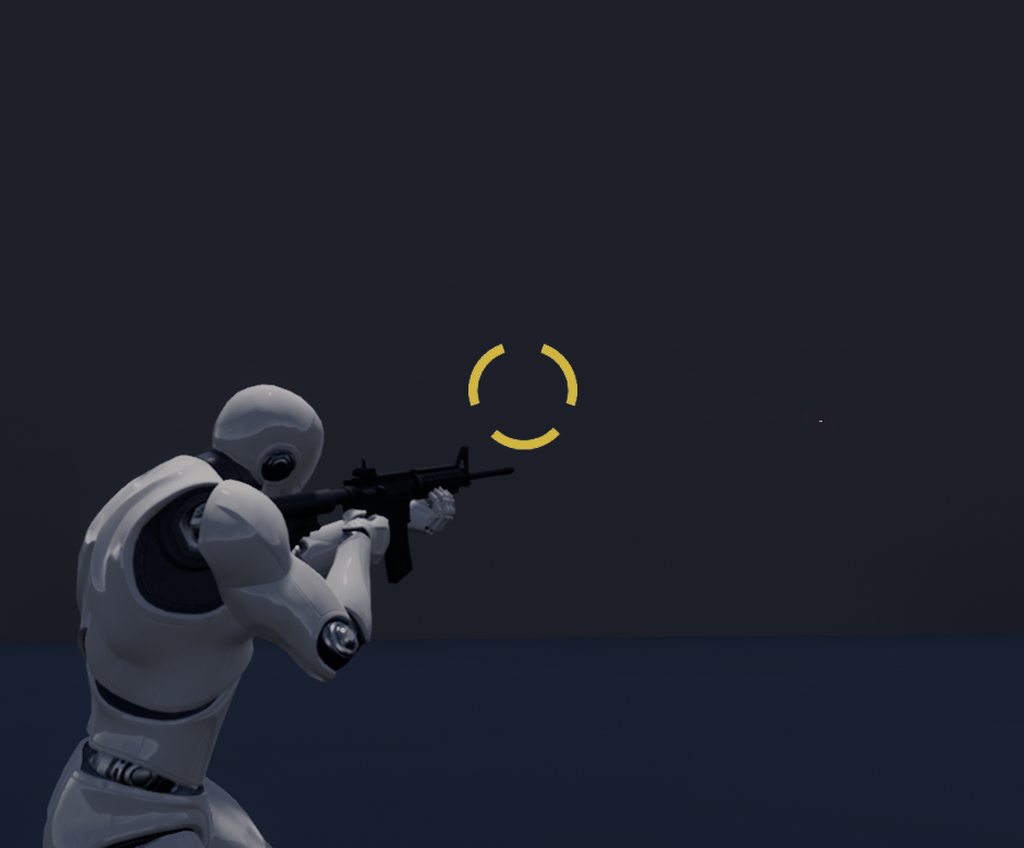
can see the effect of it pretty clearly here
the red dot is the forward vector of the rifles muzzle
Is it possible to scale animated character in-game, without messing up anims and whatnot ?
Any idea how to rotate a rig to face X forward in Maya?
@sharp cedar You'd have to get the gun's raycast and convert the world point of it to screen point, then make the crosshair image to be clamped to the raycast converted value
Bear in mind if the raycast hit gets out of the screen, it would make a bad aiming system
So you have to know what you make gameplay-wise first
I think i have it solved already but thanks for the feedback
I ended up just rotating the camera to the impact point. The impact point itself is a sphere on a spring arm that serves as a laserpointer :P
I'm really confused on what's going on with my animations
So I've added dodges
and this one seems to work fine:

but my unarmed version does this:

Both are setup in almost the same way, however the unarmed is using root motion from first animation frame rather than ref pose, however if I switch it, it messes it up more

I then rotate it back to face forward, but it still messes up
Any ideas?
like just messing with it causes things like this

can someone help me with aim offset ?
@hexed wedge i think if you reimport the animation and set the z rotation to 180 in the reimport animation settings , it will work
aim offset ? for a crosshair ?
Can someone quickly answer this for a programmer. Do Animations typically get exported as FBX? Or is that for models only?
What format do you use for Anims?
I do believe animations are in FBX as well
at least thats the format I see when exporting the animations from the animset I use
How do you export a custom attribute from ART to UE4? I created one on the root bone and checked import custom attributes on import settings but it doesn't seem to import
I want this animation to fully play before leaving its state
how do you do that
they are both running off the same bool of isDead?
Nvm. 😃
Please Help !
i'v been having problems with this for like a month now
i seriously need help ina serious way
whrn i animated Steve i did it without any bones i simbly used the move and rotate axis since he is a robot , i used link tool only to link objects to each other EX link hand to arm 1
so when i imported it into UE4 it automatically created a skelaton for it but it keeps giving me that massage every time i open the project and it sometimes crashes my project and it messes up my AimOffset setup
@young patio Animations are exported through fpx files yes and that format is the best for both animations and models
games wise *
it also says in the skelaton tree none on some bones
If we're going to create characters with very distinct proportions (like Team Fortress 2) but all bipeds, is it better to do separate skeletons and rigs for each? Or one common skeleton?
Seems like the common skeleton would be broken by the distinct proportions of the mesh
Is there a way to get the difference between a retargeted bone location and the original bone location? 😃
@sharp cedar just rotate the hand holding the gun so that the muzzle points towards the correct place
Guys I need several events fired from animations, and having a custom notify that cast the mesh to character, and then calls a character event seems kind of too many jumps between classes to me.
Maybe there is a better way to do a system that depends heavily on animations like mine?
A more clear and orderer way?
Does anyone know how to force an AI to rotate while executing a root motion animation?
I've been able to do it with the player character by ticking 'use controller rotation yaw' which then translates the root motion relative the control rotation of the player
But I can't figure out a way to do the same for a pawn maintained by an AI Controller
Figured it out. Can do it the same way, but one of my other blueprints was messing with my controller look rotation. I think I fixed it
ey can anyone help me pls?
this would be a reason to quit unreal engine never ever i bought a good animation never
unless you use the animations from the markeplace on characters very similar to the standard mannequin, you will need to edit them and fix little things a lot
Hi Im having problems with assigning a new skeleton to a skeletal mesh. First there is this problem with a root bone called after the mesh being added that has to be assigned:
When I add the bone it changes the one in the Skeleton I want to assign. Is there any way to keep this bone away?
When I hit ok I get this:
But the bone hierarchies are the same:
Now the problem is when I hit Yes it gets rid of the extra bones of the new skeleton but they are needed.
Alright so I think the problem was this Root Bone called after the Armature in Blender, I gave it a common name and the reassigning worked fine
Alright so now I'm having a new problem that did not appear before.
Again exporting from Blender to Unreal, for some reason only the lower arm bones are going in the wrong direction at animations and also the hand bones are twisted.
All transforms and bone rolls are applied/ at zero, hopefully anyone has an idea what causes this. When I imported the mesh before it did not happen.
So at another mesh it's just the hand bones
how do you blend 2 animations in a montage
no, I have say two sword attack animations
normally there's a windup -> attack -> follow through, right? but I want to go straight from the end of the attack into the next attack
but it doesn't blend in the montage, it just goes from one pose immediately to the next
and now unreal is crashing when I delete a state in the animation graph
🤕
@hoary knot I really dont know how to do this but with the anim montage open to the left there is "Blend Option" also I think in the correct blueprint node there probably should be a Blend In/Out value
hmm on another topic
I have animations with no root motion
Is there any way to do something like this
where I add the difference between the hips and the root
onto the root, and subtract it from the hips
I'm using some root motion sitting animations for NPCs but I found that if the player stands in their way when they get up it will block the root motion and they'll end up in the wrong spot. Is there a good way to have the NPC animations push the player away?
Well, i'm making a first person project and i'd like to attach a camera to a bone in the skeletal mesh, and as i move the camera, the bone is rotated in the animation by the same amount. So if i move the camera upwards, the bone it is attached to gets an upwards offset when an animation is played so the bone always follows the camera. i've already tried several combinations on the component section of the character blueprint and even some scripting to make it work but until now nothing works. Can someone help me on this?
@desert jolt The camera should never move the bone, the bone drives the camera. The child is relative to the parent, not vice versa.
Oh, i see
So there's no way to make the camera move the bone, then?
I tried adding offset based on the camera position when the animation updates as a workaround but it didn't quite work
There is a way, but don't go down that path, it's poor design
What's the way?
Welp, my project is something close to "Totally Accurate Battle Simulator", so i guess there's no need for a very great design anyway, it's kind of comically weird and sloppy
hey, is there any way to reset character's animation blueprint instance?
so it will call init, begin play again, and restart state machine
i believe there'd have to be a reset of some boolean or something that would feed into a conduit that goes back to the beginning of the state machine
So I'm trying to restore the Paragon heroes back to their original, animated glory, but things are escalating real quick. This state machine only handles walking in 4 directions, not including diagonals.
This clearly isn't the way to go about it. Can someone please point me in the right direction?
that's going to double when I add combat animations, and then I'm adding diagonal movement, then jumping...
It's going to be huge if I keep going like this
@glossy spade Yea definitely not the way, what you want to do is use blendspaces to manage your movement, so you can have one single state for each type of locomotion, such as walking, running, etc. State machines inside of state machines is another valuable tactic to use.
i have a question, not sure if I am on the right track. imported two different animations which i plan to blend dynamically. one is just eyes blinking, the other is a bit more involved with the rest of the body. i noticed when using blend node that all bones were affected, not just the ones i keyframed. is there a way have Unreal only pay attention to the bones i keyframed? or is it the case that Unreal assumes every bone has a keyframe associated with it? not sure if this makes sense
@misty dagger You're looking for the "blend depth" and "branches" parameters in blend nodes. That gives you control over which bones are blended.
@river meteor I must be using the wrong kind of Blend node because i don't see either parameter
@misty dagger make it an additive, and make the selected animation the current animation first frame
zeroes out everything but the eyes
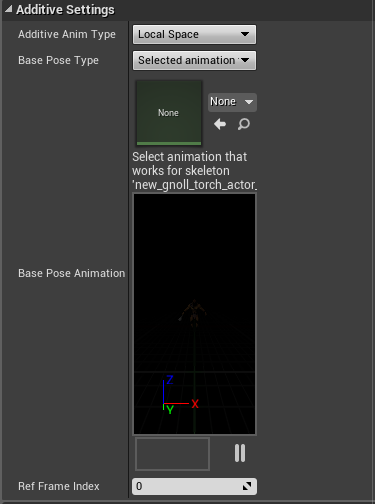
I might be jumping too far ahead. I'm used to animating in Blender, where (if I am using the right terminology) bones that aren't keyframed have no influence or weight in the final animation. Here it appears that all bones are keyframed at the beginning of the animation.
this stuff
yes
all bones are keyed in every animation
you make your idle animation
then you make your eye blink animation
wow... okay i was not expecting that!
the eye blink animation becomes an additive
so you subtract the first frame so everything zeroes out
so the only motion that will happen is the eye blink
you can make all sorts of blend spaces this way
basically, you can only add an subtract, then you just layer everything to get the desired result
so you can say, make a "breathing" animation, and add it to your aim poses
also, there's no real "one solution" to doing animation blend spaces
looks like i got some reading to do. thanks for the insight!
basically, any motion you don't want baked into the animation you do it seperately
i think i have done that if i understand right. i separated out the different animations into individual FBX files, and import those
so the blinking is a separate animation asset from a walking one, for example
yeah, then just mark as additive, and set the reference pose to the first frame
you can use local space for things like blinking
oic, okay that makes sense!
i think it is working... somehow i feel like it shouldn't, lol
using the animation itself as its own reference
animation is nsfw, hence blacked out
thanks for you help!
@river meteor will I still be able to put those start / stop animations in when using blendspaces?
Transition animations get placed in their own state.
I'll dm you some images to help
I don't have the time to explain them right now, but this should be a decent reference point.
great, thanks!
If we're going to create characters with very distinct proportions (like Team Fortress 2) but all bipeds, is it better to do separate skeletons and rigs for each? Or one common skeleton?
Seems like the common skeleton would be broken by the distinct proportions of the mesh
Hey guys, any tips as to why I have a random plane in my animation? In blender there is no hidden objects (Alt+H). Also I do have a custom neck bone, but its set to wireframe and it follows the animtion( like it should because it's parented)
Everything is weighted too as far as I can tell
That looks like an issue with the blender model
If it was properly connected you would see the mesh stretching
Yeah eh? There would be. Maybe there is a hidden poly that's not weighted?
Probably
It must be super sandwhiched in my other polies
you can use the select > non manifold for floating pieces
@frigid drum I'v never used that, is that a tool in blender Im guessing?
@frigid drum What version are you using? I don't have that option for Non-Manifold
You must be using a pluggin
Im using 2.79
@frigid drum Okay I did and these verts were selected
im also 2.79
it selects basically everything that doesnt have thickness and is floating
see if theres something out of the usual
Everything looks normal as it should be....
by moving etc
These verts by the neck is the only thing I can think of, but they are technically floating I guess
Everything is weighted as it should be, its pretty simple there
hi pls someone help me
so
uuuhhhmn
i created animations the walking and the running in one Bp and its conected to an idle
but when i walk my characters flashes and he goes walking straight but he repeat it
like 50cm back and then few cm front
back go back go u know what i mean?
its a blend space on my idle state
its oke i deleted it all, enough for today
@thorn tendon have you tried moving the root bone in blender so see if that mesh follows it?
Also, from what it looks like, it's that blue plane https://i.imgur.com/wrvSGlh.png
I think one fo your helpers is getting exported
is it necessary to create a custom animation to hold each weapon in a third person shooter if you have like 30 different weapons?
looking into unreal tournament they seem to have a standard pistol, rifle and dual wield setup, and the root / pivot of each weapon is on the weapon handle
So it seems like they just use one animation for every weapon but I could be wrong. Curious if there are any insights to this or any useful information anywhere
@misty dagger No, you don't. What you can do is have an animation for each distinct type of weapon (such as a rifle, sniper, pistol, etc) and use IK to adjust hand locations. This isn't a perfect solution and having an animation for every weapon will most likely look cleaner.
Thank you @river meteor
doesn't need to be perfect in my case
however whenever I move the ik bones with the default mannequinn, nothing moves
is there something I should be doing differently here, or does it need custom bones added?
Can you show me your IK node?
I don't have any nodes setup at the moment, just talking about those extra IK bones that come with the skeleton
Should I just be setting up the ik node with the existing working bones?
like hand to clavicle?
Yep

This talk provides an overview of the latest animation tools in UE4. Topics include the Live Link and Control Rig plugins, and the Animation Retargeting feat...
Hey Guys I'm just curious if this is possible. I want to export a mesh/skeleton and a few animations from UE4 to blender. Like, the opposite way that you would normally be thinking. Mainly because I have my own mesh that is rigged and skinned in Blender. There are animations in UE4 that I would to try to mimic for my own character. My personal mesh is the exact same proportions as the Ue4 mannequin and so i basically just want to run rig and its animations from UE4 in blender so I can manually mimic the keyframes on my own character in Blender.
to put simply. I want to export a rig and its animatons from ue4 into Blender. Is this possible?
thanks for any help.
you can right click on an asset and go to asset actions->export
Awesome thanks! I was able to accomplish what I wanted
Hey everyone! I'm having an issue with retargeting some animations to my character. I have no clue why my pose is getting messed up. Ive never had an issue retargeting anything before and would appreciate any help! I have also made an example project with the 2 skeletons and 3 anims for each to see if anyone could get it working. If anyone can get this working, it would make my day :D
unreal post: https://answers.unrealengine.com/questions/852969/animation-retargeting-issue-2.html
example project download: https://drive.google.com/file/d/1ziq6XiA9f5fz0A8xeIYQAbJevalrAtP9/view
Google Docs
is it just me or does playing a flipbook/movie animation (mp4) take more setup than it maybe should? :p
Hi everyone!
I modelled and rigged my first goofy dog model using some blender videos on yt, in ue4 imported mesh and animation look fine, hovewer bones are all over the place (see picture), and this also affects physics because paws are disconnected from legs :-(
https://i.imgur.com/TTN5M2T.jpg
So I think that rig requires to be set up with ue4 in mind in first place, that's why I'm looking for some good in depth blender-to-ue4 tutorials (or just modelling videos), with rigging, morph targets, inverse kinematics etc,
pls share if you have some, thanks 😃
I have a spawned body and I applied a force. So it moves. Whats the best approach to make it slow down over time?
ops, probably that question is for Physics.
@verbal pier IIRC this is because Unreal does not display bone relationships the same way Blender does. If it animates correctly than the bone hierarchy must be correct. You can confirm this by looking at the Skeleton hierarchy in Unreal.
Hello. Sorry not sure where or what to search on this one. If any could point me in the right direction please thanks! :D basically my character has 4 weapons. Each interchangeable. How do I make it so that it is holding what ever weapon is activated? Each with their own running animation too. Think like monster hunter world. Sword run animation then change equipment to hammer (put sheat animation on sword then hammer unseat animation) then hammer run animation
I assume youd have blend spaces for each weapon type?
And in the animation bp have bools that you transition based on what you're holding
Thats how I'd think you'd do it
O damn
Hi everyone! I want to use ControlRig Plugin. But I have a problem. I can't to find items in sequence like in tutors-video. Any ideas?

any idea why when i try to add any animation sequence to my graph, my mesh disappears? im using assets from unreal marketplace. the animations work when i use them as isolated assets in animation mode
@shell gulch the way I would do it is to "group" animations, then use a blend by int to select which "holdtype" I want to use
How are character animation references usually made? Like if I want to animate a walk cycle for my character but match it to the reference
is there a control rig blueprint asset for the mannequin somewhere? every video/post shows something like this:
with an art-tools like control panel
but nothing like that exists by default from what I can tell in trying to use it
is there an asset somewhere everyone is using?
@lyric crane nice! what kind of techniques are you using to stabilize the head?
hmm, @winged valley I see your control rig tutorial here from 4.16: https://forums.unrealengine.com/unreal-engine/feedback-for-epic/116194-4-16-preview-control-rig-sequence-feedback?143289-4-16-preview-Control-Rig-Sequence-feedback=
is the 'BaseHuman' control rig blueprint gone in 4.21? I don't see it when I go to add the control rig sequencer track
Unreal Engine Forums
Tell us how to improve Unreal Engine 4!
ah, I see from 4.20 release notes:
Removed: Control Rig has been completely redone and the previous BaseHuman has been removed and will not work anymore. If you wish to still use the previous Control Rig, this build will break it.
@vast trellis the reason the camera is so stable is because the spine is not animating. Im blending between lower body and uppder body animations where my upper body is only using arm animations.
ah, nice
I've been wanting to make a system like that
looks kind of weird with no influences from the 3rd person animation though
Has anyone ran into issues where the backpedal animations of a blend space slightly glitch out when going from -180 to 180?
(in direction)
Not sure why they are as they are both using the same animation on either end
is there a simple online tool for graphing distance over time given acceleration?
@misty dagger do you have interpolation on direction axis?
try removing that?
But it seems to be just an issue from going from -180 to 180
No without the interp its far worse
The more interp the better
It smooths the pops
I had a similar problem, it was related to how I calculated direction
I think the calculate direction node caused it ultimately
iirc I fixed it by calculating direction using delta between base aim rotation and acceleration->rotation from x vector
@noble pelican Thanks a lot I'll check that out!
In maya is there a way to click drag a bunch of key frames and delete them in timeline?
@misty dagger how are you blending your backpedal animations?
Are you doing a singular line with the only input being yaw, or a 3x3 grid with movement direction vector?
I typically like the movement direction vector
@sudden sedge just feeing a direction float from -180 to 180
But it has a really hard time only when pressing back for 2 - 3 seconds or longer as it constantly flickers between -180 and then back to the other side at 180
hey guys
i've modeled and imported an MP40 into unreal
and i've animated an animation where the stock folds out
however, the end of the stock is rotated oddly, and idk why
i've tried applying loc/rot/scale in blender
but nothing helps
this is what the animation looks like
in blender, the animation looks fine
and this is what it looks like in another animation
this time the bolt's movement
@misty dagger assuming all of your animations animate at the same speed, have the same amount of frames, and "move" the same distance I'd do a 3x3 grid blend
NE N NW
E C W
SE S SW
like so
then a "move_x" and a "move_y"
Question: How can I take only the upperbody animation and put it on top of another leg set? For example, taking the upperbody of a standing animation and applying the upperbody to a sitting hip and legs.
ANother example, I have aim rifle animations for a 3rd person. I want to re-use the animations for my character sitting on a horse.
So I'm playing a montage with root motion but I want the player to be able to move as he's returning to idle so I have another montage that just plays on the upper body and that all works well except there's no blending on the lower body since it's just switching back to the locomotion state machine. How can I get that to blend as well?
@sudden sedge I tried the SE S SW blend but holding S still glitches out a lot
It may be just these particular anims as using other anim packs works fine
does anyone know if unreal engine supports spriter animations? id like to import spriter animations without turning them into flipbooks
@ripe yew per bone blends is what you want
do you know why blender animations in ue4 have Inbetweens for 2!!! FRAMES , like how does it make sense to have an inbetween for 2 frames ,its not like it was 3 frames where u got 1 frame that u can inbetween but nope
every animation from blender in ue4 has inbetween for 2 frames , its weird as hell because the best way to try to figure it out ,is to cut (in ue4) the 2 frames and creating an offset for the frames to begin earlier/later
*so like if a character changes Head size in the second frame (because new camera angle) , when i PLAY the animation it shows an inbetween the 2 frames (even if the animation is linear)
and when i scrub it doesn't show anything
i think the issue is with ue4 , because when i scrub the animation its all perfect
when i play/render ,it goes to hell xD*
Any tips on how to blend start walk/run animations? I have a walk bool but if I use that it plays the run start anim when you press lightly on a analog stick for example. if I use a blendspace the values between walk start and run start look bad because I can't use much interpolation or it takes too long to transition into run start. I can't seem to get it right.
this is more of a maya problem but every time I try to open a file it unbinds all skins
so I lose all my weight painting data
even if I save as
looks like it did it to the FBX too
I dont want to weight paint this thing for the 5th time
huys
guys
how do i export something with bones on blender?
???
........
come on
pft
help me pelaes
AHHHHHHHHHHHH
I:(
i have a skeleton
i have a model
i need to get the skeleton in the model
also
the legs are seperate from the other models
and idk how to fix it
i just need help please dm me or something
idk sorry
o ok
hi guys, i'been reading about additive animations but i cannot understand how they work and in wich cases you have to use an additive animation instead of a standard animation
seems to be something to blend between face expressions only...
hmmm noob question for you all - I purchased an animation pack a few marketplace sales ago
but it seems like the skeleton included with the purchased pack is different than the one UE ships with (slightly somehow)
so I can't just use those animations on the skeleton that comes in on a third person template
what do I need to do to use those animations on my character? I've done some reading and heard about something called retargeting? is that what I want?
Yes @muted heath that's what you need. Set both skeletons to "humanoid", right click on an animation and retarget.
search from some epic tutorials on youtube or on the learning hub
yea i found how to set them to humanoid
but when i do the "Duplicate and Retarget Anim Assets"
and select the skeleton that comes in the template
the t-poses are different
from source to target, and then when i view the animation it's definitely off
am I just SOL?
maybe your character is on A pose
you can find an A pose for the standard ue4 mannequin
or maybe your animation pack comes with an T pose somewhere in the files
ohhhh, A pose is an actual pose like T
I see
so the standard UE4 is on the right
and I need to change them to a T-pose?
will that break other animations that are assigned to the skeleton? like idle, running, etc
the standard ones
sorry for the noob questions btw, I really appreciate the help
no, you can change the retarget pose any time
doesn't affect the alreadyy existing animations
by the way @muted heath before retargeting anything, try exporting a single animation from your pack and importing it again but assign it to the standard skeleton. If you have some luck, that may work
okay, I'll try that first
yea, looks like I have to change the UE4 mannequin to have the standard T pose by moving bones individually
@tender elm perfect
worked way better
nothing like a good old reimport 😛
I'm trying to import a model of Samus' arm cannon into ue4. It's rigged in Blender, and I made animations and everything
However, when I go to import it to UE4, there are no bones and all the animations are just empty. Any help?
in #graphics
·
Hey guys. Some question about root motion.
I have Football player that have locomotion system on it., and i have kick animation that have root motion in it.
If for example i want player to kick while he running, i change state to KICK in state machine, its blends perfectly, but character velocity changes based on animation(Root motion data), and after it finished character speed becomes 0, so player completly stops and then goes back to locomotion state again, with normal speed. How can i make that players speed wont change while root motion runs?
If it possible ? 😄
Does UE4 support any form of real time retargeting?
My game has mod support but I'm trying to allow different skeletons to be used while also not having to manually retarget every single animation.
Hacky methods are fine too
Anyone familiar with 3dsmax?
There are couple vertices whose weight can never be modified
Can anyone tell me why this skeletal mesh not smooth please ?
https://imgur.com/a/xCa0td9
in 4.19 everything ok but in 4.21 after migration i got this issue !
thnx

import smoothing groups
already done @coral hatch
what have you been exporting with?
3ds max
does it looks smooth in 3ds?
yeap
well fook me, then
neverthless thnx man 😃
i lack 3ds knowladge lol i only use blender and maya
i guess check other programs to see if it renders the mesh smoothly
if it's all smooth, then it's unreals problem. Check the import settings.
Looks maybe like a screen effect like SSAO?
@indigo folio thnx man for idea but even when i delete complete postprocessvolume polygons are still visible..
Just to be sure try untick here
yea looking better but still i can see polygons on @indigo folio
this is how it's look on 4.19
everything same but whenever i migrated to 4.21 i got that smooth problem (polygons are visible despite smoothness group) !
@tender sigil
are normal maps used? it seems that with a modified tangent space they give this effect.
@dire kestrel nope very simple material no normal!
Then, when the geometry is changed, the tangent space is not recalculated.
There are several settings that are associated with this.
I will not say for sure what you need to try
https://i.imgur.com/ZbMsCJO.png
https://i.imgur.com/3Pb6zmt.png
https://i.imgur.com/UWnW5MG.png
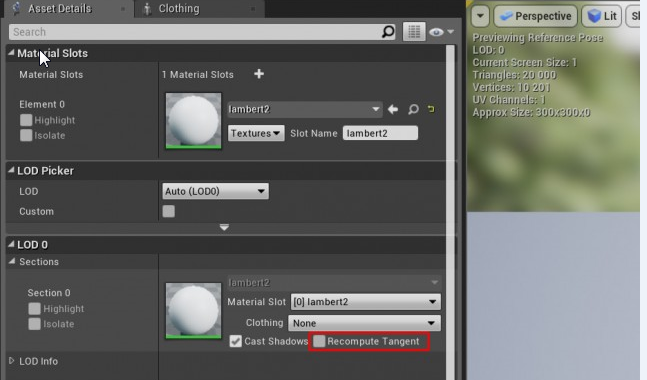
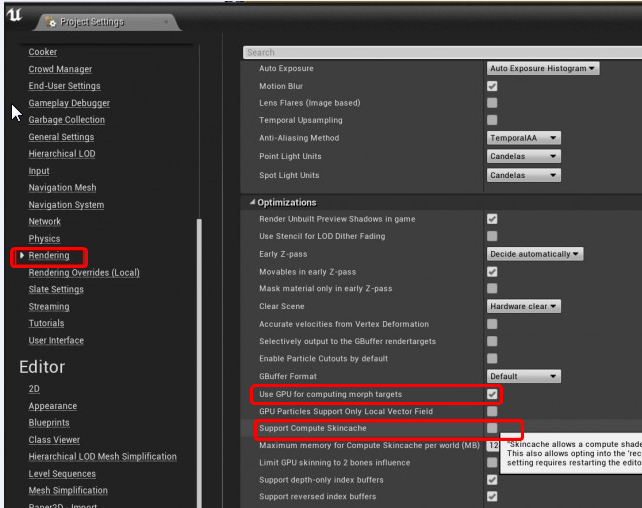
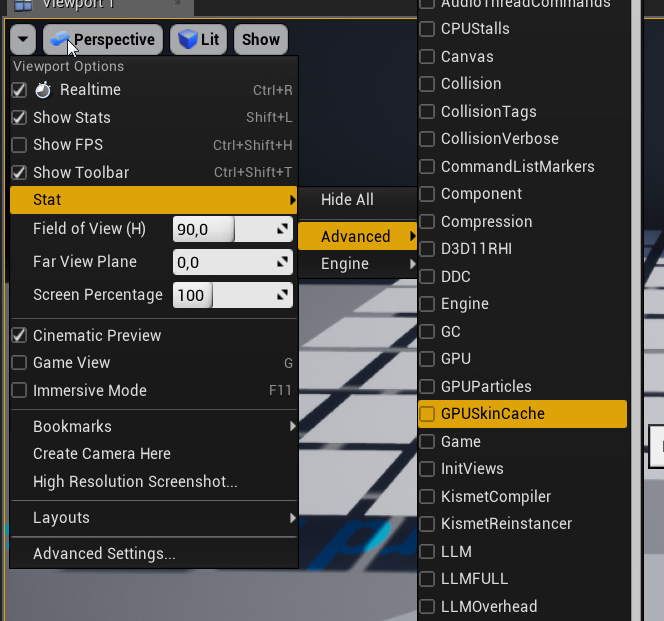
@dire kestrel hey, thank you for showing another lvl what i did but same result as i turned off ambient occlusion /post process volume
When you did the reimporting, did you use mikk t space?
and tried the diffrenent normal settings?
also In blender it is possible to clear the "custom split normal data" in the geometry data. Try doing the same thing is 3ds max maybe and make sure that your mesh does not contain double verticies @tender sigil
anybody here using Maya who can help me with a problem? I'm using a plugin and with a fresh restart of Maya everything seems fine, but after some clicks the font size switches to suuuuuper tiny https://gyazo.com/a66c82e7cba3b4c9618be5e2868a318a

and I can't get it to work
I don't have Vray installed (unless it comes natively with maya?) and idk what else to do
@alpine citrus thanks for respond man, i already tried other normal settings as you mentioned, also checked double verticies but no result, and somebody respond my issue in forums and point me that huuuuge topic already exist years with no solution! here:
https://forums.unrealengine.com/unreal-engine/feedback-for-epic/106544-dynamic-shadows-artifacts
Unreal Engine Forums
Tell us how to improve Unreal Engine 4!
When creating different animations for different weapons does that normally mean that you'd have a unique aim offset for each weapon?
@ebon portal Have you tried nuking your prefs folder? Be sure to make a back up before hand.
uuuh you mean just delete it from the explorer? 😮
yep
nope ...
Docs/Maya/20xx/prefs
make a copy of that folder on your desktop
and delete it while maya is closed
maya will regenerate it when it opens up
btw it just happens in the plugin ... dunno if that helps
thats strange
whats the plugin?
it seems less likely a prefs nuke will address the issue if its triggered just by the plugin
but maybe?
faceware retargeter
idk wanted to try it out 🤷 just have an educational license
what resolution is your monitor?
FHD
1920?
1920x1080 yeah
hmm, doesn't seem like it would be a dpi glitch
shouldn't with 1080p ... it's the most common
ya
@misty dagger If the weapons are similar, like shotguns and rifles, you could likely use the same AimOffset. The AimOffsets are basically a set of rotations that get added onto each bone.
If there is some drift you could use IK to correct for the some of the differences.
Thanks @frosty peak
@tender sigil are there distance fields on that mesh?
does someone know if there is a good (not costing 10k) solution for full body IK (or similar if not full body but customizable with joint limits, etc) ?
anomotion costs 10k... and iKinema doesn't allow you to work with the source code version of the engine -_-
(in the indie version)
@simple karma yeap
Possible the resolution of the distance fields causing those strange shadows
how do i make the character head bone move when the player is moving the mouse
?
forgot to put a question mark
@misty dagger Get your mouse input MouseX and MouseY, add MouseX to your head bone's yaw rotation, and add MouseY to your head bone's local pitch rotation
thank you
i need to turn 3 blendspaces into one 1D blendspace, is that possible?
@left kindle IsPlaying is a subset of IsActive, where to be Playing the montage has to be actively running, while a montage can be Active but not Playing (paused).
Awesome, thanks!
cna i somehow make a character, that use vertex anims?
i mean i know a way using dynamic mats and va tools but is there any other way than writing a shader?
if i wanted Massive number of characters present like ~10k
each having like 700 verts (and 20 bones as skel meshes)
with skel meshes it dies at ~2k
also are there any tools for vertex anims like the max tools, for blender exist?
Any useful links or docs for creating rigs for weapons?
Also does the root bone for every skeletal mesh have to be at the origin?
no
root bone should be where you want the weapon to be attached to
For weapons, you really just create a bone for every part you want to move
The best would be to probably just have a pool of bones you want to animate, then attach objects to bones accordingly
@sudden sedge Thank you very much
I'll start out with a root bone at the handle of each weapon and a mag bone for now
add one for the bolt as well
@sinful salmon There is a thing called "Blend Poses by ___" (bool, integer, enum, etc). It's kind of like a switch and you can define the blend time in between poses. I recommend using that1
Hmm, I'm fiddling around with blendspaces. Does anyone know if there is any way except for creating a new animation / setting the playback rate to change the total animation speed of one of the animations in the space?
I get the impression that sync groups might be what I need, and I'm looking at code / docs for that right now, but so far it looks like it might not really be designed for blend spaces
hmm
I suppose I just have to get a new animation it seems
I have a walk/run blendspace and a walk/run with gun blendspace. And two switch between the two I use the Q key. The issues I have is when I hit play it's auto in sprint anims and speeds, then I tap shift to fix it, also with holding the gun one, when I come out of the sprint it goes normal movements speed but the animation playthrough speed is staggering slow.
how can i get IK to keep hand attached to weapon?
WeaponSocket

he looks like this ATM
Hey out there. Was wondering if anyone knew how to lock a physics body like shown in the advanced locomotion pack?
Locked
@cloud lodge How we do it: 1. Bind to a callback for when the held item changes in the anim bp, where you cache the grip socket local space transform. 2. Use FABRIK to apply IK in bone space against the cached grip transform with the effector target as the hand bone and the effector rotation source set to copy target rotation (for rotating the hand to match vertical grip attachment sockets).