#animation
1 messages · Page 103 of 1
Geometry caches can be pretty intense. I would really suggest using vertex animation textures, they are much better for VR
im doing a water simulation rn
I dont see how I could use vertex anim textures
im hitting 90fps, there's no performance issue
it appears to be something to do with Oculus ATW/ASW or something im not sure
and 4.17
VATs are pretty flexible, they can do water simulations.
They are significantly smaller on disk, run entirely on the GPU, and depending on which method you take you can get sub-frame sampling. Where as the alembic is going to be flipbooking.
Anyway, that's much more of a VFX topic, than an animation one.
okay, noob question: I've got a leap motion which can capture any hand animation in real time. How do I create a recording of a hand animation and then play it back through an anim sequence?
just a quick one, say i have different arm animations for a character, but want to seperate it from the leg movements, ie for running, etc, how do i do this?
@cloud lodge You would do this in animation blueprints.
yeah, using slots?
You should look at the blend spaces sample in the content examples

@static wasp You could try using the record animation function in the Animation Blueprint while the game is running. That might work.
@cloud lodge use Layered Blend Per Bone to mix parts of poses together.
even if both animations have legs/arms?
i am no animator just using some free stuff to just get concept going
@cloud lodge Yep, You get a base pose, and a pose to blend on top. And then you pick which bone the blend starts on
unfortunately its a string for the bone name
Okay now going to start from scratch on my blueprint it's a mess lol
anyone have any experience with maya LT and rigging?
We were able to tear out the broken animation system and replace it with our own from engine source, it all seems to work quite flawlessly now. however, we are missing functionallity at first I thought this was something we broke, but I tried the binary unmodified ue4 and it appears the same. The boon to this is we have several thousand animations we were originally unable to use due to unsupport by Unreal, now we can use
its all working, all good however we are unable to use a float to drive animation positiion
we are reading this thread: https://forums.unrealengine.com/development-discussion/animation/68738-play-a-specific-frame-using-a-frame-number-as-parameter?96950-Play-a-specific-frame-using-a-frame-number-as-parameter=
Unreal Engine Forums
Animation discussion, including Animation Blueprint, Persona, Skeletal Meshes, and more.
it says "
Right-click on your animation sequence -> Convert to single frame animation" however this option is not here
it doesn't appear to be our modification that has removed this as we tried with the normal unreal engine build and one of the built in animations from the starter packs but the option is still not there, we tried this on our mac workstation and the PC but this option is not found on either.
i cannot complete set number 4
i dont know what im doing wrong I've tried reinstalling the engine on our Mac workstation, our modifications (which are so far only on the pc) to the engine source. I've swapped out the work ssd (figured it was a disk issue) on the pc, updated gpu drivers, tried an older binary build, we're about to just forget it to use this feature and have our engine dude add it in himself
@misty dagger I feel like I'm missing some context. What effect are you trying to achieve?
Use a float to select frame out of an animation that is playing?
yeh, its ok i was able to implement it as an engine change, quite easy to expose it just wasn't exposed to blueprint
Exposed to arbitrary blueprints?
yeh
also is there a way to blend an additive animation only to certain bones
i have a blueprint network i've set up with almost 700 nodes in and its getting real hard to see anything there has to be a better way
you could use Sub-Anim Instances to break up some of the complexity
as far as the additive, It's either in the authoring of the asset, or use a layered blend per bone to control the contribution.
When I worked with Leap Motion data, I specifically made a sub-Anim instance just to handle the finger rotations.
gochya
im not shure how to realy explaine this but im trying to animate an orbiting planet but ue4 wont let me roate it a fule 360 degrese is there any way to fix that?
how can i ensure that 2 animations that have different skeletons (since theyre 2 different objects) but havve been animated together with the same timing and total frame count run in sync?
I have a bunch of issues where animations sometimes won't flow nicely into each other, they will jump/skip. any ways around this?
example, check the transition between the attacks:
https://puu.sh/AaHH8/fba6012dd0.gif

hey guys i have this animation in blender https://gyazo.com/909adf014da8b98918891842156e3939

the root bone moves
but it doesnt show a red line fro root bone movment in ue4
Has anyone played with this pack?
I'm having trouble with finding the foot-ik realization nodes
hey quick question, alls working but i need to add 2 bones for the eyes, i've done this but in 3dsmax i dont see a way to skin them
i have the left eye bone selected, but it seems 3dsmax 2019 is not like 9, there is no way to simply 'paint' to skin things any more, infact there doesn't seem to be any way to reskin whatsoever, there is no 'commit' button or 'tie this to that bone' any more, its like the whole way of rigging things has been taken away, anyone any ideas? i really dont want to learn Maya if i can help it
we got any bored animators here? lol
Hello guys, I don't know what happened to my anim bp , i can't use save cache pose ! when i drag from a node and type for cache, i can't find it!
when i create a new empty anim bp , i can see save cache node
I'm using 4.19.1
I found that cache not working inside an state machine ! is there any way to use cache saving state machine ?
Hey guys, random question by opinion and workflow: what’s the most common way of weight painting with multiple objects combined? It seems that sometimes some bones will not grab certain parts of the mesh if it wasn’t attached by default. Is there a workflow for handling this?
For example if I had a cube and a sphere combined, how would I have that react to two or three bones and per say bend together (strictly an example I’m not trying to animate a box and sphere..)
@ancient tree Have you tried enabling root motion? It's disabled by default. Not sure what you mean by the red line.
https://i.imgur.com/KblnBMT.png
Hello, everyone, I am looking at an issue which seems to be caused by conflict between root motion animation and manually setting the rotation of mesh component.
So my understanding is the root motion animation will change the rotation and position of the character's capsule component according to the mesh.
And if we at the same time (during the root motion animation) change the mesh's rotation according to the capsule component's position and rotation. There gonna be some problems.
Hello, guys. How do i import static mesh with morph target? Unless i make it skeletal, there is no checkbox for morph targets and they don't import.
@twin ore it is done through a material function and baking stuff with a max script:
Thanks! It's a bummer though you can't use such basic function without getting 3d max.
Hey, I'm following this guide to import the ue4 character into blender https://wiki.unrealengine.com/Exporting_the_Mannequin_Skeleton_from_Unreal_Engine_4_to_Blender_and_Re-importing but it doesn't seem to be working. I see nothing in the scene and also nothing in the scene outliner
And there doesn't appear to be any errors
Oh wait, it seems to be importing something named "Lamp.001"
But there's no character
Need to chat with an experienced animator (fps hands, primarily) asap about some paid work. Feel free to DM.
I really really really wish epic would add a "split animation into poses" option
where you can add like a 9 frame animation and have it split into single-frame animations
Hey I'm having some trouble getting hold on how im supposed to change a variable in a state machine
I have a turn left animation, which at the end of the animation will reset to the start, so I need to rotate the whole mesh instantly at the end of the animation, however this is proving to be an imposible task
ue4 just does not seem to want to allow it, I've tried several different approaches but I come up trumps on all of them so far
basically you cannot change the state of a viarable in a state machine, so that rules that out, and in the anim graph you are not allowed to find out if the animation has stopped playing or not, so I can't do it from the anim graph either
im tempted to modify the engine source more to force these features but wondering how ya'll did this without losing your mind
im familier with using custom user data in the fbx animation data but ue4 seems to lack that feature (even source engine had this wtf). so we have no way to do in-place turning animations without a lot of fudge-factoring and hard-coded values??
this is not the standard way to do this... Yup I'll write a ticket to the engine programmer guy to implement it, im surprised as its a standard feature game engines (both in-house and public) have had since the days of source engine lol, and UE4 is missing it
I sort of have it working, but you need to run an external program along side my game
when we ship the demo we should just say engine limitation, we cannot set rotation based on bone location as unreal supports only one way animation system
I've managed to use something that injects a variable into ram
and forces the change, but it has to run as a seperate exe so i'
I'll package it with a launcher and make it invis so people dont see how hacky the solution was lol
Anyone any idea why this ensure is firing? Or rather, what we do wrong? Only happens since 4.19. We upgraded straight from 4.17
It says why it's throwing but I can't make too much out of it, what it means
im having trouble trying to get my double jump to go back to jump loop when it finish playing the animation, currently the double jump pause at the end of the animation instead of going into the jump loop
Hey guys! Is any1 here have a good video series about how to set up a full locomotion system in ue4? Or any1 can help here? I got all the animations just need to put it together, willing to pay!
Hey, I would like to create a simple Ledge Climb Up Animation. Is there an easy way to achieve this without Root Motion?
YEah bro
ITs e
z
-Set the component capsule location, Z axis, Using A Custom Timeline. You can control how fast its position it will climb up the wall, until it matches the acceleration of your animation
If I make my animations with hair bones, coat bones, skirt bones, and anything else that might ever be needed -- will it cost me too much performance when using them without those addons, or is that the way to do it?
Hi, kinda wierd question here.. Ive got a animation on my character on a specific bone.. i use GetSocketRotation inside anim BP to put the rotation on another pawn
however the rotation is on the wrong axis..
ive tried like adding some offset rotation but thats just not working
i need to 'rotate' the rotator in some kind of way.. anyone knows how?
@misty dagger If you need to rotate a mesh at the end of an animation, I would suggest either leveraging root motion. OR you can use curves on an animation asset to drive the rotation throughout the animation.
Such as a Delta Rotation float, on every tick, add X amount of rotation. So instead of trying to do a rotation at the end (which is a bad idea because of threading), you can rotate gradually throughout the animation. You may want to checkout the Advanced Locomotion System on the marketplace, his approach produces some really impressive locomotion.
If you do want the animation graph to control rotation, you need to make sure that the pawn capsule does not rotate, otherwise you will have a hell of a time fighting the rotation of the skeletal mesh component, and it'll not do what you want in a multiplayer context.
yeh our collision box (dont ask lol) does not rotate, we only rotate the mesh within
I will try this method, also curves on an animation asset? how would I do this I think fbx only supports basic user data
i've never seen curves imbedded into them before
@misty dagger The Animation Asset itself can have variable curves. You can import them from the FBX, if the float lives on a Bone and you have the correct import flags. Or you can generate them in Unreal (either manually, or procedurally using Animation Modifiers).
Hi im trying to figure out the best way to have a default state machine (Idle walking running jump etc) that blends with different attack animations (Sword attack, Punch attack, etc) I tried animations by enum but i cant get it to blend. because the statemachines for attacking are just idle->attack or idle->attackrunning. What is the best way to achieve this?
should i just have whole statemachines that change per enum or what
There are a couple of options. You could layer your animations together.
Locomotion State machine for you walk, run, idle ETC. And then you can either play montages for your attacks, or have another state machine for your attacks
I highly recommend looking at Shinbi on the Unreal Marketplace to see how you can blend attacks & locomotion together..
shinbi is a really nice loc and animation stuff ill do that thank you
What's the best way to make my character's head (bone "head")to always look at the other character's head?
Try the LookAt node in the animation graph
You'll need to get a transform/location on each tick, for the look at target.
I am having a problem with the animation I imported into unreal for one of my models. I was wondering if anyone could explain why the model is lifted from the surface of the flooring. In the animation in blender there is no lift.


@prisma tangle change the translation from animation to skeleton like this https://answers.unrealengine.com/questions/38324/having-problems-with-retareting.html
Or its something about your root bone
Thanks, I'll give it a try.
How to make my character's head (bone "head")to always look at some other actor?
I got my animation blueprint working with my state machine and the rest of the stuff. But I'm not sure how to add the custom movement of the head to that system.
@crude sun Have you looked at this? https://docs.unrealengine.com/en-us/Engine/Animation/NodeReference/SkeletalControls/LookAt
Im trying to learn more about the animation progress as far as the order everything is done in, going from scratch all the way to in game characters with movement, anyone know any good info for me to look up?
Applying AimOffset deforms the mesh any idea why?
@frosty peak Thank you 😉
How to use Anim Dynamics or Spring Controller with Play animation or montage?
@whole blaze You can either add those nodes after the Slot for the Montage in an animation blueprint. Or you can make a Post Process Animation Blueprint (which is assigned in the skeletal mesh UI), which can add those effects. The post process animBP would start with a Sub-Graph Input node.
@next ginkgo It is likely that one or more of the Anims involved in the AimOffset has a bone that is offset from the additive reference animation. Make sure all of the AimOffset animations are Mesh Space Additive. And you can set them all to use your forward aiming animation as the additive reference pose.
@frosty peak thnx
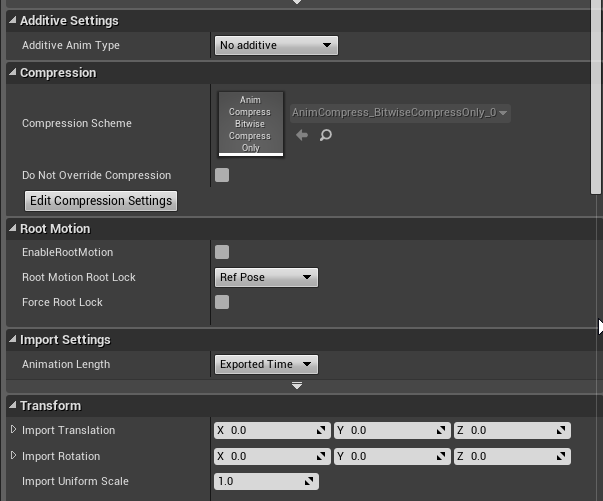
im getting really weird results from exporting the animations from paragon, even though they are for the unreal skeleton. anyone know what might be causing it?
basically the bones appear to be in the right place, just rotated
other animations import ok (the old animation example pack was fine)
here are my export settings
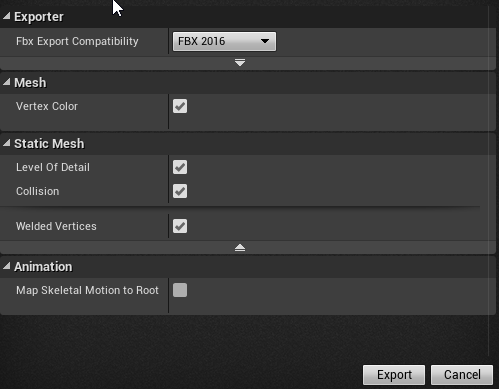
appears to work in a fresh project with an unadulterated ue4 mannequin skeleton... hm
it appears that, if i import to the mannequin and THEN retarget to my custom skeleton it works without issue. i guess thats a fine enough work around. thank you!

Any good way to blend IK with a run animation? Im Thinking Lerping from run animation to an ik position for the foot. two, But i could lose details i nthe animation as as i approach the ik position.
Simple question about importing animations. I exported an animation that was 180 frames. When I imported it, it was 5516 frames. Anyone know why?
The animation did the same thing, but way slower.
hey im having some more issues with animation blueprints, we cant add rotation to previous rotation when its an animation curve
it always resets to 0, we've tried only 'adding to' but this does not work
no problems in a normal blueprint doing this with normal values so i ddont know whats wrong here
the character just resets to 0 rotation, even if we tell not to
we've had oru engine programmer look at this problem 3 times already now, and so far he's pretty stumped at why this would be, even he had a go at this and thinks that Epic resets all values every tick in anim blueprint, our engine programmer would remove this limitation however we can't seem to find it in the source code
so we're pretty stuck and a bit at a loss on what to do here
Can someone check if this event even fires?
https://docs-origin.unrealengine.com/latest/INT/BlueprintAPI/Animation/OnAnimInitialized/index.html
On Anim Initialized
it never fires for me
@dusk dove It worked for me. Perhaps it is dependent on the AnimBP also running its Initialize?
That doesn't seem to be the case.
@misty dagger If you log the curve value, is it changing? It's possible for curves to stomped by blending various poses together. I have used similar setups like this in the past, but never to drive component rotation
You may want to consider using 'rotate root' anim node, if you are currently applying the rotation on the skeletal mesh component.
@prisma tangle For the animation import settings, did you select "Animated Time"?
And what frame rate is your source animation?
@undone ether Often when doing Run animations with IK, you'll have socket on the foot that you will trace an offsetted ray from. The basic process is to fire a ray from above the foot, and then use the hit information to determine if the surface is above or below the threshold for IK that you are happy with. Then offset your foot IK bone to the height of the surface. You could also add a Curve to your run cycles, where you can animate the IK weight as a float. So when the feet are in the air, they do not get any influence from the IK, but as the foot approaches the ground in the clip you'll animate the IK weight up.
@frosty peak I did Exported Time and the frame rate was 120, but I was able to get simplified animation, by using the default sample rate. It evened out the animations I imported really well. If you know what caused it though, I would still like to know just for future reference.
I think it may be a bug. When I import animations at 60 fps, I don't get double the frame count of the 30 fps clip.
Interesting. It was like giving me 100 frames per every one frame or something like that. Like the remove redundancies wasn't working or something.
Hey ive got a character here and its just playing a looped walking animation and I just want it to walk from one point to another for a simple demonstation of a particle effect whats the easiest way to do this?
or if some one could just point me in the direction of a tutorial as well would be 👌
This Guy Crows got our back.
@obsidian path There are a lot of ways to do it. Perhaps the simplest would be to use a level sequence? You can place the skeletal mesh as an actor in the scene, pick an animation for it to loop, and then key frame the path that you want it to take. And set the Sequencer to auto-play and loop. Otherwise you can use Timelines to add movement input. Or if you need something more powerful you can get into some basic AI navigation (which there are some good tutorials on Epic's Youtube channel)
@frosty peak cheers 👌
how to make the animation so that it would be played sequentially/continuously?
something like: translate Y-position of second animation ...
its called RootMotion. your animations don't have root motion (the red line is the root bone and does not translate with the boy)
Anyone here know much about animation curves?
Hi! Question from a beginner.
- Q1: For example, Rifle Aim animation, Full body / upper body slot. Is it enough to make a rough animation (Mocap or Manually) and then adjust the arms / fingers at the correct height / angle relative to head / camera with Timeline's Record in the UE4 Editor? Then use Socket to attach weapons and hand-IK to make it look right? Or what is the best way to adjust an animation to fit perfectly for different weapons, stances ect?
@molten hamlet I'm pretty familiar with anim Curves. What's your question?
@snow lotus The work generally falls into two categories; Make solid assets that function well together (which can be as simple as a pose), or Use IK to 'correct' the existing assets. IF you can make clean assets you will have a much more pleasant time than trying to wrangle incorrect assets. I only introduce IK as a last resort.
You should write down all the different features & states that you need to support, and then try to eliminate random one-off ideas.
For instance, if you make it so that you only support 2 or 3 grips (Pistol, Rifle, SMG), and then guarantee that all of the weapons fall into one of those categories, then you don't need a crazy amount of assets.
Generally speaking, You'll have a pose/animation that is your standing idle loop. Then you'll have an aim offset to go with that pose. And then you'll have your various montages to play (shoot, reload, take out, put away).
@frosty peak I have a LOT to learn 😃 I thought Hand IK would make everything look more realistic and more "connected"? I trying to create a "True FPS" with full body and good animations with just the right amount of animation movement on weapons, and weapon sights during aiming at all times is in the right place relative to camera. There will be a lot of the adjustment to make everything flow smoothly during gameplay - I think. I just have to try and fail. I would think that separating the upper body for aiming, reloading ect will save me some time.
@snow lotus The 'True FPS' is a pretty tricky thing to do. Mostly because the view of the weapons in first person usually doesn't look very good. I feel like the only traditional game to have pulled it off is ARMA.
It looks awesome in VR though, I did FullBody IK on Star Wars: Secrets of the Empire and it kicked ass.
It would be worth your time to play around with all of the skeletal controls. HandIK is pretty strange, I personally have not found a good use for it (seems like it's more about favoring handedness rather than doing proper IK). But Two Bone IK & FABRIK are pretty handy. It's valuable to experiment with those tools.
But ya, If you want to hit that quality bar, you need really clean assets. IK is like the last 10% of polish, Add it last because there are many instances where you want to turn off IK during various states, and it's complexity that you don't want to carry around from the beginning.
@frosty peak Thank you very much for your answers 😄 'True FPS' is probably hard and not a good place to start, but I'm motivated and really want to make it work. You mentioned Arma and that game has given me tons of inspiration. Do you know how to create something similar to the Arma 3 Stance switching (change stance-button + S / W for switch between every stance. I think I need an enum to store the current stance? Anyway, too advanced right now 😄
@snow lotus For something like ARMA's stances, You would likely have a state machine for each stance, and you could use a Pose Cache to store each graph's result.
Then you take those pose caches and make a 'master' state machine out of them. In the master state machine you can control the flow and transitions between stances. While each Stance get's its own graph to control the specifics. This pattern is way cleaner than nested State Machines, and you can avoid a giant web of transitions. And then ya, for performance wins you should use Bools to drive transitions, don't do any blueprint logic in the animGraph, do it all in the event graph. An Enum is a pretty good idea for tracking the stance.
You should look at the Shinbi asset on the marketplace, she has a light version of this pattern.
@frosty peak Nice! Thanks! I will certainly check it out!
Now that the chaos has calmed down, might as well show off this work in progress character model while I'm here. 😛
What method would you use for playing things like a "Turnaround" transition if moving in a direction >135 degrees?
I'm trying to make my skeleton/character's hands slightly smaller but adjusting the bone size doesn't actually change the hand size of the characters using the skeleton. What am I doing wrong?
I think you cannot do that as hands are not a separated mesh, but Im not sure at all
@sonic roost these adjustments you make in skeleton/animation editor are mostly temporary and reverted soonafter, to do what you want you'll need to tackle animation blueprint with bone transformation node
something like this (not everything in shot tho)
Perfect, that works - thanks
Anything wrong with how I'm using this node to combine some IK stuff with a state machine?
has anyone tried this https://getrad.co/ with Blender or Akeytsu?

RADiCAL
RADiCAL detects and reconstructs human body motion in 3D from 2D consumer cameras for media, entertainment and AR/VR applications.
hmm
I wish they didn't limit how much you could do per month even with higher priced packages.. this would've been nice as a standalone software with a subscription or a premium price
Lowkey they could just be motion capturing your submissions manually and giving you the files 😂 there are wait times (ofc)
@carmine cove This really depends on your setup, if your character capsule rotates, then you need to fake the turn in place logic very carefully, because the game & physics threads may not run in sync with the animation thread.
For a standing 'turn in place', you can store the world rotation of your character when they enter idle, then on every frame you get the current controller rotation, and then compare the delta between those rotations. Once the delta is large enough, you trigger a turn animation in the direction of the control rotation. One of the difficult parts is the setup that allows you to rotate between arbitrary angles.
If your capsule rotates, you have to add some rotation offset with a modify bone that will counter the rotation of the capsule, or allow the animation graph to set the world rotation of the skeletal mesh on every tick (which is not something that you should do in a multiplayer game).
If the capsule does not rotate, you can let the animation graph define exactly how you want to rotate the skeletal mesh over time.
It's, unfortunately, a really tricky problem to solve well without root motion, but root motion has its own set of pain.
For a moving change in direction, I use the dot product between velocity & acceleration to trigger 'pivot' transitions. Just keep track of the relative direction you are pivoting to/from and play an appropriate animation.
I hope some of that makes sense or at least gives you some ideas to kick around.
Ah cool, got some good responses in #gameplay-ai as well
This is all for NPCs currently
Haha, that's funny
I was doing the exact same
Do you try to keep it all contained in the ABP @frosty peak ?
And from your experience is the RootMotion solution cleaner?
Interesting. I predominately focus on player controlled characters, not on NPCs, so I largely avoid root motion techniques
I personally make everything in the animation blueprint, so that the logic works regardless of the controller being a player or NPC
but if its working, and it meets your needs then great!
if you have the coin, the Advanced Locomotion System on the marketplace is pretty amazing, his setup works with NPCs and players and its so clean
but ya, first question is - Does the capsule rotate?
I was checking it out, but i'd prefer to implement myself to get the know-how
sure sure. I learned a lot from dissecting it. There is some value in deconstructing assets
Gotcha, Well to answer your question, my animator sent 4 transitions where the root remains static and the transition is from idle -> direction
My thinking was that I'd just play the trans anim and then set the capsule rotation after it finishes
definitely dont do that
animation finishing is pretty arbitrary because of the threading
Gotta start somewhere 🤷
does the capsule rotate towards the movement direction?
thats a setting on the movement component I believe
Yea, i've tweaked it to get it looking passable with a walk cycle blendspace alone
We're trying to move beyond it now
Should it not rotate when using transition anims?
I'm just wanting to know in general
if the character runs in circles
are you rotating the capsule
the default is usually on
Oh. Yea i am
give me a sec to think about this in the context of an npc
I am not sure what the control rotation of an AIController looks like
but I assume you have your signal for when to rotate
from the BTTask
Let me check the MoveTo code
personally, I am not a fan of the rotate towards movement direction
simply because iit creatives complexity to counter that rotation in the animation graph
There are a ton of MoveTo functions
and its pretty easy for the animation graph to accomplosh the same thing
but I would guess that you would store the world rotation of the character when entering the idle state
You've never done transitions for NPCs?
and you could select a turn and move animation based the acceleration of the character
I have not yet
I like to have the animation graph be responsible for all of the character movements
Game animation is strange, seems like there's not a lot of documentation on what seems like it would be common problems
None of the current test animations rotate the root bone
RootMotion follows the root bone, right?
the animator didn't animate the root correctly, I assume?
does the skeleton on your character have a root bone that is at the origin of the scene?
yea, just doesn't rotate
If you can have him rotate it to follow the rotation of the character, you should be able to leverage the root motion techniques just fine
outside of root motion stuff
there is an approach where you have looping turn in place animations
like they are spinning in a circle forever
and as long as the rate of rotation in linear, you can control the playback rate to accomplish arbitrary turn angles
so you can have the capsule rotate linearly from your source rotation to your destination heading, and the animation graph can take that capsule rotation as input to play the "Turn in place" animation
Would that just stop the animation based on the magnitude of the turn?
ya

This is an update video for the Advanced Locomotion System on the UE4 Marketplace. The system has received some major 'back end' changes, and now should be e...
you can kind of see this technique here
Watched that like 15x now 😃
so you have the rotation of a capsule that updates based on the control rotation right?
that delta of rotation from last frame's rotation and this frame's rotation can be used to control the speed of a turning animation
Ah, that makes sense
what part I am missing
is that I don't know what the data from the AI Controller looks like
for a player, it's the facing direction of the camera
but I dont know if that is true with NPCs
for 'control rotation'
Control rotation has given me weird issues in the past
but I suppose it can be done purely on capsule rotation
Would the root bone turn with the animation in that case?
the odd part would be the AI task to rotate towards the target
root turn?
well
if we are talking about the continuous rotation turning
the animation looks really bizarre
the root does not rotate
the animation looks like a funny foot shuffle
imagine this
the animator makes a clean looping rotation animation
in maya/blender they would rotate the root around
but when it comes to exporting the animation
they would remove the root rotation
which would leave them with a stupid looking animation
Then the capsule fakes the mesh rotation
but the capsule is the source of the animation
i get it
ya
so you adjust the playback speed to match the rate that the capsule rotates
I don't know that you'd want this setup for NPCs
it seems easier just to get the animator to rotate the root
and include like 8 directions
https://s3.drafthouse.com/images/made/marchofpenguins1_758_426_81_s_c1.jpg uber realistic movement

I think we're gonna try the rootmotion method tmw
good call
On a different note, have you seen this? https://www.youtube.com/watch?v=LNidsMesxSE

In this 2014 GDC session, indie developer David Rosen explains how to use simple procedural techniques to achieve interactive and fluid animations using very...
is it a multiplayer game?
Nah
ad ya, the curve driven stuff is cool
I get to do everything i want in the ABP 😍
How would something like that work with Unreal?
I know curves can be attached to anims
Create Curve Assets for everything?
So not attached to the anim?
curves on animation are more like metadata
you have to be careful of animation curves
I've only used them for turning on/off IK up to this point
because if you are compositing multiple cached poses together, you may end up blending the curves incorrectly if you are not paying attention
I like curves a lot, they are super useful, but they are more for modulating certain parts of the graph
the Shinbi animGraph has an anim curve that controls the blending of the upperbody/fullbody of the animation, which is pretty clever
Could you give a quick technical example of how they'd actually be used?
Oh, from the new Paragon packs?
yea
only Shinbi has an animGraph at the moment
I generally use AnimCurves to Opt In/Out of certain features
So, like i was doing with IK
but the Advanced Lococmotion System uses them to encode delta rotations
which is also pretty cool
They can also drive material properties
and the animGraph can modify the curves as well
I've never actually created a curve asset
Curve Assets are great
I assume they're like Timelines
they are like timelines and they can be used BY timelines
Where you call them and shift the X axis manually?
they are variables
and you can Get Float Value, where you input the X/Time of the curve
Curve Assets are super useful
you can have a timeline use a curve asset, so that if you have something like a damage flash
you can author a single curve, and it will update in any timeline that points to it
I guess that's more useful than duplicating them across BPs
Quite
Wouldn't they need to be called every frame for a smooth progression along the X?
You'd need a Tick event for that
Or a Timer to handle it
Timelines are called every frame that they run, so it's no different than that
I'm just talking about overhead
Didn't realize you could point to curves from Timelines tho, that's very useful
One other thing
We have a player and NPC ability to get inside objects with doors
Once they're inside they can't move, just open up the door to look out
Where would you place the root bone?
is this like a top down perspective?
When i prototyped it (no anims) i just disabled collision, lerped the actor location/rotation to an arrow component inside, then lerped them back out
and yea
Capsule was on the player
Just without collision enabled
I suppose I would disable collision on activate, then call the montage to Start
and allow the montage to apply the root motion
seems reasonable because you're momentarily taking control away from the player to get them into position
AS?
anim seq
Then ya, I'd call the montage on both the character and the Prop
I'm not sure what the merits of using an animSequence would be
We're not creating skeletal props
I use curve data attached to the animation to set the rotation of the door
weird
Otherwise we'd have 100+ prop skeletons to manage
eh, there are easy ways to handle that
BUT, keep in mind that the animation thread doesn't run at the same time as the game thread
so there may be a cost associate with reading a curve value from the animation graph to set on some other actor
either in syncing or in reading
Part of it is that using prop skeletons would be more work for the animator
amen
which is just like 1-2 bones
and then I can attach any static mesh to the bone/socket
So, would they be skeletalMeshActors with a staticmeshcomponent?
and it would simply be attached to the root
and you could read the values off of it, and apply those to your target meshes
ya, I make 1 triangle, and skin it to like 1 -2 bones
make that skeletal mesh not visible
then add a static mesh, and use the attach to lock it into the skeletal meshes bone
That's an awesome idea
Ya, so image you had a prop bone that was on the root
which could animate something like a door opening
This one would be for manipulating held objects
do you know about Copy Pose?
yes
where the names of bones match between two skeletal meshes
the transforms will be copied
it's like 'Master Pose' but infinitely better
Like runtime retargeting?
driving two skeletons with 1
that part yes
but retargeting is something else
anyway, imagine that your generic prop skeletal mesh also starts with Root->Prop-Bone
you can enable Copy Pose, set the reference variables
and now your character is completely in sync with another skeletal mesh in the scene
you don't need multiple sets of animSequences, or fancy curves
you just need your animation for your character
and the character will drive the bones of the prop
This setup is very weird, now that I think of it
it would work great, so long as the character and the prop occupy the same world transform
however, copy pose is pretty flexible
if the skeleton hierarchy does not match, it will still copy bones where the names do match
How do i print a discord transcript 👏
If it's in world space, can't i just create a handgrip on the doorknob?
CopyPose to that?
its not that it is in world space
its in component space
however the location of component space between the two skeletal meshes can differ
so imagine you have this setup with a door
and the door's forward is 180 from the characters forward
the copy pose would work, but the alignment would be flipped 180
so you would have to consider that
I think its a pretty cool idea, and I would consider it for an experiment
however I do not know if it there are some pitfalls that would burn you
Isn't this what you normally do?
Oh hahah, no i meant this implementation
oh yes
so make a variable from that
and then you can assign that variable at runtime
Right, for the skeletalmeshactor
at the very least, this node is useful for character customization
they use it on fortnite
they have an invisible skeleton that runs the animation graph
a skeletal mesh
and then they have multiple skeletal meshes that use Copy Pose
for different parts & equipment
so whats badass about copy pose
is that you have a reference to another skeletal mesh
you can copy the pose from that mesh, but then you have the opportunity to modify the local version of that pose
and since you have the skeletal mesh, you can read the curves from that skeletal mesh as well
ohhh
which means you can do really interesting effects
like the character is charging up an attack
and that charge is stored as a curve on the skeletal mesh
and then some weapon could take that charge curve and pose, and then do something cool with it
spin some blades, or add a material glow
a bunch of cool functionality that is self-contained within that animGraph
How would you convert the CopyPose location back to worldspace then?
Cause it seems like componentspace would always be incorrect
depends on how it is authored
Unless i make the dummy rig a childactor for a second
but you can get the transform of the bone/socket in the animGraph
in my mind, the way I would do it
is that the actor that is the Prop
say its a door
the skeletal mesh would be at the origin of the actor
0,0,0
Was that Copy Pose from Mesh node what you've been referring to btw?
that would also be the same transform that you would move the character to start the whole thing
yes
so you would have your character get into same world transform as the door actor
Ah, that's how we do executions
nice
aligned to the same root location
ya, so you're working with familiar concepts
This is awesome
So say when you start a door open
the animation would have that prop bone placed at the fixed distance away
say 50 cm forward
You'd keep the root at the same location of the root of the dummy rig then? For all 3 stages (enter, hide, exit)?
hmmm
same
I think root motion would poop on this idea
because these copy pose transform are in component space
however, its easy to reconstruct world transforms
Oh, before i forget, we found out how to export anims without the rig in a Maya file using references
very strange
was it a case where the rig file was disconnected from the file reference?
had to disable this
sounds dangerous
indeed
honestly, likely not worth the complexity
just play some montages
keep it simple
What's the reason you use montages for everything?
They always seem to be more than i need
We're not doing anything that will loop variable times
I suppose it could be a Montage for a character and a sequence for the prop
montages can blend in and out with the anim graph, and they have functionality for sections and looping
I tend to use montages for the gameplay cues
I think i've just done that with States before
They allow blending
states have blends
and blending between two actors in tenuous
I just dont trust that two animGraphs will blend consistently
because you could have someone think that the blend between the states is too soft, and they update one
but dont update the other
but triggering montages is quite a lot more reliable
So, you're talking about when you're doing skeleton - skeleton interactions?
and you dont have to worry about having lots of transitions
ya
which I guess is something that I think about a lot
I guess that's why, we haven't really done any yet
because I spent like 5 years doing that on the SIms
Making transition anims?
no, Multi-Skeletal animations
but ya, if you can make it work with a single skeletal mesh
and just reading curve values
then keep going with that
there's less to maintain
BUT!
That single dummy skeleton approach seems promising
Yea, already doing the interface part
At least to inform the Pawn what interaction animation to play with enums
Do you pass the animSequence from the DoorActor to the character, and then assign that in the AnimBP? Because thats a real hip way to do it
totally a good idea if you have hundreds of unique animations
Does Actor == interaction object?
ya
ah
nah, currently passing it from the BTTask
passing the enum
It seemed like i'd need more than just the animationseq
Again, i'm a programmer/lead with little anim knowledge
haven't ever considered where i'd need the root to be in an animation before this month
Is the enum approach not very common?
no its fine
however
can you send me a screen of what your transition rule looks like?
If you are concerned about performance, you'll want to make sure your transitions only use a bool and Not Bool
this is all of them
which means you evaluate your transitions in the event graph instead of in the animGraph
!= for exit
ya, that will break the fast path
like 30 bools
30 bools, or 1 Bool + a Sequence Variable 😉
Speaking my language
or 0 bools and a montage
what's a seq var?
btw, AnimGraphs can call montages to themselves
So you have an animation clip, right?
that you plug into a pose
you can make that animation clip be a variable
so in your event graph you could decide which animation is set to the variable via a switch on your Enum
and then you just raise your transition
OR
you switch on your Enum
and play a montage
and that Montage Slot can be the very last node in your animgraph
so it doesnt even need transitions
however, I dont think thats what you want to do for your NPC setup
your enum approach is basically having the state machine fall into the correct state
which is totally fine
but, you could have to call a montage when the enum changes
If OldEnum != CurrentEnum, Then Switch on Enum, Play Montage
OldEnum = CurrentEnum
Anyway, It's getting pretty late. Hopefully I've given you some ideas to play with!
Actually, since your state want to loop, avoid the montage approach
For sure. So you're suggesting that i use montages and play them based on the enum i set in the EventGraph of my ABP
looping montages are not worth the trouble
this may all be premature optimization
keep what you have
I'm definitely open to it, just might be a future thing i'll have to look at
What did you mean by raise your transition btw
basically setting a bool to true based on the variables
for me, I deal with a lot of jumps
and so far I have not found the equivilant of triggers from Unity
so I catch a delegate, set a bool to true, then use a timer to reset that bool after a short window
I guess I meant raise a transition
as work you do in the event graph
so that the anim graph doesnt have to perform any logic
which enables fast path optimization
idk, it's 2 am, and I'm losing it
Hey, I'm trying to use my BlendSpace currently and for some odd reason, it works fine except the running animation, it stops at the walking animation and even blends with directional jogging anims, but when it comes to running forward, it won't do crap
is there a way to use First person arm animations on a third person skeleton
Yes
First person is mostly reliant on the camera
If you open up the 1st person blueprint in unreal you can see that they are using the arms of the mannequin rig (which is a full body character rig)

oh I may have misunderstood your question.
From what I know they generally have two different animations
one for the 3rd person view and one for the 1st person perspective. Ive never seen anyone use one for the other since they tend to look janky
sorry about that
i need an animator 😄
i got the animations but they are for a set of arms, or someone to explain how to do that in maya/blender
So. I recently noticed that the implementation I am using to rotate the torso separately from the legs is affecting all players. I can't see why though.
So if i place another instance of this player BP in the world, and I look around to move my torso, both instances move their torso
How do I correctly apply Aim Offsets? In both Local and Mesh Space Additive it produces Garbage
Or am I better off blending it manually with a 2D Blendspace?
@dusk dove Aim Offsets are supposed to use the Mesh Space additive import type. You need to specify the animation clip for a reference pose. You can use the neutral aiming forward clip as the animClip for all of them. Blendspaces do not produce the same results as Aim Offsets. Aim Offsets handle rotations in component space to achieve the correct rotations.
@floral horizon In this setup, each instance in the world is looking to the pawn that is controlled by the player. It would be better to use 'Get Owning Component' or 'Get Owning Actor' instead.
@worldly spade That's pretty strange, Does the animation work correctly on it's own? Outside of a blendspace? Have you tried making a 1D blendspace with this animation? Are there any Sync Markers setup on the animations?
@frosty peak I see. I figured it out this morning, too 😄
👍
@frosty peak Thank you! That fixed it up right away.
Is there a way to set up one parent anim blueprint for multiple different skeletons?
For example, I have hands and weapons as separate skeletons, but they tend to have identical animations (with 2 types, weapon + hands).
@frosty peak I don't think that the animation doesn't work on it's own because it's from the Animation Pack from the Unreal Engine Market Place, Haven't tried it outside of the blendspace though, I tried with a 1D blendspace and it still didn't work, and no, there are not any Sync Markers setup on the animations (probably because I still don't know what that is)
apparently, Layered Blend Per Bone nodes scale the Pin Connection size
(not that 20 is a value you should enter anyway, but it's funny to note)
How would I play an Anim Montage (Shooting) ontop of my AimOffset?
save AimOffset cache and then do the animation montage from this cache
Montages are not additive, are they?
there is an option Additive settings
not sure, but it makes sense for montages to be additive
Is it possible to trim (play just a part of) and animation when placing it a montage? I have an animation inside a montage, but I want to play only a part of it, not the whole thing. I could just trim the animation by cutting frames, but since I need both the longer and shorter versions I would have to duplicate assets. Trimming / cutting inside the montage would make things much easier.
@dusk dove If you want the AimOffset to apply to the montage, put a Slot before the AimOffset. If you want the Montage to override the aim offset, place a slot after. If you do Additive Montages make sure that montage has an Additive Identity pose connecting to it and then Apply Additive afterward.
Montages & Aim Offsets
@sharp cedar You can define montage sections, and play those to get a smaller range of an animation clip. But it's a clunky process.
What If I want to play a Montage ontop of the AimOffset?
e.g. AimOffset+ Shooting/Recoil animation?
@frosty peak
use number 1
the aim offset will rotate the montage in the direction of the aiming
say all your montages are authored pointing forward, we call that 0
and the aim offset takes 0 and rotates it up 45
your montage will be oriented to the 45 because it is going into the aim offset
sometimes you may have an animation that you dont want to rotate, like a salute or something
you would put that into a slot that comes after the aim offset, because it will stomp what comes before it
yeah, it makes sense. Didn't think about putting AimOffset after the montage
thanks
@frosty peak Have it like this now
are you concerned about performance?
You'll want to evaluate your delta rotator in the event graph if you want to enable fast path optimizations
anyway
depending on how your aim offset is authored
you don't need to use a layered bone on it
a properly authored aim offset should work across the entire body
I have to, otherwise the AimOffset produces garbage
so it's authored incorrectly
is Duel, Single, and heavy the different sizes of weapons?
yeah
generally you should give each of them their own authored aim offset sets
Shooting, Reload etc is within these montages
the rotations of the arms are very different for two handed and one handed guns, for aim offsets
unless the aim offset is handled purely through the spine
which can look odd
I currently test Dual only and have only one animset for these
You said I can do it without Layered Blend. But the Aim offset plays additive, which means I cannot blend it with my running animation for example
The first layered blend is to apply the Base AimOffset Animation (Spine upwards) and then playing the AimOffset ontop of that to have a correct Additive.
@frosty peak
it all depends
Most Answers on answers just tell me to do Layered Blend, which does make sense
IF the aim offsets are authored with very discrete bones rotating, you'll have 0 rotations on legs
layered blend is fine
If you check out Murdock (paragon) on the marketplace, you''ll see that they use full body aim offsets
which lets them hit really extreme poses
they use IK to correct for the rotational drift
but if this is working with what you have/need, then keep going
I'm trying to find an optimal way that is easy to extend.
personally, I find that it's often less work to create the clean assets, than it is to band-aid assets with the animation graph.
WHAT Expanding on the content from the Animation Blueprint Setup & Walkthrough livestream, Jay continues work on Shinbi's animation system to show some more ...
can you turn off parts of a skeleton when not needed to reduce processing, without any visible glitch?
@devout lantern The only mechanism I can think of would be skeleton LODs. But I am not aware of any system that lets you disable the updates per bone.
I wanted a decent face rig but it wouldn't be doing much most of the time
You could make those face bones only exist in LOD0, and then they would cull out
or the face could be a separate skeletal mesh that copies a pose from the main mesh
idk, faces can get tricky
heh used to know someone on irc years ago called crow
Alas, that would not be me, I never really got into irc.
yeah, LODs are the way to go.
ok I will look into that thanks
is there a good guide on Hand IK ? want to keep my hands on my gun at all times

@cloud lodge Looks like there are offsets on the TwoBoneIKs, Should those be zero'd out?
oh, I guess those are the pole vectors

I would try to make it work without the HandIK first
it works without it
Hand favoring is often not needed
but when i aim up and down his left hand moves away from the gun
likely the AimOffset is moving the left hand IK bone incorrectly
i disabled everything and just plugged in a running anim

thats what it looks like without the IK, ignore the gun being slightly off, not finished setting the socket
can you show the bones in the viewport?

That IK_Hand_Gun is pretty far off to the side
yeah i figured
If the aim offset makes those bones go crazy, you won't be able to get solid IK

i disabled all aim offset for now, just straight single animation
oh wait that socket needs to be on the ground i think
that bone*
doesn't have to be on the ground
those bones should follow the placement of your wrists in the animations

well, Epic is not perfect, sometimes the assets have errors
yeah, but i kinda thought the hand ik should work
well, if your animations are looking good, you could use virtual bones to make a set of IK bones that work

I personally wouldn't worry about IK too much, it's not something you need till later in most projects
but ya, you can right click any bone and add a virtual bone to another bone
it makes like a copy as if it were a child bone
i just want to keep my left hand on the gun, didn't think it was that hard 😄
Make a virtual bone on the right hand that points to the left hand
use the virtual bone as the effector on the two bone IK
I would try to keep 1 TwoBoneIK for the left arm
and ignore running IK on the right arm, until you need it
this is like the quick bandaid approach to the problem


👍
thanks for the help 😃
if i have a reload anim, which is when the player is aiming, is there a way to play the animation when hes not aiming without causing this?

@cloud lodge I don't think there is an elegant way to handle this. You could try making the reload be an additive animation (using the aiming as the reference pose), and then apply that while in a different pose. But doubt that would line up very well.
BUT
for your layered blends, you can specify a depth of say 2, which would ease the layering over 2 bones
so you might try making a spine_03 be the bone with a blend depth of 2. You can add '-1' to chains that you want to ignore in the layering.
Hello everyone. I'm having some problem with animation retargeting. Whenever I try to retarget my animations to my model, I get this crash
I've tried different engine versions but nothing changed
This crash only happens with one model only
thanks for the help @frosty peak
hi, some quick question about playing montages in blueprint (MontagePlay). Its not playing , but i doubt if perhaps i need to change something to the animationBlueprint ?
@wraith verge Does the AnimBP have a Slot for the montage to play in?
Hey guys, I have a small question. Is there any way I could ignore certain sample points in blend spaces when interpolating? The problem is that I have a blend space that takes in direction as an argument, which can be [-180; 180]. Problem with that is if I set an interpolation time on the direction axis (I don't need on speed because that increases and decreases gradually, based on an acceleration) it will go trough the other samples first, making the animation look weird (like the guy strafing left before going forward).
Is there a way to mirror an animation? I have an animation where character waves their right hand. I want one where they wave their left hand. Skeleton is symmetrical, so in theory taking animation from one bone and applying it to another should be possible.
I know that would be a rather weird solution and it would be better to just make an animation file... But I would need a lot of new animations 😛
hello fam
anyone have any experience with IK?
I wanna IK this badboy
robotic arms
about to rig it
but just wondering if someone has done that before with robotic type stuff like above
Hey guys, I was wondering if anyone could point me in the right direction on something; what would be the best way to limit the range of rotation of joints on a skeleton to prevent unrealistic joint movement when using IK?
I'm interested in this as well.
@analog cove haven't tried and I might be wrong, but you could try using the "set all bodies bellow simulate physics" and "set all bodies bellow physics weight" nodes/functions in order to let the physics constraints from the physics asset limit the rotation. You should make sure though that gravity is not enabled on the mesh, otherwise it will ragdoll.
@swift heath I'll look into that method, thanks for the suggestion
No problem, but as I said, I didn't test it and I'm just a newbie to UE myself, so idk if it's any help.
I'd still love to hear other thoughts on best practices for achieving this
@swift heath To address you question from earlier, You could control the interpolation of the float in the event graph with an FInterp instead of relying on the blendspace to perform the interpolation.
@analog cove I think Physical Animation is the only way to address this with the current tools. But you can constrain the data that you feed the IK nodes.
How the syncing of multiple-character animations to one world is called? Having trouble googling that without a proper search definition. What I'm trying to do is to move player to an enemy and have them "connect" to then play animations on both at the same time
I've seen people use some marker to snap animations to one world, like in Uncharted presentation, or was it a bone, no clue
hope I make any sense, thanks in advance
I think the typical approach would be to call a pair of montages for your actors at the same time.
and ya, you get them into predefined positions
yeah but the problem is that I need them to lerp into position
not sure what is the best way
usually you would move your character into a defined location
and then trigger the montages after they are there
yeah, thats the part that confuses me
is this like an assassination or what?
the enemy can have a scene component that you can query
so, get the enemy, Get BackStab transform, Move to World Transform
trigger montages
most of the work is making it look smooth
but that approach wont scale well, if u go for more anims I think
we used this technique on the Sims
you need a data structure that defines the slot and montages
"Synched Event DataAsset:
Name : "Stab Face"
LocEnum: Front
Player Montage: Stab_Face_montage
EnemyMontage: "Get Face stabbed_Montage"
Other Tunables
"
discord doesn't like my formatting
but ya, if you need a lot of things, make some custom structures and data assets
its the best way to handle large quantities of things
thing is if animator changes the animation it can break easily and the connection won't be as perfect as animator set it to be, unless he'll try to adjust it himself inside editor
that shouldnt be the case
the animator needs to know the distance between the two characters to author the animation
and they would author both characters together
like you have to create a fixed set of distances, and agree to them
otherwise you have to write your own animation system that can handle a lot of crazy blending, like in Uncharted
The simplest way is to do a fixed transform relative to the enemy actor
that transform could be a scene component, or you could use Compose Transforms
You could have the data asset define the offset transform from the target actor
and then you move/teleport your player character to that world transform
block inputs, and then play montages
thanks for the ideas, I'll try several approaches probably to see what will work best for the animator
cool, good luck!
hi guys
i need help with a very small thing
i have animation for aiming and aim offset ready to go
it's just not working cuz of the additive part
what and how do i figur it out
@celest orbit Need some more info. What issues are you seeing?
For the additive, Do you have a reference animation for the additive clip in the import settings?
Is this additive a montage or a sequence in the AnimBP?
Are you using the 'Apply Additive" node in the AnimBP?
If you are using a montage, have you placed the 'Additive Identity Pose' into the montage slot pose?
Trying to setup 2 Aim offsets, with the starter pack, the hip fire and ironsights one both aim offsets are made and work within the aimoffset, and the hip fire one works in the animbp but the ironsights one is like a broken hipfire when i try to tie it into the animbp
https://gyazo.com/813f3435436c226075fb6da2a0c63329
https://gyazo.com/4c50441acd3861bad9147c91f64d0127


Ive tried using blend poses with bool and enum and its the same result theres something wrong with the aimoffset ironsights but i just dont know what bc it works in the aimoffset
any help would be appreciated please tag me :3
is it maybe because I didn't separate the top half of the body or something properly?
I cut off his body and left his arms for first person. And its done this. Any solutions on a fix?
@teal mulch Are the Iron Sight anims imported as Mesh Space Additive? And do they have the neutral Aiming pose as the reference pose?
@molten stump Can you display the bones? That may be a Bind pose error. Are you using any Additives?
@frosty peak yes
@teal mulch In the AimOffset asset, when you place the Idle as the Preview Animation, does it look correct there?
Yeah in the aimoffset it works, it's in the animbp and play viewport where something goes wrong
I have work though so I won't be able to respond to show more pictures until 8 hours from now
The only other thing that comes to mind is the Axis Ranges might differ between the two AimOffsets
@frosty peak I'll have to check tomorrow dude
how does one build Tank tracks that use PhysX to conform to the wheels
@terse bone Doing that with PhysX sounds pretty intense. How does the animation of the tread work? Are you panning textures? Are you playing an animation with bones an a path?
Hmm. I'm importing a skeletal mesh from Maya and both the mesh as well as the whole group it is in get imported as bones.
What can I do about it?
@sharp cedar Are non-Bones getting imported as bones?
yes
Have you tried disabling the import flag 'Import Meshes in Bone Hierarchy' ?
on the skelMesh
I even did a simple test and exported a basic mannequin from UE, opened it in Maya, exported again and imported again: Same thing.
Yes, I tried that
Doesn't work.
are you exporting FBX or using Send to Unreal?
tried both. No difference
Export Selected?
hello
Hai
Im franche
@sharp cedar You could try export selected on just the skinned meshes, it may fix that (in theory the exporter will bring the bones with the skinClusters). Or perhaps try disabling the "Input Connections" flag in the export settings.
Will try that
Nice to meet you, Franche!
@frosty peak Exporting selected didn't help. And I can't find that "Input connections" option.
hmm, how perplexing
Maya:
Ue:
I added that "m" at the end. Otherwise there are multiple bones with the same name and it fails to import
this is the simple ue4 mannequin exported to maya and back.
@frosty peak this is what i came up with regarding gun reloading with first person only arm animations

@sharp cedar Dumb thought here, But could you try just having the skeleton not being in the group? On the game I am working on we have the skeleton on its own and the geometry inside of a group.
slightly off with the gun clip
that looks like its working well
not the smoothest but it works 😄
did you blend the poses or additives?
Will try that.


disables the IK (will make that better (probably put it with the actual IK stuff))
not sure if there is a better way other than get someone to make me the animations if i pay them
i have other guns with no reload animations which i would like to handle
not sure if you could import the arm animations into a 3d program like maya and put it on the third person character
That's pretty cool
@frosty peak Unparenting the skeleton from the group fixed the problem. At least that's what I think did it 😛 Im not sure anymore. Thanks for help.
So ive got these paragon assets here and I want to just make a chain animation maybe like start with Idle>Punch>Idle
Can some one point me in the direction of how to do that?
@frosty peak im home, would u prefer me posting them here or in pm?
@teal mulch here is fine. So the problem is the Aim offset yes?
Im just assuming still not a 100% but ill show u the event graph in the animbp and the full anim graph

heres it working in the aim offset
--
Heres the event graph in the anim bp to get the aim offset to work
https://gyazo.com/0aa0346f9cfbf95c07df9b4dab27057c

Heres the ironsights variable being set in the event graph in the anim bp
https://gyazo.com/9acead7e4ada1415ad1d009cf01563dc

Heres the anim graph

Heres the Char bp using the ironsights variable


heres what happens when i try aiming
@frosty peak
@teal mulch just a moment while I put this together
side note
you should store the variable after you cast your character
you'll have more performance and less wires to mess with
I like to create an "IsValid" macro from my character variable, and off the Invalid branch I do the Get Pawn Owner and Cast.
@teal mulch Do you know how to debug with the animation blueprint while the game is running?
with a breakpoint?
Halp! I have these paragon animations and I want to have crunch start at idle then punch then back to idle, whats the simplest way of doing this?
it doesnt need to be used in game or anything just for an effect display
I added an isvalid (not a macro, would need a pic to fully get what you mean, i get the jist though) and make a char reference variable
but to do the debug is it not just adding a breakpoint? @frosty peak

heres a full picture of the anim bp event graph
wait do i need to change the idle pose to ironsights idle in the anim graph i just assumed doing the aim offset would
i actually may know the issue now i think that is it
yep thats the issue
i thought the aimoffset was playing a separate animation on the upper half of the body but its blending that with the idle my bad, sorry >.< learning animations didnt get it before but i do now
@frosty peak Ty
Lazy Getter
@teal mulch ^ This is what I meant by the IsValid macro. This setup is kind of like a lazy getter. Has a lot less blueprint overhead than a lot of casts.
I'm glad you found the solution!
As far as the debugging animBP, There are other tools besides breakpoints. When you press play, you can goto the AnimBP asset and select the live instance of the character for the "Debug Filter" at the top of the UI. The AnimBP will show the graph and values of the character as you run around. And then the other really useful tool is that you can right click on any anim node and select "Toggle Pose Watch", Which helps you see what the poses look like as they are processed through the graph.
@obsidian path https://www.youtube.com/watch?v=hRO82u1phyw&list=PLZlv_N0_O1ga0IoRrpI4xkX4qmCrhGu56 This series playlist covers that topic. Video 16-18 is about where they talk about setting up Montage Sections, looping, and branching

In this series of videos, Wes Bunn will walk you through the steps to create a third person game. (00:05) - Intro and Play in UE4 (02:17) - Importing FBX ass...
Its all good thanks crow just using seqeuncer 😛
👍
didnt realize i could do the debug filter thing for anim bps as well cool ty, and didnt know about toggle pose watch, and your use of the is valid is noice, should i promote the char cast to or the main char cast to?
usually promote the cast of the exact blueprint class that you are working with.
in the project that I have open, I only have the starter blueprints
Me givin' ya mom's the business:
https://gfycat.com/SameWelldocumentedCoral

Working on some stuff using the Epic Skeleton and ART tool
So the hand on the right, what should I do with it?
Hey, anyone here good with rigging/animation?
could anyone point me in the direction of a good animation tutorial for having the mannequin interact with the environment during animations?
How do I import a SkeletalMesh as the separate parts in the model?
Do I need separate FBX files?
^Yes
Ok...I have a tank that has Hull, Turret, Gun, Treads all in 1 FBX file with a skeleton (that is crap and I will have to re-make)
only the Hull needs a skeleton for its wheels basically
so I would pull out the Hull+Wheels and import that FBX as skeletal mesh
and push the Turret into its own FBX and import that separately?
yes
you will likely want them all to share the same skeleton
so that you have 1 set of animations
but you need seperate fbx's to get the separate parts
Tank is kind of separate in nature so this is another thing I am unsure of
like gun moves only up and down vertically in the turret
technically I could do this just by transforming a bone with Gun attached
but when the gunshoots..it recoils back into the Turret
i'd like to be able to control how far up and down the gun can move through code
you can do that easily with a single skeleton
the basic idea is that you'll have two skeletal mesh components
one for the body, one for the turret
you can either use Copy Pose in an AnimBP, or you can use Set Master Pose in a character BP
Master Pose requires identical skeletons
Copy Pose can have different skeletons, and they will match transforms where the names are identical
so 1 skeletaon for each Turret and Hull but it's the same skeleton?
ok
I guess it can technically be a different skeleton asset
that part is not all that important
so I work on the animations through the FBX with the whole tank together
here's another thing though
ya
if I swap my turret out on a hull
it would have a different skeleton
so i would need 2 different skeleton assets then yes?
sure
you are thinking of the tank as 1 skelmesh that you attach to another skelMeshes socket, yes?
I'm thinking of a tank as separately animated parts (different skeletons) that attach to bones no other parts
right
like Hull has wheels and a turret bone (it rotates the turret)
so imagine instead we were discussing a character with outfits
you have your biped skelMesh
and you want to attach a shirt to the character
you can use copy pose on the shirt skelMesh to make it follow the parent's pose exactly
this is what they do on fortnite
you can do the same thing with your tank
the Shirt is actually a skeletal mesh?