#animation
1 messages · Page 102 of 1
Hello !
I decided to give one of my Workflow techniques for free without all the details but it's still understandable and applicable.
I offer my services by remote course of how to animate and do rigging via Blender + Technics to integrate a human character into UE4.
Cost 62 $ That includes lesson + Doc + Sample files and templates
If you're interested, please contact me in Private Message.
Have a Happy reading ;)
https://docs.google.com/drawings/d/1t1ZZU6L9jrCyWYuuO9Tw5Z7mBIlG1OUFP6NNWeMLRnE/

Google Docs
1 Ctrl + Alt + + (numpad) to Zoom in and - to Zoom out this document. Since 5 April 2018 and Done with Blender V2.79 https://www.blender.org/ + The blender addon UE4 Tools V1.2.4 http://www.lluisgarcia.es/ue-tools-addon/ Unreal Engine V4.19 https...
@strong flame There was something mentioned in the fortnite performance talks at GDC on the topic - I think they mentioned they use the vertex shader to scale down the unused section to size 0, which meant that there were no pixel shader ops running for it.
I'm not sure if there's a way to avoid having the animation system do the transforms for the mesh verts altogether if that's your goal. I suspect they would have mentioned it in that talk if there were, and I don't remember it.
@wise yacht Thanks woppin.. it sounds like the vertex shader was a more optimized way of removing the mesh. I know in UDK it was possible to just hide the sub component meshes but im still new to UE4 code. Even if the joints are still being animated, at the end of the day I just need to hide the mesh, by merging multiple meshes into one skeleton I am hoping I can toggle this in engine.
If I parent multiple meshes to one armature in blender, will it import into ue4 correct?
Anyone know how to edit the animations in the anim starter kit without ruining the other anims. What i mean is i dont like squat that the playermodel does when he crouches but when i modify the joints to sit better. I save it. Then check the crouch to fwd motions so your sneaking forward and his leg inedited is all janky
Its like the whole set of crouching anims are 1 anim
@eternal ivy Yep. They come in as different mesh sections if they have a material set in blender, or as a single section if not.
Although in general the answer to any question with "Blender" and "Will it import into ue4 correct" is "maybe"
Does anyone have any helpful advise for my above post
@white isle try to duplicate animation then insert keyframe in UE4 Animation editor or try something like this maybe https://www.youtube.com/watch?v=CWBgPrYYt4s

Wait a minute, I thought you guys told me that it's not possible to create new animations in Unreal!
You can definitely do animations in UE4. Doing it in your preferred modeling software is more efficient for most cases though.
I only want to edit mine in ue4 @jovial imp
this thing should help:
@white isle
would love to do animations in unreal too, but I don't think it's ready
Thanks guys ill try it when in the office next
Does anyone have a working workflow for importing animations from Mixamo into Blender, retargeting/editing them, and importing them into UE4?
This is the best I can do
Shoulders/chest and also fingers are way off
among others
Mixamo + UE4 Tools Mirring Moves, i did only Hip and Right Hand IK, too laszy to do all the rest but it might works...
https://imgur.com/a/LVp2f
just went from blender to houdini, and was able to rig my character mesh into Mannequin skeleton in a FAR superior way
the automatic bone weight tool is godlike, but then i just plop some extra nodes to paint some different bone influences to combine it
as its on nodes, i can change the capture all, and my paint nodes still keep in their way
Hey guys, what's your prefered way of setting up random idle animations ? I'm scratching my head on how to have them work with an idle/run blendspace
Yes, I've been trying to use UE4 tools @sinful smelt that gave me the best results, but still off so much, I'd be better of to start from scratch.
Is it the latest Blender version?
2.79
More importantly, what did you use for retargeting/mirroring?
Bone constrain Location+Rotation from Mixamo to the UE4Tool Man
Hips to CS_Pelvis in this case
Yeah can do this way too
But one by one with my method is more acurate i beleive or i miss something
I'll try, if your version works, it is way better xD
Location + Rotation > in Local Space > per bone
start with pelvis like this you know allready if its fuckup or not lol
example with the UE4 SK_Manequin, no mater what the rotation are not the same
Oh well, i will continue to be super nice and share one of my basic test to better understand the Import/export process Blender/UE4
https://docs.google.com/drawings/d/1z-V-3uO-3wDSwYCk1BMIWBW7Y3ufKHwfN0Ka8Xy2HJo
For the rest i give some private lessons for money guys XD

Google Docs
Test 01 We change the bones axis during FBX import in Blender Step 13 explanation : https://wiki.unrealengine.com/Exporting_the_Mannequin_Skeleton_from_Unreal_Engine_4_to_Blender_and_Re-importing SAME PROCESS In Blender, the SK_Mannequin Skeleton...
@torpid grail I forgot where but if i remember well there is a pack with all the Mixamo animations directly included in blender or with FBX + easy Export With root bone to UE4, search for it or do it your self or try this https://www.reddit.com/r/gamedev/comments/4jb68g/anyone_still_got_the_whole_mixamo_pack/
reddit
yo ~13 days ago some dude uploaded all the free content on Mixamo into one mega link, that's down now (lame) j/w if anyone's still got the pack...
That would be awesome, thanks @sinful smelt
Mixamo should probably be ignored for the dick move they pulled with removing support for UE4 😦
@torpid grail an other lead to try is this plugin https://github.com/enziop/mixamo_converter
if it work please tell us, i might be interested to know the results
or try manually rename the mixamo skeleton root bone and name it root or armature
GitHub
mixamo_converter - Blender addon for converting mixamo animations to Unreal 4 rootmotion
@torpid grail But hey ! They listen to you pray LOL Double Dick Moves
https://www.unrealengine.com/marketplace/mixamo-animation-retargeting

Editor plugin for precise and automated retargeting of skeletons, skeletal meshes and animations created with and exported from Mixamo tools (Auto-Rigger, 3D Characters, 3D Animations).
cool, BUT I don't think I'll ever find an animation that fits perfectly. I want to edit it in some other software before bringing it into UE4
Unless they improve that inside the engine, which would be awesome
Yeah unfortunately there is more chance it works under Maya, Motion Builder or https://www.nukeygara.com/
Obey and pay XD
I got the same problem, i want to import UE4 animations like the starter pack, the Kubolt Animset Pro, the Mixamo animations too why not, > into Blender > modify these animations with the UE4 Tools blender addon with the IK controllers > then export the result to UE4
Even better ! Mirror these BVH Mocap moves to the UE4 Tool Mannequin, if some one have the solution please tell us
1GB .iso file that you can open with daemon tools light, there is some jedi moves inside https://mega.nz/#!jE5BkLTZ!30nNCAJCb1k1cW5aI0tDad7Khcoclp9Ar0IUQCAzFa4

MEGA provides free cloud storage with convenient and powerful always-on privacy. Claim your free 50GB now
I tried with Maya 2016, because that is what Epic uses. Their ART tool doesn't recognize the new mixamo fbxs properly.
Also tried with Maya 2018 and HumanIK, looked very promising, but then it broke and kept being broke after restarting, even after reinstalling!
just skip Autodesk ...
hmm, @sinful smelt were you mirroring the CS bones or the deform bones directly? CS is giving me some issues. Well actually just not looking quite accurate.
OMFG i must try it with the Maya 2018 demo when i have time and there is this plugin for UE4
http://alexallright.com/2017/03/22/allright-rig-beta-1-3-released/
https://www.unrealengine.com/marketplace/maya-tools
There is also the Live Link https://www.youtube.com/watch?v=_ku41AVH16g
But it cost a lot, its heavy, buggy, etc... But ill give a try when i can to be sure ^^

The Animation and Rigging Toolkit (ART) has shipped with Unreal Engine from the beginning. We are now making it available on the marketplace so we can more quickly roll out updates and have a centralized place to get the latest version.

@torpid grail The UE4 Tools CS_ Bones drive his skeleton bones,
so try to Mirror the Mixamo Bones to all the driving CS_Bones that will drive the UE4T bones or tru to direcrtely Mirror the Mixamo Hip to pelvis for exemple but i guess it will have allreaty the constrain of the CS_ones
Yes I figured, one spine bone doesn't play nice, otherwise it looks good
That spine bone is f**ked from the beginning. UE4 Tools is probably causing issues because it's old.
--
I haven't done it yet @wide badge but probably you want a separate state for random idles, which you switch to after being idle for a time.
or just based on speed
Im sure there is a way but for the moment the best is to bring it all to UE4 then mix up all animations source by retarget, blendspace, animontage
or Add more Driver bones to the UE4T Skeleton
Does anyone know if Unreal has the equivalent of Unity's Mecanim 'Triggers'?
They are basically bools that automatically turn themselves to false when they are used for a transition (They are really handy for one-shot transitions).
At the moment, I'm manually resetting the bool with a very short timer event, but I was wondering if there was a cleaner solution.
hey guys, what is the best way to animate using the Unreal mannequin? Is there a 3DS MAX rig available that anyone can point me towards?
good question
ART tool trying to export animations:
The creator seems to be gone too:
I guess I shouldn't be using that either ....
Should I just create my own rig and retarget stuff inside UE4 because no one is able to create functional tools?
lol, tried exporting the animation without the tool, of course Maya crashes.
@torpid grail LOL
Well come to the dark side my apprentice follow my work flow force 😄
@Blindside#3500 Maybe try this https://docs.google.com/drawings/d/1t1ZZU6L9jrCyWYuuO9Tw5Z7mBIlG1OUFP6NNWeMLRnE
Google Docs
1 Ctrl + Alt + + (numpad) to Zoom in and - to Zoom out this document. Since 5 April 2018 and Done with Blender V2.79 https://www.blender.org/ + The blender addon UE4 Tools V1.2.4 http://www.lluisgarcia.es/ue-tools-addon/ Unreal Engine V4.19 https...
Any of you have a good experience return or a working workflow with MAYA + ART Tool ?
how do i turn this in the skeletal mesh so i can animate it?
Anyone? I can't select the mesh I want to animate.
is there a way to exclude bones from an animation blend?
for example I want to not have my hand attach be blended, on a bone animation? or maybe I do, so i can add that specificly?
The problem I am having is we have a bow attach point that is parented to the root, but keyed to follow the arm. Our bow animation raises this but we blend from the spinw up to allow running and walking with bow holding
This blend ignores the attach point now because the bone is parented to the root. Is there a common method to resolve this?
Add two blends? Onw for the core animation and then another for the attach points?
Is there a way to reset skeleton pose?
I have two different UE4_Mannequins and each of them have slightly different poses, feel like they should or can be the same?
Hello, I'm having some trouble with my animation and skeleton... the right hand came out looking like this... the left hand is fine
What could be causing this?
I'm retargeting animations here
Hey Guys so this keeps happening when ever i use the blendshape in unreal. But in maya it stays with the mesh. The blend shape just puts the hood down. Any thoughts on what is going on?
@sinful smelt ART can actually export animations fine, that warning doesn't mean anything. I just had a stupid check box unticked which stopped me from importing them.
I still haven't figured out how to edit mixamo animations though.
@torpid grail Thanks for the update, maybe try this https://vimeo.com/254521296
this is a how to file linked to unreal engine 4, the free engine I use to make my short films
Also here you can download some including the Blender model ready https://forums.unrealengine.com/community/community-content-tools-and-tutorials/1415750-blender-mixamo-animations
I hadn't realized how much mixamo would change their website, but before the change I downloaded all of the pink and blue animations and I thought these might
i didn't test it yet but if you succeed please update me thanks
@supple wasp check the transforms of the meshes in maya. Maybe the hood or the body have some difference in translation that gets baked to mesh when exporting, thus causing the blendspace to offset.
make sure to freeze all transforms in meshes in maya before adding skinClusters and blendshapes
@misty dagger Just went in and froze transforms deleted history redid the bind and the blend shape in maya. Everything is clean on that end. but still getting the same issue in unreal
ultra strange, is the hoodie and the body in one skeletal mesh?
yea
im in early stages of a project and first step is getting characters into engine ready to move. All the blend shape does is put the hood down. Is there a work around in unreal where i wouldnt need that?
Oh also worth nothing that the other blend shape works fine as well.
I would rig stuff like a hoodie with bones probably
but the blend shape solution is legit too
if you want I can have a look at your file and see what the issue is.
@misty dagger would you be able to jump into a call?
a short one yes, am about to leave the house
oh well if you are about to leave no worries haha
My robot dude has an antennae and I'd like to apply a physics thing so it springs around, without having to animate by hand. not sure what to look up for that
AnimDynamics was the answer 😄
Hey guys a quick question,
Say I have a model that has a base rig (in my case a character model) and I upload that to mixamo to get some of the default animations (walk/run/crouch etc etc) and export those like that as it is with just the literal bare bones, and then used that exact same rig to create more custom animations, only difference between the first and second rig are that the first doesn’t have ik and such.
Is there a way I can upload the rig without any ik bones and then have the rig with the iks uploaded and not have conflict?
Can I use both rigs at the same time (without conflict) for the same mesh and have all the animations there (from Mixamo and custom)?
Hi, someone can tell me how to resolve the animation curve change importing an animation in UE?
The fbx is ok, the import ruins all
what happens when you rotate that
looks liek its going to rotate the lower arm
the pivot is at the elbow
true, it rotates the lower arm, weird as fuck though
why is the upper arm selected then?
not congruent with any modeling software
its because the things between the joints are just visual, the real joints are those circles and it just happens to highlight up the chain instead of down the chain
joints are really just pivot points that affect verts
I'm trying to re-rig the mannequin in Blender and that nonsense is making it needlessly confusing. Other people have been confused too as I can tell by their broken skeletons. Who ever came up with the idea deserves a kick in the ass.
@torpid grailIf you succeed ill be interested by your rigged skeleton
"Child of" constraint is probably the solution, just a lot of work to finish it now.
I got the mannequin as one armature and control it with "child of" constraints from a second control armature
I builded the same Skeleton as the native SK_Mannequin but i stop at the twist and IK parts
you can just delete those, not needed
I would like to control this Son of... XD
Can you export/import though if you totally rebuild the skeleton? Mine was doing some quite impressive yoga when I tried.
Thus I leave it technically untouched and just manipulate it
I build it from Scratch and using the cursor to target
Like here probably https://forums.unrealengine.com/development-discussion/animation/100864-tutorial-how-to-make-ue4-mannequin-in-blender
Animation discussion, including Animation Blueprint, Persona, Skeletal Meshes, and more.
didn't work for me
oh interesteing
i will see it tomorow
my build was based on the SK_Mannequin left side is imported normaly so the bones have crazy rotation in blender and the right side is the same but imported on different axis and the middle one is my build
Interesting resolution, you must have two monitors set up as one xD
Can you import animations from the middle one directly to the mannequin in UE4?
i got this Monitor and i press the Windows key + left arrow for a windows app on the left and Windows key + left arrow for the other app on the right, pretty handy for open UE4 opn left and Youtube on right for following tutorials
http://www.lg.com/us/monitors/lg-34UM88-P-ultrawide-monitor

Get information on the LG 34UM88-P. Find pictures, reviews, and technical specifications for this LG 34UM88-P: 34 Class 21:9 UltraWide™ QHD IPS LED Monitor (34 Diagonal) | LG USA
It does not do the 120 FPS but for the rest its all good
yes
This is the simple version before i try to add the twirl bones and ik
hmm intresting .. must have done something wrong when I tried
can I have the blend file please?
100$ please
hehe
I'll trade vs the constraint version
although you won't need it if you already got it working
😂
joint hierarchies are easy to make, and you only have to make one half
I GTG if you can perfect it and send me later ill be super happy 😃
I don;t use blender
no time for that, but out of everything else you have to do to get a character animated it's the easiest is what I meant
ah ok thanks for your review
what do you use @somber briar and would you recommend it?
blender has a few too many quirks for my taste, although I can work around them.
Mhh ok, I tried maya, got just as frustrated as with Blender due to crashes and slowness, I prefer getting frustrated for free 😄
yesterday I had maya crash on me after making a cylinder, increasing its subdivisions and scale, sat back to think for like 10 seconds and maya crashes
when I wasnt even touchign anything
and just a cylinder in the scene
crazy .. and to be honest I prefer the control scheme of Blender, although I may be alone on that front.
2018 crashes often when I make quick adjustments to the UI
like if I open graph editor or somethign and immediately try moving the window somewhere
before it totally loads
but other than that it's usually pretty stable
and I might just need to redo my prefs from scratch
often thats where problems come from
outdated old preferences
Hey guys, I have a small issue with an aim offset
While it might look alright at first, the hand seems to be sliding over the weapon
slowly and only a little, but sliding it still is
I believe it simply is because the animation I have applied on the character
But I'm looking for a way to stop that
So is there anything I can do?
Anyone know how to use the blendspace in Side Scroller template?
Alright so I finally got my blendshape to work properly. i have seen that i would have to make a animation blueprint. So anythoughts
@cobalt mortar What exactly do you mean by use?
A Blendspace is just something you stick multiple animations into. Depending on a value or values, you can blend from one animation to another.
You should check out some tutorials on how to do it. There are plenty on youtube.
Well, how can I explain this?
@hazy pollen I implement a 180 turn with timeline, if you are in the left and press right you turn in 0.5 seconds
But I want to add an animation to this proccess, an animation for the transition from one side to the other side.
Hmm. I don't think it's a good idea to drive the turn via timeline. I'd think it's better to just play a .5 sec turnaround animation
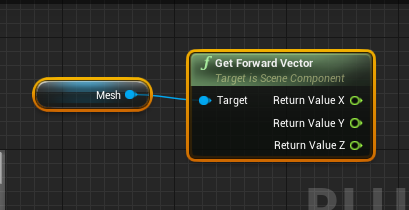
I think you'd just compare the controller input with your player character mesh's forward vector (the direction it's facing). You're just using the standard sidescroller template?
Play the animation only if the character's facing is different enough from the input.
That's how I'd do it. There are probably a couple other ways tho.
You're using the basic UE4 mannequin character, yeah?
https://i.gyazo.com/e4eae1bfae9039ce5b5653f15c004f2c.gif
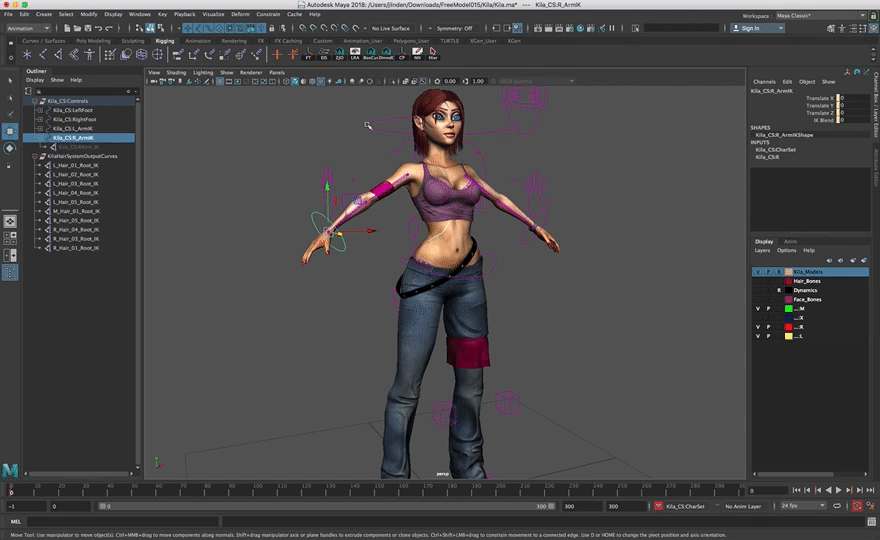
I'm using someone else's character rig for reference but I'm not sure how I can enable IK solvers for the arms. The hand controller has a NURBS control with an ikBlend attribute, but when I try to use the "Enable IK Solvers" tool, I get an error saying the attribute is locked or connected.
Clicking "Unlock Selected" on the attribute doesn't fix it. Breaking the connections also breaks the ability for it to drive the enabled/disabled state of the IK handle.
The rigged character can be downloaded here if anyone wants to try to help me out: http://www.antcgi.com/2014/06/03/free-model-15-kila-lods-rig-dynamics/
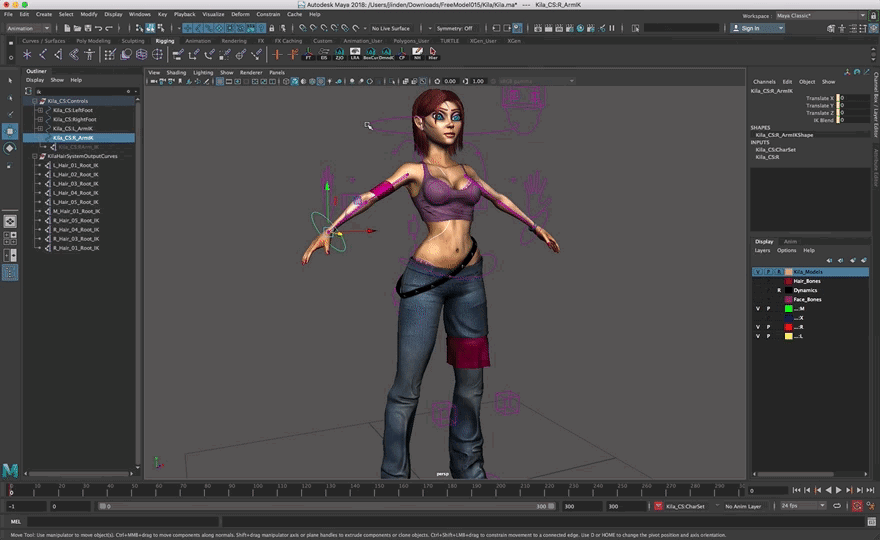

I thought it was about time I uploaded another freebie for you all, and this one was just begging to be added to the list. If you have been following my Game Character Creation Series you will no doubt already have
@hazy pollen this is my blueprint
When the player presses left, that MoveRight input returns -1. When pressing right it returns 1.
use this to get the facing of the mesh:
https://i.imgur.com/VqV8dKU.png
When the player is facing right, his forward vector is X:-1, y:0, z:0. When facing left it's X:1, y:0, z:0.
So basically on the MoveRight input, you'd check and see if the input is greater or less than 0 AND if the Mesh is facing left or right.
If he's facing left( X:1) and the input is greater than 0, play turn around.
If he's facing right( X:-1) and the input is less than 0, play turn around.
I prove that, and it works fiine
*fine
the problem is that I have an animation to put as a transition from left to right
But IDK how to implement that in the blendspace
Ah I see. I don't think you want to put it in the blend space. You're talking about the 1d blendspace yeah?
I'd stick it in a state of a state machine in the animation BP
yeah
@hazy pollen I confused blendspace with animBP
I want to put in a state of a state machine
but IDK how
The blendspace is being run in the anim BP.
Open up ThirdPerson_AnimBP
then go to AnimGraph > Click on the "Default" node, and then Click on the Idle/Run State. In there is where your blendspace is getting referenced.
In most all cases, all animations are run in the AnimBP. You should take a tutorial on it.
I'll see if I can throw something together for you.
I see
I want a transition between run and turn
that's all
but IDK how to reference in the event graph
Hey all! Sorry for disturbing I have just an question.
So i have an character and i have to rig it exactly like the ue4 mannequin 3d person.
My question is :
I have a full project based on anim starter pack with all BP compiled based on ue4 mannequin.
Can I just change the mesh in the Character BP or I have to redo all my BP.
Eh it give me lots of problem
you could rig in another skeleton
I recommend mixamo, it's a lot of tutorials how to retarget that
I know but if i rig it exactly like mannequin i have to redo all bp or not?
BP like anim blueprint/ idle walk rifle combat ecc ecc
I think no
I tried with different meshes and the same skeleton
But both were provided by epicgames
When i import with rig i have to import as ue4 skeleton or without it?
when you import it said with that skeleton u want to import
If i use same skeleton maybe i can change only the mesh on character Bp
when you import a character UE asks u if u want to import the mesh over a skeleton in the project
if you select NONE the program import again the bones and all
The problem is (i didn't proove it yet) when you export the ue skeleton to rig a character on it, maybe UE doesn't recognize it as the same skeleton
but that last is only a theory
I think is too work doing that, that's why until now I avoid rig a mesh in the UE skeleton
Yes it is because i try to export and make some mixamo anim but when i re import them they aren’t compatible
are you trying to import a mixamo rig into a UE skeleton?
Nope man i have only the character right now i try to rig in mixamo but it give me lots of bug with bones and skin on retargeting phase
if you still want to rig in one of the ue skeletons I recommend to select one of the paragons
for example, if you character is female you could rig into muriel or another female character
cause the size of the "man type" of mannequin skeleton is a nightmare for female characters
Nono is male 😛
@hazy pollen do u know how to add that movement into a state machine?
What happens right now when you run what you got.
in the same position he turn 180
but i want to add an animation to that
do u know smash bros?
something like that
they execute an animation before changing directions
You mean the character turns to face the direction you push the control before moving in that direction? Last time i played SSB was on N64.
So you want to have the character rotate before moving in the direction he's facing?
I already make it rotate now I need to add an animation, it looks too weird rotating in the same pose
yes
I have a tun around animation
is from paragon
but is a 180 turn animation
and I want to implement it in a state
what's the name of the animation
Anyone knows twist bones?
UE4 seems not supporting twist bones
Anyone knows anything?
@obtuse yoke UE4 supports twist bones. You must not have set them up correctly
Oh
Could you tell me some points where I may set it wrong?
Here's the bone in 3dmax
My animator says this is the default setting
I dont know how 3dsMax. I only use blender.
@hazy pollen Turn_Left_180
emmm
@Shiina Sora Export the ThirdpersonCharacter fbx and import it into max. You can see how their twist bones are set up.
Thanks ,I'll have a try
Just right-click on SK_Mannequin > Asset Action > Export
@cobalt mortar Ah now I see. Their animation doesn't rotate. Ill tell you how to set it up in PM
@hazy pollen Thanks a lot
I found the problem
It's because
UE4 needs the twist bone to be the child of the parent bone
But the human bip created by default dose not do it this way
I simply changeed the inherit relation and solved
Nice!
is maya's own HumanIK rig any good for keyframing or making animations from scratch? i've tried the ART tool but it's really buggy and makes me wonder if anyone even uses that anymore
trust me, HIK is worse. its meant mostly for mocap editing, but hand animating with it is nonsense.
Ehi guys, the Linear interpolation ruins my animation, I'm forced to set the interpolation to step to avoid this, but I don't want do this. is There a solution?
ue4 linear interpolation
I made an animation in maya
the fbx is ok
i opened it: the animation curves are correct
but ue4 changes them
i baked the animation
it seems the curves changes between each frame
inside the non-baked frame
I sell my animation workflow as individual live course with screen cast from Blender 2 UE4 , if interested PM Me THX
Download the UE4 Free Project to test Example Animation Results, even fingers are properly animated.
UE4 Project BasicSWA01.zip 111Mb https://mega.nz/#!TNQAxAwR!T9T5Z2n1r0QmfSVW-CW7TrlbmmJuaTXD2MSVYTzHINc
Quick Preview https://imgur.com/XeUsPHP
so i guess it's back to ART then
i wish the guy behind the tool pushed his latest changes of ARTv2 to github
the stuff in his blog seems much more polished and has more v1 features in it than the current github version
I am not sure why, but now when I import my animations I get thousands of frames instead of the real number. It animates as usually, but at really high rate(?), but it increases the import time and file size a lot. Anyone heard of this?
Maya License to pay/Year or 62$ in one shot + explanation, your choice guys, just saying 😉
Since 2015 Im working on this problem...
hey guys
can anyone help me a bit
i am having some trouble with uploading my animations onto a blend space
it keeps saying invalid addative animation type
that means the animations in that blend spaces have different additive settings
check every anim you want to include in the blendspace and make sure their additive settings are identical

@misty dagger
does anyone know what happened in 4.19 thats broken the ability to reverse an animation (play rate -1)
in your video I dont see a blendspace tho. The blue node is an aimOffset which only takes additive sequences
@runic fractal ^
So I need a blend space first?
depends what you want to do
an aimOffset is not a blendSpace and both serve different purposes
take a look at this: https://www.youtube.com/playlist?list=PLZlv_N0_O1ga0IoRrpI4xkX4qmCrhGu56
should get you started pretty good

YouTube
Video Tutorial Series Categories: Build a Game, Blueprints, Animation
Hey guy, can you suggest me a good video-tutorial about good game character topology? I have an highpoly model of a character that I need to retopology, but since I never did rig or animation, I don't know beforehand what are the good topologies I need for it to work properly when it will come time to animate it (and no time to learn trough many characters trials and error).
Pretty much it will be fine as long as the there are plenty of verts but to make it look professional, make sure you put loop cuts around the areas that will bend a lot, like the elbow, knee, fingers, wrists, stomache, neck and if there are to many loop cuts, put more verts on the out side than on the inside (eg. underside of the finger few, top side a lot) @Marcus#5549
And the other parts, keep those just normal, and keep the lines straight
Any one know of a good video for creating a third person view that is complete And will work with 4.19? I just followed one for half an hour and it ended In a fail
All that I gained from it was a blend of the animations
Hey guys. If I paint the cloth weight using the new cloth simulation tools, can I then export it as APEX to use in older version of unreal? Yeah I know i can use a 3D package to do that, but sometimes it takes ages and lots of trial and error. Thanks
thats a good question. Would be cool because the apex plugin for dcc packages is cancer.
Exactly my opinion @misty dagger
I'm using a animation state machine. Most have a single animation that completes and then moves to the next state. How can I mark these animations to use root motion?
I've tried pressing the checkboxes randomly and that's not working.
Is it possible to make vector curve in animation/montage?I mean not to use a vector curve outside
does anybody know how i can set stretch limits for 2 bone IK
sorry for a beginner question but how do I start making animations
can someone link me to some resources
Quick question: Do Matinees work for components of a skeletal mesh? Trying to open a door on my vehicle using it
@Epitoaster#3472 I'd try using youtube. I'd link you a video but I'm not sure what kind of animations you're looking to create.
Has anyone gotten root motion animation working with blender?
just a simple walk @trim stream
There's tons of tutorials on that, have a look on YouTube. Good luck!
Anyone knows how to convert an animation curve inside matinee/sequence into an individual curve file?
is there a way to get first person arm animation on a third person character?
specifically target the animation on the arm bones?
anyone working with Twist bones before? How do I set them up properly?
the forearm twist is a child of the elbow and the wrist is also a child of it.
yep thats the correct hierarchy for twist bones
Thanks 😃
I like the Sub Anim Instance Feature
insert Feels Good Meme
it lets you modularize your animation Blueprint pretty easily
I use it to encapsulate "not necessary" graphs like correctives or other stuff like blinking eyes, AnimDynamics etc. Stuff that's not relevant to Gameplay
What's the appropriate way to make a wheel turn on a vehicle?
I've tried different methods and I cant find the correct one. thanks
There is a motion blur problem if you rotate the Wheels. Someone used World Position Offset to rotate them
I'm trying to test my animation with root motion. Is there an example where I can just pull the animation into a level and watch is just walk continuously? Right now it keeps jumping back to the start position and the's the OPPOSITE of what I want.
i am new to animation and want to learn ue4 animation system i just want to animate ue4 robot any suggestion or link of video to start learn ue4 animation system
So I'm following this Live Training where the guy copies some nodes from the default third person animation blueprint to his own. I tried to recreate this by adding the nodes manually, but this one node "Get Movement Component" does not seem to exist. Why is that?
Is it a custom node or something?
no. It says "Target is Pawn"
an animation Blueprint is not a Pawn
you have to use Try Get Pawn Owner
and call "Get Movement Component" on that
@dusk dove Alright, thank you I tried using it on a pawn blueprint, now I see
Though it is used in the Third Person Animation Blueprint by default
This means that when you want to add this node to an animation blueprint you will always have to copy and paste it
Thanks @dusk dove. am trying to do the movement in animation blueprint.. I've got the socket and I'm turning it by 5 degrees, but its only running once as the state does not loop. Any idea if I can make it loop*speed?
im skin weighting a rig. using ART in Maya. I have IK bones on foot and wrist parented to the root bone like UE4 manaquin does.. any idea how to get them to move with there respective joints?
So IK left joint will stay with left wrist even though they are not child or parent of each other?
is it possible to retarget fps arms onto a third person character? inside UE4
literally, google what you just wrote. 😃

indeed
just confused why there are no prebuilt tps gun anim's only first person ones, i am not an animator/modeler
just thought i would give this a try but it's probably more involved i.e making my own animations, which is beyond me
So what exactly does the Loop Up Axis do at the Look At Node?
"Which axis to align to look up." I dont really understand
can anybody explain why socket attachments get jacked up when you add a post processing animation modifier?
our attached weapons do some odd things, i can show video if needed
@cloud lodge which tutorial did you follow? i remember a couple of good ones in video
Hey guys, my animation skeleton is smaller than the original but has the same bones. It's squishing the mesh though. What should I do?
@umbral moon I don't know but I'm interested too.
i fear that you have to export the assets, import them in a model program (such as blender), size them up there and re-import them in ue4
i tried to resize them by goruping the skeleton and scaling
but i can't freeze the transform, so it doesn't apply
i can't freeze because I get incoming joint relies on transform X @wintry belfry
do you first export or do you have the source
yes i meant if you had the source of the model or you had it in unreal first
see if this can help https://www.reddit.com/r/unrealengine/comments/6vsnt3/help_character_enormous_and_distorted_after/

reddit
Hello, I followed along with the official Unreal tutorial for retargeting different skeleton:...
basically change the scale at import
i had to manually drag the individual bones to get them to the position that looks right
scaling doesn't fix the proportions i guess
the i had to click key at the top of the animation editor
then click apply for all the bones
@wintry belfry
it wokred right away on unity
although not perfectly
i'm not an artist so it's imperfect and takes a lot of time :/
@umbral moon yeah... yesterday I spent like 6 hours figuring out how to retarget properly
For some reason... one of my files doesn't take UE4 retargetting too well so I am forced to do it in othersoftwares
well, to be fair, i had the exact same issue in maya
i think this particular problem comes from the animation just being smaller than it should be
proportionally
yes, you can translate them in that editor
I want to slightly rotate this bone... but If I do that, It will affect the rest of the arm.
I don't want that.
I want to rotate one bone
you'd have to go further down the hierarchy
Again. One bone
no, i don't think you can
you'd have to go into an editor and disconnect the joint
i believe, I'm not an artist
yeah I guess
Left - UE4 retarget
Middle - UE4 animation
Right - Blender retarget
keep in mind this character has the same bone names and very similiar hirarchy
you could try rotating the forearm to offset the uppperarm's rotation
wow the left one is terrible
retarget animation & uniform scale don't work together
Can someone help me? I'm in editor version 4.17 and i can't open Animations help is really appreciated cause if i can't open them my whole project and work of 1 year is garbage then https://cdn.discordapp.com/attachments/225448446956404738/434680819408306192/Desktop-2018.04.14-13.36.33.02.gif
Its even not for that project its even for the whole version


I have no clue why or how this is happening. Looks fine in editor, but in game it isnt (WE SLOWED DOWN ANIMATION ON PUPROSE) btw to show it off
How does UE handle animation looping? When I have a walk loop I usually have the first keyframe as the last and want it to end at the penultimate frame so that keyframe is not played twice. Does UE do this by default?
Since I just learned how to use Blend Spaces yesterday I now especially ask myself how it loops in this fashion.
@wintry belfry i have no idea now, it was one on youtube
importing skeletal meshes to ue4 is pretty cancer
what about it? I find it quite easy and straight forward
Hello, has anyone on here ever tried to animate a walk that can go in all 4 directions? I wanted to animate a little "combat shuffle" using a blend space as a sort of test, but my feet dig themselves awfully deep into the ground. Am I doing something incorrectly? Is there something I can do to fix it? If it's animation-related, what should I keep in mind while animating the 4/8(if necessary) walk directions?
the feet also dig themselves in when the blend doesn't fully move into a direction, as in, you move a speed of 25 while the shuffle moves at 50, causing the idle to be added to the blend also.
@charred moat You should use IK to avoid the feet digging into the ground.
@dusk dove Ah, is this the only way, just solving it with an IK?
I don't mind either way, I just don't want to feel like I fix my sloppy animation with an IK solution
You would fix anykind of issue like this with IK anywaay. I mean your feet would usually dig into the ground when standing on a slope, too.
fair enough, I was just making sure. Thanks mate
https://www.youtube.com/watch?v=ZqxRUV_mrVo @charred moat try this out

This time You will learn how to set Your first character. Add strafes capabilities and death animation. I also show and explain basics about animation bluepr...
ive been working on it
oh hey thanks man, I'll check it out later, day's been busy so far.
lol
same
though it might confilct with your already made one if it has stuff
it seems to be making a prob for me
is it normal that after a ‘play animation’ a character exits from its animation bp?
@runic fractal Aw, dang. I did everything like you did in your video already, I think, so this didn't really help with my problem. Still thanks, though.
My character does not play animations at all in play. They do show up in the Blend Space and the Animation BP preview. Any suggestions?
ok guys 2 things
firstly
i want to do a bit of ajoke thing with my character where it will play a animation, but when the loop finishes, it freezes at the last pose and wont go abck to being idle and moving like normal
https://gyazo.com/7925c72ab9c230d7fba67ed0da1f9681
this is my get up
https://gyazo.com/92fbac442c9b8ac8f17b0065a2951117
how should i end the loop to make it go back to normal?
also, i finally figured out how to make the strafe work, but it wont seem to go in reverse
https://gyazo.com/fb4057c27ad3900df1c08024606405ca
and would sometimes run sideways when walking normally
any ideas


@misty dagger Perhaps you forgot to assign the AnimBP to the skeletal mesh.
That, or you 're not using any of the variables from the Character BP in its corresponding Anim BP.
Sorry for low level question is possible to make a custom animation with key fuction?
@hazy pollen Thank you, for some reason the Anim Class was set to None for the mesh.
@pastel cloak Yes it's rather easy. You create an Animation Montage and put your animations in it and make sections for each animation. Then in your Character Blueprint you use an event node for the key, f.e. keyboard keys are just called "1", "2", "A", etc. and you plug that node into a "Play Anim Montage" node. In this node you gotta assign the Animation Montage and the start section name. One more thing: When you wanna make sure that every section just plays its own animation and not the whole rest too, you gotta press that little clear button in the animation montage above those horizontally disposed animation bars.
Check this video out to learn this and a whole lot more: https://www.youtube.com/watch?v=YVC-DL9Ibf0

In this stream, Wes Bunn takes a look at the quickest way to get a humanoid character up and playable from a Skeletal Mesh and a series of animations. We’ll ...
Thank you bro🙏🏻
Yw 😄
@pastel cloak Btw to create a section you rightclick on the animation bar and choose "New Montage Section"
@runic fractal Maybe use a Pose Snapshot and a "Blend Pose by bool" node in the animation pb, then use a boolean to define wether or not to blend to the freeze pose. https://www.youtube.com/watch?v=nkj6PAbGYtM

Wes Bunn walks through how to set up and use Animation Pose Snapshot to create more natural looking ragdoll-to-standing animations. Ragdolls are fun, but sna...
@misty dagger thanks i already figured it out, someone msged me in private on how to do it
When I hit play I move the camera instead of the player. I use a Possess node in the gamemode blueprint. Any suggestions?
This happened after changing the physics asset but I see no context
The player controller 0 target returns None
but it does spawn a pawn
is it possible to play a blend space like a montage, so not going via the Anim Graph? just need to trigger it, don't need complex state transitions etc
Is there a way too call Events on Sub-Anim Instances?
How would I go about transporting my fuse character into ue4?
can anybody help me out? i have an animation with root motion trying to play it through state machine but there is no movement
the root bone moves (checked in maya),
the animation has root motion enabled and processes it correctly
the anim gets root motion from everything
Hey is there a way to give custom permutations to a skeletal mesh?
Like for example replace the geometry weighed by this bone with another mesh
While remaining in the skeletal mesh
Something like what Preview Meshes allow you to do but without the preview part
you mean like adding clothes on a character by replacing bodyparts of the mesh?
@nova kestrel
I was more thinking like destructible parts
Like for example I have a hull of a vehicle or a wing
After a certain amount of damage, replace the wing part with a damaged wing mesh instead
well im pretty sure that you can switch out the mesh on runtime
if its just a static one
but if its skelatal, id add some more skeletals as subobjects to the root skeletal mesh and switch them out
Can you do that inside the root skeletal itself or only inside the bp
If I wanted to use animations for uppbody and lower body would I need 2 state machines?
Looks like your materials are bad. Open them up? Maybe there are some errors.
That or maybe textures didnt import? Ive never used Mixamo stuff before tho.
Anyone know how to do hand grab animation in VR
Transform(Modify) Bone node
do that for every single finger and concatenate it with Layered Blend per Bone
thank you
Hey mates. Quick question.
Starting to work with Blend Spaces. DO I have to have a root dummy bone and also do character have to be looking like walking on the spot in the preview or keep on walking away ?
Thanks.
Basically should it look like this or should the character stay in place while doing the animation:
Bros .I exported an 50+ frames animation from 3dmax to ue4
But it becomes 450 frames in ue4
Anyone knows why?
all, i want to have a physical animation when a character is hit by a bullet. So far I have this:
https://gyazo.com/ef207f344db7912a5e851d7bc6db5025

However, I do not know how to reset back to a non-simulation in a blended way. Right now, I can have the character go back 100% directly in the animation, but cannot find a way for him to go back smoothly
https://gyazo.com/1c4c4aa59b056ff1d064b16ef54d79cc

Ok, anyone looking for an answer, the best I could get comes from UE4: https://docs.unrealengine.com/en-us/Engine/Animation/PhysicallyDrivenAnimation
Can anyone think of any reasons why... when switching to control rotation (i.e. strafing), the pawn always starts facing forward then blending to the side even if you were running to the side when entering the state?
interpolations are all at 0, the blend state transitions are at .5 but that doesn't seem to affect it
oh wow that does seem to affect it... er... if I reduce it to .1 I almost don't see the forward state at all but it's an instant snap. I'll just keep brainstorming to myself if anyone has any suggestions 😄
:/ I would prefer a longer blend into a state that already knows what state to be in. So confuse
Hey, so I want my FPS Arms to have default walk and run animations (move/sway them left/right). On top I would like to have the idle animation for the specific weapon. The arms are attached to a SceneComponent. Would I animate the scene component to achieve the always present walk/run animations?
Is anyone but me seeing this jitter in the animation?

how would i go and smooth this?
You should make your character's capsule visible first, to determine if it is a movement component problem
how would i be able to see it?
open the blueprint, goto the root capsule, and turn on the 'Visible' option
but once i enable it, what would i achieve?
or you can use a debug command
if the capsule itself is jittery, and you are not using root motion, then it doesn't seem like a problem that animation can fix
are you using Root motion?
what's root motion? i don't think i'm using it
hmm
i belive it's something with the animation
is this starting from a template?
no, it's custom
ok, so you have a skeletal mesh, ya?
if you set your skeletal mesh to use Animation asset
and you plug in an idle clip
and then test the movement
if you are still seeing a jitter
then it's the movement of the character's capsule
if it is smooth, then it could be the animation graph
i did set the speed for the 1d blend to 0
we are just trying to properly diagnose the problem
if it jitters with no animations, then the problem isnt with animation
ya
smooth
ok, so do you have an animation graph?
what does the walking or running state look like?
ok, what does that MyIdkleWalkRun look like?
is speed acceleration or velocity?
what does you event graph look like in the AnimBP?
hmm

let me rephrase
there are 2 cases here
jitter while rotating
jitter while moving in a straight line
the thing is, once it picks up speed, the jitter goes away
with no animation graph, was the jitter present while rotating?
what is odd, is that in your output, the same speed is printed 4 times in a row
is that print getting called multiple times per frame?
but only once right?
yes, but i don't see that as a problem
perhaps the jitter is partially because we are stepping through the velocity
instead of a clean linear move through velocity
hmm
like you would expect that on every frame of the move, the velocity would be increasing
well, the velocity doesn't have to be linear
doesn't have to be, sure
but it's odd to get the same velocity multiple frames in a row
but you are accelerating
does that make sense?
this is a server/client setup, i have no control over the velocity
i can only control the acceleration
are you testing with multiple clients?
no, when i test with multiple clients the things are far worse
but you were talking something about rotation?
well, if there is jitter in the rotation, that's not going to be something that the animation graph is responsible for
unless you made the animGraph override it's world rotations
so the character is responsible for the rotation
i does seem that rotation contributes to the jitter
so perhaps the jitter is related to the network smoothing on the character
are you testing with dedicated server?
yes
does the jitter occur without dedicated server?
well, it would be very difficult for me to set this up right now
real one
wow, thats cool
so you cannot test in an empty scene, without a dedicated server?
you may need to tune the network smoothing settings in the character blueprint
which are a bit tricky
if that's not possible, we can do a band-aid/hack
which would be to use an FInterp on the speed variable
i would like to try that hack
you mean that if i smooth the speed, the jitter would dissapear
ok, just a sec
something like that would interpolate the speed over time
you can use FInterp Constant if you want something that is not framerate dependent
eventually you will want to take a look at network smoothing
gunna try the lerp
i think that rotation is partly responsible as well
do you know where can i smooth the rotation as well?
the rotation is coming from the capsule of the character
the only way to smooth that is to address the networking smoothing
sorry for the delay, I'm not sure if there are good docs on network smoothing. Perhaps there may be some stuff in the content examples?
anyway, I must be out for the day. Good luck!
@frosty peak i'll look it up. Thanks for you help!
Does an animation have to be in a slot in order to see if it's playing from within say, the character or anim BP? Just want to see if a normal anim in a state machine is playing. Can't just check the condition (bool) that makes it play in the state machine, because that condition is checked only after the previous anim has finished playing.
Hey everyone, is there a way to fix transition problems after retargeting animations?
My retargeted animation is a little higher then the target skeleton animations
Hey , I just started using unreal and my idea is doing a zombie shooter game (Something basic nothing too fancy) and i would like to create a weapon with a Aim down sight but i cant manage to understand on how to do it
is it a first person zombie shooter? if yes, one way to do aim down the sights is to move weapon from it is default position to new position at the center of the screen
Can someone help me out and dm me if you know how to fix this problem. So I have my FPS Controller I made from scratch, controls are fine, but when I move, the walk animation doesn’t play, it only shows t-pose. And when I stop moving, the idle animation plays.
I created a blend space for my idle-walk-run at Horizontal axis direction -180 > 180, and Vertical Axis speed 0.0>600
I changed the interpolations to 1 for smoother animation
is it possible to "save" certain Bone transforms and drive them with curves?
This could be helpful for Facial animations
@dusk dove Pose Snapshots? I dont know about the curves though
how would i do a start and stop sprinting Anim when im using a Blendspace 1D with Idle, walk and run
You would likely split it up into multiple states.
Idle State > Start Moving > Moving Blendspace > Stopping State > Idle
Any help on my matter?
Hey guys, I have a small issue with my 2-bone IK setup. I'm using it so I make sure the left hand of the character stays stuck to the grip of the rifle, but it looks like the animation still has influence over it
So it looks like the hand is sliding up and down on the weapon's grip on the idle animation, and even more on the running one.
Is there any way I could "force" the IK to have full control over the bones of the hand, ignoring animation?
Can I animate more than just skeletal meshes? For example a SceneComponent I only want to animate the postion of? Thanks 😃
You could "animate" it with a timeline in the blueprint.
You could also use Sequence Player to animate things around, might be overkill though
Thanks for your replies @frosty peak @swift heath but this way I couldn't use the animations in a blendspace and in a animation blueprint right? Let me explain what I want to achieve: I want my first person arms to move left and right when walking or running (these animations always play no matter what item is equipped). On top I need them to play their accurate animation for the equipped item. Any idea how I can have the walk/run animations always be present?
I'm new to animations in ue4 btw. 😃
@quasi perch Montages are an obvious choice for single shot animations, you can also make an animation be a variable which you can update on the fly.
generally speaking, you'll have your controller create an event
From that event you can have your inventory get variables from your equipped weapon, and set those variables in the animation graph
perhaps the gun holds a variable for the montage to play when the character fires the gun
that montage would be for your character's skeleton
the weapon could also hold a blendspace variable that you could assign when you equip the weapon
a blend space for the character
the challenge here is that there are a lot of different ways to handle the data
ultimately you need to pick a solution that fits with the scope of your project
if you only have a few different types of weapons, it may be simplest to just use blend nodes in a state machine
Thanks for the great suggestions! But still, how can I play a walk or run animation (sway left/right) on top of all other animations? In unity i would have animated the parent of the first person hands but in ue4 it seems like I can't animate a scene component. Do you get what I'm trying to achieve?
You could use the layered blend node
you basically set up a blendspace and then run on top montages that target specific portion of the body. say you have a reloading animation and you want that animation to run even when you're wealking. you setup that montage on a specific slot, let's call it Upper body and you play it
there has to be tutorials on youtube
there are
I think you are looking at it a bit backwards
sway is not played 'over top' of shoot animations
sway is the first thing that you play
and then you additively play shoot animations on top
Sorry to interrupt guys, but just a quick question: Is there any way I could stop an equip/unequip anim from playing if the player cancells it? Currently my equip/unequip system is a state machine
your main layer should be movement and base locomotion, and you play on top of it any other animations.
like, reload, ADS and so on
Oh. Actually I'm so stupid. You guys are competely right. I can just play all the animations on top. Didn't think of that for some reason. Thanks so much @severe thistle @frosty peak
@swift heath If you use a blend node,
Plug your state machine into A, And something else into B.
If your alpha is at 1, it will full stop a state machine and force it to restart when the alpha stops being 1.
I doubt thats the solution that you want.
You could create interupt transitions from your states if you need.
Just depends on what you want it to look like
Thanks @frosty peak , but I'm willing to get a "smooth" transition. For instance, it goes half way into equip anim then it cancells it and it plays the unequip anim from there.
montage would fit better for that as well, not state machine
My knowledge of montages is very limited, only using them for the shooting currently. Is there a way to implement this smooth transition with montages @severe thistle ?
montages have blend in and blend out. they stop smoothly if you setup them to do so. and it's easier to start and stop them once you trigger an action
Ya, a montage would be a better fit for sure
going back and forward through state machine is kind of annoying
Thanks @severe thistle and @frosty peak I'll try switching to anim montages then.
👍
🕵
@jonathan#5861 FYI: Unreal provides PoseAssets. A Collection of Poses. You can easily drive them with Curves.
Hey i'm having a not so great time with the engine today im trying to retarget a skeleton to the default unreal engine one, but its not working, by not working i mean the retarget manager part of the engine is entirely none-functional
I've got my skeleton which imported with a mesh, and then the default UE4 manaquin one but they don't "see" each other, I've tried both retarget managers and neither works. im completely dead in the water here
@misty dagger uncheck "Show Only Compatible Skeletons"
@misty dagger It also looks like you haven't set up the PreviewMesh inside the Target Skeleton
He hasn't selected a target skeleton yet. So the preview won't be there.
Whoops, didn't look at the screenshot. My bad 😄
How would I add a crouch from idle animation in the animation state?
I have the animation, I have the crouch key set to “c” with my event controller. I don’t know how to reference back to that in an animation state
Anyone knows why anim notify events aren't showing up in animation blueprints with UE 4.19 ?
i have an animation montage with notify events, and when I try to add an anim notify event in the corresponding animation blueprint, I can't do that
fixed, I was adding "montage notifies" instead of custom notifies
@misty dagger Make sure both have humanoid rig selected in their skeleton then
drag and drop your animations or skeleton mesh into the scene, it can correct the bug of UE4
@misty dagger @sinful smelt and make sure your bones are set in the retargeting tools, if you have different name, like with the rigify skeleton from blenders, the humanoid rig need to be set manually
Hey guys, hope this is a right place to look for feedback. If it is here's a video of the rig editor we are creating for BIK (Full Body IK for UE4): https://youtu.be/n6iLQSbnUyA .Thanks!

Feature overview of the new Rig Editor in BIK that will be released soon. Easily control digital characters within Unreal Engine 4 using a Full Body IK solve...
@hasty wigeon Looks like a big improvement over the previous component configuration!
anyone having any trouble with root motion in 4.19?
using the level sequencer in particular
@frosty peak It will still ultimately need component configuration as that actually is how you would interact with the game world. However, the joint limits and IK setup can be done via this editor.
Hello everyone~ So I've been searching high and low, but couldn't find a definitive answer to my question. Is it possible to record Morph Targets in Sequence Recorder? My Morph Targets are driven dynamically during PIE, and I would like to "bake" them into animation asset. I hope it's right place to ask 😃
Right I have both skeletons imported, I've found some documentation here: https://docs.unrealengine.com/en-us/Engine/Animation/RetargetingDifferentSkeletons and conveniently the skeleton is actually a maximo one, however at the section it says to right click the animation and retarget and duplicate im not seeing my skeleton in there
if i check show incompatible skeletons and select mine the heads sideways and like really big
I've set humanioid rig bones to their correct values and double checked
so i dont understand why this isn't working, I've scrapped and repeated the steps multiple times and double checked evert step but this window (from the documentation) https://docs.unrealengine.com/portals/0/images/Engine/Animation/RetargetingDifferentSkeletons/Retarget11_2.jpg looks like this for me

that's the result, so the documentation is wrong/incorrectly written, because I've followed every step multiple times
is there an extra step I need to take to fix this?
Hello I have an issue with the layered blend by bones node. It returns the skeleton/animation of the base pose for the location of attached component. Is there a way to make it use the skeleton/animation of the full blend pose for get the position of the attached component ?
i think the only way to do proper animation in ue4 is to import each frame of an fbx, and just cycle which ones are visible, either that or hire someone to unbreak the engine enough to get animations working
about your issue, you didn't have followed every steps : by example your pose is not set correcty on your skeleton output
@misty dagger Tpose to Apose, if still have some issues mesg me in PM
@mental zinc Does it work if you use the animation blueprint's record function?
Open the AnimBP, Press Play, Go back to the animBP while the game is running, Set the Debug Filter/Preview instance to be the character in question, Then click record in the Anim Preview window.
It should record everything that the character does, I would expect it to catch blendshapes as well.
I'm trying to learn UE coming from Unity.. is there a way to create animations within the engine? I would like to create a temp. animation for the FPS hands (from the template) for when reloading the weapon. Is this possible or do I have to download that specific animation? If so... is there a free one to download somewhere or do anyone of you guys have one to share for educational purposes?
...or do you have a better solution for this since itä's only for prototyping..? Maybe there's a way to lower the arms so they are out of view for the player while the weapon is reloading via blueprint?
I believe you have to make the .FBX file yourself via blender, but I could be wrong. I’m also pretty new
I made my character in mixamo fuse, and I made my own fps controller
@woven wren No you can't create animations in the engine, you can just create pose ( single framed animation)
Anyone care to share some knowledge? I'm trying to keep my characters left hand on a melee weapon during montages without success.
Have followed quite a few tutorials/forum posts in hope for a solution but to no avail.
https://gyazo.com/d15a4937d7cb84b156691f2af5a58a86
This is how I currently handle it. Left hand glides away quite noticeably on every montage. I Have tried FABRIK and multiple bone combinations in the settings.
Any help/tips is super appreciated!

@weak beacon what do you mean by "glides away"? Isn't your melee weapon attached to the hand socket?
It's attached to the right hand, I'm trying to keep the left hand just below it with FABRIK or 2BoneIK atm
It sounds like you want Component Space
Hm.. If I use component space It seems I'll need to get vector from EventGraph. So it follows correctly
@weak beacon are you trying to hold something like a two handed sword? I'd just calculate the location offset / rotation in event graph in world space and feed it directly to the IK
the animation nodes are often pretty confusing and it's faster to do part of the calculation by myself
Yeah, somehow 2H weapons seems to give me the most trouble. I'm setting up some pre calculations atm, see if I can get something up for testing
And yes, it's a 2H sword im trying it with atm 😄
Good luck(always needed it in animation stuff)
Thanks, ill take all luck I can get tbh! Appreciate the tips!
@woven wren @golden parrot technically it is possible to create animations by using the experimental ControlRig plugin (experimental since 4.16 iirc), but it is very experimental and it would be easier to find some animations online and import them 😃
Anyone here export animations from Maya that are referencing a separate .mb with the skeleton/rig?
Or just using Maya to animate in general?
Any know if for cloth physics to work it can intersect geo or does it 100% not have to intersect geo to work?
@strong flame did you tried ? Maybe you will get more answer from #legacy-physics
is there a way to import collision bodies with a skeletal mesh?
I'm currently having a problem with a skeletal mesh + animation blueprint
In the animation blueprint I've got one animation playing this works in the animation view but as soon as I press play the animation is stuck in it's first frame (skeletal mesh stays in this frame the entire time)
Does someone know what the problem could be?
Hey I'm struggling with importing a basic "salto" animation, the rotation of the main bone is not working after importing the animation in UE4
I first thought it is because this rotation is applied on the root bone, so I read about this root motion thing, but first even after ticking the "enable root motion" it doesn't work
I also tried to change the root bone by creating another bone (that doesnt have any vertex attached to it) and parenting the old "main bone" to this new bone, but it also doesnt work
aaaaand nevermind, just found out why x_x
'I finally figured this out, I was doing a rotation animation as two key frames 0 to 360. This didnt work coming from max. I got it to work by doing 4 key frames a key frame every 90 degrees and it came in to unreal perfect. '
is there any problem with having too many keyframes in an animation? or ue will optimize it
it will usually try to delete redundant and "trivial" keyframes.
but overall, there shouldn't be any problem
s
@frosty peak Hey, thanks for the idea! Unfortunately it doesn't seem to catch Morph Targets (but it does bake every Morph Target anim curve at 0 in resulting animation asset, which is weird). Although I can see Morph Targets in AnimBP preview. Does it work on your end?
Have anyone tried MayaLiveLink? Did anyone figure out how to stream parameters from subjects? Blendshapes specifically.
Does someone know a better solution than a delay of .2 in Initialize Animation?
If I remove the Delay, the Component is Not Valid
Hey all, interesting "puzzle" I'm facing.
If you had physical animations on a character with a 2 handed sword. The sword is locked to the main hand via socket, how do you lock the second hand in and have it so the physical animations don't mess it up?
IK doesn't seem to work, i assume the physical animations are calculated after
@dusk dove I'm not sure its right but in my project I do end up doing something similar a lot too
how did you get the lines so straight? 
@misty dagger Editor Preferences -> Graph Editors, change the Spline Tangents and Deltas to 0
thx
I like it with straight lines
@mental zinc I have not tried this myself, but I have one more idea. Try doing the same thing as before, but temporarily Disable Multi-threaded animation update. In the AnimBP > Class Settings > Optimization > Use Multi-Threaded Animation Update. Perhaps the morph-target curves could not be properly written because the animation was updating on a different thread than the game-thread.
hi guys I have a doubt about skeletons and performance in UE4.
If I have a character skinned to a skeleton with a hierarchy that resembles the UE4 mannequin except that is missing twists and finger bones. And then I import that character but reuse the UE4 mannequin skeleton, so I can reuse the mannequin anims. Would my character have more bones? Even if they are not being used?
or would that character bone count be reduced, even if it's now using the UE4 skeleton..?🤔
@supple slate I believe you only pay the performance cost of the bones that are in the loaded skeletal mesh.
Anyone animate with Maya?
Yea, my animator can't export without including the controllers in the fbx
60 frame animations were 2.7MB
that's pretty interesting, which version of maya?
2018
However if we export it twice it exports without the rig
we have to open up the exported fbx
well, there is the Send To Unreal UI, have you tried it?
File > Send to Unreal
selecting the skeleton and exporting selected should do the trick
My modeler tried it and it created temp files in the root directory
Does the same thing happen if you do it with your rig?
select the skeleton hierarchy and export selected
If I do that process, I only ever get the skeleton + animation
which is what we want
Have you tried openeing them back up?
yep, and its only the skeleton
perhaps there is a constraint in there that is trying to pull in the control rig?
it would be very strange if that could cause the controls to come through
Maybe?
as far as hierarchy goes
is everything in a group?
or does the skeleton live on it's own?
is that root actually a locator? or is it a bone?
how do i tell?
you should be able to see it in the viewport
but its likely that its actually a locator
in which case, you should make sure that the skeleton is parented to a single root bone
unless those other two skeletons are for IK/FK switching?
very strange
the mannequin's root is a bone
anyway
its working for you, so thats good
so with the root selected, and clicking export selected, you are getting controls in your FBX?
yea
Then if we open up the fbx again and export we just get the skeleton + anim
Not the most fun thing for the animator
Also i should mention that when he manually baked out the animation before exporting it did nothing different and just doubled the filesize
We've gone from 2.7Mb to 600kb
per anim
there must be some random connection that the skeleton is making to the control rig
Perhaps try the send to unreal? Or the Game Exporter?
I can pm you the file if you want to take a look?
unfortunately I do not have time to take a look myself
I understand, just not sure how to find the connections you're talking about
Is there a menu it would be in?
try selecting each bone, one by one, and watch for the control rig to change colors
that i can do
the control rig should have no dependency on the skeleton
constraints too?
constraints should only be 1 way
from control to skeleton
all that said
large FBXs are not a real problem
if your skeleton asset is correct, where it only imports the bones
More of an optimization
makes sense
in the past, at larger publishers
the setup we had involved two skeletons
a control rig skeleton
and an export skeleton
you do all your IK and stuff on the control rig
and then constrain the export skeleton to the control skeleton
That's what we were doing before to use maya skeletons in blender
But i've gone through the skeleton and none of it appears to be connected to controllers 🤔
perhaps some scripting can aid the process?
What would you have it do?
there are some ghetto ideas
duplicate the skeleton, constrain and bake keys from the main skeleton, and then export
and delete the generated skeleton
OR, some tool to quickly import the FBX and re-export the FBX
Maya support any good?
not at all
if you want to PM the file, i can take a very quick look
really appreciate it!
Can any here explain about an animation between Arm and Weapon in FPS?
Question is
1.If it sperate animation between Arm and Weapon. How it attaches together perfectly?
2.If using socket do we need to change socket location for each weapon?
3.Arm and Weapon have an animation especially?
I tried to find a tutorial on google or sample project but I still don't know how should it be.
and if you have video the lecturer speaking about fps animation and fps mechanics too, please leave a link in a comment.
Thank you.
Sorry for my English skills.
wish there was an easy way to assign an existing skeletal to a new mesh, instead of it being a pain in the ass
someone should make a UE asset editor or something
like skinning a new mesh over an existing skeletal and retain the animations.
@feral gale Have you looked into this? https://docs.unrealengine.com/en-us/Engine/Physics/PhAT/HowTo/KinematicWithSimulatedParents
at the very least you could IK to a position of the socket (instead of to a bone directly), which may be a frame behind.
Thanks for the response!
I tried the IK to a socket, it doesn't work, it seems the physical animations are applied after the IK or something so the hand wobbles out of place constantly
checking your link
oh but maybe in combo with that link it might work 😃 if thats what you mean
I'll try it, thanks
Using Blender UE4 tools to create and export the default mannequin with the purpose of introducing myself to animation retargeting, I get a strange result after retargeting and previewing a single animation. Unsure how to rectify this:
Unreal Engine Forums
Animation discussion, including Animation Blueprint, Persona, Skeletal Meshes, and more.
Hopefully should point me in the right direction.
Yeah, that's what I needed. Recursively Set Translation Retargeting Skeleton. Now I just need to understand what that means...
@Crow#9071 Thanks for suggestions Crow. But still no luck. The fact that it actually bakes empty Curves makes me think that it should be possible and I'm missing something in my setup. I'm driving Morph Targets with "Set Morph Target" node, is there another way to change anim curves in runtime?
Is there a certain fps animations should be created at for UE4 importing?
@limpid gyro I believe 30 is standard
thank you
anyone able to animate a handcuffing animation
you looking for an animator that can do it for you? or someone to explain how you do it?
might help to be a bit more precise with what exactly you need there also in terms of animation, like whats it supposed to be.
hey guys i am having trouble with root motion
it resets it positon after the animation
Anyone can help me with retargeting? I have a little question
If I have smooth animations, and I decide to make every joint work separately on my character, will it screw up my animations?
Like for example, I want my character to actually move his head, even though the camera is socketed into his head
Instead of the camera moving by itself.
who here works with alembic
i'm always wondering what the best way to export/import (some tricks potentially), to avoid such massive file sizes
@mental zinc The Animation graph can adjust curves with the modify curve node. Perhaps that would do the trick?
@vestal gust Definitely don't attach something like a camera to a bone in a skeleton. It's best for a skeleton to react to the data or input, rather than be the parent of those components.
You could have your character IK to the camera position, that would be much safer & cleaner.
Sort of difficult question, but is it possible to have the absolute result of one animation, (position and rotation) and lerp it with the absolute result of another animation?
like say I have an animation of reloading a weapon, and I want the hands to have the reloading part, but the body to be doing whatever else
aim offset would sort of work, but the issue is the body might be doing something else and the bones won't align properly
unreal is the worst bloody engine
6 days.... 6 days i've been trying to retarget this damn skeleton, i've tried adding root bones, resetting xform, different scales, different poses, different rotations and everything i can think of and find online and NOTHING will fix this
na the whole thing seems really broken, i've followed instructions for retargetting animations designed for the manaquin skeleton to my skeleton (which is just a maximo skeleton) and despite being told ue4 has a great animation system by someone a few months ago i've just not been able to get it to work
I've actually gotten it to work just fine in both Unity and Godot engine
xforms are all reset, scales are reset, scales are correct (I've quadruple checked both ends in max and unreal!)
iirc t-poses should be similar for animation retargetting
also you need to do retargetting for different skeletons
this if you aren't
@merry rampart afaik, alembic files have option to be imported as skeletal animation. It's useful if your vertex count doesn't change. If it does change and you need smaller size, I suggest you to look at Vertex Animation Textures, those a really great tool for prebaked FX.
I did
see it even shows matched up in here
almost, if it's "a bit" broken. fine i can fix that up but im not wasting time fixing something up if its scaled to the size of a planet and all glitched and spazzed up
thats the result
if i uncheck either convert spaces to new skeleton I get this
i applied the offset to that bone in 3dsmax but it showed broken anyway and the rest of the skeleton doesnt animate
yup even my friend is stumped
he just says dont use unreal
he's a rigger and says its an absolutel nightmare to work with
@misty dagger Does the Hips bone have any animation on it? I remember having a similar issue with a custom rig of mine where the root bone had some animation on it and was severely messing up bones down the chain. Once I got rid of the root animation, my rig animated as expected.
@bold fjord I tried adding a root bone (we call 'em granny bones in the industry)at 0, 0, 0 but that didn't help in any way
I think he means root motion extraction
oh we're not using any root motion animations
unreal is decent if you author all of your own animations
iirc motionbuilder might have animation retargetting
I've found unreal's animation retargetting to be kind of ehhh
I do most of my animations for source engine
some stuff with unreal
a cheapass way is to just set up a rig in 3ds max or maya to do it
with ik and rotational constraints
tbh I've never had much luck with retargetting in unreal either
yeh it doesnt work 100%
so much AAA, 2bh thats just bad engine. I just wanted a character for the adventure game I was working on but I've now had 3 people, one of which switched to the source engine (?!?) as he ran into the same problem... he's had a game up on Steam a number of years thats done quite well now and he won't go near UE4 if he needs characters/people in the game
@Crow#9071 omg. It works purrrfeeect! You are life saver. My char is ready to kiss you!
animation errors are the best errors
Looks good to me. 😄
idk if i am explaning this correct but whats the correct method to stop all upper body anims except the aimoffset
@misty dagger IIRC, you need the Mixamo to Unreal Plugin on the Marketplace
@mental zinc Glad to see that you got it to work!
@sudden sedge Did you get an answer earlier? To the absolute animation blending. There are a couple of options. You can run any number of state machines & animations, and simply use the Layered Blend Per Bone, Apply Additive, and Blend nodes to mix them all together. You just need to use the Pose Caches. That's good for just mixing it all together. OR you can use a pose snapshot, if you need to blend from a frozen ragdoll pose into an animation.
If you check out the Shinbi paragon pack on the marketplace, they have an interesting pattern where they take the result of 1 state machine, and feed it to another state machine. It's really clever because it can vastly reduce the number of transitions that you need to manage.
Hi there. I have an AI character which rotation faces the player if he is spotted by the AI. Is there a way to maintain this "focus behaviour" during a root motion animation? How do i prevent the root motion animation to override the character's rotation?
@misty dagger
- The bones looks to be not well sized into the skin so the rigging is not good i guess...
- in skeleton tree tab > make all the bones to skeleton (then later you can change some like root and pelvis to animations)
- in retarget manager tab > Clear Mapping > and try 1 bone after 1 then retarget to find the guilty one (in general its often spines or the bones under show advanced)
@mental zinc Thanks for response!
in my case yea vertex count is changing (fluid sim from blender), but its good to research vertex animation texture
Ive actually split the animation into multiple parts (frame 1-200, frames 200-400, and so on) to reduce the size of overall file,
working out well so far
@merry rampart interesting trick 😃 keeps it less memory intensive.
btw, I saw on trello, Epic plans to add alembic streaming support in the future. Hopefully it will make it into 4.20.
@grand quest You can seperate "actor rotation" and "look rotation" Then use an aim offset
get the player position, get the enemy position create an offset from the enemy actor rotation, and use that as your look rotation
that way he can maintain focus no matter where the player goes