#animation
1 messages · Page 92 of 1
Do you have frames?
No, it says 0/0
Maybe there's a bug where you can't add frames to an animation without frames.
How do I add frames?
Then again I don't know how you ended up with an animation with 0 frames. 😛
I think I kept deleting them because I just used it as a still pose haha
If you've got a pose you can do Create Animation - Create from current pose.
Then you should have 1 frame at least, and you should be able to right click to add more.
How do I create animation from pose?
These are animation 'Sequences'
It doesn't give me the option to create such a thing
I think those are only on anim imports
From what I recall
Not there, in Persona at the top.
Here?
I think I'll just export the anim data of the still frame and animate it in 3ds max, then re-import on a duplicate and replace its animation
Should work
Thanks though!
Persona is the editor you get when double clicking on an animation/mesh.
And there at the topyou have a menu like this:
And after you've done that you should be able to right click and add frames.
That did it! Thanks man
3ds max kept crashing on import so that saved me haha
I'm able to add frames to the new one
Cheers
Not being able to add frames sounds like a bug though. 😛
@winged valley do you know any way of getting the "state" of a state machine ?
like, in which state it is, what is the animation current time etc ?
@green ether Depends on what you want to do, for debugging you can select the ABP in the preview filter.
@winged valley it would be for using in game
You could just make an Enum with every state and set it to whatever state you entered with the entered state event.
@winged valley yes but i'd need the timing of the current anim it's playing
it seems impossible to access the anim graph from blueprint
You can do the same thing for a float.
@winged valley the problem is, if the floats are not in full sync with tthe anim, the game logic becomes inaccurate
that's why i'm trying to get the floats from the anim state to be sure they are correct
i'm also trying to play anim montages, but now i can't even play them
no error/warning messages or anything, it just doesn't play
maybe it's a slot problem, i have no way to tell
You should show the BP where you're triggering the montage.
@winged valley there are multiple bps because i'm trying to make it work for several characters
Just show one. 😛
but in the current bp
yeah in this bp 😊
there's a "PerformDab" function
that is triggered when players press the " Dab" key
It's a bit weird that you can't get the state time for a state though because you can see the active time in the editor.
that function triggers the "Dab" animation montage
@winged valley yes, and if anim states would be a bit more easy to use, there wouldn't be a need for "animation montages"
anim montages are completely redundent when there are state machines
Not really.
they're just a different type of anim state machine that can fire events
You could as well say that state machines are redundant when there are anim montages. 😛
@winged valley it's more "system" bullshit I have to spend time learning instead of working on the actual game 😊
and I don't know how to add a slot node
Doing everything in a state machine isn't really optimal.
sure, I'll use AnimMontage s if i can make it work
You go to the AnimGraph and type "slot".
Sure, create that.
Then put it last in the anim graph.
(for now)
Then try playing the anim montage again. It should work assuming you didn't change the slot in the montage itself.
i'm confused
😛
Slot ' Default Slot' is a node with a "Source" input and an output
so I take the existing "state machine" as an input, pass it trough slot , and connect the slot output to "final animation pose " ?
Yes.
Why doesn't it make sense? 😛
If you use an anim blueprint you need a slot node to play montages.
that "slot" node thing, coming from nowhere , I don't understand it
You can see it as a track for playing montage animations.
@winged valley yes but it's not depicted as a track, it's a node passing trough two nodes
But playing a montage when there's no slot node should probably give a warning somewhere.
(if the actor is using an anim BP)
it's like a tube wrapping two wires, and it would create another tube next to it
it's so weird
o_O
@winged valley I swear I didn't see ANY warnings
Yeah there aren't any I think, but there should be so things are less confusing if you haven't used montages before.
@winged valley the slot thing you mentioned isn't even in the unreal videos showing animation montages
the guy creates a slot in the anim montage
but never changes the animGraph accordingly ( not in the animMontage sections anyway )
Which tutorial?
@winged valley one sec, finding them
you know the unrealEngine training videos
@winged valley https://www.youtube.com/watch?v=200-D0A3ntU&t=59s

(00:05) - Intro and Hugh Jackman analogy (02:30) - Adding a Custom Event (04:49) - Adding Anim Notify Events (06:32) - Telling Montage to jump to Sections (0...
In older versions you could only have one montage playing at a time, maybe the Slot node didn't exist then.
He uses a slot node in the next video actually. 😛
@winged valley omg
LAWL
so i searched all the videos before
and not the videos after
aargh i'm such a bad cat 🤦
" BP 3rd Person Game: Using Slot Nodes & Branch Points "
I didn't think it was related to Anim montages
You can see why montages are useful if you watch that video btw, he uses Layered blend per bone to only have the montage play on the upper body, so he can run around and jump while the montage on the upper body is playing.
@winged valley yes but why not create two anim graphs , or restrict certain states of the anim graphs to certain slots
You can only have one anim graph I think.
we could think of anything more simple than yet another layer of shit to learn and use
@winged valley yes indeed, and i'm going to use anim montages
it's just that ... it never ends
Wouldn't it be more complicated if you had states for everything instead?
soon they will create other systems to do simple things in complex ways
@winged valley well an anim montage is already a state machine, just presented differently
For example if you had your state machine with walk, run and whatever. Then you have dab too in its own state. What if you want to walk and dab? Or run and dab?
😛
well you have a state machine for the lower body, and a state machine for the upper body 😊
Yeah you could do that too I guess.
and you could also get the current state and time of any StateMachine
But for me it's easier to have a state machine for locomotion and play event based stuff with montages.
@winged valley that would prevent creating a whole other system that is essentially the same thing
You can trigger Play Montage from whereever really, but you need to set up the state conditions in some way.
@winged valley well it's great that you like it, they didn't created it for nothing then 😊
but it will never end,
they will create more complex systems to do simple things
like " bones attributors " and " skeleton driven markov chains "
They are complex to have the functionality to do complex things. 😛
Playing a montage isn't really complex, as long as you know what you need to do (have a slot node for example).
because binding data to objects isn't """ smart """" enough
@winged valley without you, I would have spent a week making this work 😊
You can do really complex things with Anim Montages too though, check this node out: https://docs.unrealengine.com/latest/INT/BlueprintAPI/Animation/Montage/PlayMontage/index.html
knowing i'm forced to use AnimMontages to get what's needed , I would have brute forced my way trought the doc and videos
@winged valley a good reason for these processes to exist would be runtime optimizations
knowing it's anim montages and behavior trees and whatnot , they can make these run faster on very different devices
because they know what these systems do and when they should execute, but still ...
@winged valley see, on this node you just showed
" On Completed " " On Blend out " " On Interrupted "
all these events could also exist in anim graphs and state machines
They do pretty much.
For state machines: Entered State Event, Left State Event, Fully Blended State Event.
To be able to do that outside of state machines? 😛
I mean you could have a state in a state machine for every attack, but it might be easier to just play them with montages instead.
so it's a "preference " thing , bu t it's not enabling anything more 😊
@winged valley And I could say that montages being state machines , it would be easier to have a state machine in a state machine
because there wouldn't be any need to learn another redundent system
It's like blueprint event dispatchers
what is the difference between using event dispatchers and calling a function ? nothing 😊
Instead of having a state machine with 10 states for each attack you could have a Play Montage node with a animation montage reference, different start time/section and so on. Doing the same thing in state machines alone would be a lot of unneccesary work.
Well you can't call a function on 10 different things at once, but you can call an event dispatcher that is bound to 10 things that do something. 😛
Okay maybe that specific case 😊
UE4 animation system includes a lot of stuff as you can see from here , so I'd like to explain some situational examples. Here is a chara...
@winged valley That's interesting, gonna read this blog later on
@winged valley yeah also, he's using the "Layered blend per bone" node in the video you pointed out https://www.youtube.com/watch?v=6aZbnldZjeM

(00:05) - Intro and final Montage setup (02:50) - Blend per bone (04:22) - Cached poses (05:41) - Specifying bones to blend (07:31) - Wrap up
so that's very awesome too
gonna use things from this blog post too https://iluvanimation.blogspot.fr/2017/
much thanks for these awesome ressources 😊
Yeah, it's not my blog though, it's Lina Halper's (animation engineer at Epic).
😛
Still not sure if Copy Pose from Mesh should work even if you don't have the same hierarchy before the copied bone, should probably test that in 4.18 preview.
@winged valley yes in my game every biped is going to share the same skeleton
and if I can somehow summarize my point (" too many subsystems are bad ") in a non-rude manner
i'd totally make a forum post about it
because for some peoples, using many subsystems is lot of fun and intellectually rewarding
for others, it means more work to do the same things, more source of potential errors and sometimes more stress
but I digress 🤦
Well you can do what you want, use only state machines, use state machines and montages, use montages only. 😛
currently i'm gonna stick with state machines and anim montages if it works
if it's the ""standard"" way of doing things with UE4, no need to reinvent the wheel
For me montages make sense because they do something at that point in the event graph, so for example if you put a Play Montage node on an input key it plays there, no need to add a new state and set some boolean that will trigger an animation, it's just there in the graph instead.
Actually it seems like Copy Pose from Mesh works anyway if the root bone of the attached mesh is the attachment point.
So for example with a spine_01 root bone it looks like this:
The wings(?) just have three bones, spine_01, wing_l and wing_r, but attached to the mannequin skeletal mesh using Copy Pose from Mesh, playing their own animations using Layered Blend per Bone.
Yep, works in 4.17 tool, guess I just messed up the setup. 🤖
@winged valley I"m glad they make sense for you and they should be in UE4 if it's the case, same for blueprints
just that users shouldn't be forced to use them to get multiple anim blends ( and it's not possible to assign two animSstates to a same skeleton, or get infos on an anim State so we have to use animMontages )
and yes for the copy pose from mesh It's awesome that they made it working
You can have several state machines in the same anim graph.
And to get the time in the state you could call an event that sets a float to 0 (from the entered state event) and is then updated in tick.
And call that from every state entered state event. 😛
but if there's a lag or anything, the float and the anim would be out of sync
ooh, neato
i'll probably use that as well then
@winged valley it's very awesome that you can talk about all these things in the chat ❤
I think that's one of the points of having this discord server. 😛
It's nice you can use Copy Pose from Mesh that way though, you can attach anything to your characters that way.
haha yeah but 😄
Wings, weapons, clothes, armor, hair and so on. 👍
indeed ^__^
@winged valley thanks I just got home
Other things you can do with Copy Pose to Mesh, play Armball. https://imgur.com/pRQYXGC
Maybe not too obvious because the recording started really late, but it's this: https://imgur.com/a/h2xy7 You could use this to split a character into a bunch of skeletal meshes and use copy pose from mesh on them, then use them as a kind of dismemberment system. Maybe a bit heavy though because you need a skeletal mesh per body part.
Are you talking to me?
Here I was lazy and just attached the lower arm and hand to the upper arm bone. 😛
Sorry I just had this window open and saw the comment
Nope, just in general. Since I found out Copy Pose from Mesh was awesome.
Did you solve your Blender problems though @terse forge ?
I wasn't really sure if I was having problems in the first place i essentially made an animation that rotates the character
and I rotated it IN blender to do the animation
but I think you c larified that I should remove that rotation from the animation
Yeah, but you wanted to reverse the pose too?
yeah I do
I have not had the opportunity yet, but I'm home now! I can take a look now haha
That's really easy to do, just select everything, copy pose, then paste x flipped in either the Pose dropdown at the bottom or Paste Flipped from the spacebar menu and tick X-Flipped in the bottom left corner.
I'll need to do that per frame, right?
Per keyframe yeah.
Damn, there's a ton of those haha.
Better than reanimating I suppose
Giw di U oaste x fkuooed
...
How do I paste x flipped
I... offset my keystrokes by one on that last sentence lol..
Only the right hand ones though apparently.
Also!

WEBSITE: http://remingtongraphics.net TWITTER: https://twitter.com/RemiGraphics INSTAGRAM: https://www.instagram.com/grant.wilk/ --- Materials Shown: ► Kinec...
I've been researching this for a few weeks now
and I ended up buying a kinect V1 which is unfortunately not useful for this :<
As I said (:P) there's a button in the Pose menu next to Pose Mode, or you can do Paste Pose in the spacebar menu and tick Flipped on X-axis.
It sucks if you have to do it for a lot of keyframes though.
I'll just make an AHK script for it for future use
That's not really too big of a problem to be honest it's more or less getting it working in the first place
I pressed space searched mirror
and when I selected it it made my model very dark
that's before
after
Not quite sure why..
Mirroring is a different thing. 😛
There is only Paste Pose in the spacebar menu, the X flipped hing is an option within the operator.
man this action editor is useless
I swear i select all keyframes
and go into keys
copy
Okay, that's some basic crap that apparently doesn't work with CTRL + C
apparently no F curves or some crap
and then I go into my other action
paste the keys using the keys menu
and nothing happens
Also, I see. That makes sense.
Ah, yeah, you may need to insert an empty keyframe before pasting into a new action.
It's a bit stupid though, should just work regardless. 😛
When I pasted the pose I did not get any operators in the bottom left area

Any ideas?
You don't have the thing at the bottom left dragged up to the top.
😛
That's probably a bug though.
Anyway, you can do it a bit faster with a certain method.
First bind something to Jump to Keyframe. Maybe it's set by default?
Yeah, nice.

(down arrow is back lol)
so yeah having an issue now that it doesn't really mirror
!
It looks like your character is facing some weird direction.
It should face forward in the -y direction.
(green axis line)
When I import into UE4 with -y and he faces forward towards numkey 1
he imports sideways
because UE4 forward is X+
UE4 takes care of that automatically I think.
nope
I don't know why honestly my swords export perfectly
and my daggers
but my mesh / anims are borked if I make them face -y
all rotated 90 degrees
by default
to be fair my swords also face the X+ axis
You shouldn't have transforms on the rig/mesh and it works out fine. 😛
Anyway if you want your character facing some weird direction you're screwed because there's only x axis flipping.
What's the problem with rotating the character in BPs though? I do that myself and it works fine for me.
I guess nothing as a workaround
but when I was using projectile movement
it was making them track sideways

this is how it looks default rotated f acing the X+ axis
I could see why you would want that for a car (using the vehicle system) or something that doesn't work right when it's rotated.
as you can imagine it would be sideways facing the Y
I don't really have the model exported facing Y haha
But yeah anyways I'll rotate in BP for this one
since he doesn't need to be facing any particular direction his AI wont care
Ah, I see.
I just was using projectile movement to test stuff out and noticed it was weird when importing facing -y
So your character is a crab like thing?
Yeah haha
Then the way it was facing was probably right all along.
But you can't really flip its animation then.
Well I guess it should still face -y even if it moves the "wrong" way.
perhaps I can just change the forward export option
for animations
and leave it alone for meshes
Can't really hurt either way. Just wish my configs would save and blender would stop wiping my export configs / user prefs >_<
I would try having the eyes face towards -y, applying transforms and try flipping the animation again.
yeah for sure gonna try that right now by rotating the armature
That shouldn't happen, did you save with User Preferences - Save User Settings?
yeah I did
Are you using a portable or installed build?
I believe installed but I'm not certain
it happens when it updates to a new version
like 2.79 wiped it
and didn't recognize any of my old files
in the recent files tab
(for instance)
Ah yeah, you need to import settings when upgrading the version, there's an option in the splash screen.
oh interesting
But you can also force it in some way I think.
I should export from now on
the settings
I'm starting to realize blender is areally buggy program and has lots of inconsistencies
but it's still probably the most powerful modeling tool out there, if anything, in scope of features.
You can try removing 2.79, reinstalling it, then look for the option in the splash screen.
It will be a while though. 😛
yeah sometime 2018 probably
PBR Shaders though and realtime rendering kinda akin to the UE4 editor
PBR materials*
Yeah, actually interesting reading the viewport schedule, lots of stuff that are in UE4.
so how do they pay for this
donations or ad revenue?
I know blender doesnt have ads in software but I assume their website must
Perhaps contracts
Blender Foundation Development Fund, sponsors
or just open source haha for the fun of it
ah yes isn't that a render farm
I don't think it's a render farm, but you get some cool stuff: https://cloud.blender.org/welcome

Blender Cloud
A bunch of textures/HDRis, training and some more stuff. 😛
Behind the scenes stuff too.
decent
(from the open movies)
It's probably pricey haha
10 bucks a month. 😛
What do you guys use to make animations
What about for character creation?
blender
blender = free
if you aren't using blender you're using 3ds max or maya
probably maya
I aint no rich person, I'll just go with blender 😂
Im guessing that I can make stuff like guns and bullets in blender too?
Alright, nice
nice monster
Haha I wish I could agree. It's the first one I've ever done and is more of a learning process if anything.
I use mixamo and low expectations
Blender.
Interaction is essentially "what hotkeys do you want?"
and can break stuff
if you change it off blender
Step 1. User Preferences
Step 2, Emulate Numpad enable

this is step 1

Welcome to my video series on using Blender 2.7! In this video series I'll be showing you everything you need to know to create models and animations using B...
1.5x speed is your friend
82 video series
You only need like the first 15
the rest are like... specialty things
when you run into a problem you'll probably look it up on youtube and come across one of those videos
How can I animate a dive roll? When I go back to the idle animation after rolling, all bones twist in the opposite direction because the bones in idle have ~0 rotation and after the dive ~280 to 360 how can I prevent this
every 3d software looks impossible to use
Hey, got a question about ironsights.
Those handled pretty much through anims and blueprint, right?
Raytrace Start point = Camera Center
Raytrace Midpoint = Some object centered at the crosshair's location
Okie. Any tips on lining up animations for that, especially if the mechanic is featured on all weapons universally?
depends
Is it all done with 3D models
if so you would just center the gun model and orient it with the camera, of course centering the camera with the crosshair.
I'm not a gun guy though so you might want to look into youtube
Youtube no helpy.
So, basically, have the animator make an ironsights set of anims that line up with the center of the screen?
The thing to make sure is that your camera settings in unreal and in your 3d program are the same
I mean he can always just offset the animation until it's centered
@misty dagger why not check out how they did it int he first person shooter starter project
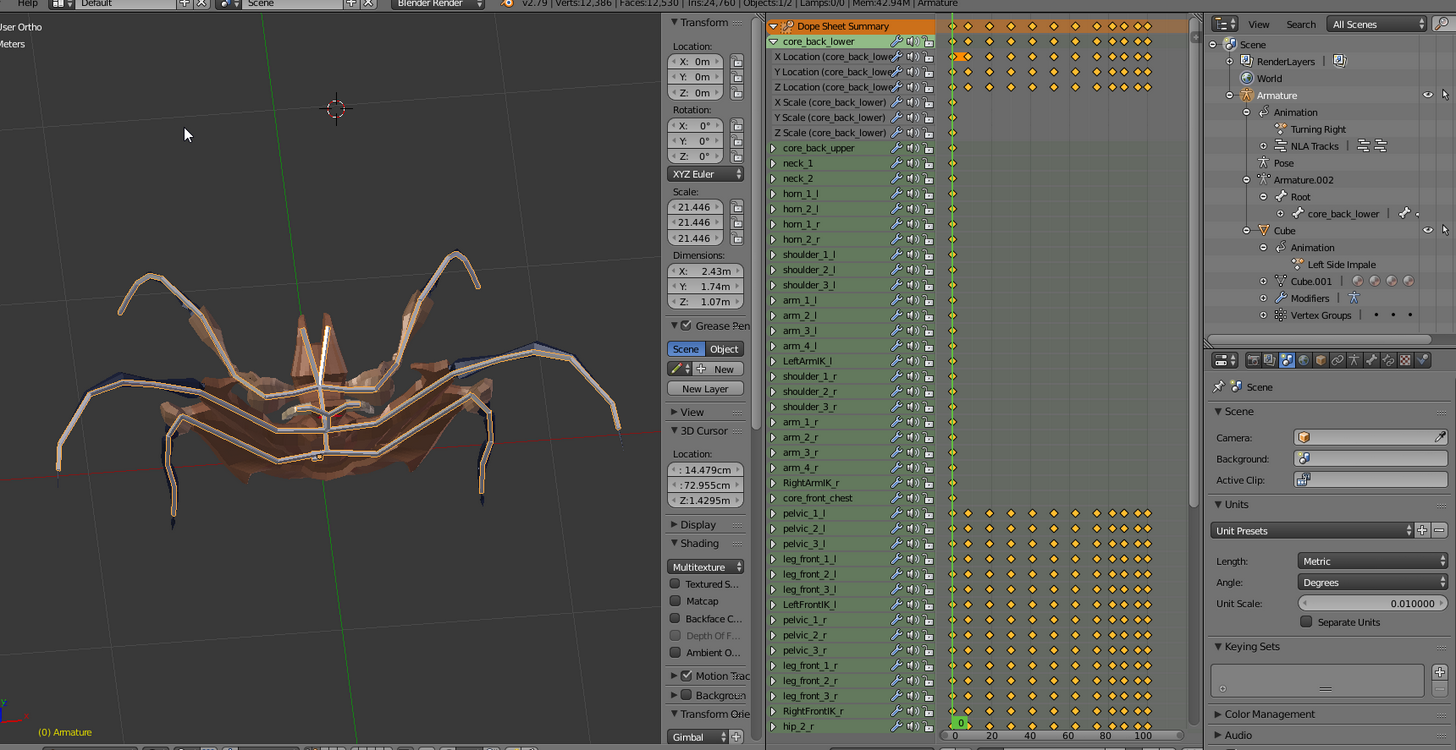
Is this pose related?
this is the skele
I was trying to make a reload anim
Using the record
@cyaoeu#1358 No luck. Mirroring just messes up some of the bones. No idea why.
It kinda works
But not in any effective way

I've tried renaming the bones properly (LeftFrontIK, LeftBackIK, RightFrontIK, RightBackIK) and that didn't help
Something to do with my shitty unparented properly bones I think (They're supposed to just be root bones but clearly aren't done properly)


I realize that's a bunch of links haha, but seriously weird issue.
Its easier to establish mirroring if you are consistent with your suffix ege hand.L and hand.R
Yeah, I imagine that to be the case.
I never realized naming schemes would matter in bone names.
I just reparented my 5 random core bones (lol why did I have 5 detached "core" bones?)
and fixed all the animations because they all messed up
but it's done now so hopefully that'll help with things
naming is quite important for bones
well I wasn't just naming randomly
I just didn't think mine was wrong haha
but yeah mirroring still doesn't work
even after fixing the parenting stuff
definitely not wrong coz it is organised but i do believe that to mirror you should try put _L or .L and _R or .R as a suffix
eg leg_back_06_R
i was gonna say lol
Anyone here experiencing a major memory leak when importing animations in 4.17?
My RAM goes from 1.4GB usage to 15GB when importing 6 animations at once.
The animations are barely a few megabytes in size...
Scratch that, it's 20GB
20gb animation? or 20 db mem leak?
Coz i have noticed my Editor slows down if i have a blueprint open for too long
@terse forge Not having a _l _r naming convention will make things not flip the right way for sure. 🤖
I didn't know that though, I learned how to name things properly before flipping. 😛
Hey guys, how do I properly animate a dive roll? When I go back to the idle animation after rolling, all bones twist in the opposite direction because the bones in idle have ~0 rotation and after the dive ~280 to 360. Is there a way to prevent this?
@hardy patrol Good question, maybe you could make the last frame of your roll into a separate animation (in your 3D software), flip the rotations back but keep the pose, remove that pose from the original roll animation, make it into a animation composite.
Maybe you would still notice it though, it would still flip over 1 frame, so 16.6ms on 60fps.
I guess you could replace the animation completely (instantly) with the other version though and blend to the idle (or whatever) from there.
Using blend pose by bool or something.
Do you think blending in Ue4 will fix this?
I don't know, never done it before. 😛
Actually you could have the whole roll animation, copy the last frame and flip it (as a separate animation), play that when the end frame of the original animation would play.
So the animation would still look like it blends to the last frame, but it would play the non-flipped version on the last frame so the pose should be the same.
I will try it at home. Thanks
@viscid willow - medium
OK Unreal fix the rotation. No problem if you blend a whole rotated rig with a non rotated
How did you fix it?
Do blend and blend poses by bool nodes optimize out the pose calculation of one of the inputs when alpha is 0 or 1 (or blend time is elapsed)?
Probably. Does it matter though? 😛
o_O
Interesting.
as I sayd. I dont fixed it in blender. but unreal fixed the rotation, because it uses -180 +180 rotations and clamp it
I thought you got the flipping in UE4. 😛
No 😄
no possibility to test it. only got blender at work
but now, with unreal its no problem
Ok, third time is charm: hey guys I need some help here with my project. I'm making a first person shooter and I'm using right now the Aim rotation on the bones to rotate the camera with the character and the problem is that the camera will always crop inside the mesh, making it not look the best
is there any way around this?
Great, that's what matters to me
@dry prawn Pictures would help also to see what you're talking about
sure, one sec
And tbh, now that I know what you're talking about, it's actually not an animation question rofl
I think not anyway
.>
I need an answer, not directions lol
If you can help me, please help me
anyways this is how it looks
er sorry
took a little while for the pic to show up
@dry prawn you can delete one
You could put the camera in front of the body (like your eyes).
the way ShooterGame arms gets around it is by moving the shoulders, but they don't show a full first person mesh
yeah they have separate arms too
I've tried the first person floating arms to owner and third person mesh to not owners
but then the way the camera is set up, when I crouch it will play the animation but the camera won't follow
and I don't know how to make it work
Just move the camera when crouching then. 😛
@winged valley sure I want to do that, but how? in the event graph for the character, what should I call?
is there a "Move camera on Z axis" thing?
It's probably not the most elegant way but if it works, it works
Set Relative Location maybe.
@vast trellis you mean use tick poses for the third person mesh only project or the mix of the first person and third person?
@dry prawn for what I was saying it is only if you were wanting head bob from the third person animation
better to just have the camera fixed in place and arms attached to it in most cases
No I don't want the head bobbing actually
I get you though
in this scenario here, the camera is actually attached to the mesh as a child, not as a parent
so it will follow the rotation of the arms
yeah, just move the camera on crouch, there should be a callback
on start crouch and on end crouch
so what is it called?
thats what I want
to move the camera
I thought it was a blueprint question, so I posted there originally but no one answered
Drag the component into the BP, then use your imagination.
😛
(dragging from the wire)
Or read what I wrote above.
you will need to just move the arms instead of the camera if it is attached that way
the arms will move because they have the animation added to them already
it will play the state from the animation blueprint
the camera won't follow it though
k, yeah you'll have to figure it out for your situation
I'm a 3d artist, not a C++ programmer
so thats why it's so hard >.<
I'm just flabbergasted on how hard it is to make a first person shooter multiplayer game
It seems like a basic thing to make
there is a built in full example ShooterGame
UDK had a lot of stuff ready to go at least
Yeah I've looked into it, but there's some C++ stuff that I don't even know how to begin
first person template is the other option, all blueprint
Yes, that's what I used for this project
you can add crouch there really easily
with your custom setup you will have to figure out a custom solution
I mean... I don't see it much as a "custom" setup, I'm just trying to get people to see the characters in the multiplayer
the only way to do it as far as I know is using third person character meshes instead of the floating arms and change the whole thing
or use a mix of the two using the owner see options
what is custom is baking the crouch transform into the arms animation
anyways...
I think I'm gonna give up, lol
I've been trying to crack this down for a whole week already
I'm just going to make the assets for portfolio
and screw the game, lol
there are many tutorials
What is a good website or place to find tutorials? Don't say youtube, lol
Giving up before even trying isn't too promising. 😛
@winged valley I've been trying to find solutions for this for days already
Yes, search for 5 minutes more and you will find it.
it seems to be like such a basic thing
At least the camera thing.
search crouch tutorial
I've searched crouch tutorial
first result looks fine, though it is on an older version: https://www.youtube.com/watch?v=xKWj1qKBhaM

In this simple tutorial, using the first person template, we will make our character crouch.
And if you want to move the camera, just move the camera.
UE4 does what you tell it to do. 😛
I've seen that video already, yes
the main difference between shootergame and first person template
the way he has it though it's quite different from what I have setup hough
is shootergame will use character properties to set the camera
eye height, crouched eye height
(though they don't have crouch hooked up)
first person just attaches it to the camera
I'll be honest, all the tutorials out there, while I'm eternally grateful for them otherwise I wouldn't have even got to what I have here already, they don't take in consideration a lot of things, it's rare to find one that will really deeply explain what's going on
so all you have to do is lower the camera
every project has its particularities so it's hard to make it work if you have something going on already
anyways
Thanks guys, I guess I'll keep looking a little more
yep, in general try to look for standard setups
because it will be more compatible with marketplace assets etc.
depends (if it is all art portfolio work then that might not be a valid concern)
fair enough man, I'm just a little frustrated lol
Like I said before, you just need to drag the camera component into the BP, do Set Local Location, then hook that up to the crouch event.
@vast trellis I want to make a game, and also use it as a portfolio piece
If there's OnCrouch or whatever, good. Otherwise check what's triggering the crouch animation.
the main reason to use OnCrouch over the place you trigger the crouch is if you want to support first person multiplayer replays
Thanks, I'll try here
just related to the question I asked before
for the camera clipping inside the mesh
do you guys know a good way to fix that?
Like... I can't move the camera further away from the character anymore
it has to be there, but it will still clip inside it because of the animation
owner no see
you said your problem with owner no see was it wouldn't move the camera, so now if you move the camera that's not a problem, right?
I don't see why you can't have the camera where the eyes are, that way there's no way you'll clip into the body.
You don't clip into your body in real life either. 😛
the camera is socketed to the head
if it's not a child of the mesh, the aim rotation won't work properly
anyways, I'm gonna try with this method here
Illustrates how to add a Camera Component to a Blueprint which can be used as a camera persepctive for a object.
I realize it might be confusing, because I'm actually talking about two different projects with two different methods, that's my bad
anyways I might have found the answer guys
I appreciate answering me back though
You could make your own socket bone (from the head bone) and use that, it would still be a child of the head bone but you could move it.
Hey do you happen to know of a way to add a suffix to all selected bones?
Make a script. 😛
You can get the selected pose bones with bpy.context.selected_pose_bones or something, then put the result in a for loop, changing the .name maybe.
(guessing)
It's a good idea if you're using Blender anyway, it's not hard.
If you can handle BPs you can handle python. 😛
How did you find that bpy.context.selected_pose_bones
You can open a Python Console, then press ctrl + space to autocomplete.
And all the options you have are shown when you press that so it's pretty easy.'
Then use for example bpy.context.selected_pose_bones[0] to get the first index in the bone list.
Then bpy.context.selected_pose_bones[0].name gives the name.
Then bpy.context.selected_pose_bones[0].name = "newroot" changes the name.
See, super easy. 😛
is concatenation done via .. or . in python
so bpy.context.selected_pose_bones[0].name = bpy.context.selected_pose_bones[0].name + "_l"
oh minus the quotes around the first
Nah you don't need (" in the beginning, only where there are strings.
So I assume like that?
👍
But if it's in a foor loop just do
bone.name = bone.name + "_l"```or something.
Yeah, with tab or spaces.
I blame discord. 😛
And if you want to write a script you do that in the text editor, just with import bpy at the top.
I'm in the scripting preset
there's a text editor on the left
black console on the bottom
and viewport on the right
Nice. 😛
for some reason whhen I run your script it breaks due to unexpected indent
I tried removing it lol
still nothing
nothing even pops up in the console
so I don't understand why it says to check the console
ah
Yeah you need import bpy at the top.
Otherwise python says "??? bpy? what is bpy?"
bpy being the Blender specific modules.
oh lol
import bpy
that worked
You can import other stuff like math too, not really important now though.
yay
Perhaps I'll just s/_right/_ at some point
one day I discovered s/blah/blah1 works
in discord
I was so happy
hey all - anyone here work with blender animation to UE4?
jk
was wondering if I animate using an IK setup in blender, will that translate well in UE?
Yeah @merry rampart
lol cyaoeu I think I was just reading your forum post
anyway wondering if IK translates well from blender to UE
Sure.
You can get some shakiness if you don't disable Simplify when exporting though (setting it to 0).
What you see is what you get basically.
Sure.
o_O
Discord lagging so no idea if you can see my messages but anyway.
Ah nice!
No all good
thanks - will keep the Simplify in mind
just so used to blender needing tons of back and forth checkbox testing to get shit to work
Also you will want to use a scene scale of 0.01 metric so animations don't turn smaller when exporting without an extra root bone.
Yea about that - where do you set the scale for scene
And naming the rig "armature" will solve that, that means you can animate root motion with the root bone in pose mode.
There's a bunch of buttons to the right.
The one next to the globe is what you want.
kk
uh, to the left of the globe.
Length: Metric, Unit Scale: 0.01.
Which basically means that each Blender unit is one cm like in UE4, instead of one Blender unit being one meter.
Someone help me turn my character to front
Every time I try it doesn’t stay that way even thoUgh I save
@winged valley apologies was eating lasgna!
Yep!
Works now 😄
Thanks dude, again, and again, and again.
Actually I spoke too soon.
It looks like it depends
It's not a 1:1 mirror
and some poses aren't working when I try to mirror and go crazy

the IK bones don't touch the root though
none of them do
There's like 7 IK bones in total
Neck, 4 legs, 2 arms.
here it is with just the IK bones and the root selected

seems like it moves some things up
It won't just flip in a single axis, it will flip in all on the x plane.
It's not easy to see what's happening in the front view either. 😛


The same thing? 😛
That looks really strange then, it should flip fine.
Did you try selecting all bones and flipping?
Can you send the file so I can try some stuff?
yeah for sure
so apparently what happens
is whenever I mirror on x-axis
it removes all rotation or some shit
I apparently can not send you the file via PM.
Unless we are friends.
Download that and let me know so I can delete it.
Yeah I got it. 😛
kk
Thanks for taking the time to look into that.
wait
could it be because they have _right
and _left in their names
and they aren't matching properly
because of the _right and the _left aren't exact
it uses _r and _l to determine left / right
and it uses the rest of the name to determine if it's the matching bone
bone.name.replace("_right", "")```that should work right?
Do I need special include for replace command?
Don't think so.
said it changed 0 entries
So it's turning left for you?
For me it was clearing any kind of pose data and just keeping the rotation
as you saw
import bpy

for bone in bpy.context.selected_pose_bones:
    bone.name = bone.name.replace("_right", "")
btw that worked for renaming that
fixed it completely for me
Are you not using IK right now though?
I am
(IK constraints don't have targets or pole targets)
Yeah I saw that too.
Blender is a strange program
I almost want to call it unintuitive without coming off as just complaining because I'm not exactly good at it yet
Maybe has something to do with you not inserting keyframes on all bones when you're not using IK.
Or at least not the target style IK. 😛
Did you try runing that python script to rename your bones on your end properly?
You mentioned you saw the same thing on your version right?
Yeah I changed the names.
This is odd.
Inserted keyframes on all bones in the animation, redid the thing, looks perfect. 😛
How did you insert keyframes on all bones?
Go to frame, select all bones, i, locrot
You can choose the whole character keying set if you want to do it faster.
yeah the Up -> I -> Enter
approach was fairly quick
yeah it looks great now haha
I'm not sure if I should ever have a "finish turning" animation inside of the turning animation
But how are you using IK?
The constraint targets are all empty, and you can rotate the bones that should be constrained by IK.
to do the animation
😛
what?
Click an IK bone and go to the bone with a chain icon at the right.
Yeah the targets are empty
but
they still animate the way I want them to
like I can pull them around
like little noodles
Ah, it's just a bug where the IK is still affecting the bones when it's disabled (clicking on the eye) when not using a target.
Good to know. 😛
But your IK setup is not too useful, for example you can go through the ground with the legs.
yeah I couldn't figure it out
I legit watched like 5 tutorials on IK
and could not figure it out they all had these huge rig setups
with like 15 controls
and I only wanted his leg not to go through the floor
there was a constraint called limiter I think I tried
and it didn't really work the way you'd expect it to
there's also a floor constraint
which also doesn't work
¯_(ツ)_/¯
Yeah...
You need a target, pole target, and probably less bones in the chain.
Check this out: https://imgur.com/c0ZNpoh

Haha that's awesome
currently I do that kind of animation manually
by readjusting the Z position of the bone
Yeah, that's probably a pain. 😛
It is!
Anyway you could experiment with adding target bones and pole targets, parenting them to the root (so the rig doesn't go crazy because of cyclic dependancies), then set them as the targets in the IK constraint.
I'd love to learn how to do this stuff better but the public tutorials are very basic and just do a lot of stuff "Just because"
And experiment with the length too.
I know of a good one though.
If you got one let me have at er

If you like this video please consider buying the DVD: http://www.blender3d.org/e-shop/product_info_n.php?products_id=146 A short introduction to the DVD, a ...
It's made by the guy who made rigify btw. 😛
Which is kind of awesome (but not for games 🙄 )
What's rigify?
I mean, I have an idea, but is that what the tool in Blender is called?
A blender meta rig thing.
Kind of like Art Tools but for animation for movies in Blender.
It's what you get in the Add Armature - Add Human Meta Rig, then you do Generate Rigify Rig.
Any reason my rigs export way smaller than my mesh?
I resized them properly.
They don't have much import issues
Yeah, your rig (and mesh) has unapplied transforms.
Fixing it will probably break your animations though. 😛
Oh
I can try fixing it.
they're still super small after applying object transform actually
I applied it to my rig first, than my mesh
settings look great
Can't recall having this issue with the previous import
Also my attacking animation has disappeared haha
Oh, okay.
Also apparently my animations blew up
my impale anim no longer exists lmao
To fix it, first delete all scale keyframes in the animations.
well it does but it just looks like something completely different
By clicking the hourglass, typing scale, then delete, for each animation.
Alright just a moment.
Then for the rig apply transforms (scale in lower left), then the same thing for the mesh.
Your mesh will get a strange color because it was inside out before, you just need to go into edit mode and select everything and recalculate normals.
ah okay
was about to ask
@winged valley I don't see an hourglass.
Where can I find that at?
In the bar that says dope sheet or action editor, to the right.

oh lol
Your location keyframes will probably get messed up, you can try scaling them back up by typing location, then clicking the pivot point thing all the way to the right and selecting 2d cursor, select all keyframes and scale in the y axis.
Uh, the above thing should be done in the graph editor btw.
make rig -> apply -> animate and pray I don't need to make any more changes?
Easy, don't touch the mesh in object mode. 😛
And rig.
You probably scaled it to make it look right and didn't apply transforms that time.
all my animations are completely destroyed ._.
and I did the thing you mentioned
but that just made him bob his head exclusively
o_O
You probably needed to insert keyframes for locrot on all frames as you did previously

Yeah I'll give that a shot
Any way to delete this root bone?
I assume unparenting everything first would likely result in animations breaking further
actually disregard that question I'm not going to do anything else to this animation
just fix it and call it a day
My Graph Editor is empty by the way.
It keeps going below the floor
I have no idea why it's even moving
it's just below the floor on all of my animations
Just delete the keyframes on it instead.
like it's too low
Like it's hard to explain
this is edit mode
that's object mode
(completely different)
You've got location in the transforms?
Everything should say 0 except scale which should say 1.
o_O
I really shouldn't be doing any of this man I feel like I'm just messing it up further.
Because when I was in pose mode
the bones all had weird locations and shit
some were like -15, 0, 41
random crap
o_O
I guess that's good if you liked the pose. 😛
it's the same pose it has by default
But the root bone (or armature) should be at the center of the scene.
the skeleton is just based off the models default "sculpted" pose
Anyway I gotta go, good luck. 😛
Thanks lol
I'm probably just gonna delete it
It's so much issues with one rig
probably best to start over
I have a feeling the animations are fucked for good
But you will maybe have to reanimate things anyway.
But if you add IK it will be easier.
You could check out the tutorials and start from the beginning instead, may make things make more sense.
Hey
@winged valley i'm giving the ue4tools rig another shot, but i'm confused about the cs bones... should the whole ue4tools rig be imported, or should I delete the cs bones or smt?
I get two different sets of bones in ue4 now
nvm
@outer herald You can export with Only Deform Bones in the FBX exporter settings if you don't want the control bones exported.
I feel like i'm in over my head without a tutorial or documentation explaining what deform bones and control bones are :/
at the moment it feels like the easiest option is to just learn how the ue4 rig is constructed, and then make my own the same way
Deform bones deform the bones, control bones control the rig in Blender. 😛
You can click the bone layers in the armature panel to see all of the different bones, like deform bones, twist bones, control bones, foot rig bones.
The deform bones have copy rotation constraints on them targeting the control bones.
You don't really need to worry about that though, just export with Deform Bones Only if you don't want the control bones in UE4, they don't really do anything there anyway.
hmm, so why would I want to export deform bones? if they deform the bones, sounds like they are for editing the control bones ?
Deform is a bone option meaning they affect the mesh if it's ticked.
ah I see
If you don't have deform bones your rig won't affect the mesh at all.
For example a bone called thigh_l with Deform ticked will affect the skinned vertices in the thigh_l vertex group.
You can go to the mesh and vertex groups, find the thigh_l group (click the black arrow thing and Sort By Name), then click Select to see which vertices are affected by that bone.
alright so basically deform bones are the regular bones that you get when you simply do armature >place single bone then extrude bones from it ?