@chilly pelican I don't know if there is a standard rig, but it shouldn't matter for animation and rigging purposes. Standard rigs are only really used if you're giving your work to someone else, the engine relies on certain bone names/structures, or if you're using pre-done animations. If you're working on the project as well, you can make your own standard rig
#animation
1 messages · Page 82 of 1
That would be why I am asking if there is a standard rig for this, I've a dozen horse, cow and donkey models and I'm wanting to do something productive with them.
I'd say have at least 2 spine bones, 2 neck bones and a head bones, then shoulders for both the forearms and the back arms
with the same names as a human rig

This may cause a conflict for a cenataur character I'm working on.
here's a skeleton I did
I've seen games do bip01
and bip02
Bip01-Forearm
Bip02-Forearm
I'm not asking how to set up a naming convention, I am asking if there is an already established rig. If there is not I'll open up an anatomy book and work something out.
no there isn't
you kind of have to set up a standard
most animals have the same kind of joints
with quadrapeds having a hock bone
and a hip bone if you want extra movement
then tail bones
the skeleton up there works pretty well for what I have
I'm well aware of the bones I will need, I was just asking if there was already an established rig used for the process, like the ue4 biped rig.
just use the UE4 biped rig bone names
that's gonna be the closest you're going to get
and everyone else does it that way too
ok, I'm going to go now. I found out what I needed to know.
This is why I hate asking for help in these chats, I end up with people telling me things I already know for an hour after they awnser the question I asked.
I'm still trying to figure out what you even meant by standard rig
like standard bone structure? standard bone names? an example file?
Was trying to provide solutions to all of them
oh
ik rig?
https://publish.unrealengine.com/submission-guidelines here they talk about guidelines for a biped character, and that is cool. I have several non-biped characters that are soon to enter the rigging process and a few of them are of the Cenataur style. So if there is a naming convention for qudraped characters it would be a very useful thing to know before doing a timedump on rigging up a dozen characters.
But I found out what I can, and I don't need an hours long lecture on the basics of rigging, If I want one of those I will open up a text book.
my main point was is if there is no standard, just make one yourself
As all creatures will be slightly different
just use the epic bone names
and if you have multiple bipeds, like a centaur, use Bip01 and Bip02
I apologize for trying to help you, but I really don't understand the issue here
Wow
But stiffy is correct. Just stick to mannequin naming convention and extend it where necessary.
You know you can always rename bones post rigging. So not really a time dump anyway
Oh, does anyone know if there are like, fade in fade out, animation blending?
likes say you're playing an idle animation, then shift to a running animation, can I do a fade to the next animation
so it isn't so snappy
Moving from source to UE4, and trying to figure out how to recreate a lot of source's script stuff
That's taken care if in state transitions of a state machine
Say you have an idle state and a running state. In the transition between the two you can specify the interpolation type and transition length.
Check out the anim blueprint part of the 3rd person tutorial on the website. They show that stuff slightly
I did, and I noticed an option, but looking back I can't really find it again
It's in the little arrow thingys that connects states.
Scroll down on the details panel and there is something like transition time or so and interpolation type
ah
also is there a way to transition once an animation is complete
the 3rd person example's is super hacky
Uh but it shows exactly that. You use the time remaining or time remaining ratio nodes. (also shown in the 3rd person tutorial)
yeah, but 0 doesn't work, and it has to be something like .3
Ofcourse if it's 0 there is no animation length left to softly transition
Yep
that's fine
OK if you say so. Glad you Got it working :)
it's from jump up to jump loop
hmm state machine looks to be messy
especially since I want to go from jump to almost any state
Yeah state machines become quite cluttered if you have many different states
hi guys. i've some probems copy/pasting tracks/keys in the new unreal sequencer. these are my 3 tries:
copy parameter:
copy parent track:
copy parent-parent:
nothing works. how does this work?! 😄
any idea on how to import a skeleton without a mesh? I just want the bones
but UE4 only gets bones that are weighted
why you wanna do that
they have to share the same skeleton
you import naked character first. That then has a skeleton now. In your skinning program you skin the clothes to the same bones as the character. And export that out (clothes+skeleton)
in ue4 you import those, and specify the existing character skeleton as target skeleton
I know that much
I want to make a base skeleton
with all the stuff
because no one mesh has all the bones
How would I go about doing a 3D blend space? (A blend space with three parameters)
I tried making a blendspace that blended between two blendspaces and that didn't seem to be work.
Nevermind, I think I got it.
That doesn't matter stiffy. I do it the same way. I import the naked character with skeleton. It has all bones. Then I import separate pieces of costume. I can make a video showing that tonight if you need.
@past nebula how did you do it in the end? I had a similar thing the other day where I was implementing a blendspace for additive pose with 3 parameters. The idea was to have a pose for the effect of gravity on the character in all 3 axes. Down (normal) down strong, up, forward, backwards, left and right.
One thing I did was to have 2 of the 3 in one axis as a 360 degree range. Worked well. Then later I updated the system to use 2 blendspaces 1 as 2d one as 1d. That way I was also able to implement a zero g pose for when gravity was none. Then apply both additive one after another
Is there a blend by string node?
I want to set up some aimlayers and have them defiend by the equipped weapon
for hold types
you need to use weapon IDs
weapon ids?
yeah, ID=0 would be no weapon, ID=1 is like, some weapon, ID=2, some other weapon, and so on and so forth
then you use blend by int
where the selector int is the weaponID
ugh
wish aim offest asset was context specific
second time I crashed because I accidentally selected an animation with a different skeleton
I may convert string to id
just to make naming things easier
@misty dagger Sorry for the late response,
I ended up using a blend pose node to switch between the two 2D blendspaces that I wanted to mix. It takes in two poses or blends, and an Alpha value between 0 and 1, so I had to set up and alpha value as a variable in the event graph
does my skeleton need all my bones? or can I add meshes with more bones
Should you play anim montages from the characters blueprint or from the animation blueprint?
Your first skeleton needs all bones
Hey guys, I have a model of an oculus touch controller and I want to show when the trigger and buttons are being pressed. Now, I have it working through my Animation BP, what I cannot get working is getting all the values passed through the final animation pose without using blend nodes like so...
I know this is causing each of my animations to have less and less influence but I cannot get it "working" any other way XD
And using the blend per bone yields no results for me... what am I actually missing... I know its something! 😄
I assume each button has its own bone. Are you setting the correct bone names in the blend node?
You are correct, If I set each one up like this I get the desired result for that particular bone 😃
@upbeat tartan I'm talking about the bone name in the details panel. Also you want the blend weights to be 1 for each blend.
I shall give that a go 😃
That worked thank you very much 😃
you're welcome 😃
Hello. I am new to Unreal Engine. I am an animator by profession and I have done some animations for a 3d side scroller. I manage to hook up the idle, walk, run and jump (more or less).
I am stuck at implementing a 180 turn animation from idle. I want the character to play this little turn animation i did when i go in the other direction. Later on I will want to add a turn animation based on velocity but I want to sstart simple.
A good example of what I want is what the game : INSIDE has done with their locomotion
I would really appreciate the help and hopefully can return the favour one day. Or if anybody needs help with 3d animation feel free to ask
Maybe someone can point me in the right direction on how to implement those turn animations
Thank you
@violet jungle yo, what you need is to get the delta rotator between actor rotation and control rotation (make sure to break the rotators and construct them only using z axis
hey, thank you for the reply. I am afraid I would need more help because I have very little knowledge about what you said :(. Maybe you can run me through the steps from where do I need to add the animation file and so on
I would need help to build the blueprint from zero
Hi Friends I have a qustion with the animations
I can't get nvidia cloth working on maya, I have my character rigged but I can't skin the clothes (A dress in this case) And I can't get nvidia cloth working
Can you mention me if you answer to me? Thank you ^^
you have to skin the object first, then apply the apex thing to it
check some of these out, the first 4 results should have plenty of info on apex for maya
Enjoy the videos and music you love, upload original content, and share it all with friends, family, and the world on YouTube.
logic puzzles are fun :v
now to potentially destroy my blueprint adding something else
Thank you
Hey Im making a VR game and i ran into a problem using Physical Animations.
https://youtu.be/CoNpEOLy4hM

I've seen that happen on my character, too. I thought it has something to do with spawning, since it happens for me when I spawn my character in front of the camera. Judging from your video it's not about spawning but about looking at the guy after he was out of of sight?
dont you have a root bone? What happens if in the phat editor your play and simulate and set physics weight to 0.5?
nah this guy doenst have a root
bad :/
where is the physics weight option in the phat editor? I know where it is in the pb i made...
hi guys anyone know how to hold the last frame of your sequencer?
I wanted to make the last frame of the camera hold when the level sequence is already finished
Hello!
So I have this anim graph setup.. the transition variables are all explained in the pic. My problem is that, when click while it's doing the transition, it just "reset" the transition (it goes back to SwingS, but acts like it's already done and restart the transition to CombatMovement). If I wait for the transition to finish, everything works fine and I can swing again, but I'd like to be able to bypass the transition and swing as soon as the swing animation is done.
Anyone know if there's something I missed, an option or something? or maybe I'm not setting up those transitions the right way?
http://prntscr.com/dvyxjw
So basically, if the transition rule becomes true while it's still transitioning, the transition blend wll reset. And I don't want that, because I want to be able to attack again even tho the blend isn't done.

Hey having some problems with animation retargeting, When i retarget this animation it gives me Super glitchy result in which all of the bones are at the same location. In addition if i make this animation's preview render either through adding it to the level or an aniamtion blueprint, it crashes ue4. Anyone have any ideas?
http://imgur.com/3Lmr8ac
http://imgur.com/T8VOGmm
http://imgur.com/0nGw0ko
http://imgur.com/F4H4Fk2
thanks!

Imgur: The most awesome images on the Internet.

Imgur: The most awesome images on the Internet.

Imgur: The most awesome images on the Internet.

Imgur: The most awesome images on the Internet.
Hey guys, Im curious as to why I can use the local axis to rotate a bone on only a few of my bones
Hey guys, I'm having a problem with an export from maya to Unreal, can someone please help me?
That is not in detail @ebon portal ...
Learn how to import animations.
Setting up, exporting, and importing animations for Skeletal Meshes using the FBX content pipeline.
okay so exact problem I'm having: I made an animation in maya, baked it, removed all constraints and IK solvers and tried to import it into unreal. But it still doesn't look like the animation I exported in maya
I imported the animation in maya again to see if there was something wrong with it after the export
but it was completely fine
I tried the same with blender and it was fine there too
@quartz cove
plus, I get a curve in unreal engine when I import the animation that's called blendParent1, which seems to be a parent constraint, but I already deleted all the constraints through the outliner of maya
wait I will send you two gifs
this is what it looks like in maya
https://gyazo.com/25219a7a8a4686cd50aa9e941efa45dd

this is what it looks like in unreal
https://gyazo.com/4f8396ec2d0b292a4d2e1d0044483a61

yes I can send you a screenshot of the outliner too
select all joints -> keys -> bake animation [] and then I've changed some settings I'll send them to you in a sec
When you select the fbx export option, down in animation, is Bake checked or unchecked?
those are the import settings https://gyazo.com/0a34300a719776381463ca69d7469a79

I tried both and both didn't work
but I normally bake
If you bake in Maya, you shouldn't bake on export
why?
Because it's UE4
okay
@ebon portal check to make sure your animation does not have extra keys
you mean below 0 and above the looped frame?
right
there are none
0 to whatever frame
those are the bake settings
https://gyazo.com/ad911673cf5f0308f92f1b8688f29451

Take a gif of your graph editor
194 is my last frame
it was always for me too
so, I am going to assume it's something in Maya that's off, that other DCCs aren't catching, but UE4 is
Is that a MoCap anim?
it was once, and worked in ue, then exported from ue into fbx, modified and now fails to import
but this workflow has always worked for me
so far at least
I don't export shit from UE4
so, no idea there
But I am going to assume that's where you went wrong
it's a marketplace animation so I don't have the raw file
Since it was working before
Just ask the provider?
I am sure they will give you them
that can't be it, it has always worked like that, I can modify it with no constraints and it works perfectly
Also, you can do the animation fix in UE4 if it's small enough
well, modification
neither do I
shite
okay so, you said that I should send you a gif of the graph
what should I capture?
all joints selected?
aye

halp
whats the difference between the anim in unreal and maya?
check in maya that your bones have the correct segmentScaleCompensation connection (.scale channel of parent joint into .inverseScale channel of active joint) unreal needs that connection and the corresponding setting on each bone of the baked rig
this stuff
I haven't seen those settings before to be honest, I'll try them out tomorrow, thank you very much in advance @misty dagger

I am super excited to announce that on Tuesday, February 28th from 2-10 PM PST, Animation is taking over Twitch! The Animation Exchange takes the knowledge sharing and powerful community…
looks interestin

We have been talking with Gio for a few months after Brad met her at his visit to Rooster Teeth and seeing her first rigging video where she did an excellent job in quickly and clearly presenting the technique. She has since created a great series of videos fro Autodesk Learning that cover a solid …
nice tips
Hi, someone can help 2min, just want ask some question about clothes, in unreal 😃
just ask, that way the people who might have knowledge will reply 😃
I want to know the workflow for add clothing to the character, from Maya to Unreal. I have the character with skin, and I can equip Static Mesh with some blueprint. Now I want to learn how to use Skeletal Mesh/Apex Clothing for my character, I have already made some cloth for the test but I don't know what I need to do now :3
If someone can help me, I'll give cookie 😃
@misty dagger thx for the answer, but if I open up my node editor, I don't have any nodes there, plus all the checkboxes "segment scale compensate" of all the joints are unticked, could that be the case?
also I've never touched the node editor before, so if I should do anything to be able to see something please tell me 😅
I very much suppose so. Its a default for bones and universal cross softwares. If you change it in maya, other softwares that use skeletal assets from it might bug out. I learned that the hard way while working on my stuff which uses a completely custom made character skeleton and baking methos.
okay thank you I'll try to tick every "segment scale compensate" checkbox on the joints and see how it looks
select joints, then click that button highlighted in blue. If you wanna se a detailed view of connections, hit 2
thank you very much 😄 I'll try that too
oh and btw another question, is there a way to disable bones temporarily, so the IK handle creation tool is easier to use?
okay @misty dagger I just ticked all those checkboxes and it looks different (if not slightly better) but it's still wobbling out of place
this is btw the size of the graph I get if I open it up, select joints, click the button and press 2 https://gyazo.com/c50973786f854dc3d9644762258f646d

but can the nodes interfere anyway with the animation? because if I go to Modify -> Evaluate Nodes -> Ignore All everything still works
so even though I practically disabled all the nodes, they can still interfere with the animation?
not sure why it still wobbles. I dont think I have enough information then to really give any constructive help. Would you be able to share these assets?
Hey! I have a skeleton with 3 already existing animation sequences. I try to create a new one, but anytime i move a bone, it moves it in the other 3 animation sequences too. What am i doing wrong? (MotionControllerPawn)
Or just how could i create a new anim sequence? 😃
@misty dagger sure, give me a minute I'll send you the file asap, and thank you very much for your support 😄
using maya/blender/3dsmax or any other 3d content creation suite.. ue4 isnt really made for that
it should be ... it's a game engine after all x)
hey guys, Is it okay to use DrawDebugSphere or DrawDebugLine in FAnimNode_Base::Evaluate ? I'm randomly getting crashes with line batching
What's a simple way to combine a run and attack animation? When I use the layered blend per bone, the run looks fun, but the attack looks terrible and is facing downward, striking the ground (sword attack). Thanks!
nvm I think it's just a shit animation not designed for moving
in layeredblendperbone there is a checkbox for mesh space rotation blend.. check that on, should improve the look
dude you're the man. Fixed hours of me troubleshooting and doing different things with one checkbox LOL. The life of developing ;o
Anyone here available for an animation question?
yeah shoot
sec
ima make some gifs
here is what it should look like
And what it looks like in unreal
the spinning disc rotation is different
I am using bones to move the panels and rotate the disc
any idea why the disc rotates differently?
Figured out a temporary solution
I baked my animation down with a 1000 samples (for a 30 second animation) to force it to play normall. I think unreal did some weird interpolating
man I really gotta get into animation
@median light try the checkbox "use default sample rate" while importing it solves a lot of issues
your animation should be made within 30 fps though
@ebon portal hey I gave that a try and it actually did change, but still rotates incorrecttly
when I import into unity it works normally
so it must be some import issue
what did change?
Seems like the intermediate frames are being lost. Interesting. I've only animated a blender model using actions and the curve editor, so I'm not sure how that works.
Hey had a weird bug with ue4's physical animations. It's difficult to replicate and doesnt occur in simulation. Thanks for any help!
http://imgur.com/hYujxjo
https://youtu.be/CoNpEOLy4hM

Imgur: The most awesome images on the Internet.
triggering a reload animation on the ASP is making me cry 😢
created montage, got character rigged up which calls the play montage fine
anim graph has layered blend per bone set up with the montage slot and locomotion
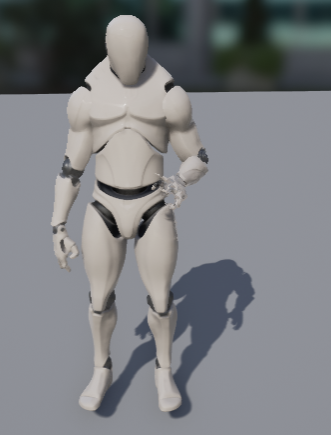
Hi guys, don't know if this is the right place to ask, I'm making a character model and I would like to adapt it to the Mannequin skeleton/animations, what are the best practices in this case?
@vernal pumice what do you mean with adapting? having the same proportions or having the same animations or both?
just creating a model that can use the mannequin skeleton out of the box
whats the easiest way to make new anims for the generic third person mannequin? 😃
@vernal pumice I'd recommend exporting the mannequin skeleton you want to use out of UE into the 3d software of your choice and then model around it, then you can easily skin your model to the skeleton and import it with no problem into UE
that's good to know, thanks @ebon portal
just like punches and kicks
and it always depends on your knowledge about 3d software (maya,blender,max,cinema4d)
ive got a small amount of blender exp and less maya exp
blender can't import the UE mannequin properly, because they use different fbx versions, you'll have to use maya
ah fair enough
but you can also export the UE mannequin from UE, import it into Maya, set keyframes for your animation and export the animation
Hey, would anyone feel like taking look at a problem I'm trying to solve for UE4 character animations?
I've posted the question on the answer hub, if anyone feels like taking a look here it is: https://answers.unrealengine.com/questions/550962/combining-animation-states-and-layer-blend-per-bon.html
Would anyone take a second look at @pearl osprey and I's weird physical animation bug?
http://imgur.com/hYujxjo
https://youtu.be/CoNpEOLy4hM
Imgur: The most awesome images on the Internet.
Hi guys, im using the ARTv1 rigging tool
do I have to skin the twist joints
??
anyone knw?
depends on what animations you're going to use
I'd say no, because many of the animations available on the marketplace aren't using them
@winter mica
@ebon portal thanks
Guys, I tried recording a gameplay from my game using Sequencer Recorder but when I visualize it in sequencer later it shows only the character's view and none of the objects I interacted with for example: I picked a torch and threw it and it showed the torch on his starting place always, any Idea how to get the result I want? And Thanjs
You know if u have a char and you have made a skull hat object
How do u attach it to the animation
do u weight it to the skull bone, or attach it to the bone
or socket it in ue4
or what
Attach the Mesh to the Character
Then attach it to the head bone
It'll follow it's position
Not sure what you mean, u cant have it attached to the both if the headbone has a spine attached to it in the hierarchy
hierarchy*
Im in 3ds max
Oh, you want the hat to be apart of the character? Not a seperate mesh?
It is a seperate mesh, i cant get it to follow the head properly
Im in 3ds max, importing to eu4 once the animation is done
Im guessing i have to socket it in ue4 to get it follow the head right or? can it be done in max with the animation
Hi people. I am trying to animate a structure self-building visualization. Usually there is a per mesh/object visibility channel for animation. Is there something in UE4 that would work the same way? Am I stuck parameterizing transparency in materials for every single piece?
@stoic remnant i honestly have no experience with max, so I'd just keep it as a seperate mesh for now
Hey Everyone, Does anyone knw any rigging tools to use for monster/quadruped characters? does ARTv1 support this?
has anyone ever done AimSpace for character that doesn't operate Z up constantly?
technically yes, why?
I'm getting inaccurate delta values
since roll becomes a factor too
I double checked the poses, all are within 5 degree margin of error
I tried using just forward vector difference, no luck either
anyone know why the jiggle bones not showing up with "dynamics" in ARTv1(when in "animate a character" tab)
Hi all, I have an animation that visually moves my character forward, behind the scene I'm just teleporting the character to the destination at end of the animation. However I can't get rid of a flicker on the frame teleport happens. Anyone know a good way to do this?
@potent current Use root motion, don't teleport the character.
if I'm not animating a skeleton, but simply a box with some additional aspects (spheres etc)
What's the best way to approach that?
Why do why animation montages never blend well? Is it an issue with the slots? Can't get an upper body + lower body blending to work well with montages. Any ideas? Examples of how to link them up right?
never worked with montages that much, do they use layered blend per bone?
ya that's what I use with them, I just can't get them to blend well. Blending works fine in that actual locomotion, but montages not so much
hm, wired.. you tried mesh space rotation blend in layered blend per bone?
So how do i attach things to a skeleton socket, when i place the skeleton mesh in to a character bp
if you ask the same thing, and replacing the "So" with ue4 you get a lot of valid answers on google :p
I need some help blending some animations
so I have 2 montages
one for aiming down sights
and one for shooting
how would I get it so that I can kind of add the shooting ainimation while Im aiming down sights
?
or wait
I think I might have gotten most of that fixed
I just now need to know how to play a montage while playing another one
montages are tough. even when I do mesh space rotation blend, they still don't tend to blend well.
Anyone ever see this problem before? https://gyazo.com/5f0e9442db5d875f27fb93d1265015c5

Using the morph target make my mesh all wierd

can anyone tell me where i put attack animations in relation to movement animations? ive only done the one state machine so far and im not sure if they would go in there or somewhere else
@quartz cove just checking, is the shader set to work with morph targets? And how were normals handled on this asset? Import, or compute?
@frail bone depends on the attacks.. shooting with guns and stuff can be in a dedicated state machine and then just blended in the upper body with the locomotion state machine when needed. Other types of attacks like kicks and such Id still do with a separate state machine, since some attacks can happen while moving, others not. Having an attack mode separate from the locomotion mode is what I would do. But theres lots of things to consider.
the ones i have currently i want to be able to use while moving cause theyre just punches and kicks
do you have a dedicated kick while move animation?
no, i'll probably have to stop movement on the kicks but wanna keep the punches available while moving
but i still want all of them available mid air xD
tricky, thats lots of things that will require rather complex mechanics
yea i need to find someone who can make me better animations xD
@jtxp#5088 what would you recomend I use instead?
does anyone knw how to export nvidia hairworks from maya
😣
these are the assets i brought in
the hairworks doesnt line up with Z- UP axis
i rotated the hair 90 degrees and during the jump animation the hair offsets back(I also made child of the mesh)
@misty dagger yeah on morph target mats. Normals were handled on import. I will double check them when I get back home.
how the hell am i having gimbal lock issues in 3ds max when i have no animation on my bones
So strange, I am not animating anything but these cannons
and it messes up the whole mesh
Interesting
I just added more geo...
and it's gone
But it's not 4x the amount of polys it needs to be
lol

@misty dagger
Still don't get why the UFO itself was affected by the cannon morph target
maybe the morph forced a normals recompute? or the morphs themselves had already foul normal data stored?
certainly wired
¯_(ツ)_/¯
I just now have to figure out how to get this polycount down now
20k tris..
lmfao
is this intended for mobile?
nah, but my professor will get mad if he sees this shit at 20k
interesting, im working on characters with around 200k tris
very true 👍
I got a character with animations but no rig. Did I get scammed lol how can animations even be made without a rig?
They're probably made for the default unreal mannequin
tried that but got an aerror about duplicate bone names
Which pack was it?
not a pack bought it on cgtrader. first and last time i buy anything there lol
hey everyone, does anyone know how to add tongue joints in the Animation and Rigging toolkit?
can I axis lock root motion extraction?
Whats the common practice for 3PS AimOffsetts when control rotation (Or if you use WorldRotation of Camera) goes BEHIND itself - IE: 180 turns to -179 to 0.... the character flips from the left to the right instantly
in WorldRotation(Camera) this would be from 0-180 180-360
what I do is disable control rotation on the pawn
then basically, if control rotation delta actor rotation > 60 interp actor rotation to control rotation
anyone here use biped in 3ds max?
I can't seem to rotate the root bone beyond 360 degrees
anyone know if root motion can teleport the root without sweeping for collision?
any maya people know why I still have separate nodes in hypershade when I combine meshes?
I rigged a character who was in multiple pieces and then I combined the meshes together later (in 3ds max) to combine the uvs. But I don't know how to transfer uvs from the combined mesh to the rigged meshes
I thought I would combine the meshes first, but they are still showing up as separate nodes in hypershade
well, the shape nodes input into the polyUnite node which outputs the combined shape
to get rid of that, delete non-deformer history
if they are skinned, make sure to use the combine skinning flag in the command
okay, i'll try that. Thank you @misty dagger you are pro
can someone help me? I have a problem with complex turning while sprinting. I have 45° and 90° animations for turning while sprinting, but what is the best way to implement them? through blendspaces or code?
nvm found it
can you please share the solution? haha
would love to find out how you implement animations for turning
well I didn't exactly found it, but as far as I know there's a variable within UE that is called Turn, which you can get
but somehow my UE version didn't had that variable implemented
so I copied and pasted the function out of the newer version into my old one
ye, this variable returns 0 when the mouse isn't turning the character, it returns something between 0 and 1 when it's a slight turn to the right, left is negative and the faster your turn the higher the number gets
combined with a blendspace
it works smooth
Question, when you apply IK solver in 3ds max, how come i cant move the bones and only able to move the solver
Hey guys! Playing alembic geometry cache on sequencer. Anybody knows a way to do it?
she is unofficial UE4 character in Japan "Gray-Chan".
make short film

make game

free asset
thank you.
Hey guys, need some help wrapping my head around a problem. So I have a skeletal mesh with 6 animations and I need to be able to switch between playing them all, while still being able to evaualate them on a frame basis like this:
Can anyone give me a hint on what to look at? State machines?
hey guys and gal, i have an interesting problem... i'm trying to use assets from an old game for a test project... trying to set up an entire lil game to learn ue4 so i wanna just steal assets from wizardry 8, problem is the game uses vertex animations.. and exporting the monsters spits out a model for each frame of the animation
so say the walking loop would be 30 individual models... do you think i can set up something like... replacing the model for every frame instead of playing an animation?
@rotund needle if you import the models into UE just untick "Mesh" in the import options, then only the animation will be imported
it will import them as vertex animations?
@barren sand state machines is the tool to look at if you want to switch between animations
@ebon portal Allright, is it straight forward to setup the abillity to jump from any animation to another? If Im not mistaken state machines work by adding transition rules between the different states
@rotund needle oh I didn't see that you wrote Vertex Animations, well this is a bit tricky, because I don't know if UE is able to do it, but there's a script for binding the geo which is moved to a bone I'll send you the link
Hey,
First of all, love what you're doing with UE4. Definitely helps the 'little guy' get hold of some really nice functionality.
That being said, there's something I've run into which is really cramping my style. One of the things Unity has going for it, which is pretty much vital to the project we're currently producing, is the fact it can import FBX files with vertex animations, and play them back without any kind of rig in place.
UE4 doesn't seem to handle this. You can bring in a
@barren sand well you can do it like that too, but state machines is much easier, because you've the ability to create transition rules, transitions themselves, the states can be a whole graph too, ...
plus you can have a state machine within a state machine
So, If I where to have a variable(lets say an integer where each animation has its own number, would I have to drag transistion rules between each state to eachother, or can I somehow flow them back to the middle?
So I end up with the left scenario, not the right 😃
or else its gonna be a hell with 12-14 anims 😄
well.. going down that road takes me to a vertex animation tool for ue4/3dsmax
i'd already seen that .. not a max user
which is why i was thinking about a cheap custom solution of simply loading all the models and replacing them really fast
i am not too worried about performance as long as it still runs at all and looks decent... wizardry 8 is around 16 years old by now and i won't be able to release any of it anyway i don't think
@violet jungle regarding your turning thing that electric mentioned. The variable isnt always called turn. It basically is called like the input axis event for mouseX input. It just returns the current input axis magnitude. If youve followed the 3rd person tutorial from the epic website then it should be called turn. But you have to double check.
Also, copying things like that cross project wont work if the input axis event is called differently, keep that in mind
@barren sand the cool thing about the state machine is that you can draw all the transitions yourself, meaning, you can have both scenarios plus you can make a cycle which only will be played in one direction
@rotund needle it could work, while the animations would jump between each other, since there's no blending
@ebon portal yea i suppose monsters would look like 30fsp while the game is running at 60.. but it would be a minor price to pay if it means i can just import them and set them up with a few clicks, as opposed to say having to recreate all the animations as bone anis
I just don't really know whether vertex animations are included in the meshes in the first place @rotund needle
@ebon portal hm looks like they did come out with an alembic importer some time ago
might be another way to have a go at it

hey guys, how would you tackle an animation like this one in UE4?
https://youtu.be/tQkDRXo7tLM?t=10s
It's a typical animated contruction and I'm not sure how to do it. I have the Max file.

Does anyone have any info on setting up jump animations for strafing? Should I just use 8 different jump animations one for each direction? Or can I tackle it dynamically with an anim offset?
@marsh kelp export to fbx? Does the animation export with it?
@tepid inlet if you want to create directional jumping, best is to use a 2D blendspace with the directions as parameters
Anyone know a good resource for info about counter animating a root control in a walkcycle?
Animating the character across the stage, then countering that so that the walkcycle stays in place for export to engine
I'm using the ART tool btw
so that generated rig
Just mute the root control channels before baking
There's an Offset and Master controls. Shouldn't the Offset control leave the IK feet planted?
I think I've worked it out, thanks for the reply steve
I'll have to create a space switch for the weapon
on the body
I'm having a problem that after I import a character into UE, the skeletal mesh doesn't align with the skeleton, like before the export out of maya, has anybody had the same issue before?
What's the best way to update a model, including importing the fbx file with the animations, skeleton, and mesh?
allright, having a bit of an issue here... i have a set of animations in motionbuilder 2016 and a model i made in blender... i wanted to do some testing with these animations in ue so i imported the skeleton into blender, adjusted my model slightly and exported it to ue. inside ue i can load the model, but when i load the animations from mobu the model is horribly deformed, looks like every bone is rotated 90° to the right. i can fix this by loading the model into mobu first and exporting model + animations... but now the scale is off by alot... blender scale is synced up with ue, but exporting from blender -> mobu the model becomes tiny... also when exporting from mobu i can see thatthe base t pose has the model/skeleton lying on their backs
it would be nice to have all 3 programs synced up nicely so that i can export straight from blender instead of having to take a detour through mobu whenever i wanna change the model
and then also have blender and mobus scale synced so the model doesnt change size whenever i do
i'm relatively new to mobu so any advice would be great
hi. is it possible to play an montage with root motion backwards? play rate -1 don't seem to work...
Hi everyone. I'm trying to figure out how to add leaning to a third-person character. I have all the normal animations setup with 8 directions he can move in, but how does one go about blending in the lean animations? I would assume I'd probably have a blendspace for all the lean animations just like the normal run, walk, strafe, etc animations, but again how do games traditionally handle that sort of thing?
Anyone know where to get some good melee animations?
jakub has some on the marketplace. kubold unarmed pack or so
Oh I mean like axe, knife etc
Is it possible to add two anims in an override mode rather than additive?
I'm using the Apply Additive node but i'd like the animation of the second anim to replace that of the first anim for the relevant bones
I feel like there's something obvious that I'm missing
Well i solved it...
Turns out 'Layered blend per bone' is what i wanted
Alright So I just joined this discord community, and this place looks awesome! I noticed this animation section and so I think it'd be appropriate to post a qestion here: I'm curious as to how I should go about setting up FPS animations... Do I make seperate hands? Is the gun interchangeably attached to the hand socket? If so, I then need to set up a pretty massive enumerator that talks to the hand animbp to compensate for which gun it is right? And then there's more issues with gun firing animation and reloading... Does the mag attach to a different socket on the hand? Im basically just trying to do a first person shooter with interchangeable guns (thionk battlefield 4 equiping weapons and whatnot), and I don't know how to go about tackling the animations. I'd prefer a single model for full body rather than a seperate arm mesh so I can use it for my Ai's... The easiest thing to do would be just making a new set of animations for the entire character each time or rather have a new skeletal mesh for each gun? I'm just really uinsure of how to tackle this and aol help is apprecciated... Thanks guys!
I would say to take a look at the FPS example included skunk
and see how they do their animations
the right way to do animations in FPS games has been to make separate models, but its different in VR
so newer games coming out tend to actually have pretty much a third person setup with the camera attached to the head
as for guns... well typically yes you would add a socket and attach it, you can offset the models to make it look right of course... but as to the amount of animations.. it really depends... obviously a grenade launcher requires different animations than say a handgun....
if you are going to use alot of similar guns, say assault rifles, then using sockets and re using animations would help quite a bit.. however if you only have 1 kind of every type of gun and you don't need the hand models to ever change, you could just make a custom animation set for each weapon and include hands and weapons in one model
a single player game with a main character who doesnt change his clothes is a very different scenario from a highly customizable multiplayer game
but having an entire full body model for every individual gun seems like a horrible idea
what if you made 10 guns like that.. and then you realize you have to change the body in some way? now you have to somehow apply those changes for every single gun... if you're doing a small hobby project its probably a good idea to keep things as simple as possible in as many ways as possible so you can actually get somewhere with it, but certain things that may seem a bit like a hurdle at first are actually going to make things alot easier down the line
thanks so much you guys... Ive checked out the FPS demo and they have seperate arms, and also take car of most stuff in c++. They also dont demonstrate any complex animations and instead lower the gun and hands when reloading...
Can someone tell me what I'm missing here?
Nevermind, found that splitting the struct pin totally breaks the node
you're welcome 😄
Any animator here who is willing to work with me on a project ? i need animators , well im not that wealthy enough to pay , but i can assure that if we can manage to make some money with the game that we are working , the animator will get his part too,, i badly need animators ,, rigged anims like reloading , equiping, these types,, :/
@plain jolt , you should post a job listing on ue4 forums job section, or perhaps under jobs in the subreddit for ue4?
anyone knows of a good tutorial on setting up a full character movement set? i.e. crouching, proning and transitioning in between?
Hey all, I published a character with the ARTv1 tool, then exported my character to Mixamo ,retargeted, made an idle animation exported it from Mixamo. Now im using the built control rig from ARTv1 but when I import the .fbx(From Mixamo), the frame range only covers from 0 - 1, Does anyone have a solution for this?
@winter mica do then all keyframes exist in that 0 to 1 range? or is there only 1 key?
@steep berry i cant recall seeing any tutorials on that out there. but Its not really hard to develop those things by yourself. Watch the 3rd person one on the epic page as an intro, then you should have a good base of knowledge to make one yourself
hello I need a rigger work on max ( ue4 skeleton ) with paid 🤑
post into jobs pls
i did thank u 😃
@misty dagger I Only get keyframed for the rootbone Translate x,y,z . All other joints have no keys
@misty dagger Forgot to mention prvsly my imported mixamo animation had difference in names for the joints, I have now renamed as in the ARTV1 Add character rig, but have the problem as shown in the top
Also when I import the mixamo animation .fbx file during the "Skinning process in ARTv1" the retarget works fine, but once i Built the character from ARTv1 and import the .fbx it doesnt work
@misty dagger and dayum ur the famous steve from youtube, love ur work
@misty dagger Also previously I imported the same skeleton but different name prefix for the joints(did the mixamo retargeting), during that time I only got keys for frame 0 and 1, and the "controllers" for the rig move for frame 0 and 1
hm thats wired, i havent actually worked with the ART tools im afraid. If you just have a default ue4 skeleotn and import your new fbx, does it read the animation properly then?
im using this ARTv1 tool, before I publish the character(when The controls are added) - that is after skinning the character, and when I import the .fbx it works fine
only problem is there are no controls
sob
I dont think it works that way, you cant import an animated fbx skeleton onto a control rig and expect it to work
maybe art has a tool to import fbx anim from skeleton onto the rig
not sure
it has, but that is what is not working
I think prv method i did is better than the las
last
Im getting the exact poses for frame 0 and 1 the controls have keys on frame 0 and 1
but after just nothing
I've an issue with Skeletal Mesh importing ... I have a character, made and skinned in Maya, exported it, imported it into Unreal and noticed that the skeleton didn't align properly with the mesh https://gyazo.com/6f7166377ad9e32055dd6a93a7803f43

I didn't use the skeleton which was exported though
I used the SK_Mannequin skeleton for skinning
and wanted to import this skeletal mesh onto this skeleton
and if I import it with the exported skeleton, I still have the same error
and I don't know why but after I imported it, the skeleton is in a T-Pose
and it should be in an A-Pose
does the mesh move along with the joints if you manipulate them in UE4?
I'm confused where you say you didn't use the skeleton that was exported... have you looked over the ue4 retargeting documentation?
almost sounds like that's what you're trying to do
I found it, it was a problem within the exporter, there was some kind of modifier from 3dsmax (the model was skinned in max, animated in maya, skeleton from ue), which messed with the scaling
but thx for the effort 😄
I'm already having another problem if you're free XD @narrow knoll
so, I exchanged the head of one of my characters, and to do that, I needed to seperate and combine a bunch of things, so that after the skinning I have one mesh, Maya always creates these groups when you do that and I could get rid of almost every group except one, and if I tried to ungroup it, it said
Error: Can't ungroup leaf-level transforms, even after I deleted the non-deformer History of the mesh
and if I just delete the group, my mesh disappears, while if I translate or rotate it around, it doesn't affect it
so maybe it's some kind of parent thing?
In the poly combine command you have a flag to combine skinning on objects. If you do that, the delete non-deformer history will work
ooooh thx I totally forgot about that, I just combined it like that
is there a way to export an animation from the animgraph? I want to export an animation which is done by a layered blend per bone node
there is a record button somewhere on the preview window of your animbp
record with those I guess using preview attrs if needed
marked in blue
thank you very much, you're the best 😄
Not sure if this is the right channel, but I'm following a tutorial so I can animate a progress health bar. When it depletes, it transitions smoothly as opposed to it going down sharply. Does anyone know what this float != is right here? https://answers.unrealengine.com/storage/temp/53807-zrzut+ekranu+2015-08-12+09.35.45.png

Below branch condition.
I'm not sure if its float=float or float<= float
!= means "not equal"
== means "equal to"
= means "greater or equal to"
<= means "smaller or equal to"
< means "smaller than" (to the closest measurable decimal place)
means "greater than" (to the closest measurable decimal place)
Ah okay, I knew most of those haha! Thank you anyway! One last question; in my blueprint I tried to attach the get value to the variable I wanted, but it doesn't connect. This pretty much:
Any ideas on what I may have done wrong?
I don't want the target to be itself, but a variable instead.
I'm also very new to this engine haha
Oop! Got it haha
👍
Thanks once again!
stuck at oddly simple thing, I guess you surely know what to do here:
I have skeletal mesh, which is animated, I need it to float around and play it's animations without deformations (not physics blend) - how better reach this effect?
hmm, can you be more precise? float around as in, no gravity? Play animations without deformations, I didnt get that either.
@misty dagger
no gravity here, yes.
space-like floating object, which is presented by animated (!) skeletal mesh
it sometimes bumps in the objects, so it needs to have physics enabled for the whole thing, but still play the its animations instead acting like a ragdoll
I think what you want to do is using the physical animation component then. Or setting only the root and/or spine01 bone to simulate while the rest is set to kinematic. Then turn gravity scale off for the physics asset.
kinematic type of bones, how could I forgot about that. I have to try both things. Thanks a lot for the tips!
setting only the root and/or spine01 bone to simulate while the rest is set to kinematic.
works like a charm! thanks again!
Has anyone here worked with weapon animation for FPS?
I need someone good with animation to give me a couple tips, I have a question
Ask
@misty dagger well currently, I've managed to import a skeletal mesh with animations done in 3ds Max but the curves are all gone it seems. The animation is very choppy and there are no smooth transitions between frames as I see in 3ds max. I'm using this asset as a continuous matinee inside my scene, an NPC that will just exist there, moving around in a very specific way, as if the player is in a movie of sorts. I presume this is a good way to achieve this? In any case, why are my curves not translating into ue4 from 3ds max?
I enabled all of the settings under 'Curves' when exporting the FBX
hmm that can have a lot of source for problem. Whats the length of the animation? And the specified frame rate
is the animation driectly on the skeleton or do you have a control rig you are baking from at export?
the bones are directly animated
it's just 1 bone moving the entire mesh, it is a sphere
a ball robot, of sorts
wired, can you upload the fbx with the skeleton? Dont need the mesh, only the animated fbx for skeleton
Not sure if that has the mesh as well, regardless
When I import into UE4, I drop the animation sequence into the environment and hit play
And it plays but without smooth transitions
Unless that isn't how to do that
just opened it in maya. In there I get double transforms as the animated node isnt the bone but the root transform. The mesh itself is a child object of it too. Ideally the animation happens on the bone itself, and the mesh is outside of that hierarchy
A little confused
On a side note,
There are also no rotations happening inside of UE4
Seems just positional
I know how to fix this in maya, im afraid I cant help you much on 3ds max side tho :/
how would you fix it in maya?
as I just said, remove non-bone nodes. Transfer the animation onto the bone itself, remove the mesh form the animation hierarchy
let's see if I understand, export this as a skeletal animation alone and then import that into UE4, then use it to animate the mesh which is already there?
yes, you dont need the mesh in the animation fbx. And also maya is reading the transform which holds the animation to be no bone. So I think in 3ds max you need to apply the animation on something else
if I import it into UE4 as just a skeletal animation, how will the mesh inside of UE4 know to read the bones and attach them properly? For example, I want to have one bone to move the entire object and an extension of that bone to control the eye only. The two animated separately.
because you import it to the skeleton that got generated from the mesh import
I'm happy to animate this inside of UE4 but when I tried that, the animation had no smooth transitions between frames as well. If the object moves straight but curves, the object will move to point B then sharply move toward point C
I made a chest in Blender, it uses two bones to animate - one is the base, one is the lid. I made an opening animation.
How would I go about playing that animation via Blueprint? I've been looking for various nodes, and none of them seems to do the trick.
Not sure if this is the right channel to post, but at the moment I created a health bar along with another damage bar. So, when the health bar gets damaged, there's another damage bar that appears showing how much damage you've taken. However, I want to make that extra damage bar deplete smoothly as opposed to depleting sharply. Would this be how I would set up the smoothly moving extra bar? Tested it but it isn't working, weirdly. I hope this makes sense, thanks in advance!
I think you should use a lerp for that smoothness, or a timeline
So a lerp from current_number to expected_number
Or, again, a timeline
I'm still very new to this engine. How do I get the timeline? I know that the color is yellow/orange, but I'm not sure what exactly to type in to get it. Typed in timeline and stuff, but nothing is coming out.
Not to force all of the work on you, but if you could show me a screenshot example or just tell me precisely how to do it step by step, then I can be able to do it.
This document contains an overview of Timelines in Unreal Engine 4 Blueprints.
Please also consider to actually try to search out the answer on your own using Unreal Documentation
Or videos online
Caveats: you cannot create a timeline in functions as they are latent
which is probably why you couldn't find it
Yeah, I found out the timeline for the most part. I'm just trying to get this done and over with, since this is the last step haha.
As an alternate option would it be fine to create a binding for the progress bar?
So when it depletes it goes down smoothly.
Hey, does anyone have any simple solutions/tools/recommendations to convert a mixamo fbx animation to work with an existing mixamo skeleton now that the Unreal format has been removed?
I don't know since I'm a beginner haha. And gonna put this progress thing down for now. I'll ask more questions in the morning if I still can't get it even if I've searched on my own.
@glacial night look also into fInterpTo that will allow you to smoothly change a float variable over time
Would it also work if you did it in a bind for the progress bar? Like so:
Its not working at the moment even though I set up the target and current, with the delta and time being set to 1 or whatever inbetween 0 and 1
you need to connect the world delta time to that
Like this? Set it up, but its still depleting sharply rather than smoothly:
Tried making it 0.0001 even for the speed, but it still depletes sharply.
This is also a binding for the percent of the progress bar, so I'm not sure if I did that wrong as well.
"Smooth Depletion"
Still not working for some reason.
I checked up tutorials and tried to piece them together, but none if it is workign out.
Okay
Also, what do you mean by evaluating each tick? Tried searching it up/fixing it up to this, but still no luck:
Hi guys, I have a question. I'm a little confused
About adding bones in 3ds max and I also want to know if the model should be divided into parts
divided into what parts?
I think that type of splits depend on how you want to handle your character modularity
personally I wouldnt, but I guess im doing it wrong anyway
That's what confuses me
Greetings I have a question. I replicate my movement float variables using in my blendspace. The problem is when I move backwards or left/right the animation stats to jitter like here: https://gyazo.com/105d77ee77af387d5c7eab68ff102e0a

The animation jitter is only on clients on the server not
after a good bit of messing around im hoping im missing something simple. I have an airship that when in hover mode bobs up and down a bit. The collision doesnt seem to follow the animation. I have the collision set in a Physics asset under the root bone but my player stands still while the ship moves up and down beneath him.
@coral carbon Not 100% sure but try decreasing this
How hard would it be to learn how to rig a model to work with the ue4 skeleton? Or if there are any tools which replace Mixamo's auto rigger?
if its facial included and you never did it before... well
at least 2 months of training
then you will be able to at least replace it
@radiant matrix Doesn't need face expressions, its for a top down game so even hands can be simplified if you want
10 hours
you need a proper 3d tool
and tutorials for that
and alot of fucking effort.
if you mean you do it
Hmm not too long for first time, would you expect like an expert to be able to do it in ~30 mins?
oh really
if i would knew its functions in detail i would be able to skin it on a mesh in 15 minutes.
there are 3 steps for animations
bones, then the rig, and then the animation
bones with iks are no rig
just to make that clear XD
I dont need animations if you counted that as part of the time
just T-pose so I can retarget
anyway I'll have a shot at it later, so sad that adobe ruined mixamo for ue4 😦
Hi everyone! Quick question, is it possible to have more than 1 mesh attached to a skeleton in UE4?
yes
for some context, I have the player character, and several pieces of armor that are animated with the character model, I'd like to be able to toggle what meshes are the children of the skeleton based on character load out.
lets get cricken.
@radiant matrix Thanks! You wouldn't happen to be able to point in the direction of some terms or documentation on it? I'm not sure where to start searching.
so you have a skeleton and on that is armor applied.
So its static meshes?
that just move with?
correct
I think so. The armor pieces and the character mesh are all in the same Maya Binary, broken up into layers.
Planning to export each to UE4 individually
the pivot is essential
make sure the mesh is at the right spot
no transforms in ue4.
thats unclean and will break the system
anyways time to start
I think I've got that set up correctly, I've successfully exported the whole MB as one piece to test scaling and animations
open your character and go to the body mesh wich has the skelton on
wait
we need the armor parts as single
unfortunately, I'm not at my computer with the UE4 project right now 😦
you told it was pieces
At work currently, planning to get back to it in about 6 hours
then owl be sleepin ^^
aww, that's okay
I appreciate the assistance regardless, knowing it's possible saves me some stress
once I get the pieces imported into UE4, what should I look into for them to all be connected to the same skeleton?
that should be more than enough to get me rolling
cool, that's already done! 😄
I just need to solve the pipeline between Maya and UE4, and the UE4 logic for toggling armor pieces
Add a mesh component to the character bp under your main mesh. Set it to be the armor. Then use set master pose component to sync
Can someone help me with retargeting?
I am pressing "Save Pose" on the retarget pose thing but it's having no effect on the stuff using it.
Even outrageous stuff like
No change.
(yes, using same skeleton)
Only change that HAS worked is this
setting those top 2 to Animation properly set the mesh to the right point (was floating)
nothing else is changing.
Anybody here happen to have experience with Daz3d to UE4?
theres some tuts on the wiki but all are incomplete it seems
and when i try import a char i get some weird effects
for one, bones dont seem to be attached to eachother lol, char just splodes apart if i simulate physics
got some question regarding to Anim_Dynamics
http://puu.sh/tSWIF/3469ae4cac.jpg
I've got this after set it to angular spring
this thing is supposed to be straight antenna. Don't understand why it doesn't stand straight and always trying to be 90 degrees angled
trying to do physics editor of a worm, when i simulate it looks stretchy in some places.. i moved the 'balls' of it apart and readjusted the constraints to go between each 'ball', which i guess represents the bone.
still looks weird when it ragdolls
and not all bodies have bones
How do you lot handle footsteps in blendspaces?
@icy valley https://www.youtube.com/watch?v=jzKZHVx_NzA

I know how to do it
Found my answer here
"You can change this to only play notifies for the highest weighted animation. In your Blend Space asset, open the Anim Asset Details panel. Under Animation Notifies, switch the Notify Trigger Mode from All Animations to Highest Weighted Animation. Now, only the notifies of the animation with the heighest weight (viewable in the Blend Space graph) will fire."
😃
Impressive stuff https://twitter.com/nan2cc/status/829805358826844160

Some progress with my LocomotionAnimSystem (@UnrealEngine) using DistanceMatching Thks @LDelayen x share this great technique #gamedev #ue4 https://t.co/VxWtS3b8gc
Based off this talk I believe: https://archives.nucl.ai/recording/bringing-a-hero-from-paragon-to-life-with-ue4/
Oh very cool. Definitely gonna check that out
thx for that linked talk @long stone was an interesting watch 😃
Hi folks, I'm not usually much into the animation aspects of UE4, but I am a VR dev and would like to put together a more robust vr hand system than the one that ships with UE4. Specifically with the Touch, there are a number of hand poses that I would like to mix together dynamically, and I'm not sure the best way to do it. So there is open, grip/point, thumb down, closed. How would you set this up so that those poses can be mixed? Would I create states in a state machine to do this? Can states blend? I currently have several 1D blendSpaces (not a state machine) that I'm trying to blend additively in the AnimGraph... however I'm getting crazy double transforms.
To my knowledge there could be 3 ways of blending the various poses that Touch allows for.
- create blendSpaces for each pose and additive blend (this isn't working for me very well, so maybe not;)
- create states in a state machine for each pose, but can you use the Axis controls to blend smoothly?)
- create slots for each of the joint groups, use cached poses and blend the specific joints on and off with axis controls
@unique viper, not saying 'this is the way to do it' but it was actually talked about shortly in the last ue4 twitch stream, this one: https://www.twitch.tv/videos/120867574 skipped trough a bit but cant find the exact point where they discuss it, but it was bscly like they have hands with seperated fingers (using bone scaling as a quick trick to save on needing some extra models)

some1 asked how it was done in one of epic's own games and they shortly talked about it
has anyone experience that when you restart a level with a level sequence in it and then you play the level sequence.. it starts to hang?
im using sequencer
Hi I'm in the animation blueprint and is there something wrong with 'Get Pawn Owner' Node? it doesnt seem to work. im trying to get the rotation and print the string and all im gettting is 0 in pitch, yaw and roll.
I have never done something like that before: I want to create a lever like this: https://www.google.de/imgres?imgurl=http%3A%2F%2Fpreview.turbosquid.com%2FPreview%2F2014%2F12%2F01__18_47_32%2FPreview01.pngf7620b59-ba1e-4f51-b000-7bd772011719Original.jpg&imgrefurl=http%3A%2F%2Fstlfinder.com%2F3dmodels%2FDungeon%2BLever&docid=Rr9F8IR7ji8IGM&tbnid=8AnRhCdwn_2YAM%3A&vet=1&w=1200&h=1200&safe=off&client=firefox-b-ab&bih=882&biw=1635&q=3d model lever&ved=0ahUKEwjVrN2J5ojSAhXDCBoKHYbeDe0QMwgfKAUwBQ&iact=mrc&uact=8#h=1200&imgdii=SIGHU3rpE9-n5M:&imgrc=8AnRhCdwn_2YAM:&vet=1&w=1200
Do I put lever and base into a blueprint as seperate model, or is it a skeletal mesh?
what's the best approach?
In the end I will use it in VR.

Both works, it's just a different workflow.
You could use two meshes and control the rotation of the lever via blueprint.
Or you can use a skeletal mesh and control the bone rotation via a blend space.
If the animation you're trying to do gets more complex than simply rotating around one axis, you don't want to do that in blueprint. Then you definitely want to use an animation you created in your modeling program.
Does anyone know if Axis lock for motion extraction is possible?
or "root motion" as unreal 4 calls it
not that I'd be aware of
I've seen it requested every now and then
it used to be there for some older ue4 version
no idea why they removed it
well, I think at least it was there, I never used it back then
Has anyone successfully implemented Jump Animations in Third Person with more than just a falling Animation?
I have a State Machine with OnGround and InAir. I play a Montage when I want to start to jump. (I am still in OnGround here)
How do I smoothly change the State to "InAir", while also playing a new montage for the actual jump Animation?
@dusk dove have you checked the 3rd person character controller tutorial on the epic site? They show some methods for jumping.
Hmm, for some reason my animations play at alarmingly fast rates on the first run
I have setup a character controller with basic movements(idle, walk, run), most of these movements are "in-place". I want to know how to add a root motion "running jump" to this, with the camera coming into place where the jump landed
I only want the jump to work with root motion not the others
Heres a little example. The error that pops up is unrelated to this Character and is obsolete as of current and is to be deleted soon. But heres the video: https://youtu.be/7-55UagAisU


You are changing the Oriantation with your animation. Either lock the Rotation in the animation, or revert the orientation back when the Montage finished
Hey guys, is there any reason why i can't seem to get vertex animations to work on a standard UE installation?
how did you set them up @coarse plume
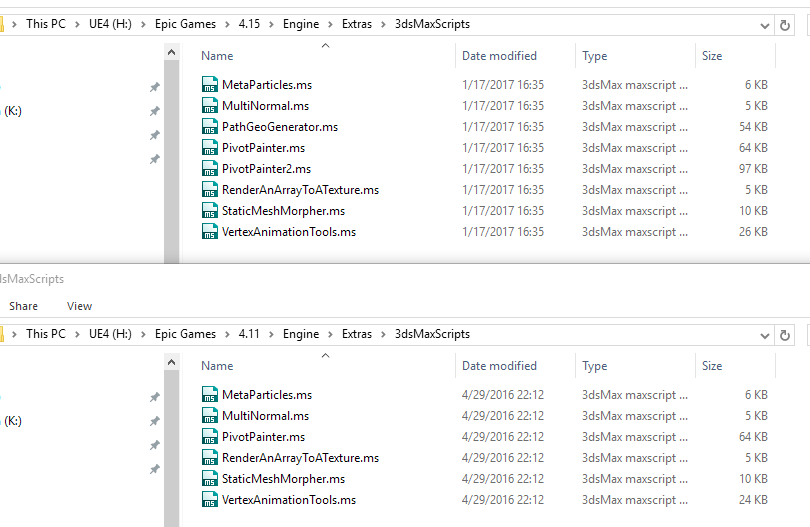
we have been trying to follow the vertex animation tools tutorials that use 3dsmaxscripts that apparently are available in the extras folder since unreal 4.8
but have not been able to locate these scripts
Apparently Epic has removed the script. They did the same with other scripts / extras as well. idk why tho ...
they are still exactly where they where when 4.8 was released for me
\Epic Games\4.XX\Engine\Extras\3dsMaxScripts
also, since the tool is mentioned by name, and written down. you could have searched for it on your drives :p
odd. they are not in my install dir

the 4.14 one has an additional option I suggested, yay
(can now bake uv's to the channel you specify)
seems my install is different then
why does everybody lack that folder, and I have it always
must be an install option people disabled
looks like it
there, problem solved
ty
:p

@copper dawn do you have any idea what might be happening with my animations??
im not an animator :/
:p
oh this chat is ded
@visual blade Is it a montage? try adjusting the blend in blend out in the montage settings. .5-.8 usually work well
Sweet, I'll give it a shot!
@coral sprucegy#9262 Unreal 4 does not support axis locked root motion extraction. You'd need to add another root bone or just not use root motion extraction
which kind of sucks
because even source engine supports that .-.
I think you tagged the wrong Greg there
Lol
maybe he left the group
Looks that way
sorry bro
Np
is it possible to extract an animation curve from a bone axis in an FBX?
Last week, I posted a question about animation blending tips for VR Hands and touch-specific gestures. I investigated state machines and other methods, but the simplest and most satisfying way I've found is to create blendSpaces for each pose. IndexIn, Grip, ThumbDown. Then in the AnimGraph (no state machine needed) it's super-simple. Use the "Layered blend per bone" node and plug blendSpace players for each pose. The trick for me was just to isolate the joint chain for each finger with the associated BlendSpace. Assign index_01 as the joint chain for the IndexIn pose, thumb for thumb. Nice and simple, and very fun to play with when triggered with Axis amounts, so the fingers curl more as you press the buttons harder.
have you guys had a read through this?
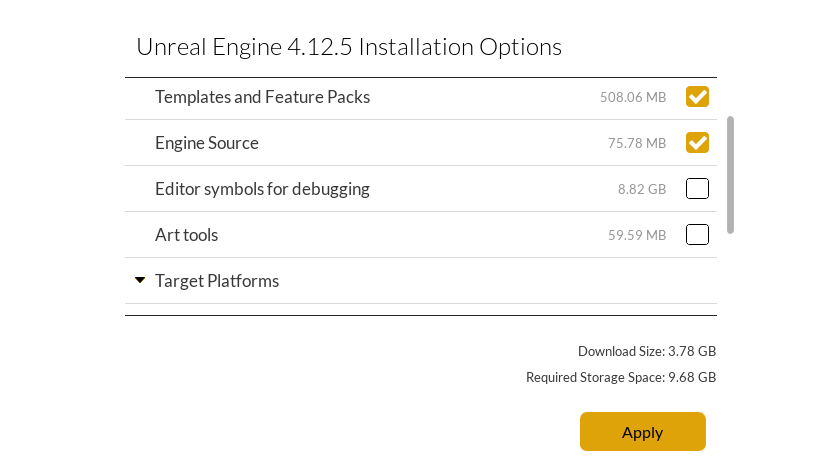
any idea what this means? New: Added experimental support for facial animation
@misty dagger No idea if it's related to the curve animation node or not
But maybe that's what they mean
I mean, not sure what else, unless they are allowing morph targets reanimation in editor
I just DLed 4.15 so no idea
well its experimental, but id prefer if they had some sort of wip documentation linked to these kinds of points
lol
im also downloading atm
i know :/ but at least they are trying, I had a struggle with nvidia apex.. holy shitters thats the least documented piece of software ive ever dealt with, made me actually angry at occasions
..well, I HOPE they are trying
Hey guys, I need some help. I've downloaded some animations and then decided to retarget them onto Epic's skeleton (SK_Mannequin). After retargeting the skeleton looks like this.
http://i.imgur.com/eWDdP9e.png
It kinda hangs in the air, the shoulders and fingers are misplaced and the animation looks weird. How to fix it?
Thanks in advance
@raw aspen that looks like a bad retargetting job, please be aware that while the retarget ui tries to be smart and auto select bones, this often fails/selects wrong bones
what it looks like to me is your having a skeleton with (for example) more bones in the hand, and its picking up some of those bones as lower arm or whatever
so yea, my advice, try retargetting again, this time pay close attention to the bones that are in each dropdown, 99% sure the issue is there
we're made many attempts and already checked every bone(
As I know the initial animation was made for old epic guy (blue one)
But I'm not sure
I'll check it all again now
this may help, some vid of a guy retargetting with the old blue unreal dude and some mixamo chars https://www.youtube.com/watch?v=3GgVUKcGvAY

(where the mixamo chars use the latest unreal skeleton afaik)
@misty dagger Hm. What does it means if UE does not open dialog with bones?
when importing? did u select to import skeleton too?
if u dont get bones dialog my best guess is theres no bones 😛
anyway id suggest trying to follow along with that guys vid, skipped trough it a bit and he goes over ever step it seems
means bones got banned from the community
#crappytruebonesjoke
Man having errors in Maya importing the mannquin from the toolkit cant figure out whats causing it
can you show some of the errors?
guys, now I need your halp
I have a character that holds a spear. I have attached the spear (static mesh) via wrist bone socket. Now im planning animations for attack and defense with spear and will need the ability to have it slide up and down the hand depending on animation. Will I need an additional group inside the skeleton? If I animate a group node in maya with the required slide translation and parent it under the wrist bone, then export the anim to ue4 onto the correrct skeleton. Will that animation also play properly?
here image of character
https://dl.dropboxusercontent.com/u/25584030/mayaWspear1.PNG

@misty dagger From what im reading, it should work because you are parenting it to a bone, so it should move with the bone. Hope that helps if I understood
oh, thanks m8, I got this sorted now, was a bit of a struggle, but it works now with bone and all.. heres the whole log of what I found and did to make it work.
thinking about it, it was a pretty trivial issue -.-
@misty dagger ah, good good
@misty dagger mixamo chars use their own skeleton, they never supported new ue4 skeleton either but the old blue guy
they removed the UE4 support a while a go too
oh, that vid was retargeting ue4 skeleton animations into mixamo char not the other way around
nevermind then
Hi guys i am new to unreal engine, need some help. I want four of my animations to play sequencially when a key is pressed regradless of any other parameter like speed, direction etc.
@iron stone use animationComposite
https://docs.unrealengine.com/latest/INT/Engine/Animation/AnimationComposite/
Animation Composites serve as a way to combine multiple animations together and treat them as a single unit.
Not sure if this is the right place, but here goes nothing. I am having some trouble getting some animations correctly into UE4.. In 3ds max everything is perfect, I have some animations that runs from the ranges 0-100, 101-201, 202-303(all 100 frames long) that i export as individual FBX files and import into my skeleton inside UE4. However.. It seems like the animations, for some reason, take some key data with them from the previous frame range
The problem:
The wanted result, note the alignment of the arrows
it only happens for 0.05 secs in the beginning. but its enough to cause some serious popping when swapping between animations
And here is a video of the problem
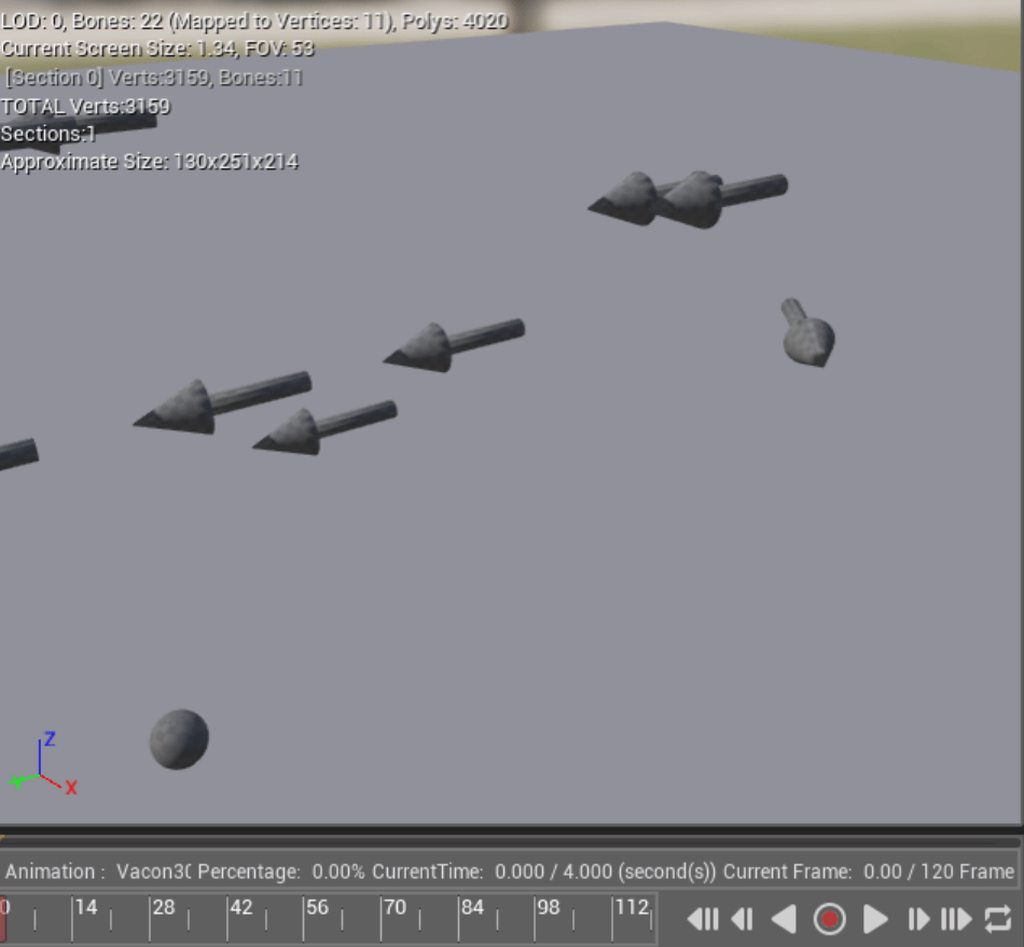
could it be that its because its exported as 25 fps?
@frail basin still good to know 😃 (and 'booooo' i guess hehe) ty for the headsup
well, they never updated for the new skeleton
and keeping the ancient skeleton support up was bit pointless 😃
ah, yep 😛
things happened around the same time as Adobe bought Mixamo
so they apparently didn't see UE4 support as a big priority (considering you can still import the meshes into ue4 regardless)
honestly i tried mixamo a while back and more recently fuse (mixamo adobe, the way i understand it) and adobe's version has incredibly weird looking chars lol
they all have weight gain 4000 / beefcake necks

The best thing about mixamo was the auto-rigger, you could upload any model and get it to work with the ue4 skeleton within a few minutes. Instant access to all the marketplace assets. Unfortunately they removed support for the ue4 skeleton 😦
Hello Hello. I have some mocap data I am working on, and there are slight centering issues I am trying to iron out without going through full adjustments in third party softwares.
In a nutshell, when I view an animation from above, animation 1 might be a bit forward from the root 0,0,0, another might be a bit back. So I thought I could just tweak the values in the 'Import Translation' fields to center them, but they seem to have no effect. Any tips?
Just trying to move the skeleton by for example moving the hips breaks it all up... Maybe my root is wrong
Ah and adjustments made by using the transform tools have no effect ingame anyway. hmm hmm hard learning : )
So yeah, I am gonna guess that my lack of root bone at 0,0,0 is the main evil here
( Using Perception Neuron if anybody is interested )
However, I don't really need to drive the animations with Root Motion, I just need to adjust the translations a bit. Hmm
Where can I set the FPS of my imported animations ?
Anybody here got experience with taking the IK feet logic from the animation content example and shoving it into a different anim/character bp?
been doing that over the past hour or so, and it looks like i have everything in place now, but theres at most like a cm of offset created, thats it, whatever i set the IKTraceDistance too
so kinda wondering what im missing, some posts i found online mention to move the character down a bit so the capsulecomponent doesnt block its movement, but thats just causing my char to sink into the ground lol
some information from distance matchmaking or capsule movement no root motion?
Threw together a picture to try explain my 'problem' (im trying to implement the foot ik from the content examples, and while it does seem to work, its hardly doing anything)
http://i.imgur.com/gPHegnn.png

after some more testing, yea, its definitely that i need some logic to 'drop down', the feet travel up nicely when walking over a staticmesh with the same collision settings as in the content example (ie; not solid too the capsule) actually much further then the ~1cm seen in the above pic, it just cant on that slope because the slope is solid/its hitting the capsule? so how do i fix that? 😃
anyone know how to rig a strange shape for Animation / physx responces ?
So to answer my own question, this seems to be a thread talking about what i want to do, so today ill be trying to make sense of all that 😛 https://forums.unrealengine.com/showthread.php?44288
@Andreww#4493 sounds pretty awsome, any chance theres a video showing the result?
anyone know to reverse an animation in ue4
setting rate scale to -1 didnt work?
So after some gaming and other stuff i picked up on trying to implement the magic from that thread, heres the result:
http://i.imgur.com/exG5bTv.png

so it does drop now, but 'the other foot' (the one that doesnt need to drop) isnt aware of that lol, so that foot is just aligning with the ground as if the char is still centered in the capsule
so does anybody have any ideas on how to fix this?

Does anyone know how to use matinee to animate?
How do I properly create Climbing/Ledge Animations for different heights?
I have a Root Motion Animation, but this is animated for a certain height Which makes the Character float on a lower height.
IK is the keyword here.. Maybe have a google on it, and maybe maybe, look into iKinema runtime
@dusk dove lara! 😮
and yea, IK is what u need
also, iKinema is awesome and all, but also comes with a quite hefty price (not the one shown on the site*)
so i strongly suggest looking at doing it yourself, i actually did friday and saturday and got it workin, see the screenshot above your 2, thats a pose of a character standing on flat surface, modified with IK to properly stand on a slope
Welp, I have a question. I'm working on a project file separately from my teammate. In order to save time, I was hoping to use Sequencer to record some shots, but was wondering if there was a way to import my camera movements into their version of the project. So the final footage would be the updated environment, but with the old camera movements
@misty dagger How do you determine the Trace Location? Is it predefined for the Standing animation Or do you take the SocketLocation into Account?
I don't have additional IK Bones, only a naked Skeleton
@supple tendon only thing i can think of is that u have a model with a bone, that bone is the animated camera path, then u can change the animations (and in effect the movement of the camera) seperate from the level
@dusk dove im using standard skeleton too, all i did was add a socket for left and right foot bones
Whenever I run the IK Foot in the Anim Graph, the Feet slowly converge against the 0,0 relative Location. This results in the feet being directly under the hips
The Feet never stay at the intended location
how did u start your ik? did u just try put something together or look at the content examples?
i strongly suggest looking at the content example for animation, 1.8 covers feet and hand IK
https://forums.unrealengine.com/showthread.php?44288-IK-FABRIK-blueprint-tutorial-for-proper-foot-placement-with-capsule-collision I looked at his, because it also takes hip offset into account
thats step 2 ;D
you need step 1, that ik stuff from content example
that thread literally builds ontop of that
(also keep that bookmarked cuz yea, you need that shit)
Isn't the Location for the Traces in the Content Examples predefined? Ie it does trace at a fixed location.
it traces from the sockets u add too the feet
based on the trace distance variable
so yea, really just do this:
1] go in the anim content example, find the IK blueprints (theyre well commented) and copy those to your own anim and character bp
2] do some minor tweaking as needed, and you will have your basic foot ik working (feet go UP only)
3] go too that thread u just linked, and just closelly look at the pic in the first post, let it sink in, then go to your char and anim bp's and notice how theres alot of similarity now (cuz both you and the example in that thread use the content example bps)
4] copy over stuff from the thread that you dont have in your anim/char bp, test, tweak a bit, profit
one thing to note, you will have to put in a little thought to overcome two small bumps in the road
the first bump is that you wont be tracing down properly, the second is that feet and hip ik are unaware of eachother
both are really quite an easy fix
just go trough 1-4 and see what you have, should be fairly obvious where to fix those 2 bumps, if not, hit me up here
that said im afk for roughly 20mins now, but back for at least another few hours after 😃
oh one last note, in the thread u linked, theres talk about your skeleton needing only 2 bones in its leg, this is no longer relevant, just use the default skeleton
and finally, in same thread they also talk about knee IK, but so far ive found that to be unneeded (will prolly change once i start doing foot rotation tho)
k, that should be all, 'god speed', back in ~20
Ok thanks, I'll try it 😄
@dusk dove sure thing, gl, and yea, feel free to ask me questions if u have any
How should I calculate the HipOffset, If I don't have the capsule?
I do the IK Calculations all in the AnimBlueprint, Where I only have access to the Bones only.
I could cast the Owning actor to the Character, but I would like to avoid using this method
(for scalability)
(and encapsulation)
hmmm, i was actually thinking about taht too, putting it in just the anim blueprint
and honestly, casting would be your best option
its what i see beeing done everywhere lol
no
capsule height = character/skeletal-mesh height, so half capsule height is like the size of the legs
so center of capsule, minus half capsule height, gets u the bottom of the capsule
and yea, just use cast lol
But in the thread he is using the whole half height
im guessing what you can do (havent tried this yet) is cast to some character_bp, then once you need multiple character_bp's you all make them childs of the one main character bp
hes using a quarter height i think
i ended up sorta slapping that together without much thought lol, its one of the main things i wanna revisit
honestly all of it doesnt really matter, all that matters is that you have some value you can use to trace a certain distance up and down from the feet
whats that pic trying to ask lol
He isn't using the quater Capsule 😄
he divides by 2 and multiplies by 2
and substracts it from the impact location
ah, yea he uses both
he multiplies by 2 there, but pretty sure he used the quarter heights for the trace lengths
i sorta didnt, like said, kinda crudly slapped together that bit, need to rework it 😛
again, whats important here isnt really the capsule height stuff
you just need (a) to know the bottom of the capsule, u can do that by measuring capsule but dont have too, and (b) you need to have a length for the trace so you have a starting point thats at about knee height, and a ending point about that same distance below the capsule
(instead of measuring the capsule u can just have a number to define the z offset)
thats what the doodles are there for i guess, because (in a way) they explain what the thing is supposed to do
and yea, in your above screen, doodle is about the trace from knee height to below character
all them math nodes are just one way to achieve that