#arma3_model
1 messages · Page 124 of 1
 stuck oyster
 white jay
yes
stuck oyster
you need to have a good grasp on how max works before you can apply the tutorials Arma parts on your model
 quick terrace
@stuck oyster if you know the tools, it doesn't matter what 3rd party software is used
stuck oyster
thats what im trying to say
but he does not yet completely know how to model in max
but trying to use Blender tutorial in Max wont work if you dont know how to apply it into the different tools
white jay
yeah but after i learn about it and how could i make a house a shop etc in max then i can move on right ? cuz there is no point of me making houses without doing something with them
stuck oyster
you dont need to learn how to model a house
you need to learn how to model
then you can model a house or shop or tank or plane
stuck oyster
I got stuff to do so for last time, dont focus on the house yet, focus on understanding how things work in 3dMax
white jay
oh okay good then am going to learn this stuff in my free time cuz its confusing a bit but yeah i will stick with terrain making and see if i can learn more about 3ds max thanks @quick terrace and @stuck oyster
quick terrace
@white jay you do it because you want to do it, you won't find a tutorial that will hold your hand from gettign that specific house you want to getting it textured as you want to getting in game
if you don't know 3ds max, i would suggest you give blender a go instead, especially for A3
 median bough
Also, blender is for free and there is even an arma toolbox for it
quick terrace
hence my recommandation, 3ds max comes free as well in a non-commerical license format
but if i would start now and focus just on A3, i would most likely start out with blender rather than max for obvious reasons (nothing wrong with max mind you)
 sacred grail
I would also recommend don't start with a house.
houses often require multi materials which is something you will want to learn further down the line once you have a good core understanding of the normal texturing process (supershader)
median bough
i'd start with a simple ammo box
white jay
Okay guys thanks for all of your advices I will comeback here once I understand everything
median bough
so... never then? 😂
nobody understands "everything"
its... arma... you know...
😄
sacred grail
"understand everything" cya in 15 lifetimes bro 😄
 noble sphinx
Hi, names Reverence, and I'm trying to configure my neck seal part of my model to properly follow the neck in Arma 3. The problem is, when using neck, neck1, or (the other one, can't remember off the top of my head), it comes out slightly off center (forwards / backwards). How would I go about properly setting it up? Everything is to scale when ported to oxygen, so I know thats not the problem. Thank you!
(Be sure to @ me when responding)
stuck oyster
neck, neck1 and last one would probably be head... @noble sphinx
and your weighting and mesh has to match very closely the character underneath your clothes in order for it to move with it
noble sphinx
So basically trial and error the whole way through?
stuck oyster
yes
noble sphinx
Fun xD
stuck oyster
its cloth modeling just about everywhere
if you have 2 meshes you want to move together
in very close proximity
on top of that is of course Armas unforgiving skeleton and animations
noble sphinx
Thanks for the quick reply anyway, better to be let down quickly so that I don't waste time finding an easier option.
Welp, no use in complaining about it, better get to it!
Thanks again!
stuck oyster
@noble sphinx what did you model/weight it in?
did you use the Arma sample character as base?
noble sphinx
I modeled a helmet with neck seal that goes down to the bottom of the neck (plus a bit more), using the Arma sample char as a base.
The helmet only is weighed in the head, with the neck seal being both neck and neck 1 right now. I've tried just neck and/or neck 1, with no avail. I think I might need to break up the mesh into multiple parts, all weighed differently to have it follow the Armature properly.
Think the top of the viper uniform in terms of neck seal btw.
stuck oyster


done such
if yours is very skintight you might want to check the sample Bust.p3d thats the proper head proxy
it has some more bones you migth need for the face to follow it properly
noble sphinx
Cool, so it's very much possible (and might even be simpler then I thought)! I'll be sure to check out the bust.p3d as well, see if I get my luck there.
stuck oyster
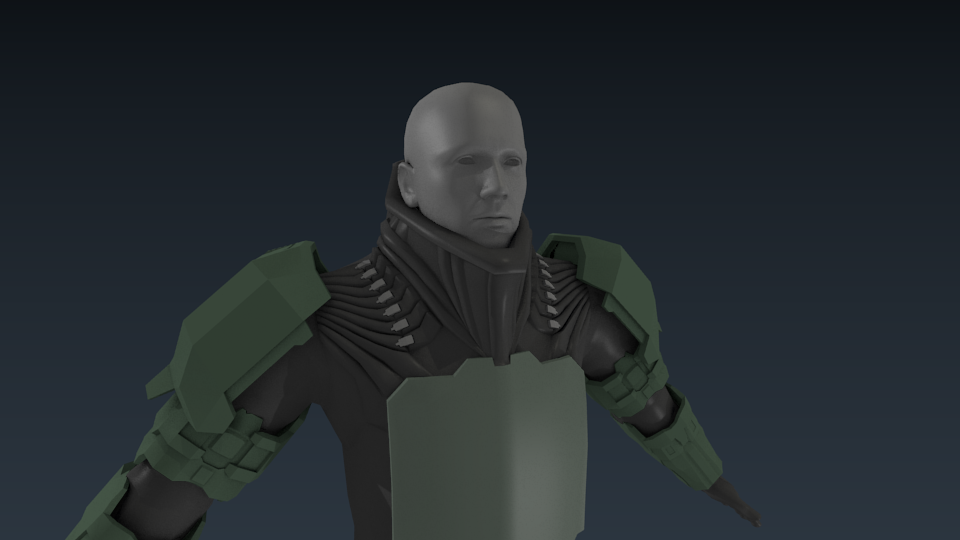
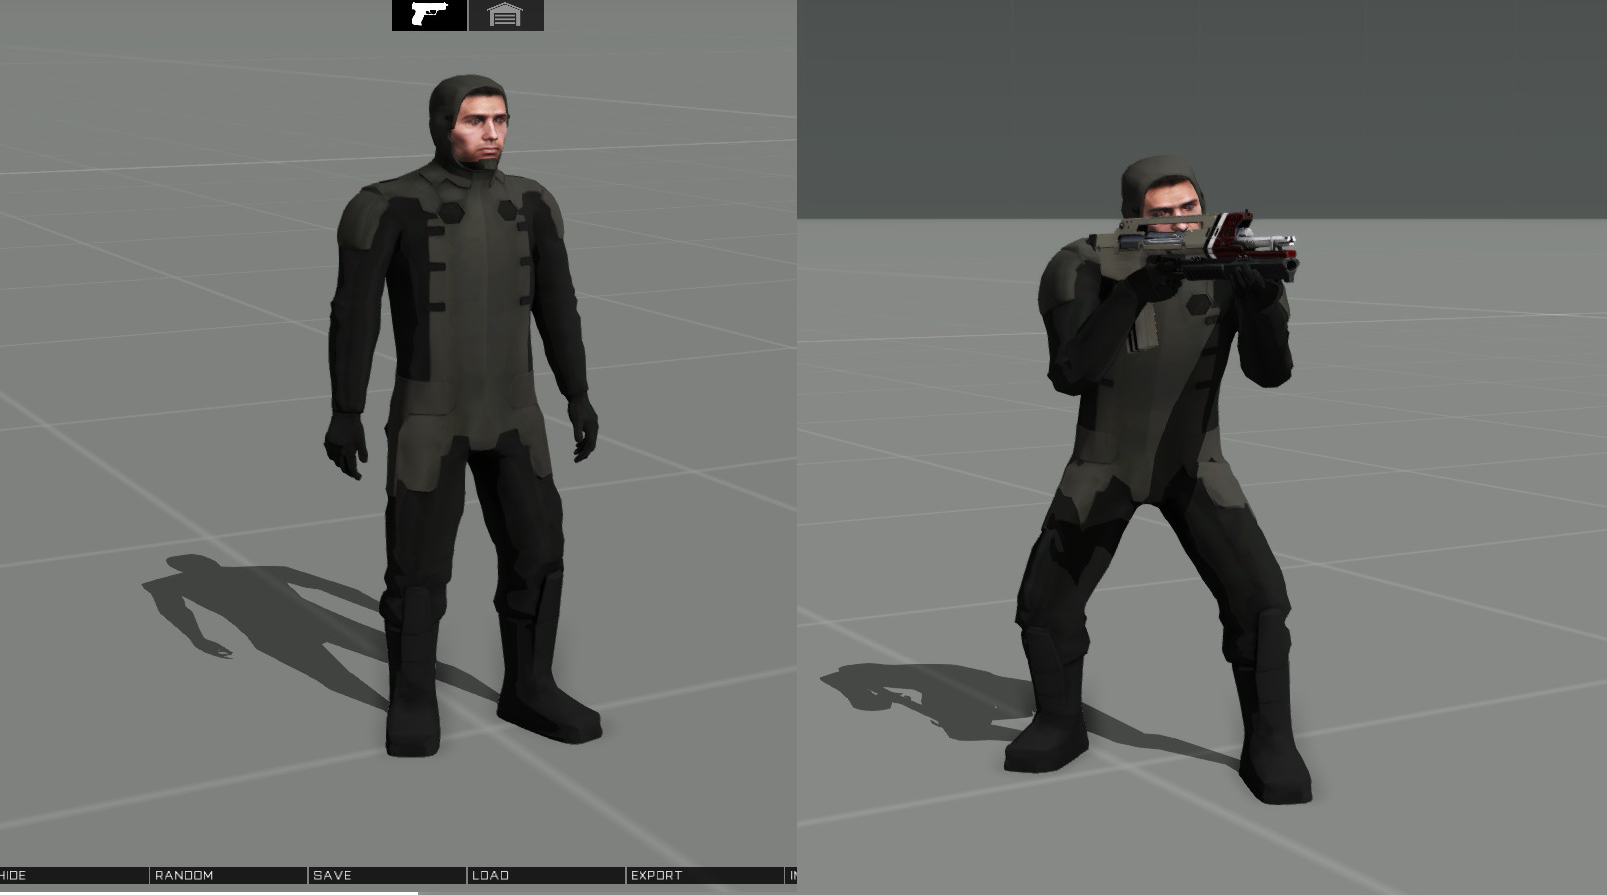
in the first pic the top of the seal is just head and the rest neck1 and neck because its large enough for the head to not clip through
the second one is more skintight with the hood and all an I recall I copied the bust weights very closesly for it to work
like the chin part moves with the chin an all that
noble sphinx
Nice. I think you just allowed me to reasonable continue working on my helmet. Thanks! Your a model / sanity saver!
stuck oyster
👍
 olive quiver
Does anyone know the keybind to extrude in odject builder or where any settings are?
 charred bolt
@olive quiver I don't think it has an extrusion feature.
 minor jasper
i've seen it beofre in OB, fro mthe pin tool somewhere, but i cannot for the life of me find the option in the menu
to extrude points from a flat plane to make a box for example
@rough idol thanks i guess we should use sbsource = visualex for buildings?
 toxic apex
@olive quiver Extrude is G. Or goto the Create menu and its at the bottom.
charred bolt
lol, all these years using it and I never knew that
 woeful viper
@minor jasper only if you like to have ugly stripes on your model
 rough idol
@minor jasper - actually I was wrong - prefereShadowVollume usage was correct
quick terrace
it has nothing to do with named selections
rough idol
I think you could also try shadowlod = 0 & etc in resolution LOD to force certain shadow LOD in specified visual level
minor jasper
ok thanks, yeah it's a weird issue - seems houses have the settings i am using, but the yare ignoring SV0.
i'll try that thanks
we're basically adding a low res shadow volume (SV10) to a lot of our older model houses
as the ydidn't have one
and then the engine is instantly switching to that shaodwlod only, even when you're right next to it
only deleting SV10 (making it an edit lod) seems to bring back SV0
seems weird with just the house in virtual reality map, it still forces SV10
olive quiver
@toxic apex legend! thank you
toxic apex
no probelm
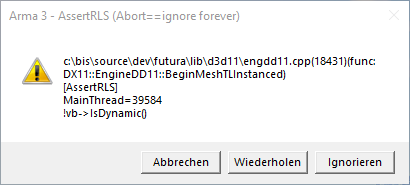
 royal prism
Someone know what that means?
stuck oyster
where does it come from?
royal prism
thats the question. never seen that befor. tried today again our map with diagnostic exe and then when i come to a specific region that error is there D:
stuck oyster
that was what I was asking for, where did it happen and what were you doing
can you reproduce it?
 spiral solstice
Does anyone have an example head for arma 3? I looked in my regular P:\a3\characters_f\heads folder but it won't allow me to look at the models since it's binarized: https://vgy.me/Z0DIGR.png
spiral solstice
thanks! is there a way to export a skeleton into ob? I tried exporting my skeleton as an FBX in 3dsmax, but nothing is showing whenever import it into OB
stuck oyster
you dont need the skeleton in OB
it is saved into the .rtm animation files
the model.cfg defines the skeleton structure
character .p3d has to have bone name weighted selections
and .rtm animation will then move it
spiral solstice
Oh, I see
stuck oyster
look up Mondkalbs Blockman custom character example
spiral solstice
I see what he did with the models, but I wonder how he got the skeleton_pivots.p3d?
 tulip beacon
@royal prism i have that error wheh i use diag_exe and unpacked wrp or models or both, not quite sure, i usually hit abort and it works just fine.
That path though "c:\bis\source\dev\futura..." is creepy
 quaint mason
In an aircraft, what does the gunner's proxy need to be named? Is it proxy:Gunner.000 like the pilot is proxy:Pilot.000?
I have an issue where the view from the gunner's seat is from the wrong place and won't turn
He also doesn't show up in the external view at all
charred bolt
@quaint mason, it's more usual for the Pilot to be index 001 (eg \a3\Data_f\proxies\Heli_Light_02\Pilot, ID 1).
The first gunner in a vehicle would be gunner.001 (eg \a3\Data_f\proxies\Heli_Light_02\gunner, ID 1).
Note that the proxies are links to models, not just triangular faces in your object, but it doesn't matter which "pilot" or "gunner" model you choose, as the animation is overwritten by your code.
You match the proxy type and ID's to the class Turret code in config.cpp by using:
class Turrets {
class Jesters_Gunner1_Turret {
proxyType = "CPGunner";
proxyIndex = 1;
Make sure you place the gunner proxy in the visible and Cargo/Gunner LOD's (also Fire Geometry if you want him to get shot).
stuck oyster
@spiral solstice skeleton pivots can be easily made using skeletons joints as a guide
spiral solstice
how would I go about creating that in OB?
quick terrace
you got the pivots already for Male ArmA Character in p3d format
in SteamLibrary\steamapps\common\Arma 3 Samples\Addons\TemplateRTM\ManSkeleton_Pivots.p3d
quick terrace
missed the custom skeleton part
note here that you'd also need custom animations for your custom skeleton
spiral solstice
oh! I see. I'll try to them to my skeleton
 velvet chasm
Hello guys
is there any bassic tutorial for Object builder?
for instaling and setup settings
stuck oyster
Before I go to any more details @velvet chasm is your goal to make models using Object Builder?
velvet chasm
actully no
i make the models with 3ds max
then want to learn Object builder to move the models to arma
sorry for my english
stuck oyster
your english is fine
just wanted to make sure you dont intend to make models with OB as its a bit limited and hard to work with for that
for proper tools setup I would refer you to PMC wiki Arma Tools setup guide
velvet chasm
ok Thanks
stuck oyster
you will need to install the whole Arma Tools suite
and preferably Mikeros Toolset for packing the new stuff you make easier
but thats all in the PMC guide
quaint mason
@charred bolt fuck yeah, I got it fixed. Thanks man
velvet chasm
Hi
We have a problem to export a 3ds max model to object builder
We have a model with seperated parts like wheel flap and ...
Now im locking for a way to creat a selection that using it for applying texture in O.B. without losing the parts
Can any one help me?
Actuly i need camo 1 as you saw before
minor jasper
he has a plane with 3 textures in use on it. when he sends me the fbx, it has all of the moving parts as named selections, but no separate selctions for all of the parts that use the same texture, making it very difficult for me to apply textures to it when i import it. he seems to be struggling with applying more than one name to a selection. i.e. wheel and flap and aileron and fuselage would all be grouped as camo1, enabling me t osee that the ytake the first texture. then cockpit glass 1 and canopy glass would be grouped as camo2 for the cockpit glass texture etc.
the issue is we have a cockpit added fro manother bought model, and so i need to know which parts of the cockpit are texture 1 and which are texture 3
he can't seem to export to fbx with these group selections created.
it's odd, i've never seen an artist struggle with this task before.
he is exporting from max to fbx
can anyone explain to ISAR how to do this?
 sonic valve
Any recommendations for setting my blender up so the scaling between port is kosher?
quaint mason
Is there a way to see separate resolution LODs between the gunner's cockpit view and his turret view?
quaint mason
Second question: to enable the advanced ejection system, I need to have a selection for the ejection seat so it can get hidden. Given the ejection seat is a proxy, what should the selection actually be?
spiral solstice
I managed to replace a head model in Arma 3's OB, how would I set up the configuration to use it ingame and debug it?
quick terrace
oxygen doesn't import FBX selection sets even if the option is ticked in the exporter settings - the so called named selection in oxygen are based on object's name imported exclusively.
velvet chasm
@quick terrace so i should creat selection sets then tick the selection set when wanna export?
quick terrace
i just said that doesn't work
what i do in such cases is offset the UVs islands i need by a multiple of 1.0 on U (or V) axis
velvet chasm
ok Thanks
I think found the solution
I select the elements that wanna be in one selections then creat a new one , they automaticly move in that
but should be test it for final conclusion
quick terrace
oxygen named selections do not care about “objects”. these NS are working more similar to max/maya’s selection sets (which again cannot be imported by the oxygen fbx plugin)
so you’ll need to manually sort it out in oxygen. one way to do that is by sorting your uvs (by offsetting these) in a way that would make it easier to make new named selections out if these
velvet chasm
howe can i send pictures here?
quick terrace
use imgur or whatever
velvet chasm
so how can I send the link here?
velvet chasm
ok thanks dedmen
quick terrace
@bold flare afaik that works only for veterans
 bold flare
Sending a text message works only for veterans? I doubt
quick terrace
ahh, link, duuh 😄 pretty sure that is not what he meant though
charred bolt
@quaint mason
It depends on what you mean by "turret view".
In an aircraft this would often be an optics sight (or set of sights), so you'd configure your gunner's turret with Optics settings that will include lines such as:
gunnerOpticsModel = "A3\drones_f\Weapons_F_Gamma\Reticle\UAV_Optics_Gunner_narrow_F.p3d";
If however, you want your gunner to be able to 'turn-out' to another physically modelled space, then you use in your class Turret:
lodTurnedOut = 1000; // Gunner LOD```@quaint mason, on the ejector seat question:
You can't animate any parts inside the proxy.
But you can hide the proxy or move it as a whole.
- put the proxy in your main model, select it, give it a named selection, then create an animation (type="hide") that hides it (or flings it out the canopy, then hides it)
quaint mason
Ah cool so you just need a selection for the triangle then
And re: Gunner lod, yes I was referring to what parts of the aircraft the Gunner sees when he control-right clicks
I made my Gunner lod thinking about what he sees from his cockpit in his "normal" view, and forgot that the tgp under the aircraft would reveal all the missing parts when he looks through it
I'll try lodopticsin/out when I get home tonight!
spiral solstice
@velvet chasm I used sharex, it allows me to crop pictures on my desktop and automatically upload then: https://getsharex.com/downloads/
 spiral solstice
Definitely!
 native garnet
sharex is patrician program
bold flare
patricia? What does she have to do with this
 velvet fractal
Anyone used the Speed Tree? I would like ask one question
stuck oyster
@sonic valve 1 Blender unit is 1 meter in Arma. Also Blender can be set to use metric dimensions which can make using it accurately more easier. I exclusively use the metric myself and its great.
quaint mason
@polar fiber I can't find any information online on what the actual commands / parameters for LODOpticsIn/Out are. Can you expand on that?
 polar fiber
it's an LOD number
0, 1 etc. for res
1000 for view gunner, 11000 for view pilot etc etc
quaint mason
Is the command LODOpticsIn = 1 etc.?
polar fiber
yes
 warm trench
I'm pretty sure this is the closest channel match for this question:
Does anyone know what might causes integrated weapon bipods not to deploy correctly from time to time? I've seen this a few times with my own mod but think I've also seen it occasionally on RHS weapons like the M249. The general trend seems to be the bipod deploys correctly probably 99% of the time but occasionally, the bipod does not deploy and the weapon tends to be pulled lower into the ground on deployment as if there's no 'bipod' point in the memory LOD. Once in a map/mission and the bipod does not deploy, it seems it will never deploy but restarting the game or changing to a different map fixes this issue. Given how sporadic this seams to be and how hard it is to get it to occur regularly, I've been unable to work out what might cause this...
stuck oyster
@warm trench does it happen with vanilla weapons?
warm trench
I don't think I've ever seen it occur with a Vanilla weapon but 1.) it happens quite rarely anyway, 2.) I rarely use any vanilla weapons with built in bipods.
stuck oyster
you have to start testing them
could be its not modded problem but a common one
common one BI might address
warm trench
I suspect so as I can't see how something that is baked into the .p3d file (via the model config) can occasionally not work... But was just wondering if anyone else had ever noticed this
I've only ever managed to get it to occur twice with my own mod and I think once with an RHS M249 but interestingly, a couple of people who've used my mod have also seen it
No one has been able to repeatably re-create it though
royal prism
someone know what that means?
geometryFire, vertex: 95, sum of weights is 150, should be 100
(its a character)
bold flare
sum of weights is 150, should be 100 Well.
Do you want me to repeat that? or...
https://forums.bohemia.net/forums/topic/202129-error-sum-of-weights-should-be-100/
2. Select all objects in the LOD, right click in the Named Selections window, choose 'Weights'. Look for any non-100 weights and change them to 100.
I guess. Vertex 95.. Is weight of 150.. And as the message tries to tell you.. It should be 100
royal prism
if i select all objects do "Weights", everything is on 100%
only 2 things are on 97%
and if i change that to 100 i get
geometryFire, vertex: 95, sum of weights is 200, should be 100
stuck oyster
@royal prism it has 2 animated selections on it that sum up to 150
a part of a mesh can be in mulitple selection groups
but the animated ones must have total weight of 100
make sure you dont have many animated selections on it
royal prism
we are complety new with character things, we just tried to modify the a3 example to see how it works etc. so the weight problem in the geometryfire is in the in a3 example too 😄
any good way to find where the problem is?
bold flare
Find vertex 95. Problem is somewhere at or around it
I think you can see the vertex number when you Press E ?
polar fiber
Ctrl+A, Shift+E, search for the number in the list, click the Create Selection button
 rough pivot
any good tutorials for blender on clothing?
spiral solstice
@rough pivot I know two methods, you can do this on the armarig model or sculpt with folds in mind: https://www.youtube.com/watch?v=szEeu6_b4fg
I have a few references for different types of folds if you're interested in sculpting them: https://vgy.me/b0fkJZ.png
rough pivot
thanks
quaint mason
What memory points do I need in my model to define where the expended bullet casings and smoke comes from when I fire the plane's machine guns? Currently I have
        {
            "usti hlavne 1",
            "usti hlavne 2"
        };```

as points on each wing where the MGs are. I'm using HMG_01 as the weapon.The casings and smoke are showing in the center of the plane right now, but the bullets come from the above memory points.
 lunar axle
hi guys , i have a problem in game with texture , they are white triangles on the model
spiral solstice
Some white triangles? Does the UV map fit with the texture?
@lunar axle Let's test this out: Go to surfaces-->UV sets --> UV editor and go to tex view to open your texture
lunar axle
hi , i send you a picture
quick terrace
@quaint mason
konec hlavne - smoke
nabojnicestart - casing point of origin
nabojniceend - direction for the case eject
quaint mason
Awesome thank you I'll give it a shot
minor jasper
@quaint mason if you are using multiple weapon points (like one on each wing), you will need to make a custom weapon class in a config, for example //class HMG_01 has one set of effects only class HMG_01: HMG_127 { displayName = "Mk30 HMG .50"; showAimCursorInternal = 1; class GunParticles { class effect1 { positionName = "usti hlavne2"; directionName = "konec hlavne2"; effectName = "MachineGunCloud"; }; class effect2 { positionName = "machinegun_eject_pos"; directionName = "machinegun_eject_dir"; effectName = "MachineGunCartridge1"; }; }; //your custom class needs a set of effects for each weapon, and then the memory points need adding to your model class HMG_01; class my_HMG_twin_01: HMG_01 { displayName = "Mk30 Twin HMG .50"; class GunParticles { class effect1 { positionName = "usti hlavne1"; directionName = "konec hlavne1"; effectName = "MachineGunCloud"; }; class effect2 { positionName = "machinegun_eject_pos1"; directionName = "machinegun_eject_dir1"; effectName = "MachineGunCartridge1"; }; class effect3: effect1 { positionName = "usti hlavne2"; directionName = "konec hlavne2"; }; class effect4: effect2 { positionName = "machinegun_eject_pos2"; directionName = "machinegun_eject_dir2"; }; };
 shell magnet
Hi everyone, I would like to create my own flag but I don't know where to find a sample, if someone can help me, thanks.
stuck oyster
there is no flag sample, but to clarify you want to create your own flag model?
using the vanilla flag with new texture is not what you are after?
shell magnet
No, I would like to create my own flag model
shell magnet
@stuck oyster You have an idea how to do it ? :/
stuck oyster
there is a flag model in A2 samples I recall. you could study that
what kind of a flag are you making?
you could try search this challen for "flag" related messages too
I think someone else asked about it before too
shell magnet
I would like to make a simple flag for a building. I'll try to search
stuck oyster
Why cant you use the default flag if you only need a simple flag?
it will need to be separate anyway
warm trench
Here's a question I probably should have asked over a year ago when I first started modding...
Is there a 'standard' for how many visual LODs to apply/load RVMats to?
I tend to have 6 visual LODs (plus the view pilot) and when I first started mod making, noticed that if you don't apply the RVMats to at least LOD2, you could see a noticeable difference in how the mod looked. (Although I suspect this was primarily coming from the specular map)
However, it dawned on me the other day that applying them all the way out to LOD6 is almost certainly not necessary. I certainly can't believe you'd notice a difference between having a normal map by the time you're looking at LOD6!
Before I start stripping bits out of my .p3d files and re-pack mods, is there a standard/any advice on this one?
stuck oyster
BI has used a simpler texture and material in the last LODs of most buildings
but I think all vehicles etc have same material/textures on all LODs
warm trench
OK - interesting. I was curious as to whether there is any performance advantages for not loading anything other than the base texture beyond about LOD3
stuck oyster
textures mipmap
so at longer distance they show lover resolutions
it actually can cost more performance switching between materials
as once its loaded its there
polar fiber
Typically BI weapons don't have .rvmat on the last LOD
warm trench
My mods are too inefficient both on poly count but especially sections. It's interesting in the Virtual arsenal that flicking through each weapon (so I guess loading LOD1) is as close as you can tell, instantaneous. But if you then look at the AI with the weapon and zoom, there's some stuttering which is presumably it doing the mipmaps for the first time. After doing this once, it runs smoothly. (Presumably, the texture then stays in memory.) But it's very interesting how much worse my mods are in this regard compared to say RHS. At some point, I really do need to find the time to re-texture them with FAR fewer sections!
quick terrace
the no.1 performance kicker is section count
ideally (not always possible)
is to have a single texture sheet per weapon + magazine
warm trench
But given the stutter occurs when changing zoom level (so presumably forcing the game to mipmap the textures, I wondered if there was some performance to be gained by NOT loading the biggest textures (e.g. normal map) for the further range LODS.
I've steadily worked out how to do fewer sections with the tools that I have so at some point, I should be able to do 1 or at most 2. But the best I've got so far is 4!
quick terrace
sure, when you start to add accesories etc things increases, but the base weapon, based on how arma handles textures, should have a single one
why would you need 4 individual textures
if you don't mind me asking?
it would take the engine more time to switch textures (the ones from rvmat) at distance than mipmap it
sure, you can choose to drop the rvmat entirely (which in fact you should - nice reminder for me to have a looky at some last lods myself)
issue with LODs is that you have no control over distance they change (also a good thing)
warm trench
I'm baking in Substance painter so it's just trying to ensure that when I bake, I get the right effects. (I.e. don't get details of a shape too close to another coming into a normal or AO map.)
quick terrace
so if you drop rvmat you will also loose any spec/gloss info
warm trench
Yeah - that's what I noticed when I first started when I only added the RVMAT to LOD1. So I then just (mindlessly...) applied it to all LODs
quick terrace
most people here are doing their textures in SP these days, i personally try and keep the number of software to a minimum, so i either bake in SP or in max
warm trench
I don't have Max (so SP is by far my best baker). But a more clever translation of the various components in blender before taking them through into Substance Painter should work. (Then obviously translating them back to the correct place in blender...)
quick terrace
whatever, max, blender, maya, modo etc they are all the same these days
warm trench
True but Substance Painter seems to be fairly easy to get a pretty good looking result. Blender isn't!!!!
warm trench
Normal and AO. (And in SP curvature etc. for all it's clever smart materials to use.)(
quick terrace
that again has nothing to do with number of texture used
i said it before, it is more efficient to use a single 4k texture
than 4x2k textures
same texel density
and UV space (in fact 4k is even better for larger shit to make it fit)
warm trench
Yeah - I'd previously been a bit dumb on how I'd got things into Substance painter with regards to separating components out to get the baking how I needed them. So learning and improving with time!
quick terrace
try exploding your mesh before export
but as i said, number of textures have nothing to do with either tools used, or with the baking results
for normals there is a very basic rule of thumb - have UV splits everywhere you have smooth splits (hard edges)
warm trench
I think what you're meaning by 'exploding' is now what I'm doing far more of - moving components away from each other before exporting so SP to ensure you don't get cross bakes where you don't want them. But I was a bit slow on the uptake with that.
So agree the tools are not related to the number of textures... but the cleverness of the person using them does affect it😉
quick terrace
for any bake you have a few options:
a. explode the mesh - as in move individual parts for both HP and LP
b. bake based on materialID (max way), mesh name (SP way)
if after bake you wanna keep doing texturing on that thing, based on the fact that SP cannot really handle texture merging on export between parts that are using different materials (material split)
i would advise you use method a.
warm trench
Agreed!
quick terrace
i personally use a. b., next project will most likely try a different approach, since substance viewer can merge different textures on its own
warm trench
It's the lack texture merging with SP and lack of 'exploding' of components that lead to me having too many sections as each mesh name ended up as a different section/texture
So do you manually re-combine textures if you are using b?
Or using Max?
quick terrace
you can bake exactly the same using a and b
but you cannot really carry on texturing in SP using just b
warm trench
Yep - and probably the part of mod making I enjoy the most is texturing in SP!
So like I say, I was very slow to realise that exploding the model before exporting to SP would solve this issue.
quick terrace
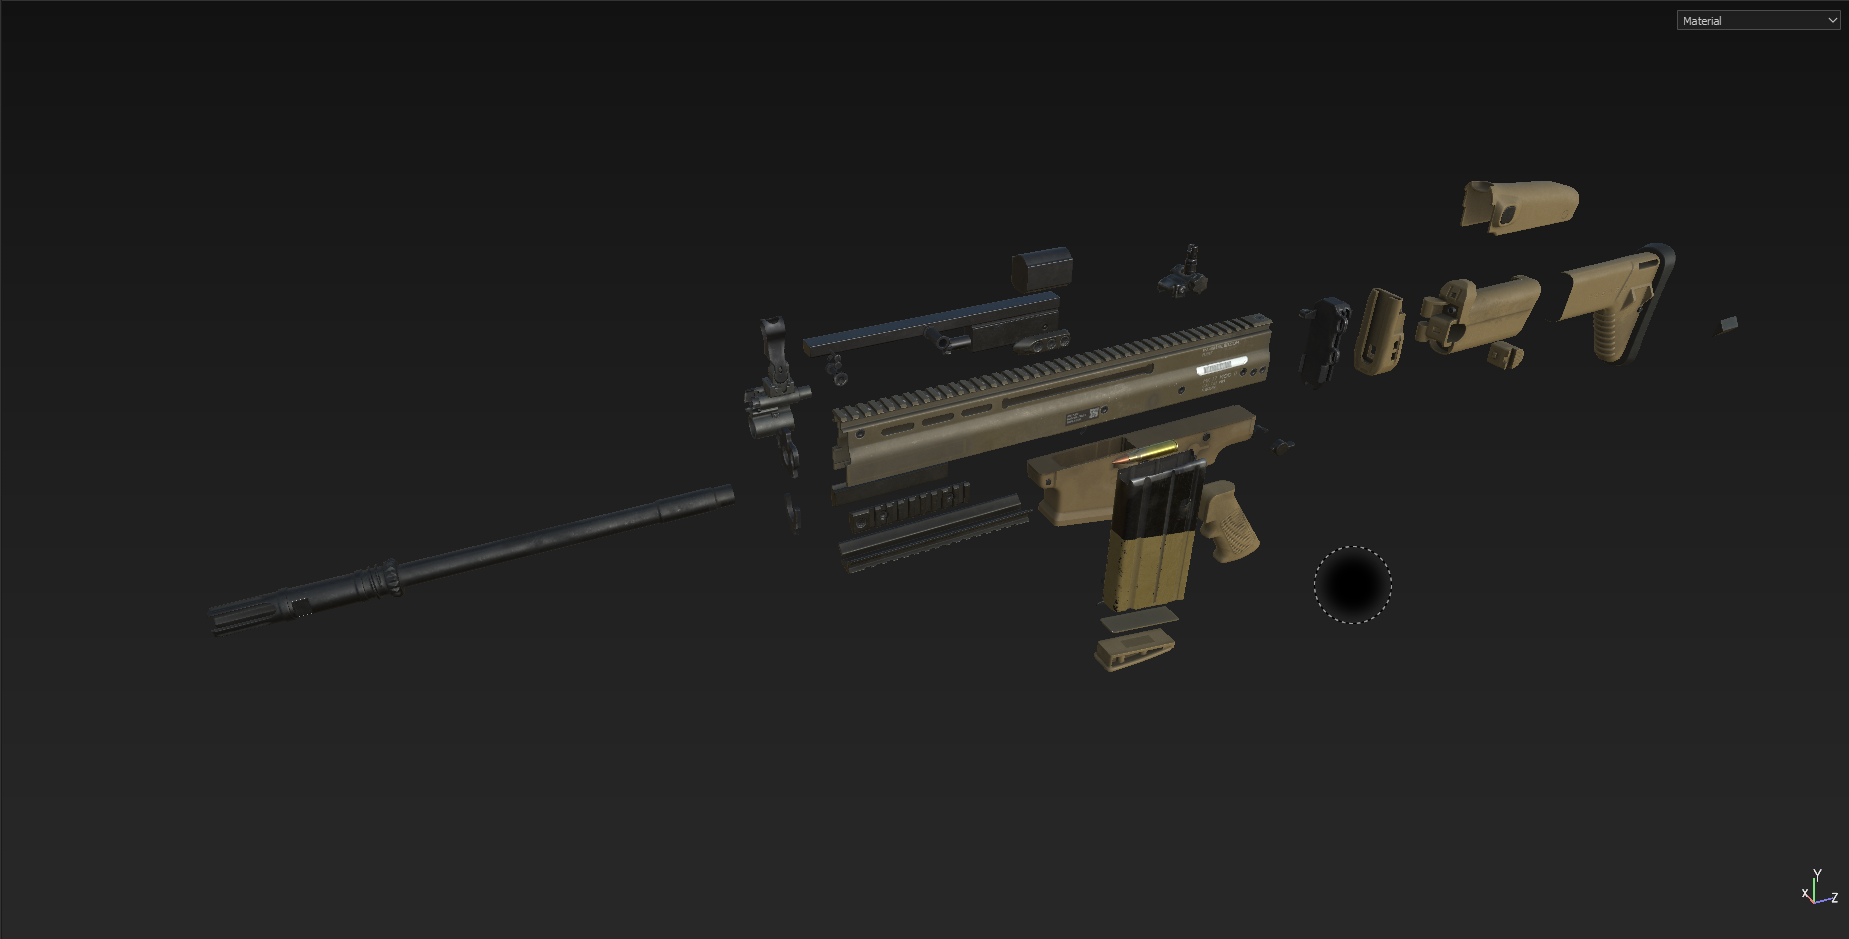
example of my work project with exploded mesh
https://i.gyazo.com/ff72cb2b9044098606a417e032687d26.png
 warm trench
👍
quick terrace
if i were to create a single texture for each of these parts...lol
bold flare
"Substance Viewer"? You mean Substance player?
quick terrace
yeah player
warm trench
Thanks for the info, by the way. Nice to know how the professionals do things!
quick terrace
player won't merge things on its own
bold flare
I feel so noob. I just do one bake with everything together. And use as many texture sets as I will output in the end right in max
quick terrace
but let me find the thing that does it to up to 6 texture sheets
😄 back in the days when i was baking directly in 3ds max, there only real option (even before matID splits and bakes) was exploded
anyways

A Substance utility for merging up to 5 texture sets exported from Substance Painter. The source SBS file is included so that you can extend to support additional texture sets.
The linked video shows how this substance was created. The purpose was to create a workaround for...
5 texture sets
not 6
warm trench
That looks like it could be quite handy for some of the work I've done already. Although part of me wants to go back and re-texture things 'properly' anyway. It's just finding the time...
quick terrace
the question is, are you unwrapping for a single texture sheet from start
or do you unwrap for n texture sheets
bold flare
https://www.youtube.com/watch?v=HMP2xpGHimY here is the video about that merge texture thingy He made it at 29:30
warm trench
n but that's easily fixed for me
quick terrace
@bold flare video is in the same link i posted 😃
in any case, i already tried it, it works as advertised
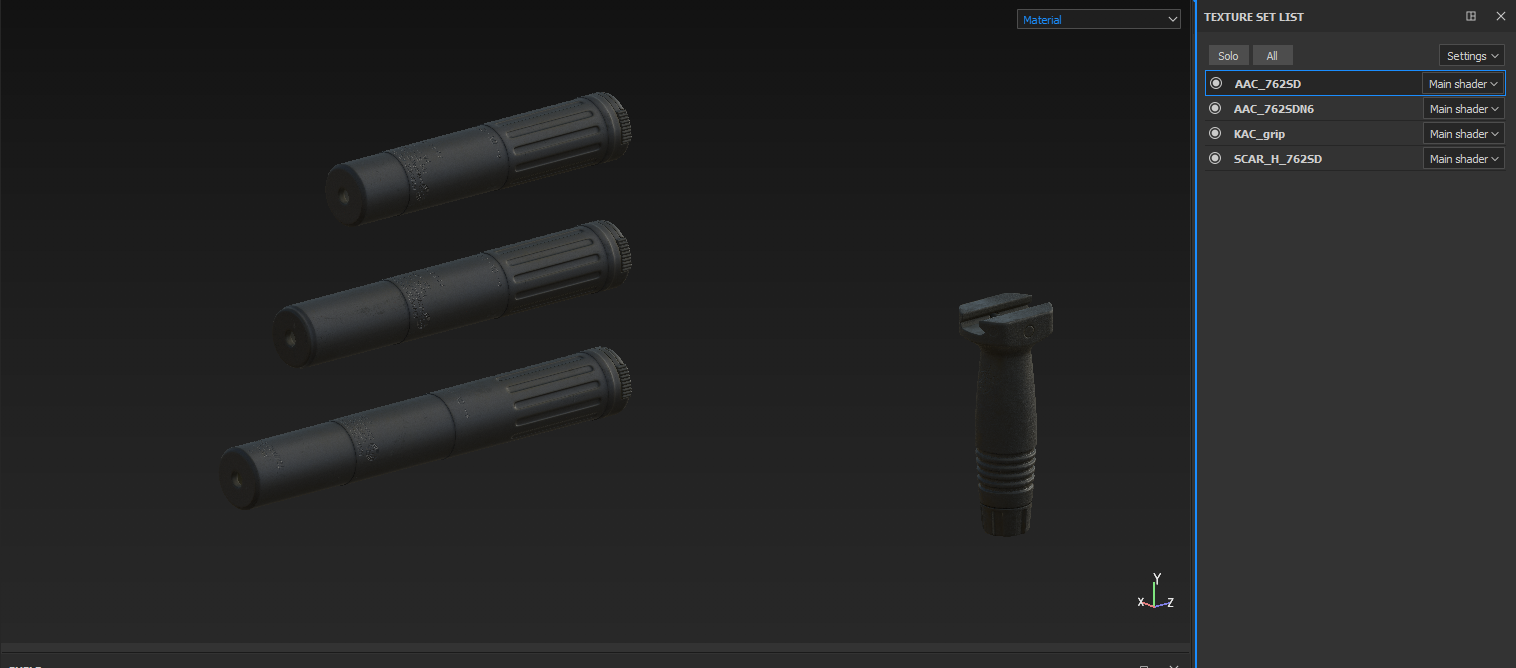
i used it for merging the 3 AAC supressors and KAC grip i did on the same texture since i split these based on material in SP
buut, if you have parts that are suppose to animate or fold (bolt, stock, mags etc) it is advisable to explode in order to be able to texture
bold flare
But you still need to seperate the UV layouts before you export from max. You can't have each material fill the full UV and the have it be automatically arranged and also the UV in the model adjusted appropriately
quick terrace
i don't understand the above?
bold flare
Like. Have 4 UV sets that fill the full UV area. And then have some script automatically merge them onto a single set. And arrange them so that they all fit into one
4 input UV's into one output UV
https://s.sqf.ovh/Discord_2018-10-14_00-23-25.png
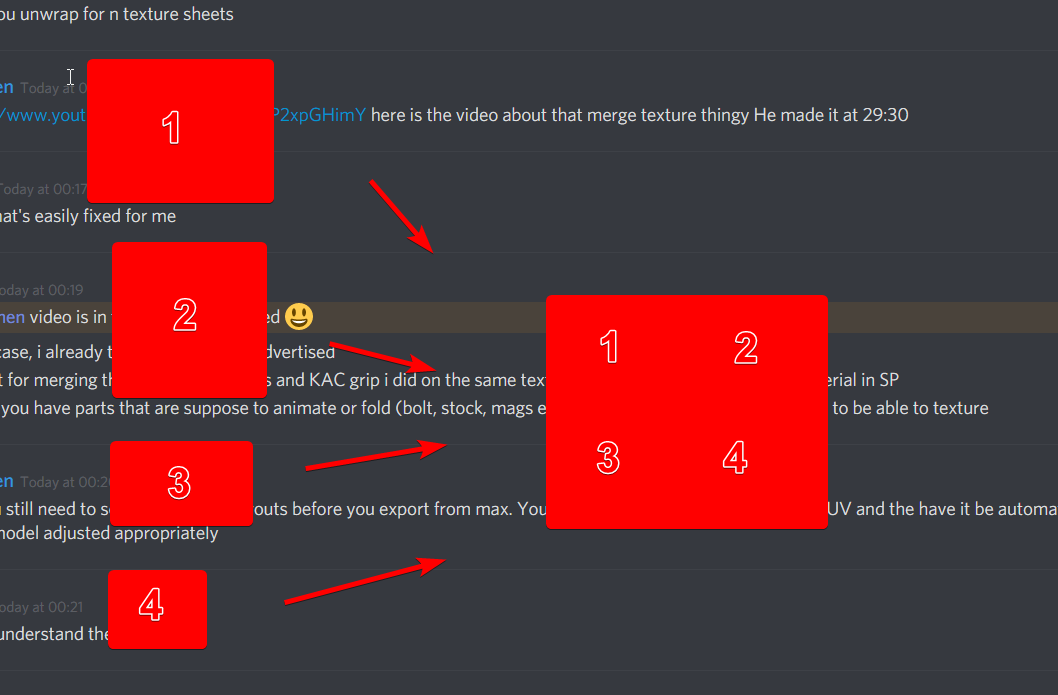
Instead of having to split them into 4 different areas right at the start. So that each UV at the start is 3/4ths empty




 warm trench
I need to watch the video but was also curious as to how, after combining the texture sets, Max (or Blender in my case) would understand how to map the combined texture onto the original UVs
quick terrace
you do that simply by assigning 4 different materials to each part
warm trench
Ah - which I think I will have done by default for how I'm making the UVs and mesh to export to SP in the first place
quick terrace
i just layed out the options
i mean the 2 possible
until substance blokes figure out a way to hide mesh (named) parts
which i hear it is in the works
warm trench
👍
 sharp holly
Hey, I'm trying to learn how to model in blender and I could use some tips, direction and all sorts of help for modeling structure and possibly guns for arma 3
Any tips or advice for a newbie?
warm trench
Find as many tutorials as possible and read up/watch vids!
I was where you were about a year ago but now do things like this: https://cdn.discordapp.com/attachments/383593050900791297/484841492595212307/unknown.png - although as discussing with Pufu, this is inefficient as it's 4 separate texture sets/materials/mesh lumps when exported into SP.
 sharp holly
That's a really nice gun
I could use some help making curve things
I've seen some videos but I can't do it the same way as they explained
For example, this happend to me
 warm trench
Thanks.
I have to admit that I only use blender to split my meshes up to make the UV maps, smoothing groups and set materials so I'm absolutely not a Blender expert.
I'm not sure I really know what you're asking there but Blender has the ability to treat meshes as 'smooth' or 'flat' which might be what you're missing. (e.g. an octagonal mesh would look octagonal if set to 'flat' but look circular if set to 'smooth'.)
Blender also has quite good online help documentation so definitely have a read through that if you're struggling.
warm trench
No. Too expensive for me. I solid model with a free CAD package (as I'm used to/quite quick with most CAD packages) then mesh with a free CFD tool or just export at STL. Then take that into Blender. It's a crap workflow so I don't recommend it. Also NOT good for poly count. It just plays to some of my strengths and keeps costs down.
warm trench
Thanks - and sorry I could not be more help.
quick terrace
what you wanna do is really simple
bevel/chamfer these edges yeah to make it rounder or start from a some spline
have no idea how the blender tools are called, but they do it just the same
just my 2 cents, here is not really the place to ask such basic stuff, make an effort and learn how the software works
blender has a ton of tuts and support as well
i would be amazed if they don't have a discord themselves
stuck oyster
there are multiple Blender related discords I think
and many general 3D modeling related ones
sharp holly
Thanks
 thorny forum
Is it possible to resize a rectangle in object builder?
charred bolt
Yes Clarkycal. Multiple ways.
thorny forum
Eh, what is the most simple way for a noobie?
charred bolt
If you want to scale the rectangle, select it, then use the scale button.
Select with LMB. Scale button is on the Edit toolbar.
thorny forum
Is it possible to make it thinner?
charred bolt
Yep. Click the Select Vertices button. Select the edge you want to move (left mouse). Hold right mouse button to drag that edge.
Do it in Top, Left or Front view and restrict movement to X, Y or Z using the relevant buttons to drag in a straight line.
thorny forum
Perfect @charred bolt you're a star
quaint mason
Working on my plane's muzzle flashes for the MGs in each wing. I've got everything else about the guns working properly, thanks for the help everyone :)
The roadblock I'm running into is figuring out how to get the muzzle flash to animate properly. Right now it just stays there at all times, and doesn't rotate when the guns fire. The documentation online is very hard to follow on this issue.
In my config.cpp, I have
        {
            "zasleh1",
            "zasleh2"
};```in CfgWeapons for the MGs, and
class Muzzle_Flash_R {source = "ammorandom"; weapon = "ST_MG";};```under Class animationsources.
In my model.cfg, I have
"zasleh2", ""```in CfgSkeletons, and
            {
                type="rotationZ";
                source="Muzzle_Flash_L";  //use ammo count as phase for animation
                sourceAddress="loop";     //loop when phase out of bounds
                selection="zasleh1"; //selection we want to rotate
                axis="";                  //no own axis - center of rotation is computed from selection
                centerFirstVertex=true;   //use first vertex of selection as center of rotation
                minValue=0;
                maxValue=4;               //rotation angle will be 360/4 = 90 degrees
                angle0="rad 0";
                angle1="rad 360";
            };
            class Muzzle_Flash_R
            {
                type="rotationZ";
                source="Muzzle_Flash_R";  //use ammo count as phase for animation
                sourceAddress="loop";     //loop when phase out of bounds
                selection="zasleh2"; //selection we want to rotate
                axis="";                  //no own axis - center of rotation is computed from selection
                centerFirstVertex=true;   //use first vertex of selection as center of rotation
                minValue=0;
                maxValue=4;               //rotation angle will be 360/4 = 90 degrees
                angle0="rad 0";
                angle1="rad 360";
            };```
in CfgModels@quaint mason
try
source="ammoRandom";
rotation Z or X is based on model orientation in OB, if it rotates the wrong way, use rotationX instead
the source in an animation is not custom unless constructed in config.cpp
the full list (i think) is here:
https://community.bistudio.com/wiki/Model_Config
charred bolt
@quaint mason, you also need to add the muzzle flash selections to model.cfg sections[]:
sections[] = {"zasleh1", "zasleh2"};
minor jasper
source = ammorandom does not work in vehicles afaik, your plan was correct to use custom sources.
sections needed, as apollo said
selectionFireAnim[]= { "zasleh1", "zasleh2" };
this will not work afaik
addthis toyour skeleton
"zasleh", "",
"zasleh1", "zasleh",
"zasleh2", "zasleh"
and use
selectionFireAnim[]= {"zasleh"};
and sections need all 3 adding
sections[] = {"zasleh","zasleh1", "zasleh2"};
in this case, the zasleh parent bone does not need to be present as a selection in your model to work
next up, i recommend making an axis for each flash
so select your usti hlavne 1 and konec hlavne 1 mem points, and make a new selection called zasleh1_axis and repeat for the second gun
then in your animations add
class Muzzle_Flash_L
            {
                type="rotationZ";
                source="Muzzle_Flash_L";  //use ammo count as phase for animation
                sourceAddress="loop";     //loop when phase out of bounds
                selection="zasleh1"; //selection we want to rotate
                axis="zasleh1_axis";                  //no own axis - center of rotation is computed from selection
                centerFirstVertex=true;   //use first vertex of selection as center of rotation
                minValue=0;
                maxValue=4;               //rotation angle will be 360/4 = 90 degrees
                angle0="rad 0";
                angle1="rad 360";
            };
            class Muzzle_Flash_R: Muzzle_Flash_L
            {
                selection="zasleh2";
                axis="zasleh2_axis";
};```may be useful
note you do not need a separate animation source for eachbarrel, assuming that they fire at the same time, the ywill have a single animation controller
class Muzzle_Flash_L {source = "ammorandom"; weapon = "ST_MG";}; // class Muzzle_Flash_R {source = "ammorandom"; weapon = "ST_MG";}; // not needed
 upbeat grail
what 3d modeling program do you guys recommend for esiest use ?
quick terrace
there is no such thing ad easiest software package to use
 oak lintel
anyone knows what is the problem with the lightning from flashlight? https://cdn.discordapp.com/attachments/293362141879074819/501151701290450964/unknown.png


 lavish mountain
Well theres different kinds of easy
Learn it the wrong way and get results quicly but get mayorly ###### in the ### down the road, or learn it properly which will be a pain in the ### now but in the end you'll be thankfull or take the middle road
stuck oyster
@oak lintel what are you pointing at with it?
 high stag
Warning: Convex component representing wheel_1_1_damper not found
im getting this error in the rpt
anyone know how to fix it? I have my dampers all in my geometry LOD
and they redefined
stuck oyster
as it says your wheel_1_1_damper convex component is not there. I would guess either its not convex
or it does not have the componentXX name
high stag
so i convex hull component
then i close it
but it becomes unconvexed
once i close it
is that maybe why?
stuck oyster
mm making it convex should already close it
not sure what you are doing there
but sounds like its not what you should do
high stag
Ohh
i didnt know that
followed an arma tutorial
on the wiki
on how to do the geometry LOD
high stag
structure>topology>close
stuck oyster
thats what you might use on shadow lod if it was not closed
not sure why you would use it on geometry lod
stuck oyster
alrighto
high stag
@stuck oyster Hey, I'm still getting a convex error
even though I have the Geometry LOD fully convexed
 peak lava
so how tough is it to make new models?
 junior saddle
Depends on what you're using
Blender, 3DS Max, Maya, other?
Also, I find it tough to make characters, but vehicles and hard surfaces come pretty easily for me. So you might find it "tough" doing something out of your experience
peak lava
indeed.
I'm actually working on simply making a new flag XD i posted my issue in texture makers 😛
junior saddle
Did you create the pole model and the flag model?
There might be one in A3 vanilla, but I'm not aware of it off hand.
peak lava
wait
you need to create BOTH the pole AND the flag?
because....i appear to have the pole....but all i did was add an actual flag image....
junior saddle
I mean you can't just wave a flag-shaped texture around, if that's what you're trying to do
peak lava
huh... :/
junior saddle
I guess you could... but it would be stiff I think.
peak lava
alright, well, if i wanted to add an image to the game and have it show up on a flag, whats the procedure?
as in, i was comparing my efforts to the UN Flags add-on mod...
it has various UN flags, seems to work just fine...
config file didnt seem that complicated, but obviously i've missed something...
junior saddle
I'd have to check that mod first for better answers to your issue. I could most likely tell if it's a model flag by looking. Gimme a few mins
peak lava
sure
https://steamcommunity.com/sharedfiles/filedetails/?id=436337289&searchtext=un+flags
This is the UN Flags Pack I was basing my efforts off of
long-short, I want to put some symbols from Command & Conquer into ARMA. it's been done in one format before, but I want to add more
id appreciate any guidance, even if its a start-from-scratch position. ive been a little frustrated about this for about 4 hours
minor jasper
@high stag all geometry lods must be closed AND convex
peak lava
see you in texture makers @junior saddle
spiral solstice
I tried following this head tutorial, but I'm not too sure how to add it in game. I got the p3d of the head so far: https://www.youtube.com/watch?v=cFwo8oumkr4
high stag
@minor jasper Doesn't convexing something close it aswell?
That's what I've been told earlier
junior saddle
Sometimes the componentconvexhull will delete non-convex geometry, especially if it wasn't triangle-ized. When Importing, tick "no-squarize" to prevent triangle geometry from becoming quads, which could potentially become concave if the diagonal is placed wrong
high stag
can i triangulate my geo LOD?
junior saddle
Sure. Select faces you want triangled, and under structure there are two Triangulate choices
high stag
0:38:26 Warning: Convex component representing wheel_1_1_damper not found
0:38:26 Warning: Convex component representing wheel_1_2_damper not found
0:38:26 Warning: Convex component representing wheel_2_1_damper not found
0:38:26 Warning: Convex component representing wheel_2_2_damper not found
these are the errors im getting
and idk if its to do because of my geo lod not convexed
ive tried everything but i cant get this error removed on my rpt
junior saddle
Anyfaces that don't get triangulated in a convex way, you should be able to re-squarize and try the other diagonal option
You can try "find open faces"
my bad
"Find non-Closed" under Structure > Topology
this will highlight any points that need geometry to sew them up
high stag
the problem is its either one or the other
if i convex it ill have one unclosed face
if i close it, il have one unconvexed point
junior saddle
so when you close it, try to squareize, then triangulate with the other / or \
You can also add a vertex and move it to where the cavity is, then re-add faces. "insert" adds a vertex to the viewport
junior saddle
Or just move the vertices you have until they're concave-proof
ok cool
keep in mind, there IS a triangle there, even if unseen
junior saddle
Ok as long as that worked then cool cool cool
junior saddle
Yeah you need to have it register as a component last
I assumed that's what you meant by "it worked"
How many component selections do you have?
if it's a low number then I have a little plan
high stag
9
junior saddle
yeah that's low
ok in the named selection list delete all the "component" entries. Do not delete actual geometry
high stag
ok
junior saddle
Anything that needed to have a named selection, just reselect those bits and "redefine" the selection
do this for all moving parts
only in geom lod of course
high stag
ok
junior saddle
Make sure your geometry isn't going to to concave, so add a / or \ trianglulate
junior saddle
now save, in case it closes or something. also we have a starting point if it needs a retry
high stag
ok done
junior saddle
now do componentconvexhull
high stag
ok done
junior saddle
ok so ctrl+z to see if we can go back
high stag
ok
high stag
no its just one open triangle
junior saddle
so weird]
high stag
if i close it
junior saddle
are you back to no components again?
junior saddle
honestly I've never used it
I imagine it combines the two tasks
you redefine when you want to change the contents of a named selection
junior saddle
you normalize when you want your faces to have a change of smoothness; more or less that's the impact.
junior saddle
it affects the face's outward direction. Smoothing can alter neighboring faces' normals. So renormalize can change the smoothness of a group of faces... I think
Yeah it is weird
Sometimes flat surfaces can be mistaken as concave, but it usually takes more than one triangle to make a cavity
select all the points in the triangle that gets removed when component-ing
high stag
it might be something to do with my model.cfg
junior saddle
maybe?
but select that triangle first
do a sweeping selection. the info bar at the bottom should tell you how many points are selected
if it's more than three, then some might need to merge
high stag
ok
junior saddle
I forget what it's really called drag the selection box around a group of points
select multiple
high stag
ok
high stag
yes
junior saddle
ok, well that's good. That means you don't have any unmerged points. It doesn't tell us what the problem is yet, tho
high stag
1:36:46 Warning: Convex component representing wheel_1_2_damper not found
like it seems like it cant find
wheel_1_2_damper
even though ive defined it
 flat flare
will having a lot of selections on a model be bad for performance in mods?
junior saddle
@flat flare probably, but what number are we taliking about?
It's not bad, per se, but every addition is another task o the processor's honey-do list
what really hinders it is if those selections move
@high stag Try to creat the missing triangle manually, then try recomponent-ing
create*
Worst case: you might have to exaggerate the convexness of your geomLOD wheel
high stag
ok il try that
quaint mason
@minor jasper (and anyone else) With your advice I was able to get the animations for both muzzle flashes working correctly, with one exception. Thanks SO much for your help. The exception is that they don't hide themselves ever, so they're always there and simply rotate when I fire. I tried adding this in addition to what you said:
In config.cpp class AnimationSources:
class Muzzle_Flash_Hide {source = "reload"; weapon = "ST_MG";};
In model.cfg class Animations:
            {
                type = "hide";
                source = "Muzzle_Flash_Hide";
                selection = "zasleh1";
                sourceAddress = clamp;
                minValue = 0.0;
                maxValue = 1.0;
                hideValue = 0.0;
                unHideValue = 0.992;
                animPeriod = 0.0;
                initPhase = 0.0;
            };
            class Muzzle_Flash_R_Hide: Muzzle_Flash_L_Hide
            {
                selection = "zasleh2";
            };```

But the flash only shows about 5% of the time when firing now.And I might have imagined that 5% 😄
high stag
ahhhhhhhh
driveOnComponent[] = {"wheel_1_1_damper","wheel_1_2_damper","wheel_2_1_damper","wheel_2_2_damper"};
i had this in my config
i think this is the reason
junior saddle
I know it's not used for the airplanes anymore, but I've seen it be used for tank tracks even in the DLC tanks
... which are new
It shouldn't have anything to do with the model.cfg
Those errors are happening because you were calling them for the driveOnComponent in the config.cpp
high stag
yes I know
junior saddle
so... the model.cfg is a new issue?
high stag
Well, i think it needs some cleaning up
theres somethings that I don't know why i have
im trying to connect the dots
junior saddle
Of course, I too have some defunct code in my model.cfg files.
high stag
like for instance
junior saddle
Coding in the first place is a little cryptic, and then on top of that you have Czech names for a lot of things
high stag
why am i calling my hitpoints for my wheels wheel_1_1_steering...
junior saddle
because Czech is such a universally used language /sarcasm
high stag
I do have one valid question
junior saddle
English is my pref, but I could understand Portuguese, Spanish, or maybe even Italian...
junior saddle
so... you want to keep the wheels, too right?
high stag
should i bone it?
in model.cfg?
because
my calipers
are defined as wheel_1_1_steering
junior saddle
so you'd need to select all components that go away and redefine them as wheel_1_1_hide, wheel_1_2_hide, etc.
high stag
ah
junior saddle
what's really happening is you're redefining wheel_1_1_hide with the new geometry, rather.
junior saddle
ASSUMING you are sticking to the hide/unhide convention used in A3 vehicles
high stag
it wouldnt rotate with the wheel?
junior saddle
Hmmm...
yes, I'd need to see your model.cfg
or I could walk you through it...
ok do this:
high stag
i think i have it boned wrong
junior saddle
lol to quote Archer: "Phrasing!"
oak lintel
@stuck oyster lightning from the flashlight. He looks on faces shit... i dont know why. I can see the triangles and loops
minor jasper
@quaint mason remove that custom animation you just added, it is suboptimal!
selectionfireanim in the vehicle config is likely your cause for muzzle flash failing
ok here's one RPT error that i still can't work out how to fix 23:07:40: Warning: \uns_weap_w\m3a1\m3a1.p3d:shadow(0), Selection magazine needs a section. The shadow volume may not work well.
so in my model the shadowvolume has a magazine selection
in my model.cfg the magazine is defined as a bone and as a section
it is a section because it hides
any idea why pboproject binlog is throwing this error for this weapon? it is not throwing the error for other weapons similarly configured
quaint mason
selectionfireanim in the vehicle config is likely your cause for muzzle flash failing
In what way?
Right now it's like so:
class CfgWeapons
{
    class HMG_01;
    class ST_MG: HMG_01
    {
        displayName = "Twin HMG .50";
        selectionFireAnim[]=
        {
            "zasleh1",
            "zasleh2"
        };
    };
};
However, with selectionFireAnim[]= {"zasleh"}; it had the same result
minor jasper
selectionFireAnim[]=
        {
            "zasleh1",
            "zasleh2"
        };
this will not work afaik
addthis toyour skeleton
"zasleh", "",
"zasleh1", "zasleh",
"zasleh2", "zasleh"
and use
selectionFireAnim[]= {"zasleh"};
and sections need all 3 adding
sections[] = {"zasleh","zasleh1", "zasleh2"};```selectionFireAnim[]= {"zasleh"}; shouldalso be in your plane vehicle config
then you only hide the bone zasleh, which automatically hides both of your muzzle flashes
the reason you had to split the bones is so yo ucan animate each flash to rotate around a different axis
making the mpart of a common bone (zasleh) enables you to hide them together
when i say "hide zasleh" the engine does this through the selectionFireAnim entry
no need for any custom animation stuff
quaint mason
Ohhh so you're saying it needs to be in the weapon config and also the vehicle config... Where in the vehicle config?
minor jasper
in the appropriate turret, which is likely t obe just in the main pilot seat, so in the class mymod_plane root config
minor jasper
i've probably configged something like 30 aircraft this way to date. you can be assured that the method works perfectly.
 river kite
hey guys, so im experiencing a small problem, when i accelarate my vehicle it goes massive up into the direction i drive, any idea why ? Here is a small video with my problem, the wiggling at the end i already got fixed https://www.dropbox.com/s/02ket1xhxxlqhc8/2018-10-14_20-36-57.mp4?dl=0
stuck oyster
the weight and engine power ration may not be right
river kite
the weight is centered in OB, but what exactly you mean with power ration
stuck oyster
well if your engine power is very high it might be a cause
stuck oyster
cant say for sure but I dont think real life data translates into arma physics accurately
for example you could compare with similar size Arma vehicles
or stuff from other mods
CUP or RHS for example could have similar vehicles
river kite
yeah already took a look at it, guess i will have continue trial and error 😛
junior saddle
I think it might be your engine power, as you mentioned
what's its mass?
BTW, I like to stay close to IRL mass, for logistics (sling, shipping, etc).
e.g.: you wouldn't want a 4-ton Abrams, because then choppers could easily carry it around.
quick terrace
pretty sure that is physx related (the bouncy bouncy)
river kite
the complete mass is 9120 in the geo lod
junior saddle
open up the Nyx in editor's config viewer. It's not perfect, but I believe it has a similar mass range. Check out its wheel properties too, and I believe its engine power is much lower than yours - like in the high 100's. It probably is a physx thing, but I'd bet the engine power is compounding the issue.
river kite
engine power atm is 154 hm
junior saddle
oh. that should be ok, then
charred bolt
@river kite What do you have for sprungMass in class Wheels and how many wheels are there?
river kite
912 , 5 wheels with Dampers each side
charred bolt
5 wheels?
river kite
Yes
charred bolt
5 wheels total
river kite
No 10 total
charred bolt
and springStrength on each wheel?
river kite
22800 i think wait a sec
U catching me right when i wanted to Go to sleep 😂
so thats the data sprungMass = 912;
springStrength = 22800;
springDamperRate = 3648;
charred bolt
Try a springDamperRate around 9120
river kite
ok
charred bolt
Make sure your maxDroop and MaxCompression numbers are equivalent to the (distance between suspension axis memory points x model.cfg damper translation offsets)
river kite
ok will check that tommorow when i got some sleep, thanks
 silver zenith
lots of them
high stag
hey everyone
my proxy is showing up an error in rpt: No geometry and no visual shape
what could be the issue?
quaint mason
@minor jasper I'm sorry to keep bugging you but it's just not working like it apparently should be. The muzzle flash doesn't hide with selectionFireAnim[]= {"zasleh"}; in the plane's class, either. Would it help if I sent you my model.cfg and config.cpp? There must be something simple I'm doing wrong that isn't apparent in a context-less convo.
quaint mason
In fact, I don't mind sharing publicly for anyone to look. Why aren't my muzzle flashes of the machine guns in each wing hiding when I'm not shooting? They do rotate properly when firing.
config.cpp: https://pastebin.com/B2x85ri7
model.cfg: https://pastebin.com/hma8h0rn
A second question would be why don't the pylon weapons I set in Eden attributes actually show on the model, but that might be for another day.
minor jasper
Check also that the selections are apllied correctly. For example applying camo1 selection to them (also a hide anim) will prevent them from hiding as you cannot hide them twice
And make sure your weapon inherits from a machinegun class as a cannon may not work
Will try to look at the files later am travelling
quaint mason
Thanks! There are no other selections for the muzzle flash proxies other than zasleh1 and zasleh2, and it inherits from HMG_01.
high stag
Whenever I UV map a vehicle, it distorts the shape of camo1 and doesn't make it look smooth. When I delete the UV map, it looks completely clean. Does anyone know why?
minor jasper
@quaint mason the only thing id change in all of that is your default classes in model.cfg and make isdiscrete 1
Otherwise must be a problem in your model p3d
bold flare
Is it somehow possible to scale down a model that's purely made of proxies? I have a Arsenal station thing that's about as big as a garage door. And I want to scale it down to a mini version that would fit onto a table.
I know just scaling down the proxies doesn't work. Any other way to scale a model (without having access to the source models from the proxies)?
polar fiber
Nope
apart from the hardcoded feature for scaling pistols in the holster proxy on vests
high stag
Anyone aware of this error in rpt: No geometry and no visual shape
its coming up for my proxies and I don't know why
bold flare
Is there documentation for O2 script? Can I use it to create a proxy object at specified coordinates?
polar fiber
I'd have thought it's easier to place a vertex, Shift+E to modify its coords to a specific point, C then Shift+C to place the pin on the vertex and activate it, then create proxy at the active pin
 halcyon wren
@bold flare
Yes and yes. The o2 script comref is in the Objectbuilder folder, its from 2003 or so. Syntax is SQF. O2 script is delicious and will make your life awesome, as it can do 100% of the things you can do with the GUI version of Objectbuilder
charred bolt
@high stag is the proxy object something you have made (.p3d)? If so, check you have created a Geometry LOD in the proxy.
bold flare
Awesome. I wanna make stuff that can turn a 3DEN composition into a model made of proxies :3
bold flare
Really? Oxygen has a builtin script debugger. But we can't possibly get one for Arma itself :U
https://s.sqf.ovh/explorer_2018-10-16_14-52-51.png Not perfect.. But it's a start.

 stuck oyster
Yyyy
junior saddle
@high stag Is it a crewman proxy, or something more like a headlight effect? This issue is beyond my experience, but if you are more specific about your proxy then it helps others help you. As for the UV problems, what exactly do you mean it distorts the shape of Camo1? Is it the geometry or the appearance of the texture on the geometry? If it's the geometry, then something went horribly wrong. When you delete UVs and make it look "completely clean," we need to know what this means; be specific. So many questions...
- Are you editing UVs in OB?
- Are you experiencing a complete lack of color and material when you delete UVs?
- Your error reports - are they when you launch, pack, or attempt to preview in buldozer?
- I think there may be more questions to get to the bottom of your issue, but depends on the answers to these first.
stuck oyster
- is what I was asking on the other channel. But also best keep the whole conversation here.
junior saddle
Yeah, @high stag it's probably best to just go ahead and say, "Don't do that in OB," while we're on the subject.
If you can open your model in Blender, Max, Maya, etc. it would be a more hospitable environment to edit UVs.
quaint mason
@minor jasper Gaaaaah this is so annoying lmao. isdiscrete = 1 has no effect. What would you look for in the .p3d?
minor jasper
Will have to wait til im home next week sorry
My guess is copy and paste zasleh1 and zasleh2 to a clean edit lod and check the selections window
Send screenshot
quaint mason
quaint mason
Not yet just the 1.0
 languid urchin
anyone has a config sample for an prop item?
we're working on an object and have the model and texture but we just don't know how to get it in game lol
we don't know the config
quaint mason
There's a lamp in the Arma Samples
white jay
Weird question. So I have these vertical windowsills that are curved, (I'll attach a photo)Each brick is it's own cube, and I had to do some weird shit to the uv's to get the texture on them correctly. So since I'll be using rvmats to texture the structure, will these uv's work the same when it comes to stretching out the brick texture that I'm also using on the rest of the bulding? Hopefully this question makes sense. https://imgur.com/a/VPeSTH5
 spare bear
I don't see why it would be an issue. It's a basic tileable texture? It shouldn't conflict with any other usage of the material anywhere else on the model.
stuck oyster
@white jay what shader are you going to use in the rvmats?
quick terrace
there should be zero issues if using multimats
 clever ibex
hey guys bit of a noob here when it comes to models i mainly do terrains 😉 so what is the best tutorial out there to get already made models from blender into object builder and then into arma
stuck oyster
not that many to choose from but El Tyranos has made a pretty good series of tutorials
stuck oyster
there is a google search engine that has the links
he has a topic on BI forums
and his tutorials were mentioned in a sitrep a while back
 true jasper
Here you go, this is his channel @clever ibex , enjoy it
https://www.youtube.com/watch?v=GxGIgurkzW4
clever ibex
thanks much apricated
 terse sparrow
Do you know why this happens?
The top object does not overlap the character
In first person
terse sparrow
In first person you see the arm when it´s overlapped by the weapon
I´m trying to create a watch
but the exact same thing happens
Just with the weapon you can see it better
stuck oyster
@terse sparrow first person view draws over everything else
so what you want wont work
terse sparrow
No fix for that?
stuck oyster
its working as intended so no
terse sparrow
@quick terrace AttachTo
stuck oyster
using attachTo to add accessories to people has a lot of limits
stuck oyster
nothing comes to mind at the moment no
any reason your watch cant be part of a character?
or was the idea to have it on all characters
no universal pipboys in Arma 😄
terse sparrow
Mmm
The idea was to have it on all characters
I created the animation for looking at it
stuck oyster
you could perhaps trick some sort of dialog screen on top of the hand that follows the watch position on screen
terse sparrow
Maybe a camera
But you can´t move with a camera right?
The animation is an action
So you can move while looking at it
stuck oyster
mm Id say getting that work would be tricky, but I'll say maybe, not definite "no"
quick terrace
did you try weighting it?
terse sparrow
increase its mass?
stuck oyster
good luck
quaint mason
How many sections for a plane is too many, how can I reduce the count, and what are they, anyway?
quick terrace
sections number is the sum of all are textures, materials and proxies (1 for each)
best way to reduce it is to have the smallest possible amount of individual textures sheets possible
junior saddle
I wouldn't reduce it too low. "As few as possible" can underutilize the engine and your expensive CPU/GPU easily. Most mods use less than the vanilla BIS models do. Start by looking at the game assets and determine what your plane needs. Don't go crazy with it, but definitely step away from the A2 mindset and start thinking like an A3 artist.
Planes come in a huge range of sizes, from the BD5J to a C-5, and anything fictional could be outside those ranges. If you have a mid-size plane like the A-10, then players might want to see it up close and personal, so you spread its exterior UVs out over two or three 2048x2048 textures. I say make it one 4096 and scale up a little more to maximize the space. This will give you better control over your Camo1 named selection for color swaps. Exclude any parts that don't have the paint job, like tires and gear, but do place them in another texture of course. Place all of your glass and transparent parts in one texture, if possible. Sometimes, this includes text labels and button icons (like what you'd see on your car's armrest), but I find that if you have to light those buttons at night it's better to have a separate sheet for them.
polar fiber
nah, large section counts are the single thing that will make your model run like shit
quick terrace
the no.1 performance hog for arma is section counts
polar fiber
lower is always, always better
quick terrace
ninjaed
polar fiber
high poly shadows might be just as bad sometimes though
depending on the shadow rendering technique (stencils vs buffer)
quick terrace
I say make it one 4096 and scale up a little more to maximize the space. This will give you better control over your Camo1 named selection for color swaps. Exclude any parts that don't have the paint job, like tires and gear, but do place them in another texture of course.
if you can put everything on a single sheet (of course, splitting ca from co), then do that. including stuff that don't have a camo or whatever
make use of MC maps on a secondary UV set to get these decals in as crisp as possible
junior saddle
@quick terrace I often find it's not just about the decals, but sometimes you need a crisp nonlinear edge or crease, like between two panels, and maybe it doesn't follow the geometry naturally. I was only saying separate everything that's not in color swap to maximize the space for those objects, and to avoid having multiple textures that require the same color swap (because you may want to color swap something else, like an interior, differently). If you have room for other things that won't get color swapped, then by all means include them. It's not uncommon to have the extras on a separate sheet, though, so if you do need to put parts somewhere else you have options.
@polar fiber I'm not talking about going overboard with large sections - just do it like BIS, and you'll be in the green. Over-do it, and you'll be in the red. I have no performance issues while adhering to this policy. However, I do agree with what you say about high poly shadows causing issues sometimes... I just don't know what you mean by stencils vs. buffer?
So, we're back to the original question: what, exactly, is a large section count? Again, I have no performance issues with how I have tested it, so far. I'm still in the process of creating lower visLODs with most of my vehicles, and they run smoothly with all of them loaded. When I have all visLODs implemented then you should be able to spam the landscape with my whole assortment.
Push forward. Make your stuff future ready. This game is likely on the second half of its lifecycle already, so think about what CPUs and GPUs can do when A4 is ready.
polar fiber
How is making unnecessary draw calls, future-proofing?
arguably, if Arma's material rendering improves, you will need fewer materials and sections in future
junior saddle
You still haven't answered the question, and would you say that BIS' models use unnecessary draw calls?
In the future, you'll still be limited to what your material textures can do, and that requires more pixels to make things crisper. I don't see the side effects of optimizing to DTX improving any time soon, so the only thing we can do is make texels look smaller, which means your UVs will need to cover more pixel area.
quick terrace
bi models, with very little exceptions, don't actually use 4k textures
reason is, engine was shit at mip mapping these, the changes happened last year
so more texture sheets per model than necesary
so large section count is ANYTHING that cannot be merged on less texture sheets
charred bolt
Has anyone done some simple FPS v section count tests? I once did performance v poly count when the model limit was increased, quite interesting results. Without data it's hard to really quantify the relative importance of these choices that modders can make in their models.
junior saddle
Wait, so you mean the textures are 4k now, and only since last year? Well that explains a lot, because most of the stuff I use for learning I've had cached since about the time Heli DLC came out. Ok I see you snuck in an edit to clarify.
Still...
I've looked at some new stuff in the last year or less, and I've still noticed a lot of paas
stuck oyster
most of Arma assets still use 2k textures
4k are a lot heavier performance hogs
and should be used carefully
junior saddle
I can see that, but what's worse: four 2k textures or one 4k?
especially if you know everything on that 4k will get called together, and not in separate parts
stuck oyster
4x2ks is worse
junior saddle
RIGHT so in the same space you use one 4k
stuck oyster
thats 4 sections/drawcalls vs 1 section/drawcall
yes
thats ok
but cranking each of those 2ks into 4x4ks is bad 😄
sure it might look veeery crispy
junior saddle
oh sure... not all of it needs to be 4k
not at all
I use 4k for larger vehicles, or vehicles with lots of surface area
EXTERIORS
I've started doing full tank interiors this way, too, including driver and crew compartments and some opaque details that would otherwise fill four 2048s...
but for glass, tracks, canopies, and other special parts I try to stick to 1024 or less
stuck oyster
if they can all use the same rvmat then that sounds like good practice
junior saddle
yes, of course
Sometimes, you don't have a choice, because the RVMATS can take a perfectly efficient texture and make it do different things
like, if your color swap also involved a material swap to make your glossy paint job into a matte finish.
and especially if you're doing that for only part of the surface
My little Hellwing jet has a 2048 exterior (it's too small for a 4096). I have alternate color schemes that change its gloss finish to chrome, matte, and semi-sheen metallic. The changes can affect the whole body (Camo1) or just the leading edges (Camo2).
This requires two separate calls to the same texture, because of how rvmats work, but also because the colors can change along with the materials. For example, chrome works better with darker colors, so if you have a white-ish paint job but want the option to turn parts into metal chrome, you might want to use a darker color for changes to that selection.
charred bolt
You are using hiddenSelectionsMaterials[] to change rvmats? That didn't used to work, as it broke damage textures iirc.
junior saddle
This is one way it's good to have your model parted out so much, because calling draws on a few 2048s and an extra call on the primary 2048 is better than making multiple calls on the same 4096.
lemme check again...
This is from the randomizing color feature I have for my LM002:
hiddenSelections[] = {"Camo1"};
class textureSources
{
class fpg
{
displayName = "Faceplant Games, Yo";
author = "Scot Gilmore";
textures[] = {"vhx_soft\civ_lm002\data\lm002_ext_base01_co.paa"};
materials[] ={"vhx_soft\civ_lm002\data\lm002_ext_02.rvmat"};
factions[] = {};
};
};
recheck. I had to edit b/c of accidental premature "enter" press
original red, and a blue option with chrome bumpers and rear rails: https://www.deviantart.com/rooster3d/art/LM002-Color-Options-622706352
more options, painted bumpers and chrome bumpers: https://www.deviantart.com/rooster3d/art/LM002-Graphics-Options-622706332
BTW, this is ripped straight from the A3 Offroad (as in borrowed its config and script).
....but with my vehicle's specifics, of course
honestly, I haven't tried it with damage textures... but I wonder if it being separated this way can help that. Like I said, it's derived from the Offroad pickup config.
stuck oyster
ripped stuff will close doors you know.
junior saddle
huh?
stuck oyster
or were you talking about the arma offroad?
stuck oyster
dunno but how you said it might be interpeted that the model is ripped from something called Offroad
phrasing is important 😄
junior saddle
ok, true enough
I mean I wouldn't have figured this out by myself if it wasn't for the config supplied by BIS for their Offroad truck... whew that's a mouthful even for me
stuck oyster
using stuff from BI configs is all fine
junior saddle
And I'm not sure it's wrong to inspect other mods to see how things are done aside from BIS, either
?
quick terrace
@charred bolt hiddenselectionmats are working, but can lead to weird behaviour
junior saddle
At least that's how I feel about my mod. I would hope people can learn from it, if it's different from the norm, and I wouldn't want to be inundated with "can I use your...," "do you mind if I borrow your...," and "would it be okay if I refer to your..." questions all the time.
But, yeah... start ripping off my artwork and we're going to have a throwdown.
quick terrace
example, Mk18 in RHS that used its last vis LOD from time to time
no hideselmats, no more issues
quick terrace
no worries, i should turn autocorrect off
junior saddle
Conjunction/possessive pronoun (e.g.: it's/its) usage is a pet peeve, and 99% I have to bite my tongue.
you got that 1% where it slipped out.
polar fiber
materials[] array works fine
it's not the same as hiddenselectionsmaterials
because it works at init using setobjectmaterials script command
but such a thing wont work on e.g. weapons, body armour etc. for units
junior saddle
Good! So when I take time to make the damage textures I shouldn't have any issues from randomizing, right?
polar fiber
I think damage textures still work so long as all the .rvmats are still listed in class damage
junior saddle
ok.
Why would this not work on weapons and man gear?
polar fiber
because there's no way to use the setobjectmaterials command on cfgweapons class objects
which is what bis_fnc_initVehicle is doing with the materials[] array in class textureSources
junior saddle
setobjectmaterials, is that hidden in a parent config? It's not present in mine.
polar fiber
it's a script command, not a config parameter
config version is hiddenselectionsmaterials, but as others pointed out, it doesn't really work
junior saddle
randomization script I use:
/*
File: randomize.sqf
Author: pettka
Description:
Removes all proxies from the car, randomizes use of rear doors (according to _rnd2) and randomizes one of the skins (according to _rnd1)

Parameter(s):
None

Returns:
Nothing
*/
if (local _this) then {
if !(_this getVariable ["BIS_enableRandomization",true]) exitWith {};
_rnd1 = floor random 6;
if (((_this getVariable "color")>=0)&&((_this getVariable "color")<=5))
then
{
    _rnd1 = _this getVariable "color";
};
_this animate ["HidePolice", 1];
_this animate ["HideServices", 1];
_this animate ["HideBackpacks", 1];
_this animate ["HideBumper1", 1];
_this animate ["HideBumper2", 1];
_this animate ["HideConstruction", 1];
_rnd2 = floor random 3;
if (_rnd2==0) then {_this animate ["HideDoor3", 1];};

_this setObjectTextureGlobal [0, ["lm002\data\lm002_ext_base0_co.paa",
"lm002\data\lm002_01_ext_BASE01_CO.paa",
"lm002\data\lm002_01_ext_BASE02_CO.paa",
"lm002\data\lm002_01_ext_BASE03_CO.paa",
"lm002\data\lm002_01_ext_BASE04_CO.paa",
"lm002\data\lm002_01_ext_BASE05_CO.paa"]
"lm002\data\lm002_01_ext_BASE06_CO.paa",
"lm002\data\lm002_01_ext_BASE07_CO.paa", select _rnd1];

_this setObjectTextureGlobal [1, ["lm002\data\lm002_ext_base0_co.paa",
"lm002\data\lm002_01_ext_BASE01_CO.paa",
"lm002\data\lm002_01_ext_BASE02_CO.paa",
"lm002\data\lm002_01_ext_BASE03_CO.paa",
"lm002\data\lm002_01_ext_BASE04_CO.paa",
"lm002\data\lm002_01_ext_BASE05_CO.paa"]
"lm002\data\lm002_01_ext_BASE06_CO.paa",
"lm002\data\lm002_01_ext_BASE07_CO.paa", select _rnd1];
};
polar fiber
why make a new script when you can randomise all that anyway? https://community.bistudio.com/wiki/Vehicle_Customization_(VhC)
polar fiber
they use the above method now
        {
            // (_this select 0): the vehicle
            // """" Random texture source (pick one from the property textureList[])
            // []: randomize the animation sources (accordingly to the property animationList[])
            // false: Don't change the mass even if an animation source has a defined mass
            init="if (local (_this select 0)) then {[(_this select 0), """", [], false] call bis_fnc_initVehicle;};";
};```ok... well this one doesn't have that conflicting parameter, and it works.
Bear in mind I did this four years ago
or more
polar fiber
yeah, this is a bit newer. Around the time of the Eden update IIRC
anyway, I can confirm that materials[] assigned .rvmats still work with destruction
polar fiber
we have it in the MRZR in RHS, and those have working damage effects on both the muddy and non muddy .rvmats
both .rvmat sets are in class Damage of the vehicle's base class
junior saddle
The way it's working for me is not subordinate to class damage. It's just in the base class, but I don't have damage set up...
junior saddle
would you settle for a captain modder?
peak lava
I can do that
Id like to see if someone who brought in the m16a2 in the mod list is willing to add anpeqs to the list of attachments for it XD
Im a little old school
stuck oyster
#creators_recruiting is the official place to ask
junior saddle
I think I heard a whoosh
 junior saddle
I think I hear an unwhoosh coming now
stuck oyster
or wait are you talking about modifying the weapons config to enable it to use the attachements
as thants not a modelmaker matter at all
more a #arma3_config matter
junior saddle
to be fair... sometimes the lines are blurred...
stuck oyster
sometimes
peak lava
Indeed XD
stuck oyster
also contacting the maker of said m16a2 might get best results
peak lava
Indeed as well
stuck oyster
as it could be updated into the main mod
junior saddle
like when you're talking about "camo1" on a model... it's named in OB, but you use configs to use it
quick terrace
are there any proper m16a2 done for Arma? as in from scratch? might have missed it
what about m16a1 released?
charred bolt
Thanks for the info @polar fiber @quick terrace , good to hear my memory on hiddenSelectionsMaterials isn't wonky, and that VhC works ok with damage textures
 noble hatch
Not sure if this or texture is the one for this question but in O2 made a load of changes to UV map and wondering if there is a way to copy them over to other lods as needed?
charred bolt
@noble hatch when you copy the object to your next LOD it takes the UV with it
noble hatch
what If the LOD that needs the same changes already exists?
charred bolt
You'll have to rebuild it unfortunately
noble hatch
Ah, good to know. Thanks 😃
stuck oyster
OB is not very good program for object creation or uv mapping.
and workflow wise its important to get uvmapping correct before you do lods
noble hatch
Live and learn eh, thanks
quaint mason
Next question: I have 9 different texture sheets applied to my plane, but Object Builder says 1978 sections. What gives?
That seems much higher than all the sample models
halcyon wren
O2 sometimes has a bug there. Run a sort-faces from one of the file menu entries to fix
Faces -> Sort
 atomic path
Hey guys, I've created a custom muzzleflash p3d, but it's not visible in-game
I can extract the proxy to the model and then it works, but that's not the point
I've also checked with vanilla muzzleflash and it works, so config/model should be all good in terms of muzzleflash implementation
basically the problem is that the muzzleflash proxy is not working properly with custom muzzleflash, but working perfect with vanilla one
any ideas?
polar fiber
does your proxy model have autocenter 0 in the geo LOD?
junior saddle
@polar fiber How good is your scripting? If you have some time, could I trouble you to look at some tank, turret, & commander issues I'm having? There's more info in my recent post in the config_editing channel.
 dapper girder
https://cdn.discordapp.com/attachments/502183031524818955/502183176584560651/unknown.png How do I make this belt translate while shooting and then loop or something so it continiously does it?
 stuck oyster
basic method would be moving each shell the distance 1 shell is wide and then looping that
 main jasper
Got something which may be a long shot. I was wondering if it would be possible to have a sight with a built in IR pointer?
polar fiber
I can't script for shit
atomic path
@polar fiber yeah, geometry has autocenter 0
dapper girder
@stuck oyster source="ammoRandom"; //use ammo count as phase for animation
sourceAddress="loop"; //loop when phase out of bounds
do i use these then to get it to loop the translation?
whats the advantage of moving each round individually vrs the whole stack and looping?
atomic path
@dapper girder use source revolving
dapper girder
havnt seen that source before, got an example?
atomic path
it goes from 1 to 0, 1- full magazine, 0 - empty magazine
I use it on my Tau weaponry to make ammo count indicator
dapper girder
wouldnt that make it translate continously until mag is empty
 mossy oxide
Is it possible to have animated bodyparts that come from a proxy placed in the uniform model? Like you have separate models for tops, pants, hands etc. Then you have a p3d with proxies that call for the parts you want in the uniform. I tried that, but sadly the proxy body parts didn't animate at all.
https://cdn.discordapp.com/attachments/456236758980362242/503192508977905674/unknown.png
https://media.discordapp.net/attachments/456236758980362242/503264336022732831/unknown.png?width=957&height=616

 atomic path
if you make it smart it won't 😄
mossy oxide
Not sure if its just impossible or I messed something up.
dapper girder
hmm what do you mean by make it smart....
polar fiber
@mossy oxide did you have a model.cfg for the proxy models?
dapper girder
hmm well gonna try this ammo random first and translate teh whole stack....then have it loop
mossy oxide
@polar fiber Yes
dapper girder
ah or that
polar fiber
well I was going to say it works on a technical level because vests and heads carry over animations from the base model and they are proxies. But they probably have some kind of hardcoded simulation for those proxies
atomic path
I mean it "jumps" from eg. 0.332 to 0.312 without moving through other values
polar fiber
may as well just use the reload source for translating the belt during shooting
revolving and ammo are only really needed as extras when you want to make an anim that factors in the remaining rounds in the magazine
so to hide the last few visible rounds in the belt when the mag is depleted
dapper girder
ooo wont bother hiding hte rounds
the thing has like 2000 rnds, dont find that to be really necessary
dont even think i need a loop when using reload i guess, it loops on its own
aaaand of course first time i try to impliment it translates the wrong direction
dapper girder
class bullets /// bullets rotating around magazine
{
type = "translation";
source = "reload";
sourceAddress = "clamp";
selection = "bullets";
axis = "bullet_axis";
minValue = 0;
maxValue = "1";
offset0 = 0;
offset1 = -1;
originally had offset being 1.....which visibly looked like it was moving the right way, but it overall was translating the wrong direction
and now that i wrote that, it makes 0 fuckn sense
ill try 1-0 next
atomic path
1-0 on handheld weapons, 0-1 on vehicles
dapper girder
werll shit that didnt work either

so now inbetween shots its sitting in the wrong spot
and it visually translates the wrong direciton
polar fiber
invert the axis then
polar fiber
select them, points>mirror X/Y (depends on viewport used)
or select them, C to place pin at the mid point, Shift+C to activate it, then scale -1
dapper girder
ahk, but havnt had a instance that was correct yet
in both moving right direction and at rest in correct position
unless count the most recent one, if flipping the vertices fixes that....then maybe that works
class bullets /// bullets rotating around magazine
{
type = "translation";
source = "reload";
sourceAddress = "clamp";
selection = "bullets";
axis = "bullet_axis";
minValue = 0;
maxValue = "1";
offset0 = -1;
offset1 = 0;
};
wohoooo 4th times the charm
@stuck oyster @atomic path @polar fiber thanks team config!
dapper girder
alright got a new one now, trying to get this pile of bullets to bobble in one direction all time (got that working).....and now want it to randomly rotate in the Z direction roughly +/- 3 degrees